Blog

  • How to Add Feet to a Box Spring and Get Rid of the Footboard

    How to Add Feet to a Box Spring and Get Rid of the Footboard

    When we set out to makeover Bill’s Room / The Guest Room / My Office, we really needed to relocate my desk so it wasn’t a focus in the room. Our best option was to move the desk to the small wall opposite the bed. However, it was relatively tight there. We needed to get that footboard out of the way to open up the space. In order to do that, we needed to figure out how to add feet to the box spring so we could eliminate the bed rails, and thus the footboard.

    We figured out how to do it – and y’all I’m so mad I didn’t do it sooner because it was so easy and made a huge difference in the space.

    Here’s the room before:

    How to Add Feet to a Box Spring and Get Rid of the Footboard - great and easy idea for small bedrooms. You could also remove the headboard with this idea if you wanted to. / Bedroom Ideas / DIY Bed Ideas / DIY Bed Frame

    You can see how the desk is to the right of the room – it was the first thing you saw when you went in the room.

    And here’s the space now:

    How to Add Feet to a Box Spring and Get Rid of the Footboard - great and easy idea for small bedrooms. You could also remove the headboard with this idea if you wanted to. / Bedroom Ideas / DIY Bed Ideas / DIY Bed Frame

    Huge difference and on top of freeing up space, it lowered the overall height of the bed which allows you to see more of the gorgeous wood headboard against the black wall – not that black and woodgrain is a favorite combination of mine or anything. 😉

    How to Add Feet to a Box Spring

    Affiliate links may be contained in this post.

    Materials & Tools Needed:

    Step 1:

    If you want to stain or paint your table legs, do so now and let them dry. We stained ours.

    Flip the box spring on its side against a wall. Attach a furniture leg attachment plate with your drill in each corner of the box spring and one in the center of each long side of the box spring.

    How to Add Feet to a Box Spring and Get Rid of the Footboard - great and easy idea for small bedrooms. You could also remove the headboard with this idea if you wanted to. / Bedroom Ideas / DIY Bed Ideas / DIY Bed Frame

    You can see from the photo above that I was only able to get three screws in each plate as there was nothing for the 4th screw to grab onto. That’s fine – it hasn’t effected the strength of our bed legs at all.

    Step 2: 

    Screw a table leg into each attachment plate.

    How to Add Feet to a Box Spring and Get Rid of the Footboard - great and easy idea for small bedrooms. You could also remove the headboard with this idea if you wanted to. / Bedroom Ideas / DIY Bed Ideas / DIY Bed Frame

    Step 3:

    Flip your box spring back over and place it wherever it will be in your room. You need to add a little extra support to your box spring / bed by cutting some 4″ x 4″ pieces that will go in the middle of the box spring under it. To do this, measure the distance from your floor to the wood frame of the box spring underneath. Its probably going to be close to whatever size legs you used. Cut six pieces of 4″ x 4″ to this length. If you have a king or queen sized bed, you would need to cut more. A twin size bed may require less.

    While your box spring is in place where you want it in the room, have someone slightly hold it up as you place the 4″ x 4″ pieces under the box spring in the locations shown below. It’s next to impossible to get a picture of this in action, so I hope you can understand what I’m saying to do with the picture below. The X’s mark where your 4″ x 4″ pieces should go under your box spring. Just reach under the box spring and place them there while someone is holding the box spring up. You don’t need to attach them to the frame or anything, as long as they are placed under the wood supports in the box spring.

    How to Add Feet to a Box Spring and Get Rid of the Footboard - great and easy idea for small bedrooms. You could also remove the headboard with this idea if you wanted to. / Bedroom Ideas / DIY Bed Ideas / DIY Bed Frame

    Make sense? If not, let me know and I’ll try to explain it more. Basically, those X’s are where your 4″ x 4″ pieces should be under the box spring.

    After your 4″ x 4″ pieces are in place, place your mattress on top of the box spring and dress the bed.

    How to Add Feet to a Box Spring and Get Rid of the Footboard - great and easy idea for small bedrooms. You could also remove the headboard with this idea if you wanted to. / Bedroom Ideas / DIY Bed Ideas / DIY Bed Frame

    How to Add Feet to a Box Spring and Get Rid of the Footboard - great and easy idea for small bedrooms. You could also remove the headboard with this idea if you wanted to. / Bedroom Ideas / DIY Bed Ideas / DIY Bed Frame

    You can see a bit of the leg in the photo above – the furry rug likes to be the center of attention instead of letting the bed legs be seen. 😉

    If you wanted to, you could even nix the headboard as well. This is a great solution if you don’t want to buy one of those metal bed frames  – especially if you don’t want to do a bed skirt that would cover the ugly metal frame.


    pin-this-post-2

    How to Add Feet to a Box Spring | Box Spring Ideas | DIY Bed Ideas | DIY Bedroom Ideas

    You might wanna see this too…

    Masculine Bedroom Makeover - This room functions as a Guest Room, Teenage Boy's Room, and an Office. Lots of great ideas for making a room function for multiple uses.

    Masculine Bedroom Makeover

    Great guide for the basics of using a drill and seeing what all it can do! Power Tools 101: How to Use a Drill via RainonaTinRoof.com

    How to Use a Drill

    The basics - exactly what it can do and how to do it. Power Tools 101 - How to Use a Miter Saw

    How to Use a Miter Saw

    blog-signature-summer-15

    You know you don’t wanna miss any of this crazy.

    Sign up to get my posts delivered to your inbox here.

    Stalk Me Here:

    Bloglovin / Pinterest / Facebook / Twitter / Google+ / Instagram

    SaveSave

  • In an unexpected twist…we bought a house. Meet the 70’s Landing Pad.

    In an unexpected twist…we bought a house. Meet the 70’s Landing Pad.

    You read that right. And no, its not April Fools Day or anywhere close to it.

    We bought a house.

    And it was completely unexpected. 

    If you’ve been around here for more than a minute, you know our love for our current home, The Beloved Foreclosure runs deep. We never really expected to leave it. We even put in a pool and new patio this summer, had plans to completely re-do the Circus’ room and were even considering adding on an addition – we love our house.

    Now, let’s switch gears for a minute. We’ve known for the past couple of years that my in-laws wanted to move down to Chattanooga after my father-in-law retired to be closer to the Circus – well closer to us too, but let’s face it, mostly they wanted to be closer to the Circus. When we found this out, we looked at lots to build a house on that would be big enough for both our families and we also looked at existing homes that would hold us all as well. I am one of the few who loves her in-laws and would happily have them in the same house as us. We actually found one, but couldn’t work a deal out with the sellers. Finally, we all decided that our best shot would be to find them a house in our neighborhood – we love our neighborhood and if we couldn’t find a great house for all of us, then we wanted to stay in the neighborhood. The problem with that is that there are few smaller, one story homes in our neighborhood that would work for them. We found one that we thought would work, but they couldn’t even get an offer in before the house was already under contract – good houses tend to move fast in our neighborhood. We also kept our eyes open for a house for us and if we found one, then my in-laws would take our house.

    We never really thought the latter would happen. We always expected to find a house for them – not us.

    We were wrong.

    A house came up for sale just up the street from us that was good for us. We looked at it, made an offer, and had a contract on it.

    And then one thing led to another, and things were progressing way too slowly and to us, it just seemed like a sign that this wasn’t the house for us. So, we backed out of the contract.

    And when we backed out of the contract, another house went up for sale in our neighborhood. And it was actually better for us and our needs than the other one. We took that as another sign. We had it under contract within a little over a week and just closed on it last Friday.

    We are calling our new home The 70’s Landing Pad.

    It is definitely rocking the 70’s vibe and it is our landing pad – we have no intentions of leaving, y’all.

    Here’s the tour of the new pad. Let’s all go ahead and put on our rose colored glasses for this one- that’s the only way I’m coping with all the work that has to be done.

    You think I’m joking. Just wait.

    The 70's Landing Pad: Before

    Welcome to the 70’s Landing Pad.

    As you can probably tell from the photo – it is a split foyer. I will say that I haven’t always been a big fan of split foyers, but I don’t detest this one.

    Entryway / Foyer

    The 70's Landing Pad: Before

    We will be updating the railings as well as all light fixtures, flooring and paint throughout the house.

    Living Room

    The 70's Landing Pad: Before

    The living room is just off the entryway. Totally diggin’ that blue carpet. #nope

    Dining Room

    The 70's Landing Pad: Before

    And the dining room is just off the living room and kitchen. The living room and dining room are fully open to one another.

    The Kitchen

    The 70's Landing Pad: Before

    And then there’s the kitchen. And all the wallpaper I have to remove. And cabinets I have to paint. And hardware I have to replace.

    #overwhelmed

    And why in the world are there vanity lights over the cabinets???

    The Hall Bathroom

    The 70's Landing Pad: Before

    Oh look. More wallpaper! YES! #winning #not

    Sorry – I don’t know why I’m using hashtags so frequently in this post. I think its just one of my favorite ways to be a smartass.

    My Office

    The 70's Landing Pad: Before

    Technically, this is a bedroom – but it is tiny for a bedroom. So, it’s going to become my office, which Bill is very happy about because I will no longer be invading his space at all.

    Also, I do realize we did just makeover Will’s entire room and my office space. When we started that, we had no idea we were going to be moving. If I would have known, trust me, I would have waited to do all that at the new house. The good news though is that everything we did to his room here will work perfectly at the new house too. So essentially, he’ll have the same room there as he did here, with the exception that my office won’t be in there.

    The Circus’ Bedroom

    The 70's Landing Pad: Before

    The Circus’ Bedroom is about the same size as it is here. However, we are going to be making it a little bigger – I’ll show you how in a minute.

    Also, there is hardwood in two rooms in the entire house – only TWO! Why, why, why couldn’t the builders have just kept that stuff going throughout??? What was the point of just putting it in two of the bedrooms?

    #SMH #WTF

    The Master Bedroom

    The 70's Landing Pad: Before

    And then there’s the master bedroom.

    That I have no idea what I’m going to do with. It has more space than we could ever need. There’s a sitting area, which will be nice, but honestly I could make another sitting area elsewhere in the room. Since this room is right beside the Circus’ room, we are actually going to take some of the space from it and give it to the Circus. We just really don’t need this much.

    The 70's Landing Pad: Before

    It’s nice to have so much space, but honestly, it’s one of those things where the additional space could have been used (and been more functional) elsewhere.

    The Master Bath

    The 70's Landing Pad: Before

    I’m also referring to this little gem as the tunnel. Because that’s what it is – one long tunnel. And it doesn’t make much sense. There is no shower in this bathroom – only a tub. #WTH This also goes back to my thoughts on how all that space in the master could have been more functionally used.

    I have no clue what to do in this space. #shelaughsinsanely

    Let’s move downstairs, shall we?

    The Den / Man Cave

    The 70's Landing Pad: Before

    This area will function as both the family room and man cave. As of right now, we aren’t going to put a TV in the living room, so this is where I’ll get my weekly dose of Shonda Rhimes. Once drywall is up, some painting and new carpet is down, I think it will be cozy.

    Grunt Labor’s Office

    The 70's Landing Pad: Before

    This bedroom, which will function as Grunt Labor’s office, is just off the den. I’m not quite sure how he got the larger office area since he doesn’t even work from home, but whatevs.

    I’m kidding. I had to say that so that when he reads this he’ll say something about me throwing him under the bus, which I do sometimes do on rare occasion just because I feel its my God given right to mess with him. #amiwrong #nope

    Really though, he gets the bigger office because he will eventually be getting his dad’s furniture from his office and all of it wouldn’t fit in the smaller office upstairs.

    #thethingsyoudoforlove

    Laundry Room

    The 70's Landing Pad: Before

    Grunt Labor is also very excited to have his own laundry room. You do know that he does our laundry, right? He calls it his “woman’s work.” He doesn’t mean it to be an anti-feminist remark. I’d give him a swift kick in the rear if he did. And also, he can call it whatever the hell he wants to as long as I don’t have to do the laundry.

    #insertevillaughhere

    The Half Bath

    The 70's Landing Pad: Before

    This bathroom kind of gives me the heebie-jeebies. It’s just off the den area. It’s T-90 (tiny and when I say it like T-90, I mean really tiny) and everything just looks so ugly and dirty, it freaks me out a bit. #slightgermophobe

    The Guest Room / Bill’s Room

    The 70's Landing Pad: Before

    This room is quite a bit larger than Bill’s room now. I think it was actually unfinished basement space at one time. It even has its own bathroom…

    The 70's Landing Pad: Before

    Once you get past the wallpaper, countertop and awful flooring, it isn’t half bad.

    The Backyard

    The 70's Landing Pad: Before

    And y’all – we have a pool.

    A real life in-the-ground pool.

    That was filled in a couple years ago because the owners just got tired of dealing with it. WHAT?! WHY WHY WHY?!

    #sheripsherhairout

    I seriously thought Grunt might just cry when he heard that was the only reason it was filled in. He thinks there might be hope for it yet though. Anyone got a backhoe?

    If you didn’t put your rose colored glasses on, you can tell there is a whole lotta work to be done. I won’t lie – I am overwhelmed. I am also excited because I know this house – at the risk of sounding cliche – is kinda perfect for us. I’m also very grateful that we found a house so we can get my in-laws down here and have them close by. They won’t be moving down for a while, so we are going to be able to stay in our Beloved Foreclosure while working on the 70’s Landing Pad.

    As we come up with plans for the house remodeling, I’ll be posting them and I fully expect you to give your opinions. A girl can’t do this kind of shit alone.

    Send prayers. Send happy thoughts. Send reinforcements. And most importantly – send booze.


    blog-signature-summer-15

    You know you don’t wanna miss any of this crazy.

    Sign up to get my posts delivered to your inbox here.

    Stalk Me Here:

    Bloglovin / Pinterest / Facebook / Twitter / Google+ / Instagram

  • Masculine Bedroom and Office Makeover

    Masculine Bedroom and Office Makeover

    How many uses can you find for one average sized bedroom?

    Well around here, we can find three.

    Apparently, we like a challenge.

    I thought that as kids got older, they liked to spend more time with their friends – away from the adults in their lives.

    Apparently, I was wrong.

    Or either Bill is the exception.

    It seems the older he gets, the more he’s here.

    I’m not complaining – I’ll take all the quality time I can get; he’s off to college next year.

    In the meantime though, the room he was inhabiting was not very “Bill.”

    The Room Before

    While Elvis loved his jungle room, apparently Bill was not fond of a similar theme with the leopard print wall in his room.

    The Room Before

    I was also invading part of his space with my office area.

    So I told him he could decide what he wanted to do with the room.

    I know – I couldn’t believe I uttered those words myself.

    The only conditions were that it did still have to have the bed, as the room is also our only guest room, and my desk had to stay in the space. Anything else was up to him.

    I set him up on Pinterest one night – and held my breath.

    I prayed he wouldn’t pin some hideous basketball/baseball/football/soccer ball border circa 1992. I cringed as he looked at bright orange Tennessee Vols decor. I finally had to leave the room.

    About 30 minutes into his browsing, he called me back in and presented me with his pick – a masculine black and white room with fur accents and wood tones.

    I don’t know if I was ever more proud of him.

    I asked him if he was sure he liked that. He did. He was actually excited about it. And then he said the words I would have never dreamed he would say – “I think we should add in some pops of green too. That would keep it in line with the rest of the house.“

    Oh. My. Stars.

    This is what we ended up with…

    Masculine Bedroom Makeover - This room functions as a Guest Room, Teenage Boy's Room, and an Office. Lots of great ideas for making a room function for multiple uses. Black Walls (Behr's Limousine Leather), Black and White with green and wood toned accents. Brown Faux Fur Rug

    I really don’t know who was more excited about how well it turned out – me or him. It is perfect for him, it works just fine for guests and my office space is still in the room – just out of the way.

    *A big thanks to Home Decorators Collection for helping with this project so Bill can have a bedroom that doesn’t resemble the jungle room.

    Here’s the breakdown…

    Masculine Bedroom Makeover

    We definitely wanted black in the room, but didn’t want the entire room to be black. We opted to paint one wall completely black and then paint black halfway up on two of the walls.

    Masculine Bedroom Makeover - This room functions as a Guest Room, Teenage Boy's Room, and an Office. Lots of great ideas for making a room function for multiple uses. Black Walls (Behr's Limousine Leather), Faux Fur Throw / Green Accents

    The bed stayed, however I removed the rails and added feet to the box spring – it was ridiculously easy. It really helped to open up the room. I also think it makes the headboard really stand out against the black walls – I love that wood grain against the black wall. We opted for a white quilt on the bed, accented with a super soft and cozy faux fur throw and a green accent pillow.

    Masculine Bedroom Makeover - This room functions as a Guest Room, Teenage Boy's Room, and an Office. Lots of great ideas for making a room function for multiple uses. Faux Fur Throw on White Quilt.

    Most of the time, he totally ditches the quilt and sleeps with the fur throw. He. Loves. it.

    My desk used to be on the wall coming right into the room – it was way too overwhelming there though. We moved it to another wall and found a vintage mid-century modern dresser to place along the wall for some much needed storage.

    Masculine Bedroom Makeover - This room functions as a Guest Room, Teenage Boy's Room, and an Office. Lots of great ideas for making a room function for multiple uses. Vintage Mid-Century Modern Dresser / Faux Brown Fur Rug / Black and Leather Chrome Chair / Fur Accents / White Geometric Table / Oversized Jack Decor

    A chocolate faux fur rug from Home Decorators Collection covers most of the carpet in the room. The rug was a steal of a deal. I got an 8 x 11 for under $300. When Bill came home and saw it for the first time, he immediately laid down on it and hardly moved for the rest of the night. We did keep the chrome and black chair in there, but got smaller side tables for each side of the bed.

    Masculine Bedroom Makeover - This room functions as a Guest Room, Teenage Boy's Room, and an Office. Lots of great ideas for making a room function for multiple uses. White Geometric Side Table with Brass Horse Tray

    The tables have open geometric shapes on the sides, so they are very airy feeling, which is great for small spaces. There is still plenty of room though to hold knick-knacks on the top.

    He picked out the dresser himself (we found it at a local vintage shop). I pulled the mirror that actually goes with mine and Grunt Labor’s bedroom set out of storage to prop on his dresser.

    Masculine Bedroom Makeover - This room functions as a Guest Room, Teenage Boy's Room, and an Office. Lots of great ideas for making a room function for multiple uses. Vintage Mid-Century Modern Dresser / Dog Statue

    He fell in love with Finneman the dog as soon as he saw him.

    Masculine Bedroom Makeover - This room functions as a Guest Room, Teenage Boy's Room, and an Office. Lots of great ideas for making a room function for multiple uses. Dog Statue - love how its used as decor in a bedroom rather than in an entry.

    He didn’t really have to convince me – I thought putting the dog in a bedroom rather than as the typical entry decor was a genius idea. However, if you follow me on Instagram, you may have seen that the Circus has tried to make the dog her own. She’s drug him all around the house and adorned him in hair of tinsel, a ballerina costume and most recently a combination of items that make him look like he’s a cross between an Egyptian pharaoh and a Disney princess.

    The art and deer head on the dresser was in the room before, it still worked pretty well with the space, however we did add in a green glass lamp that I wouldn’t mind stealing for my own room.

    Masculine Bedroom Makeover - This room functions as a Guest Room, Teenage Boy's Room, and an Office. Lots of great ideas for making a room function for multiple uses. Green Glass Lamp with Faux Wood Shade / Black Walls (Behr's Limousine Leather) / Chrome and Leather Chair

    When he said we needed green accents, there was no way I wasn’t going along with that one. 😉

    Masculine Bedroom Makeover - This room functions as a Guest Room, Teenage Boy's Room, and an Office. Lots of great ideas for making a room function for multiple uses. Green Glass Lamp with Faux Woodgrain Shade / Black Walls (Behr's Limousine Leather)

    I also love the shade on this lamp – it’s a woodgrain look that goes great against the black and white wall.

    The other side of the bed may be my favorite part of the room though.

    Masculine Bedroom Makeover - This room functions as a Guest Room, Teenage Boy's Room, and an Office. Lots of great ideas for making a room function for multiple uses. DIY Bookshelf / Guitar as decor / White Geometric Side Table / Black Walls (Behr's Limousine Leather)

    Bill and I made, (yes we made!) a bookshelf for this wall.

    Masculine Bedroom Makeover - This room functions as a Guest Room, Teenage Boy's Room, and an Office. Lots of great ideas for making a room function for multiple uses. DIY Bookshelf / Guitar as decor

    The full tutorial for the bookshelf is here. We decorated with some vintage items around it – including my grandmother’s guitar which he thought was a pretty cool touch.

    Masculine Bedroom Makeover - This room functions as a Guest Room, Teenage Boy's Room, and an Office. Lots of great ideas for making a room function for multiple uses. DIY Bookshelf / Guitar as Decor / Vintage Records / Fur Rug

    The other occasional table is on this side as well.

    Masculine Bedroom Makeover - This room functions as a Guest Room, Teenage Boy's Room, and an Office. Lots of great ideas for making a room function for multiple uses. Old guitar as decor / White Geometric Side Table / Black Walls (BEHR's Limousine Leather) / Brown Fur Rug

    And finally, on the wall opposite from everything else is my workspace.

    Masculine Bedroom Makeover - This room functions as a Guest Room, Teenage Boy's Room, and an Office. Lots of great ideas for making a room function for multiple uses. Functional office space in a guest bedroom.

    It’s tucked away from everything else and I also kept this wall entirely white to visually separate the two spaces. I’m one smart cookie, right?

    No, I’m not at all. It was just a random idea that happened to work. 🙂

    So what do you think of the masculine bedroom makeover? Bill did a pretty good job, didn’t he? He only had a smidgen of help…

    pin-this-post-2

    Masculine Bedroom Makeover - This room functions as a Guest Room, Teenage Boy's Room, and an Office. Lots of great ideas for making a room function for multiple uses.

    You might wanna see this too…

    DIY Modern Rustic Bookshelf - simple build and costs about $40 in materials. Could do any color you wanted to!

    DIY Modern Rustic Bookshelf

    How to Add Feet to a Box Spring and Get Rid of the Footboard - great and easy idea for small bedrooms. You could also remove the headboard with this idea if you wanted to. / Bedroom Ideas / DIY Bed Ideas / DIY Bed Frame

    How to Add Feet to a Box Spring

    ***Giveaway Now Closed.***

    And…Home Decorators Collection is giving away a $50 gift card to one lucky guy or gal!

    Home Decorators Collection Gift Card Giveaway

    Use the Rafflecopter below to enter!

    a Rafflecopter giveaway

    Disclosure: This post was a collaboration with Home Decorators Collection. However, all opinions and pride in the teenager’s design skills are 100% mine.

  • Semi-Winning The Tablescape Game: DIY Stone Embellished Napkin Rings

    Semi-Winning The Tablescape Game: DIY Stone Embellished Napkin Rings

    This post is sponsored by Birch Lane, however all opinions are 100% mine. Affiliate links may be contained in this post.

    I am not a tablescape person.

    To be blunt, I suck at them.

    It’s just too much thinking – there are too many things that have to be on a set table for me to also figure out what to use as a centerpiece, place cards, etc.

    Now, doing one of those things solo without having to think of all the other jazz – I’m good.

    Like last year – I had really cute, or really cute in my opinion anyway, also cheap, little painted pumpkins that doubled as place card holders.

    And this year, I’m rocking one single element of the tablescape – the napkin and napkin ring.

    Now, just let me say this is not too frou-frou. I’m not a frou-frou person and frou-frou just stresses me out. So if you were expecting a perfectly color coordinated full place setting to go along with that napkin and ring, I’m not your girl.

    However, if you want pretty stone embellished napkin rings (done in under 10 minutes), then I’m totally your girl. 😉

    Beautiful, easy and done in less than 10 minutes! You could use any kind of stone! DIY Stone Embellished Napkin Rings

    Also, coincidentally, I managed to color coordinate these napkin rings and napkins in Grunt Labor’s fraternity colors – purple and green. He was very proud.

    I didn’t tell him it was 100% unplanned.

    Materials:

    Beautiful, easy and done in less than 10 minutes! You could use any kind of stone! DIY Stone Embellished Napkin Rings

      • Various Colored Stones (use any color and sizes you would like, although you don’t want them to get too big.)
      • Pretty Napkin Rings (Mine came from Birch Lane)

    Step 1: 

    If your stones are a bit dirty (mine were), rinse them off well and let them dry. After they are dry, give each stone you intend to use three light coats of the clear gloss spray paint. This is going to make them more shiny and polished, rather than looking like you just pulled them outta the dirt. Let the stones fully dry.

    Step 2: 

    Tear off a piece of painter’s tape that could wrap around the napkin ring several times and set aside. Place a small amount of E6000 Glue on the flattest side of each stone, then place the stone on top of the napkin ring. While holding the stone in place on the ring, wrap the painter’s tape around the top of the stone and around the ring to keep it in place while the rings dry.

    Beautiful, easy and done in less than 10 minutes! You could use any kind of stone! DIY Stone Embellished Napkin Rings

    Place the rings in a box with paper towels smushed between them to keep them upright or in a bowl of rice or beans. Don’t worry – the rings don’t fall over when they are on a napkin – I just needed something to keep the rings from falling down against each other while drying. Let them dry for a full 24 hours before using them.

    Beautiful, easy and done in less than 10 minutes! You could use any kind of stone! DIY Stone Embellished Napkin Rings

    In an unexpected twist, I opted for plum colored napkins to go with the napkin rings. I have to say – I’m really digging my signature green with the plum…

    Maybe those fraternity colors aren’t too bad…

    What do you think of the combo?


    Beautiful, easy and done in less than 10 minutes! You could use any kind of stone! DIY Stone Embellished Napkin Rings

    Since this is only one little part of the table, there are more bloggers lined up to show you the rest!

    Elements of Thanksgiving Blog Hop

    Monday

    Everyday Enchanting | Maison de Pax | The Wood Grain Cottage

    Tuesday

    Rain on a Tin Roof | Making Home Base | Life on Virginia Street | Migonis Home

    Wednesday

    The Blissful Bee | House by Hoff | The Happy Housie | Just a Girl and her Blog

    blog-signature-summer-15

    Disclosure: This post was a collaboration with Birch Lane. However, all opinions and admittance of not being able to pull off a complete tablescape is 100% mine.

    SaveSaveSaveSaveSaveSaveSaveSaveSaveSave

  • King Headboards for $300 or Less

    King Headboards for $300 or Less

    I am not a snuggler.

    I can be a snuggler for about five minutes and then you need to get off of me.

    Grunt Labor isn’t a snuggler either. This is good.

    However, he does roll over in his sleep quite a bit and while doing so, his face sometimes becomes thisclose to mine and he breathes right on me.

    And I hate that.

    I do love him though, don’t get me wrong. He knows I can’t stand him breathing on me. Some nights I give him an elbow or kick to get him to roll back over. If I’m feeling nice and don’t, then I usually don’t sleep great or it takes me forever to get to sleep and then he feels terrible the next morning when he finds out I didn’t sleep because he was breathing on me.

    We need a king sized bed.

    The best sleep we get is when we stay in hotels with king sized beds. I love him, but I need him to be on his side of the bed. In his defense, he says there are some nights I get right up on him, although I don’t remember this, so I cannot attest to its validity. Maybe he needs me to be on my side of the bed as well though.

    So we’re on the hunt for a king size headboard and/or bed that won’t cost a year’s worth of preschool.

    Here’s what I’ve found so far…

    This post contains affiliate links for your shopping convenience. Click here to read my full disclosure policy.

    King Headboards for $300 or Less

    King Size Headboards for $300 or Less + Awesome Sources for all Sizes of Headboards - gorgeous selections and affordable! White Upholstered Headboard

    Sovereign King Headboard

    This headboard also comes in other colors as well. Its upholstered in vinyl, so not quite as cozy as another material, but would be very easy to wipe down when its dusty. It has a very chic shape to it.

    King Size Headboards for $300 or Less + Awesome Sources for all Sizes of Headboards - gorgeous selections and affordable! Beige Upholstered Headboard

    Curl King Nailhead Headboard

    This one is also available in ivory. Its upholstered in linen, so a bit more cozy and it’s neutral, so it would work with lots of styles.
    King Size Headboards for $300 or Less + Awesome Sources for all Sizes of Headboards - gorgeous selections and affordable! Grey Upholstered Headboard

    Clique King Headboard

    Also available in ivory, this one has some tufting and is also upholstered in linen.

    Confession: I may have lied a little about the next three headboards being $300 or less. They are all actually $320. I just couldn’t let a measley $20 not let me share them with you…King Size Headboards for $300 or Less + Awesome Sources for all Sizes of Headboards - gorgeous selections and affordable! Green Upholstered Headboard

    Seville Velvet Headboard

    I won’t lie – I love that green, however it is also available in five other colors.
    King Size Headboards for $300 or Less + Awesome Sources for all Sizes of Headboards - gorgeous selections and affordable! Floral Upholstered Headboard

    Floral Patterned Headboard

    I never thought I would be a floral patterned headboard person, but I love the rich hues on this one. Other patterns also available.

    King Size Headboards for $300 or Less + Awesome Sources for all Sizes of Headboards - gorgeous selections and affordable! Navy and White Patterned Upholstered Headboard

    Blue & White Patterned Headboard

    The blue dots on this one aren’t perfect, which is what I like about it. King Size Headboards for $300 or Less + Awesome Sources for all Sizes of Headboards - gorgeous selections and affordable! Black Upholstered Headboard

    Annabel Black Headboard

    This one is definitely more on the manly side, but I’m still digging it. Its upholstered in vinyl and I think it would look awesome against a dark green wall.


    King Size Headboards for $300 or Less + Awesome Sources for all Sizes of Headboards - gorgeous selections and affordable!

    Rectangle-y Modern Headboard

    Sadly, this was the only non-upholstered headboard I found that was under $300 and that I actually liked. To me, it has a vintage-y mid-century modern feel. I do think it would be really pretty painted a fun pop of color.

    Do you have any great headboard sources? Help a sister out. I need to sleep.

    pin-this-post-2

    Affordable King Size Headboards | Cheap King Headboards | King Headboard Ideas | Affordable King Size Beds

    blog-signature-summer-15

    You know you don't wanna miss any of this crazy.

    Sign up to get my posts delivered to your inbox here.

    Stalk Me Here:

    Bloglovin / Pinterest / Facebook / Twitter / Google+ / Instagram

    SaveSave

  • How to Remove Paint Overspray from Floors

    How to Remove Paint Overspray from Floors

    This post is sponsored by HomeRight, however all opinions are 100% mine. Affiliate links may be contained in this post.

    I can’t tell you how many times I’ve sat at the kitchen table or been driving the car having a conversation with one of the part-time children about their day and all of a sudden they say, “So I told him you would do it.”

    Stop.

    Hold the phone.

    Shut the front door.

    You did what? What did you just volunteer me for child?

    To buy ad space on a t-shirt.

    To help sell peaches.

    To makeover the locker room.

    While there are countless more events to note in this department, today I would like to talk about the time I was volunteered to makeover a football locker room.

    What had happened was…

    Bill, the 17 year old, is very interested in what I do for a living – blogging. He has figured out the basics of it and knows that I have pretty decent painting skills.

    He knows enough to be dangerous.

    Not to himself though – to me.

    He loves to try and explain to people what I do.

    And then he loves to volunteer me.

    Now, in all honesty, I really don’t care. I love helping the kid out. This locker room makeover though – I don’t think we’ve ever wanted to rip out each other’s throats more.

    So he finds out his football coach wants to makeover the locker room. Bill promptly tells his coach that I would probably help out. Bill comes home and talks to me and I said sure, it’s a great idea. He even says it can be his senior project. Great. We’ll have this thing knocked out before his senior year.

    That was in the spring.

    Summer rolls around and nothing has been decided on this makeover. Bill and I have a discussion that it would probably be best to wait and do this until after football season so that we get a few uninterrupted weeks of work without players there. Sounds good.

    It’s late June now. I’ve been over at my Dad’s one Saturday. I come home that day and Bill informs me that he just decided to go on and start on the makeover.

    You did what? 

    Keep in mind, this is the child who has spray painted his cleats multiple times now and never puts anything under them, so I have three different shades of cleat outlines on my garage floor.

    I can tell he isn’t telling me everything, but he says he’s going to finish it and take care of it after FCA camp – which he leaves for the next day – he says I shouldn’t worry about it.

    We drop him off at camp for the week.

    Halfway through the week, I’m out in the front yard when his coach stops to talk (he lives in our neighborhood). The first words out of his mouth are, “Have you seen the locker room?”

    At that point, I knew three things.

    1. Obviously, the locker room was in bad shape.

    2. My upcoming weekend was going to be spent in the locker room.

    3. I was going to strangle that child.

    I picked him up from FCA camp Thursday morning, promptly took him to the dentist for his scheduled root canal and then drug his butt to the locker room to work.

    This is what I found, minus the plastic sheeting, I failed to take a picture when I first got there as flames were shooting from my fingertips, ears, eyes, nose, and mouth. Basically I was a human fireball.

    How to Remove Paint Overspray - great tip for vinyl, plastic and rubber flooring!

    With the exception of a few random newspapers scattered here and there, none of the benches or floor had been covered. None of the helmets or pads or lockers themselves had been cleaned out either.

    Overspray from the spray paint coated everything.

    I fed him some pain meds the doctor had given him and told him to get to work. Root canal or not, we had to fix and finish this locker room by Sunday because football started up again on Monday. We worked all Thursday afternoon, all day Friday, and all day Sunday (Saturday just happened to be the 4th of July) to finish the locker room.

    He’s never started another project without me since.

    Overall, the biggest thing I was worried about was the spray paint all over the floor. After we got all the lockers finished on Friday afternoon, I walked in there on Sunday armed with multiple scrub brushes, floor cleaner and my HomeRight Steam Machine.

    How to Remove Paint Overspray - great tip for vinyl, plastic and rubber flooring!

    I told Bill I was not cleaning up the mess he made, I would only supervise, so he’d better find help. Lucky for him, he has good friends, otherwise he’d been scrubbing for a looooong time.

    This flooring was some sort of rubber flooring. We found the best way to remove the overspray was to wet it down with a mix of water and floor cleaner (that’s what’s in the big bucket) and scrub, then follow with bursts of steam and scrubbing from the Steam Machine.

    It totally did the trick. The Steam Machine ate through any of the really tough spots on the flooring. Here’s a good idea of what we were dealing with…

    How to Remove Paint Overspray - great tip for vinyl, plastic and rubber flooring!

    The far left side has been scrubbed. The right side still has the overspray. Those straight lines of the overspray you see is where he had just thrown newspaper down. Randomly.

    #SMH

    After scrubbing with the Steam Machine, we did go back over the whole thing with a mop to pick up the scrubbed up spray paint residue.

    And in the end, we did manage to get a pretty good looking locker room…

    How to Remove Paint Overspray - great tip for vinyl, plastic and rubber flooring!

    He, however, decided to do something else for his senior project.

    #imaginethat

    What awesome uses have you found for a steam machine?

    pin-this-post-2

    How to Remove Paint Overspray | Steam Cleaning | Cleaning Tips | Cleaning Ideas | Paint Removal | Paint Removing Tips

    You might also want to see…

    GROSS, but very interesting! Clean that Disgustingly Gross Shower with One Single Tool via RainonaTinRoof.com

    How to Clean a Disgustingly Gross Shower

    Disclosure: This post was a collaboration with HomeRight. However, all opinions and children who call me their white mama are 100% mine.

    SaveSave

  • DIY Selenite Knobs: Super Easy, Super Cheap, Super Pretty

    DIY Selenite Knobs: Super Easy, Super Cheap, Super Pretty

    During our staycation two weeks ago due to the hurricane, we visited the Land of the Gnomes.

    Its not really the land of the gnomes, but that’s what I like to call it. I’ll tell you all about it in another post…

    At every staycation stop, we let the circus get something from the gift shop to attempt and make up for not going to the beach.

    Ok, I wanted something from just about every gift shop too.

    In the Land of the Gnomes gift shop, I found a display of stones and gems.

    They were pretty. And shiny.

    Therefore, I was immediately sucked in.

    Mainly because they were shiny.

    After deliberating 10 minutes about which stones to buy and what I could do with them, I finally settled on a few small bars of selenite.

    And I came home and made the prettiest, and cheapest, hardware knobs you ever did see…

    DIY Selenite Knobs - These are GORGEOUS! Plus, they cost LESS than $1 per knob to make! / DIY Hardware / Gem Knobs / Gem Hardware / Stone Knobs / Stone Hardware

    Of course, their beauty is amped up by like 1000 because they are against my favorite shade of green too.

    You can make these in less than five minutes and for $1 each.

    That’s right, one dollar each.

    DIY Selenite Knobs

    Affiliate links may be contained in this post.

    Materials Needed: 

    DIY Selenite Knobs - These are GORGEOUS! Plus, they cost LESS than $1 per knob to make! / DIY Hardware / Gem Knobs / Gem Hardware / Stone Knobs / Stone Hardware

    • Brass Knob Making Base ($0.59 each)
    • Selenite Sticklets (10 come in a pack for $4 = $0.40 per stick)
    • E6000 Glue (If you don’t have this on hand, it will cost about $7, but trust me, its well worth it and you will get a ton of uses out of it.)
    • Dried Rice or Dried Beans (This will make sense in a minute.)
    • Small Bowl

    (I didn’t include the cost of the glue, rice or bowl in the per knob cost. I’m figuring some of you will already have that on hand.)

    Step 1: 

    Unwrap one of the knob making bases. Apply a small amount of the E6000 glue to the side that has a hole, but does not have threadings for a screw (you’ll easily be able to see what I’m talking about). Then, immediatley place a selenite stick on the glue/knob.

    DIY Selenite Knobs - These are GORGEOUS! Plus, they cost LESS than $1 per knob to make! / DIY Hardware / Gem Knobs / Gem Hardware / Stone Knobs / Stone Hardware

    Let me just say, this was my first time using the E6000 glue and I’m hooked. Quite frankly, it pisses me off that I didn’t discover it sooner. Its clear and significantly less messy than hot glue. It’s also about 100 times stronger than hot glue. I see this glue and I forming a beautiful relationship as we DIY our way into the sunset.

    Step 2: 

    Put a small amount of the dry rice or beans in a bowl and carefully nestle the knobs within the rice/beans. Let them stay here for a minimum of 24 hours to dry. (The glue says it may take up to 72 hours to dry.) If you don’t have a circus running around, there’s a good chance the knobs will be ok just balancing themselves while drying. We weren’t taking chances around here though.

    DIY Selenite Knobs - These are GORGEOUS! Plus, they cost LESS than $1 per knob to make! / DIY Hardware / Gem Knobs / Gem Hardware / Stone Knobs / Stone Hardware

    Step 3:

    After the knobs are dry, screw them onto your furniture.

    DIY Selenite Knobs - These are GORGEOUS! Plus, they cost LESS than $1 per knob to make! / DIY Hardware / Gem Knobs / Gem Hardware / Stone Knobs / Stone Hardware

    I told you they were cheap and easy.

    But most importantly, pretty.

     pin-this-post-2

    DIY Selenite Knobs | How to Make Custom Knobs for Furniture | DIY Stone Knobs | DIY Stone Pulls | How to Make Custom Furniture Pulls

    I may or may not have plans to do this with any other stones and/or gems I can get my hands on…

    What do you think would be a pretty one to try out next? 

    You can read about the beautiful green drink bar here…

    IKEA Tarva Hack: Turn It Into a Drink Bar via RainonaTinRoof.com

    IKEA Tarva Hack: Drink Bar

    And you might also like…

    How to Make Faux Crystal Knobs | Furniture Hardware DIY | Furniture Hardware Ideas | How to Make Crystal Geodes | How to Make Knobs

    How to Make Faux Crystal Knobs

    How to Make Crystals | How to Make Geodes | DIY Faux Crystals | DIY Faux Gemstones | DIY Faux Geode | DIY Faux Gems | DIY Crystals | DIY Geode

    How to Make Faux Crystals

    blog-signature-summer-15

    You know you don’t wanna miss any of this crazy.

    Sign up to get my posts delivered to your inbox here.

    Stalk Me Here:

    Bloglovin / Pinterest / Facebook / Twitter / Google+ / Instagram

    SaveSave

  • 10 Stylish, Comfortable and Affordable Office Chairs

    10 Stylish, Comfortable and Affordable Office Chairs

    You don’t have to compromise style for comfort in your office! These stylish office chairs are pretty, but also comfortable and easy on the wallet!

    We need to get something straight.

    Not that you didn’t already know, but just in case. 

    Comfort trumps style.

    There. I said it. I’m sure some furniture manufacturers are screaming at me now.

    Let me give you a prime example.

    When I first created my office space, I used a vintage chair I had made over for the space. It wasn’t technically an office or desk chair.

    The chair was ok for a little while, but as I was increasingly at my desk more, I started getting horrible back and neck pains. After moving my computer to the kitchen table to work one week, I realized the problem was my chair. While it was pretty, it was not comfortable for my desk. Overall, it was a comfortable chair, but it wasn’t made to sit in front of a computer all day. It was made to sit in a living room or den.

    And while I had gotten a couple of massages out of the whole thing, the massages didn’t make up for the pain.

    So I ponied up and bought a real desk chair.

    And it just might have been the best money I have ever spent. 

    Well, aside from cheap beer money.

    I do still get the occasional neck or back ache when I’ve been in front of my computer for far too long, but it’s just every once in a while.

    The best part about my office chair though is that its comfortable and stylish.

    And y’all, that is hard to come by in an office chair.

    So I have searched this vast land that we call the internet and found 10 stylish and comfortable home office chairs….

    This post contains affiliate links for your shopping convenience. Click here to read my full disclosure policy.

    Pretty Office Chairs

    Now ya’ll, please realize that I have not tried out every one of these chairs. I do what I can, but I can’t do that much.

    Although wouldn’t it be great to just get paid for testing out chairs all day?

    Note to self: work on that.

    I’ve read the reviews on each and based on that and my own experience with office chairs, I think these would provide the most comfort and style in your office.

    Additionally, most all of these are height adjustable swivel chairs, so you can easily adjust and get around.

    Neutral Color Office Chairs

    Stylish Office Chair - White and Silver

    My Office Chair


    This is the updated version of my office chair. It’s my hero. It has a chic modern look, but the white can work with just about any style.

    Pretty Office Chair - White and Gold, no arms

    White and Gold Task Chair

    If you prefer a Midas touch in your office, here ya go. At less than $100 and with great reviews, this one is a real winner. No arm rest though.

    Pretty Office Chairs - looks like a real armchair.

    Rolling Armchair


    If you don’t want your office chair to look like an office chair at all, here ya go. Also available in a gray hue.

    Stylish Office Chairs - Faux Brown Leather

    Brown Faux Suede Chair

    This beauty could be a good chair in a modern office used by both guys and gals.

    Black and Gold Pretty Office Chair

    Black and Gold Office Chair

    Isn’t there just something powerful about black and gold? This one is also available in other combos as well. Looks like it has quite the comfy seat cushion!

    Colorful Office Chairs

    Green Velvet Pretty Office Chair

    Green Mid Century Office Chair

    Oooo, that green! Everyone will be green with envy of your desk chair. Also available in an aqua color.

    Blush Pink Office Chair

    Blush Office Chair

    Isn’t this one a beauty? Those curves! This one is also available in a beige color here.

    Teal Blue Stylish Office Chair

    Blue Velvet Chic Office Chair

    The blue is beautiful, but paired with that gold base, it’s a home run! Also available in a green hue here.

    Stylish Patterned Office Chairs

    Cow Print Upholstered Office Chair

    Cow Print Desk Chair

    Y’all! Cow print on an office chair! How fun is this?!

    Leopard Print Desk Chair

    Leopard Office Chair

    Leopard print on a desk chair? I’ll take two please…

    Seen any great office chairs around? Share them with us below!

    Looking for more great office ideas on a budget? I’ve got you!

    DIY Chippendale Desk – this desk only cost $200 to make, but would have cost thousands to buy!

    Home Office Makeover Full of Budget Friendly Projects – and style isn’t compromised!

    DIY Built In Cabinets – easy to follow tutorial for using stock cabinets to create built ins.

    Want to remember these chairs for later? Just pin the image below!

    Comfortable, Pretty Stylish Office Chairs
    blog-signature-summer-15

    You know you don’t wanna miss any of this crazy.

    Stalk Me Here:

    Pinterest / Facebook / Twitter / Instagram

    Affordable Office Chairs | Stylish and Comfortable Desk Chairs | Desk Chair Ideas | Affordable Desk Chairs | Pretty Desk Chairs
  • Show Me Your Grain…Your Wood Grain.

    Show Me Your Grain…Your Wood Grain.

    This post is sponsored by HomeRight, however all opinions are 100% mine. Affiliate links may be contained in this post.

    I won’t lie.

    The sight of a beautifully bold painted piece of furniture (preferably either kelly green, navy blue or a bold red) makes my heart soar.

    Not as much as Grunt Labor makes my heart soar, but pretty close.

    However, I have come to really appreciate a good grain…a good wood grain that is, because chocolate isn’t a grain yet, is it? I’m still waiting for chocolate to be classified as “good” for me.

    Here are a few of my favorite stained and painted furniture makeovers…

    Painted & Stained Furniture Projects with a HomeRight Finish Max / Furniture Makeovers / DIY File Cabinet Table / Cobalt Blue and Stain

    Stacy Risenmay is a lucky girl. Because all I want to do is steal her bedside table. The cobalt blue and stain combo is beautiful.

    Painted & Stained Furniture Projects with a HomeRight Finish Max / Furniture Makeovers / Hall Tree

    This is another shade of blue paired with stain that I think is stunning. Gail from My Repurposed Life made a hall tree from a door and sewing table. I’m usually not a big aged paint effect person, but I do love the depth the aging has on this shade of navy. She used her HomeRight Finish Max on this project.

    Painted & Stained Furniture Projects with a HomeRight Finish Max / Furniture Makeovers / Midcentury Modern Dresser Makeover

    A never fail combo is stain and white – especially on mid-century modern pieces like this one from While They Snooze.

    Painted & Stained Furniture Projects with a HomeRight Finish Max / DIY Pegboard

    Addicted 2 DIY made this stained pegboard organizer using her paint sprayer. She also has some good tips here for using stain in a paint sprayer.

    Painted & Stained Furniture Projects with a HomeRight Finish Max / Furniture Makeovers / Stripped and Stained Buffet Makeover

    My stripped and re-stained buffet makeover is one of my most favorite makeovers ever. I was actually a little worried about going back to stain after the piece had been a bold red, but it was totally the right decision. I used my HomeRight Heat Gun to strip it easily.

    Painted & Stained Furniture Projects with a HomeRight Finish Max / Furniture Makeovers / DIY Platform Bed

    Lauren from The Thinking Closet opted for a beach-y hued stain for her bed.

    Painted & Stained Furniture Projects with a HomeRight Finish Max / Kitchen Table Makeover / Furniture Makeover

    Ask Anna actually stripped and re-stained the top of this table, as well as painting the bottom of it. If you need tips on cleaning your paint sprayer after using stain in it, she’s your girl.

    Painted & Stained Furniture Projects with a HomeRight Finish Max / Furniture Makeovers / Dresser turned Home Gym

    This idea from HomeJelly is nothing short of genius. She took an old dresser and turned it into a home gym. She stained the top and feet, but painted the rest with her Finish Max. Now, as much as I would like to think this piece would actually motivate me to work out, I’m probably wrong. The idea is still genius though. 😉

    Are you a fan of stained and painted combination pieces?

    pin-this-post-2

    Painted and Stained Furniture Ideas | Furniture Makeover DIY | Furniture Makeover Ideas | Stained Furniture Ideas | Stained Furniture DIY | Painted Furniture Ideas

    Disclosure: This post was a collaboration with HomeRight. However, all opinions and corny post titles are 100% mine.

    SaveSave

  • Business in the Front, Party on Top: 70’s Credenza Makeover

    Business in the Front, Party on Top: 70’s Credenza Makeover

    This post is sponsored by Velvet Finishes, however all opinions are 100% mine. Affiliate links may be contained in this post.

    I got my first and only Achy Breaky Heart t-shirt at the flea market in the middle of town.

    I was seven.

    It was heather gray, with a big multi-colored neon heart and multi-colored neon lettering on it.

    I was so damn proud of that t-shirt.

    Billy Ray Cyrus and his mullet essentially had overnight success with a song that had a terrible title.

    It was the age of the achy breaky heart craze.

    It wasn’t until I was in at least middle school, if not high school, that I realized the name for Billy Ray Cyrus’ infamous hairstyle was a mullet.

    And that people described it as business in the front, party in the back.

    Well that’s just what this credenza makeover is. Business in the front, but the party’s up top…

    Easy and pretty way to cover a surface that isn't in the best shape! 70's Credenza Makeover with Malachite Wrapping Paper / Velvet Finishes / Furniture Makeover / Furniture Painting

    Y’all I wish you could have seen me hauling this thing into the truck.

    I found it while I was riding solo thrifting one afternoon. A store employee helped me get it into the truck, but then he quickly realized the cluster that was about to happen and scooted off quickly.

    He was a smart man.

    This thing is heavy. And it ain’t small.

    First, I thought I would just let part of it hang out the back of the truck and use Grunt’s ratchet tie-downs to keep it in.

    Well, I knotted up that tie-down.

    So then I thought it could just go sideways and I could close the tailgate.

    It wouldn’t close by a hair. A hair.

    So I turned it back around and attempted to strap it in again with another tie-down.

    I didn’t get the tie down secured correctly, but I got it secured enough to get it home.

    There was only one close call on the way home. 

    When I got it home, I promptly had a beer and told Grunt Labor I would buy him new tie-downs because I was pretty sure we were going to have to cut his to get this piece out.

    But it was totally worth it.

    This piece was only $20.

    Easy and pretty way to cover a surface that isn't in the best shape! 70's Credenza Makeover with Malachite Wrapping Paper / Velvet Finishes / Furniture Makeover / Furniture Painting

    And if we are going to be really honest about it, I probably would have paid that for just the hardware. It’s so pretty.

    I originally intended to paint the entire piece. However, I decided that I really liked the stained drawers. The top though had to have something done to it…

    Easy and pretty way to cover a surface that isn't in the best shape! 70's Credenza Makeover with Malachite Wrapping Paper / Velvet Finishes / Furniture Makeover / Furniture Painting

    I think it must have had some other top on it at some point. Here’s what I did…

    Easy and pretty way to cover a surface that isn't in the best shape! 70's Credenza Makeover with Malachite Wrapping Paper / Velvet Finishes / Furniture Makeover / Furniture Painting

    I used:

    Step 1: 

    Since the top was so rough, I used my power sander to smooth it out as much as possible. It didn’t do a whole lot of smoothing but it did knock some big uneven chunks out of the way.

    Step 2: 

    I painted on a good, thick coat of Velvet Finishes Luxurious on the top and sides of the credenza.

    Easy and pretty way to cover a surface that isn't in the best shape! 70's Credenza Makeover with Malachite Wrapping Paper / Velvet Finishes / Furniture Makeover / Furniture Painting

    The paint helped to fill in a little more unevenness on the top and also worked as a primer of sorts for the deco-paste that would adhere the wrapping paper to the top of the credenza.

    Step 3: 

    Next, I cut the paper to the size of the top of the credenza. I did leave a little extra on the sides just in case.

    Easy and pretty way to cover a surface that isn't in the best shape! 70's Credenza Makeover with Malachite Wrapping Paper / Velvet Finishes / Furniture Makeover / Furniture Painting

    Step 4: 

    This is where a friend comes in handy. Luckily for me, one of main girls, Brittany had come over to work on some other projects. I painted on the Deco-Paste that would adhere the paper to the top, while Brittany held the paper up.

    Easy and pretty way to cover a surface that isn't in the best shape! 70's Credenza Makeover with Malachite Wrapping Paper / Velvet Finishes / Furniture Makeover / Furniture Painting

    The Deco-Paste dries really quickly, so you need to work in small sections. I would paint on a little bit, then firmly put the paper on top of it. After I had the whole top covered with the malachite paper, I went back over it and smoothed out any air bubbles firmly with my hands, then let the piece cure for the rest of they day.

    Step 5: 

    Once it was all dry, I came back with an X-Acto knife and cut off any excess overhang.

    Easy and pretty way to cover a surface that isn't in the best shape! 70's Credenza Makeover with Malachite Wrapping Paper / Velvet Finishes / Furniture Makeover / Furniture Painting

    Step 6: 

    Where there was any extra overhang that was too small to cut, I used fine grit sandpaper wrapped around a sanding block to smooth the edges.

    Easy and pretty way to cover a surface that isn't in the best shape! 70's Credenza Makeover with Malachite Wrapping Paper / Velvet Finishes / Furniture Makeover / Furniture Painting

    When you do this, you want to go straight down on the edge. Don’t go back and forth sideways or up and down vertically – go straight down and then again if needed. This helps to give the paper a clean, finished look.

    Step 7: 

    Finally, I topped the paper off with a coat of Protect.

    Business in the front.

    Easy and pretty way to cover a surface that isn't in the best shape! 70's Credenza Makeover with Malachite Wrapping Paper / Velvet Finishes / Furniture Makeover / Furniture Painting

    Party on top.

    Easy and pretty way to cover a surface that isn't in the best shape! 70's Credenza Makeover with Malachite Wrapping Paper / Velvet Finishes / Furniture Makeover / Furniture Painting

    This piece is destined for my office. I just gotta find someone to help me haul it there first. 😉

    Any takers?

    What do you think of the midas malachite touch?

    pin-this-post-2

    Credenza Makeover | Decoupaged Furniture | Wrapping Paper Furniture Makeover | How to Decoupage Furniture | How to Decoupage Wood | Furniture Makeover DIY

    blog-signature-summer-15

    You know you don’t wanna miss any of this crazy.

    Sign up to get my posts delivered to your inbox here. 

    Stalk Me Here:

    Bloglovin / Pinterest / Facebook / Twitter / Google+ / Instagram

    Disclosure: This post was a collaboration with Velvet Finishes. However, all opinions and references to Billy Ray Cyrus are 100% mine.

    SaveSave

  • Achieving Green Thumb Status

    Achieving Green Thumb Status

    This post is sponsored by Nimbus pot, however all opinions are 100% mine. Affiliate links may be contained in this post. 

    One summer, my great uncle and I got into gardening.

    Ok well, it was more me and he just listened to me rant on about it.

    We visited every Lowe’s, Home Depot, plant nursery and any store basically within an hour of us that was selling plants.

    He bought each of us a rose bush.

    I bought each of us a tropical plant of some sort.

    As if I know the name, I just thought it was pretty.

    The rose bushes lived.

    The tropical plants died.

    As did anything else I purchased. 

    I read his mother’s book on gardening that was thicker than the Bible.

    I’m not kidding. I still have it.

    I attempted to propogate hydrangeas.

    I divided irises.

    I ordered a ridiculous amount of flower seeds from a specialty seed company and planted every last one of them.

    Much to my dismay, not a darn thing lived except for a few irises.

    It was apparent that summer that me and flowers didn’t get along too well.

    When I realized Grunt Labor was such a fantastic gardener, I jumped for joy and didn’t worry with anything flower related again.

    Things have changed though.

    I have now achieved green thumb status, y’all.

    And I didn’t have to lie, cheat or steal to get it.

    Ok, I did cheat a little…

    How I Water My Indoor Plants Only ONCE Every Few Months - And yes, they are thriving! / Nimbus Pot

    Recently, I have a newfound love for indoor plants.

    The problem is that I forget to water them.

    Poor Fiddle Leaf Fig.

    That poor fiddle leaf fig is still recovering from when I forgot to water it for three weeks. The really sad thing is that I was super pumped about getting that plant and then forgot all about it.

    But now, I have a friend who gives me instant green thumb status.

    How I Water My Indoor Plants Only ONCE Every Few Months - And yes, they are thriving! / Nimbus Pot

    The Nimbus Pot.

    Its just like any other flower pot – except its magical.

    Because it waters your plant for you. For up to 4 months.

    All you need to do is plant your plant as you normally would in any planter and water it.

    How I Water My Indoor Plants Only ONCE Every Few Months - And yes, they are thriving! / Nimbus Pot

    P.S. You can use this inside or outside. There’s a specific plug on the bottom for inside or outside.

    Then, remove the handle.

    How I Water My Indoor Plants Only ONCE Every Few Months - And yes, they are thriving! / Nimbus Pot

    Fill the reservoir with water and replace the handle.

    You can also add plant food in the reservoir to help your plants really kick butt and take names. 😉

    How I Water My Indoor Plants Only ONCE Every Few Months - And yes, they are thriving! / Nimbus Pot

    When the cute little blue float drops, you need to add more water.

    So y’all, my plant (as if I actually know the name of it), has been in the Nimbus pot for about a month now. It has done so well – it even had new leaves growing within two weeks of being in the pot.

    I may or may not have done a happy plant dance.

    How I Water My Indoor Plants Only ONCE Every Few Months - And yes, they are thriving! / Nimbus Pot

    I was seriously amazed with my green thumb abilities.

    Ok, the Nimbus’ green thumb abilities.

    You can place the Nimbus pot inside a pretty container if you want to and it won’t affect the watering at all.

    How I Water My Indoor Plants Only ONCE Every Few Months - And yes, they are thriving! / Nimbus Pot

    I have mine inside a thrifted gold container I found. Its actually a little too small at the top for the Nimbus, but not enough to bother me. I think it looks great in front of the confetti wall.

    pin-this-post-2

    How to Grow Indoor Plants | When to Water Plants | Growing Plants Indoors

    Is there anyone else who is ready to achieve instant green thumb status?

    blog-signature-summer-15

    Disclosure: This post was a collaboration with Nimbus Pot. However, all opinions and admittance of lack of watering plants are 100% mine.

    SaveSave

  • My Fall Home Tour: Take Two

    My Fall Home Tour: Take Two

    If you saw my fall home tour a couple weeks ago, you may have noticed there wasn’t a pumpkin in sight.

    I like to ease into fall.

    Or maybe I hadn’t figured out where I stored the fall stuff last year…

    Either way, Lindsay from The White Buffalo Styling Co. is hosting the Fall Edition of the Blogger Stylin’ Home Tours this week and asked me to join in, so I thought sure!

    You’re actually forcing me to find those pumpkins, aren’t you? 

    If you are popping over from Caitlin at Desert Domicile, welcome! No kidding, I drool over everything that woman makes. If you don’t know her, you should. In fact, you should have known her yesterday. She’s that good. 

    Ok. I’m going to tell you my big secret for fall decorating.

    Are you ready?

    Seriously. Its top secret.  

    Affiliate links may be contained in this post.

    Fall Home Tour with simple fall decorating ideas / Cowboy Hat / Vintage Cowboy / Blanket / Guitar / Cowboy Boots / Dollar Tree Painted Pumpkins

    Confetti Wall / Green Pillow

    Pull out all those special treasures you’ve been storing away and decorate with them.

    Like the blanket that was your dad and uncle’s when they were kids and your grandfather’s hat and your grannie’s guitar.

    And then….

    Fall Home Tour with simple fall decorating ideas / Guitar for decorating / Dollar Tree Painted Pumpkins

    Ribbon Wrapped Pumpkins

    …litter Dollar Tree pumpkins all around.

    That’s the big secret. 

    Fall Home Tour with simple fall decorating ideas / Dollar Tree Painted Pumpkins / Elvis Bust / Lips Print / Abstract Painted Wall

    Elvis Bust / Lip Print

    Because they look good with anything…even an Elvis bust and lip watercolor print in front of an abstract circle wall.

    Really. Could you ask for pumpkins to be anymore versatile?

    Fall Home Tour with simple fall decorating ideas / Green Velvet Pillow / Plaid Throw

    Plaid Throw (similar)

    You see, Dollar Tree pumpkins are only $1.

    Fall Home Tour with simple fall decorating ideas / Painted Dollar Tree Pumpkins

    White Bust (similar) / Brass Unicorn (similar) / Sconce

    And they look really cute painted with glittered stems.

    Fall Home Tour with simple fall decorating ideas / Dollar Tree Painted Pumpkin / White Bust / Gold Unicorn

    So if you can’t find all your fall decorating items from last year, you can just spend $10 on Dollar Tree pumpkins.

    Fall Home Tour with simple fall decorating ideas / DIY Ampersand Pumpkin / Gold Sphere

    DIY Ampersand Pumpkin / Gold Sphere

    Not that that happened to me or anything.

    Fall Home Tour with simple fall decorating ideas / DIY Ampersand Pumpkin

    I just may or may not be too lazy to haul all that stuff out.

    If we’re being honest and all.

    Fall Home Tour with simple fall decorating ideas / Donkey Print / Dollar Tree Painted Pumpkin

    Donkey Print

    So instead, we are making it rain with mini-painted pumpkins.

    That’s how we roll…

    Up next on the tour is The Chronicles of Home. You are going to love Jennifer’s home!

    *Also, this post is in no way in partnership with the Dollar Tree – I just really like their pumpkins.

    SaveSave

  • How To Refinish Wood Furniture Without Sanding or Stripping

    How To Refinish Wood Furniture Without Sanding or Stripping

    This post is sponsored by Velvet Finishes, however all opinions are 100% mine. Affiliate links may be contained in this post.

    There once lived a man.

    He was a farmer who wore Liberty overalls.

    And he was a wood worker too.

    He made lamps and a baby cradle when his first granddaughter was born.

    The granddaughter slept in the cradle and her daughter slept in the cradle.

    And the granddaughter doesn’t remember a time when a lamp her pap made wasn’t in her grandparent’s den.

    They were floor lamps with a small table halfway up – nothing anyone would probably consider in style.

    Except her.

    A few months ago when the granddaughter went back home, she found her grandfather’s lamps in an outbuilding.

    And that just wouldn’t do.

    So along with a huge gold mirror and some old farm equipment that she just couldn’t let get thrown away, she brought the lamps home.
    How to Refinish Wood Furniture and Cover Stains without Sanding - must read if you want to keep something stained, but don't want to strip and sand it!

    The base and the poles were ok, but the table part, it was rough.

    But she was ready to make them shine again….

    How to Refinish Wood Furniture and Cover Stains without Sanding or Stripping

    Supplies & Materials Needed:

    How to Refinish Wood Furniture and Cover Stains without Sanding - must read if you want to keep something stained, but don't want to strip and sand it!

    Step 1: 

    If the piece you are working on has a glossy or shiny finish, spray it down with Ready, let it sit for a few minutes, then wipe the piece down with paper towels until its no longer shiny.

    Whether you used Ready or not, use a tack cloth to clean up any dust or dirt that might be on the piece.

    Step 2: 

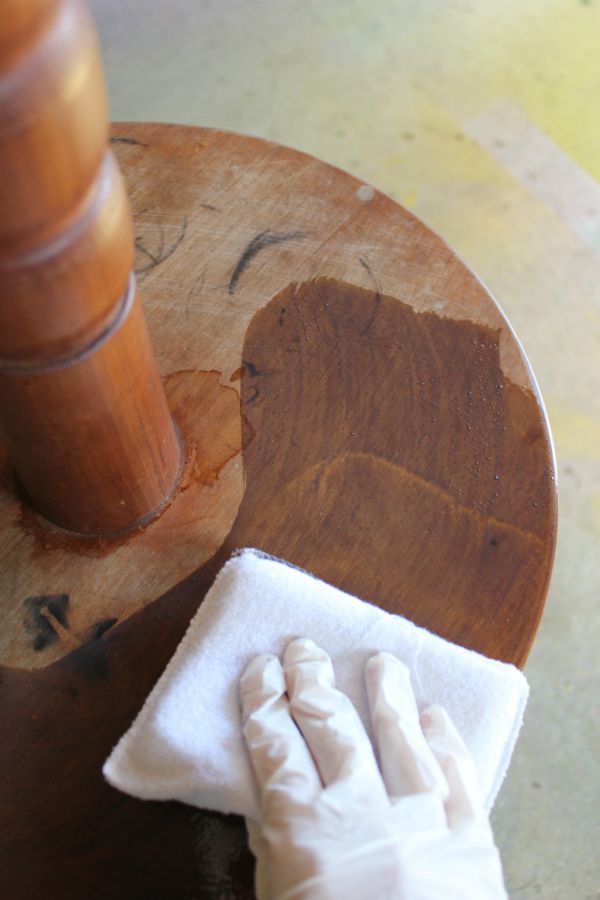
    Put on the gloves (this will stain your hands if you don’t!) and pour a little Stain Restore onto a paper plate.

    How to Refinish Wood Furniture and Cover Stains without Sanding - must read if you want to keep something stained, but don't want to strip and sand it!

    Use the stain pad (it comes with the Stain Restore) and soak up some stain restore.

    Spread it onto the surface you are restoring.

    How to Refinish Wood Furniture and Cover Stains without Sanding - must read if you want to keep something stained, but don't want to strip and sand it!

    You can spread it around however you want to, but make sure your final swipes are in the direction of the wood grain.

    Step 3:

    Let the Stain Restore dry and repeat as many times as needed or to get the color you want. I did four coats of the Stain Restore to cover my lamp.

    How to Refinish Wood Furniture and Cover Stains without Sanding - must read if you want to keep something stained, but don't want to strip and sand it!

    You can just barely see the rings that were there in the beginning. I could have done another coat or two and covered them completely, but I didn’t want to go any darker with the lamp.

    How to Refinish Wood Furniture and Cover Stains without Sanding - must read if you want to keep something stained, but don't want to strip and sand it!

    Stain Restore dries to a shiny, polyurethane type finish. You can add on a topcoat of Protect for more protection.

    How to Refinish Wood Furniture and Cover Stains without Sanding - must read if you want to keep something stained, but don't want to strip and sand it!

    It may be considered out of style, but this girl is happy to have her Pap’s lamp in her living room.

    And she thinks it looks just right.

    Do you have any family heirlooms that need to be restored?

    pin-this-post-2

    How to Refinish Wood Furniture | How to Refinish Old Furniture | Restaining Wood Furniture | Restaining Furniture | Furniture Makeover DIY

    You know you don’t wanna miss any of this crazy.

    Sign up to get my posts delivered to your inbox here.

    Stalk Me Here:

    Bloglovin / Pinterest / Facebook / Twitter / Google+ / Instagram

    blog-signature-summer-15

    Disclosure: This post was a collaboration with Velvet Finishes. However, all opinions and love of my Pap’s lamps are 100% mine.

    SaveSave

  • How to Raise Cabinets

    How to Raise Cabinets

    So sometimes during a big project or after I finish a project, I start looking at all the little projects that made up that big project and I decide that some of those little projects probably wouldn’t be that interesting to you.

    So I don’t bother too much with pictures and I don’t post about it.

    But then months later, someone will ask me something specific about that small project that helped to make the bigger project possible and I will realize that I probably should have posted about that.

    Does any of this make sense? Its late and I’ve been drinking. And apparently that makes me use the word projects too much.

    So there’s that. 

    Anyway, if you remember way back in January, Grunt Labor and I finally finished his man cave.

    How to Raise Cabinets - Learn how we raised our base cabinets to accommodate for a refrigerator that was taller than the base cabinets.

    In order to deem the man cave livable, he had to have a beverage center (a.k.a. a fancy name for a mini refrigerator). But when the beverage center arrived, it was a bit taller than the opening we had for it, thus we needed to raise the cabinets or get a new refrigerator.

    Raising the cabinets was cheaper and faster than getting a new beverage center.

    So you can guess which option won.

    How to Raise Cabinets

    Affiliate links may be contained in this post.

    First, let me say that these cabinets were not in our kitchen or around any sort of plumbing. I definitely think that you can do this with your kitchen cabinets, however you would have to remove the countertops and possibly create a few new holes in the back of the cabinets for plumbing. It would be a bigger job than what we had to do.

    You will need: 

    • 4 x 4 Post
    • Saw (We used our miter saw and a table saw, you could also easily substitute the miter saw for a circular saw.)
    • Drill and Screws or Hammer and Nails or Nail Gun (We used our nail gun.)
    • Trim for the bottom of the cabinets (most likely a 1 x 6 piece)

    Step 1: 

    Determine how much you need to raise your cabinets before moving them.

    Step 2:

    Remove your cabinets from the wall and flip them upside down. Before cutting the 4 x4 post to the height you need to raise your cabinets, look at the bottom of your cabinets.

    How to Raise Cabinets - Learn how we raised our base cabinets to accommodate for a refrigerator that was taller than the base cabinets.

    Most all cabinets have that “base” or “frame around the bottom. Your 4 x 4 pieces are going to need to fit in that frame, but extend out of it the height you need to raise your cabinets. Does that make sense? So, you should cut your 4 x 4 pieces the height you need to raise the cabinets plus the height of that frame. Cut the 4 x 4 post to the appropriate length you need – we did 5 of these for each cabinet – one in each corner and one in the middle.

    How to Raise Cabinets - Learn how we raised our base cabinets to accommodate for a refrigerator that was taller than the base cabinets.

    Step 3:

    Secure the 4 x 4 pieces to the cabinet with nails or screws. For each of the corner pieces, just go through the frame. On the middle piece, just use wood glue to secure it, otherwise a screw or nail would probably go through the bottom.

    Step 4:

    Put your cabinets back into place.

    How to Raise Cabinets - Learn how we raised our base cabinets to accommodate for a refrigerator that was taller than the base cabinets.It will now look like you have “feet” on your cabinets – although not pretty ones. To fix this, you need to trim it out. Measure the space that you have to cover and cut trim to fit, then secure. We had about 5 inches to cover (height wise), so we bought a 1 x 6 x 12, cut it down to the appropriate length, then ran it through a table saw to get the six inches down to five inches. We secured it with finish nails. Paint it whatever color matches your cabinets.

    How to Raise Cabinets - Learn how we raised our base cabinets to accommodate for a refrigerator that was taller than the base cabinets.

    Beverage center catastrophe averted.

    You can see more of the man cave here.

    Have you raised cabinets before? Did you use a different method? 

    How to Raise Cabinets - Learn how we raised our base cabinets to accommodate for a refrigerator that was taller than the base cabinets.

    You know you don’t wanna miss any of this crazy.

    Sign up to get my posts delivered to your inbox here.

    Stalk Me Here:

    Bloglovin / Pinterest / Facebook / Twitter / Google+ / Instagram

    blog-signature-summer-15

    SaveSave

  • Fall Home Tour: Cowboys and Elvis

    Fall Home Tour: Cowboys and Elvis

    This fall tour is not at all about pumpkins.

    Sorry if you were ready for pumpkins.

    Instead its about some of my favorite fall-ish things…cowboy hats and boots…red plaid blankets…and Elvis.

    Ok, Elvis isn’t really fall-ish, but its my house and I’ll do what I want to.

    If you want pumpkins and leaves and all that jazz, check back in a few weeks when I’ve actually had time to remember where I stored all that decor from last year.

    #storyofmylife

    A huge thanks to Marty at A Stroll Thru Life for organizing this Fall Tour of Homes. She is so on top of her game – don’t miss her tour. If you are new here from A Thoughtful Place or another blog on the tour, welcome! Fair warning that I’m not near as talented as all those other ladies and also don’t speak as eloquently as they do. I’m also just weird. And random. You’ve been warned.

    So, let me tell you something.

    I love country music. 

    You may have already figured that out.

    But in the fall, I love it a little bit more. 

    Which I didn’t even know was possible.

    I don’t even know why I love it a little more in the fall besides the fact that I drink a bit more Jack in the fall and what pairs better with Jack than country music?

    Nothing I tell you. Nothing.

    Fall Home Tour / The Entryway / Kelly Green, Black and White accents / Cowboy Accents

    So in the fall, instead of leaving my grandfather’s cowboy hat tucked safely away with the vintage cowboy blanket, I pull them both out.

    And decorate with them.

    Because what’s better than a kelly green pillow paired with a modern black and white one and cowboy paraphernalia all against a confetti wall?

    Random? Yes. But it makes me smile.  

    Fall Home Tour / The Living Room / Cowgirl DIY Lampshade

    And I might play a little bit of musical lamps.

    And put the cowgirl lampshade in the living room.

    Just because.

    Fall Home Tour / The Living Room / Kelly Green Accents

    And mix in a little red and gray plaid with another green velvet pillow.

    Because you can’t have enough comfy green velvet pillows.

    And to top it all off…

    Fall Home Tour / The Stairwell / Easy Abstract Circles Accent Wall / Elvis Bust / Lips Watercolor Art

    We’ll put Elvis against a random abstract circle wall beside red watercolor lips.

    Because every home needs a little Elvis in their lives – whether its fall-ish or not.

    Am I right or am I right?

    P.S. That abstract circle wall is the stairwell! I finally figured out what to do with it – it only took me five months – more on it soon!

    What are your favorite fall-ish decorating pieces? Besides pumpkins!

    The next tour stop is Style Your Senses – I promise Mallory won’t let you down!

  • Power Tools 101: The Ultimate Guide to Using a Paint Sprayer

    Power Tools 101: The Ultimate Guide to Using a Paint Sprayer

    I had a revelation the other day.

    A hold-the-phone-shut-the-front-door-smack-myself-on-the-head revelation.

    I realized that for two years I’ve been showing you all these awesome (if I do say so myself) furniture makeovers that I’ve completed with my paint sprayer, but never once have I actually told you how to use the paint sprayer from start to finish.

    See why I smacked myself on the head? 

    So here it is. The ultimate guide for how to use a paint sprayer from set-up to cleaning.

    Sorry for the two year delay.

    This post is sponsored by HomeRight, however all opinions are 100% mine. Affiliate links may be contained in this post.

    How to Use a Paint Sprayer | Using a Paint Sprayer on Furniture | Paint Sprayer Tips | Paint Sprayer for Furniture Makeovers

    This post contains affiliate links for your shopping convenience. Click here to read my full disclosure policy.

    How to Use a Paint Sprayer

    First off, let me say that the directions and tips in this post only pertain to the HomeRight Finish Max paint sprayer – the sprayer that I have used for the past two years. While other paint sprayers, may operate similar to this one, I can’t give exact instructions for those as I can this one. And yes, I am a HomeRight Brand Ambassador, but even if I weren’t, I would still use and sing the praises of the Finish Max. You are talking to the girl who tried three paint sprayers prior to finding the Finish Max and every single one of them went back to the store and she swore off paint sprayers forever.

    And then she ate her words. 

    But it was worth it.

    Before you get out your paint, first setup your painting area.

    The Ultimate Guide for How to Use a Paint Sprayer - from set-up to thinning the paint to an easy clean-up, its all here!

    The Spray Shelter is a little big gem. While there isn’t as much overspray as I’ve seen with other sprayers, there is still some with the Finish Max and this baby helps to contain it. Setup is easy and takes less than 10 minutes. The spray shelter doesn’t have a “bottom” so to speak, so if you are concerned about getting paint on your floor, you’ll want to put a tarp down under the shelter. As you can see, I don’t worry with that. A rainbow garage floor never bothered me.

    Also, if the piece I’m painting is smaller, I will set it up on sawhorses so I don’t break my back bending over.

    Now, let’s get down to business.

    Step 1:

    Unscrew the paint container from the sprayer and fill it with paint. If your paint is old (like a month or more), you will want to strain it.

    The Ultimate Guide for How to Use a Paint Sprayer - from set-up to thinning the paint to an easy clean-up, its all here!

    Once paint has been opened, it can sometimes get lumps that dry up in it and if not strained, those lumps will clog your sprayer. To strain my paint, I just use a cheap $3 strainer that I found at Target, I think.

    Fill the container about 1/2 to 3/4 full depending on the size of your project.

    Step 2: 

    Thin the paint.

    To thin the paint, all you need to do is add water. I usually try to have a cup of water nearby. Add a little at a time. Start with about 1/4 of a cup of water for thinner paints and 1/2 cup for thicker paints – you can always add more. Stir as you add water.

    The Ultimate Guide for How to Use a Paint Sprayer - from set-up to thinning the paint to an easy clean-up, its all here!

    The big question is always, “How do I know if I’ve thinned my paint enough?” Ya know what? That used to be my question too! One more reason I love this paint sprayer is because it takes the guesswork out of thinning.

    The Ultimate Guide for How to Use a Paint Sprayer - from set-up to thinning the paint to an easy clean-up, its all here!

    The Finish Max comes with a little tool called a viscosity cup. Once you’ve added water to your paint and mixed, dip the viscosity cup in the paint cup and time how long it takes the paint to run out of the cup. If you’re using a basic enamel paint, the paint is thinned enough if it all runs out of the viscosity cup in 25-40 seconds. If the paint doesn’t run out of the cup within that time frame, add more water, mix and test it again. Repeat until your paint is thinned properly.

    Let me stop here and talk about other materials you can use in the paint sprayer and whether or not you should thin them.

    You can use:

    Oil Based or Latex Based Paint – Needs to be thinned, 25 – 40 seconds run-out time.

    Clear Sealer (Polycrylic) – No thinning required.

    Polyurethane – No thinning required.

    Primer – Needs to be thinned, 30 – 45 seconds run-out time.

    Stain – No thinning required.

    Varnish – Needs to be thinned, 20 – 50 seconds run-out time.

    Its also important to note that many oil based paints recommend thinning with something besides water. Be sure to check the material’s label to see what it says about thinning the paint.

    Step 3: 

    Adjust your spray pattern.

    To adjust the spray pattern, turn the air cap on the front of the sprayer that has the “wings” as I like to call them.

    The Ultimate Guide for How to Use a Paint Sprayer - from set-up to thinning the paint to an easy clean-up, its all here!

    Turning the wings horizontally will give you a vertical spray pattern and turning them vertically will give you a horizontal spray pattern. If I intend on spraying something up and down as I spray, I use a horizontal spray. If I intend on spraying something from side to side, I use a vertical spray.

    You can also turn the wings at a 45 degree angle and spray horizontal or vertically, but honestly, I don’t think I’ve ever used that method.

    Step 4: 

    Plug in the sprayer and paint.

    Another one of my favorite features of the sprayer is that it doesn’t need an air tank – just an extension cord.

    how-to-use-a-paint-sprayer-12

    When you start spraying, hold the sprayer about 5-10 inches away from the piece you are painting. Pull the trigger and start painting. You want to move your entire arm – not just your hand – as you spray, and keep your arm in constant motion. Don’t stay in one place for too long.

    The Ultimate Guide for How to Use a Paint Sprayer - from set-up to thinning the paint to an easy clean-up, its all here!

    The sprayer won’t magically cover the entire piece in one coat. Typically, I have to do 2-3 light coats, but it takes far less time to spray those coats than hand paint them. There will probably be some small spots that don’t have paint on them the first go around – that’s ok  – you’ll get them next time. You can tilt the sprayer to get into hard to reach places, just try not to tip it anymore than 45 degrees. Let the paint dry between each coat. You can protect your paint job with a topcoat (see thinning instructions above), using the sprayer exactly the same way.

    Step 5:

    Clean-Up.

    After you are done painting, first clean out the paint container cup and the paint pick-up tube. If you did any tilting of the sprayer, you’ll also want to clean out the area where the container cup gets screwed on. Set the cup aside, but re-attach the paint pick-up tube. To clean the rest of the sprayer, attach the black faucet attachment end of the Rapid Clean to your water hose and the tube end to the pick-up tube. Clamp both ends.

    The Ultimate Guide for How to Use a Paint Sprayer - from set-up to thinning the paint to an easy clean-up, its all here!

    Turn on the water, pull the trigger and let the water run through the sprayer until it runs clear.

    The Ultimate Guide for How to Use a Paint Sprayer - from set-up to thinning the paint to an easy clean-up, its all here!

    And that’s it – the Rapid Clean makes cleaning the sprayer so easy.

    Have any of you used a Finish Max paint sprayer before? Any tips or tricks you can share with us?

    Want to come back to this paint sprayer guide later? Just pin the image below!

    How to Use a Paint Sprayer | Using a Paint Sprayer on Furniture | Paint Sprayer Tips | Paint Sprayer for Furniture Makeovers

  • My Favorite Southern Books

    My Favorite Southern Books

    There are few things better in life than a good book.

    One thing better is a good southern book.

    Cause we all know I’m slightly partial to the south.

    These, in my humble, 100% un-expert, but truly southern opinion are the best southern books – the keepers. Some are fiction, some are non-fiction. Some will pull at your heartstrings and some will have you rolling in the floor. Some are about scraping by to make ends meet and some are about witches and ghosts and all things weird.

    Would you expect any less from me?

    This post contains affiliate links for your shopping convenience. Click here to read my full disclosure policy.

    The Best Southern Books

    1. Anything by Rick Bragg

    The Best Southern Books - Must Read Books! Anything by Rick BraggAll Over But the Shoutin’ / Ava’s Man / The Prince of Frogtown / The Most They Ever Had

    Hands down, Rick Bragg is my favorite author. Start with All Over But the Shoutin’ – his tale of growing up poor in Alabama and how much his mama sacrificed for him and his brothers. Its raw and honest and an amazing memoir. He also has a new one coming out – My Southern Journey – and you’d better believe my copy is already pre-ordered. He writes a column in Southern Living every month as well. I have saved every single one of his columns from the magazine – they are so good.

    2. Natchez Burning & The Bone Tree

    The Best Southern Books - Must Read Books! Anything by Greg Iles, but especially these two.Natchez Burning / The Bone Tree

    Every time we go to the beach, it never fails that I spend at least three or four nights up until the wee hours of the morning reading a Greg Iles book. Once you start one of his books, you cannot put it down. His latests ones, Natchez Burning and its sequel, The Bone Tree are unbelievable. They are set in present day Natchez, Mississippi, but everything that’s happening are results of events that happened during the civil rights era. Both are full of unforgettable twists.

    3. The Last Madam

    The Best Southern Books - Must Read Books! The Last Madam

    The Last Madam

    As you may remember from my story about visiting a whorehouse, things that most people find weird or scary fascinate me – and I love all things New Orleans. The Last Madam (non-fiction) is a book about just that – the last madam of New Orleans. It is a captivating tale of debauchery. I’ve re-read the book now at least three times. Its that good.

    4. The Eden Moore Series

    The Best Southern Books - Must Read Books! The Eden Moore Series by Cherie PriestFour and Twenty Blackbirds / Wings to the Kingdom / Not Flesh Nor Feathers

    Now, I’m quite partial to these because they are all set in Chattanooga, where I call home. They are all fiction, but the cool thing about the Eden Moore series is that they are based around real ghost stories and historical events here in Chattanooga. Cherie Priest did a spectacular job of creating stories around real events. These are books I’ve read over and over again as well. Start with Four and Twenty Blackbirds to get to know Eden Moore and the three ghosts that protect her. Continue with Wings to the Kingdom and then Not Flesh Nor Feathers. Then, let’s all beg Cherie Priest to write another one in the series because you’re gonna be hooked.

    5. The Mayfair Witches Series

    The Best Southern Books - Must Read Books! The Mayfair Witches Series

    The Mayfair Witches

    While Anne Rice might be most well-known for her vampire books, my personal favorites of hers are The Mayfair Witch books. I’m quite sure they were the first books that I read which were based in New Orleans, so of course I was hooked immediately. The series is centered around a family of witches in New Orleans that is haunted by an unknown being. Start with The Witching Hour, followed by Lasher, and finally Taltos. If you love tales of witches or New Orleans, you’ll love these.

    6. The Help

    The Best Southern Books - Must Read Books! The HelpThe Help

    Unless you’ve lived under a rock for the past few years, you’ve heard about The Help. You probably even watched the movie. But did you read the book? Because if you didn’t, you need to. The Help is set in Mississippi during the Civil Rights era and man, is it a powerful book. It will make you laugh out loud and cry at the same time.

    7. Midnight in the Garden of Good and Evil

    The Best Southern Books - Must Read Books! Midnight in the Garden of Good and EvilMidnight in the Garden of Good and Evil

    New Orleans is my favorite city, but Savannah is a close second. Midnight in the Garden of Good and Evil is set in Savannah and you may have seen the movie for this one too, but the book is worth a read as well. There are mansions and voodoo and crime all rolled into this one.

    8. The Divine Secrets of the Ya-Ya Sisterhood

    The Best Southern Books - Must Read Books! The Ya Ya SisterhoodThe Divine Secrets of the Ya-Ya Sisterhood

    If there were ever a group of girls you wanted to be friends with, its the Ya-Yas. This is a tale of strong, true southern women at both their finest and weakest moments.

    Ok. Your turn.

    What are your favorite southern books?

    ***Update! Read Round Two of my favorite southern book picks here!***

    Favorite Southern Books: List of amazing books based in the south with unforgettable characters and plots!

    More Favorite Southern Books

    And you might also want to read about two of the best cities in the South…

    Amazing city full of fun! Must Do's in New Orleans

    The Must Do’s of New Orleans

    Things to do in Nashville TN • Nashville Attractions • Fun things to do in Nashville • Nashville Tourism • Nashville TN Attractions

    Things To Do in Nashville

    pin-this-post-2

    The Best Southern Books - A list of books about or set in the south that every lover of the south should read! Really great book recommendations!

    You know you don’t wanna miss any of this crazy.

    Sign up to get my posts delivered to your inbox here.

    Stalk Me Here:

    Pinterest / Facebook / Twitter / Instagram

    blog-signature-summer-15

    SaveSave

  • Using Velvet Finishes Paint in a Paint Sprayer

    Using Velvet Finishes Paint in a Paint Sprayer

    This post is sponsored by Velvet Finishes, however all opinions are 100% mine. Affiliate links may be contained in this post.

    It’s no secret around here that I have a love for both Velvet Finishes paint and my HomeRight Paint Sprayer.

    In fact, last year, when Kellie from Velvet Finishes asked me about trying her paint, one of my first questions was “Can I use it in my paint sprayer?”

    Luckily, the answer was yes.

    Now if she would have said no, it wouldn’t have been a deal breaker. There are lots of times when the weather isn’t cooperating with me and I can’t use my sprayer or other times when the project is small and it just doesn’t make sense to use the sprayer.

    But on big projects and pieces with lots of little details and nooks and crannies, I like to use Velvet Finishes in my paint sprayer to cut down on my work time.

    Because I like having more time for cheap beer, ya know?

    Am I right or am I right?

    Many of you, my dear people, have asked me if you can use Velvet Finishes in a paint sprayer and I’ve said, “Yep, you sure can!” Just like with any other paints though, you do have to thin Velvet Finishes before spraying it.

    So here’s how it all works. Even though there’s a lot of writing, its really easy – I promise.

    How to Use a Paint Sprayer | Using a Paint Sprayer on Furniture | Paint Sprayer Tips | Paint Sprayer for Furniture Makeovers | Using Velvet Finishes in a Paint Sprayer

    Using Velvet Finishes Paint in a Paint Sprayer

    Step 1: 

    First, unscrew the paint container from the bottom of the sprayer. Fill the container with paint. I generally fill the container somewhere between 1/2 and 3/4 full. If its a really thick paint, then 1/2 full because more water will be required. If its a thin paint, then 3/4 full because less water will be required.

    Using Velvet Finishes Paint in a Paint Sprayer

    Step 2: 

    Add water. Generally, I try to have a cup of water nearby. Add a little water at a time. Start with about 1/4 of a cup of water for thinner paints and 1/2 cup for thicker paints – you can always add more.

    Using Velvet Finishes Paint in a Paint Sprayer

    Its really important to note that some of the Velvet Finishes colors are much thicker than others. The lighter colors such as Minimalistic, Cosmopolitan, Ethereal, and other light colors are thinner. Those won’t require as much water. Darker colors like Vivid and Glamorous are much thicker and will require more water. The color I’m using here, Boheme, is a paint that’s kind of in the middle – its not too thin, its not too thick.

    After you have added water, stir.

    Using Velvet Finishes Paint in a Paint Sprayer

    You want to fully incorporate the paint that is on the bottom with the water on top.

    Step 3:

    You’re probably wondering how you’ll know when you’ve have added enough water. That was one of my questions when I first started using a paint sprayer.

    Using Velvet Finishes Paint in a Paint Sprayer

    The paint sprayer I use, the HomeRight Finish Max, comes with a handy dandy little tool called a Viscosity Cup. Fancy name, but simple to use. Also, with my paint sprayer came an instruction manual that outlined how quickly the paint should run out from the fully filled viscosity cup when the paint is thinned correctly. For most paints, the paint should empty out of the viscosity cup within 25 – 40 seconds.

    So, after adding your water and mixing, dip the viscosity cup in the paint, hold it up and count how long it takes the cup to run out. If the time falls within 25 – 40 seconds, you’re ready to paint. If its more, add more water and mix until it falls within that timeframe. Chances are it won’t be less, but if it is, its usually ok to paint with. Test the sprayer on a scrap piece of wood first to make sure the paint comes out well.

    After you thin paint a few times, you’re going to get the hang of it and not need to use the viscosity cup as much. Honestly, I’ve done it so much now that I rarely ever need it.

    Step 4: 

    After you’ve thinned your paint correctly, you are ready to go. Reattach the paint cup to the sprayer, plug it in and pull the trigger.

    Using Velvet Finishes Paint in a Paint Sprayer

    You will want to keep the sprayer in constant motion by moving your arm – not the sprayer – as you cover your piece. Generally, I find that each piece I do with a paint sprayer and Velvet Finishes takes 2-3 light coats.

    If you have extra paint leftover that you have thinned, I usually just put it back in the container with the un-thinned paint and give it a good shake. If you don’t want to do that though, you could store it an airtight container of its own.

    Step 5: 

    Finish your project by sealing the paint with Protect – there’s no thinning required on that one.

    Using Velvet Finishes Paint in a Paint Sprayer

    DIY Dress-Up Station 

    If you’re wondering how easy clean up is with the paint sprayer – I promise its so easy. I’ll actually have another post about doing just that in a couple of weeks, so stay tuned.

    Also, Velvet Finishes will soon be carrying HomeRight paint sprayers on their site!

    Because they go together like Rama lama lama Ka dingity dinga dong.

    Name that song! 😉

    Have you used Velvet Finishes before? Do you prefer a paint sprayer or a brush and roller when using it?

    pin-this-post-2

    How to Use a Paint Sprayer | Using a Paint Sprayer on Furniture | Paint Sprayer Tips | Paint Sprayer for Furniture Makeovers | Using Velvet Finishes in a Paint Sprayer

    You know you don’t wanna miss any of this crazy.

    Sign up to get my posts delivered to your inbox here.

    Stalk Me Here:

    Bloglovin / Pinterest / Facebook / Twitter / Google+ / Instagram

    blog-signature-summer-15

    Disclosure: This post was a collaboration with Velvet Finishes. However, all opinions and love of both Velvet Finishes and my paint sprayer are 100% mine.

    SaveSave

  • My Favorite Green Color Combinations for Decorating

    My Favorite Green Color Combinations for Decorating

    It was love at first spray when I made the Kate Spade Inspired Lamp Makeover.

    I had met my decorating color soulmate and there was no turning back.

    Green and I went together as well as me and cheap beer.

    Well, almost. Let’s face it – cheap beer will always have my heart. Oh, and Grunt Labor too.

    I think one of the main reasons I love green so much is because it looks great with my second in line favorite colors.

    The Best Green Color Combinations for Decorating

    Affiliate links may be contained in this post.

    Green + Navy

    The Best Green Color Combinations for Decorating • Green and Navy

    My Kitchen

    Painting the lower cabinets navy was by far one of the best decisions I have ever made. My green barstools just pop off the navy and white.

    The Best Green Color Combinations for Decorating • Green and Navy

    Green and Navy Nursery

    This nursery. No more babies for me, but this nursery is just adorable. I am digging that dresser. I wouldn’t turn my nose up at it in my own house. Just sayin’.


    The Best Green Color Combinations for Decorating • Green and Navy

    Green and Navy Dining Room

    No doubt, the rug and the green accent wall totally make this space.

    The Best Green Color Combinations for Decorating • Green and Navy

    Green and Navy Bedroom

    Another bold green wall with navy accessories. I’d take those X-benches too. 🙂

    Green + Red

    The Best Green Color Combinations for Decorating • Green and Red

    Red Hutch Makeover

    If you are one of those people who think green and red only belong together at Christmastime, I’m so sorry for you. I’ll be honest – I use to think that too. But let me tell you, I think the combination is bold, pretty, and unexpected.

    The Best Green Color Combinations for Decorating • Green and Red

    Green and Red Living Room

    This living room – and the entire house – was featured in HGTV magazine a while back. I drooled the entire time I read about it.

    The Best Green Color Combinations for Decorating • Green and Red

    Living Room Tour

    Those might just be my favorite lamps in the whole house paired with my favorite curtains.

    Green + White

    The Best Green Color Combinations for Decorating • Green and White

    Green & White Cane Inspired Accent Wall

    You can never go wrong with green and white – its perfectly crisp.
    The Best Green Color Combinations for Decorating • Green and White

    Green & White Bedroom

    While the bed is a bit too fancy for my taste, this green and white bedroom wouldn’t be too hard to pull off. Paint all the walls green. Make everything else in the room white. Showstopper.

    The Best Green Color Combinations for Decorating • Green and White

    Green and White Stairwell

    I’ve always thought that photo frames together in the same color make a big impact. This stairwell proves I was right.

    Green + Black + White

    The Best Green Color Combinations for Decorating • Green and Black and White

    Green and Black and White Chair Makeover

    Green + Black + White = Oh so right.

    Look, she rhymes! 

    The Best Green Color Combinations for Decorating • Green and Black and WhiteGreen and Black and White Bathroom

    Y’all, this is a bathroom. A bathroom. The whole space is stunning.

    What about you? Any favorite green color combinations?

    pin-this-post-2

    The Best Green Color Combinations for Decorating | Decorating with Green | How to Decorate with Green | Home Decor Ideas

    You know you don’t wanna miss any of this crazy.

    Sign up to get my posts delivered to your inbox here.

    Stalk Me Here:

    Bloglovin / Pinterest / Facebook / Twitter / Google+ / Instagram

    blog-signature-summer-15

  • Cane Inspired Accent Wall for $25

    Cane Inspired Accent Wall for $25

    This post is sponsored by FrogTape, however all opinions are 100% mine. This post contains affiliate links. 

    Sometimes I try to make things more complicated than they really are.

    Not on purpose of course.

    I just don’t think sometimes. Its like my mind sometimes turns off its “common sense” mode.

    That’s also when I end up saying things I shouldn’t to people. 

    Whoops. 

    That common sense mode of my brain shut down when I started to do this accent wall.

    You see I love caned pieces. Caned chairs, caned tables, caned light fixtures. I’m crazy over the pattern.

    And I have a pillow with a caned pattern on it.

    And I was determined to get that pattern on my wall. I knew I could. It was just straight lines strategically placed.

    But I was overthinking it.

    And it took Grunt Labor coming up to me, turning the pillow diagonally and saying, “Its just squares, Jenna,” for me to figure it out.

    He was right.

    But I didn’t say that because I’m not too keen on how saying he’s right tastes.

    Like vinegar, I tell ya.

    And once this revelation was made, I figured out how to make my own cane inspired accent wall.

    DIY Cane Inspired Accent Wall

    DIY Cane Inspired Accent Wall done for around $25. Gorgeous kelly green wall treatment in this bathroom.

    It might look complex, but it really wasn’t.

    After I used common sense and all.

    Here’s what you’ll need:

    Step 1:

    My wall was already painted white which was what I wanted to use for one of my colors. However, if you want to use a different color than what your wall is already painted, you will need to paint the entire wall first. Keep in mind this will be the color that will be the pattern (lines) on your wall in the end.

    Step 2: 

    Find the center of your wall at the very top and mark it. Place one corner of your 12 x 12 piece of cardboard or cardstock (I used cardstock) on the mark. Trace the piece of cardstock on all four edges. Next, move the cardstock to either side of the diamond you just traced, match up the edges and trace again. Continue doing this until you have worked your way all the way across and down the wall.

    How to make a cane inspired accent wall.

    Step 3:

    Using the smaller width FrogTape, run the tape all along the inside edges of each square you traced. Your wall should look like this when you are finished:

    How to make a cane inspired accent wall with paint and FrogTape.

    Step 4:

    At this point, I was going to do two horizontal lines across the top and bottom of each square, just like a caned pattern. However, as I started to run the tape across the wall, I realized that I had some very uneven and shoddy drywall work at the top of the wall and it was throwing off the pattern. So, I opted to forgo those lines.

    I still wanted a little extra pop though, so I “framed” in the pattern along the edges. Do this by coming 2 1/2″ in from the wall edges on all sides.

    How to make a cane inspired accent wall.

    Run tick marks along the edges at the correct measurement and then run more of the smaller width FrogTape along the tick marks. This is what it should look like when you are finished:

    How to make a cane inspired accent wall with paint and FrogTape.

    Step 5:

    Use the larger width FrogTape along the edges of any walls that butt up to your accent wall, ceiling, and any other fixtures.

    How to make a cane inspired accent wall with paint and FrogTape.

    Step 6:

    To ensure crisp, clean paint lines, run your fingernail or a credit card along the edges of all the tape that you have applied to the wall.

    Step 7:

    Roll and brush on a paint color of your choice. It took about three coats of this bold green hue for me.

    Step 8: 

    Remove the FrogTape as soon as you have applied the final coat of paint while it is still wet.

    DIY Cane Inspired Accent Wall done for around $25. Gorgeous kelly green wall treatment in this bathroom.

    And commence the swooning.

    DIY Cane Inspired Accent Wall done for around $25. Gorgeous kelly green wall treatment in this bathroom.

    If you only need a quart of paint, you’ll end up having about $25 or less in the wall. Not too shabby, eh?

    Are you an accent wall fiend?

    You might also like these then...

    Super easy to make and fun! Easy Confetti Accent Wall

    9 Accent Walls for $30 or Less via RainonaTinRoof.com #homedecor

    pin-this-post-2

    DIY Cane Pattern Accent Wall | Patterned Accent Wall DIY | Accent Wall Ideas | Accent Wall Bathroom | Feature Wall Ideas

    I did end up painting the pink ceiling in the bathroom white. It was just clashing way too much with the green.

    You know you don't wanna miss any of this crazy.

    Sign up to get my posts delivered to your inbox here.

    Stalk Me Here:

    Bloglovin / Pinterest / Facebook / Twitter / Google+ / Instagram

    blog-signature-summer-15

    frogtape-disclosure

    SaveSave

  • Kitchen Makeover: Take Two

    Kitchen Makeover: Take Two

    Hi. My name is Jenna.

    I’m a recovering neutral decorator. 

    Yes friends, there was a time when I turned solely to whites and beiges for decorating.

    I knew no better. I thought I liked it. I thought it was my style.

    I was so damn wrong.

    As soon as I spray painted my first piece kelly green, there was no going back.

    And then I discovered the no-fail combo of kelly green and navy and it was as if the design gods smiled down upon me and showered me with their wisdom.

    Ok, maybe that was a little much, but you get the idea.

    I am a color girl.

    And when we renovated the beloved foreclosure I opted for beiges, whites, and light blues.

    And they were pretty. I’m not bashing on beige.

    But they weren’t me. 

    So slowly but surely, every room in this house has gotten re-made over.

    The kitchen was especially in need of color. This is what it looked like before we added in some glorious color (besides the barstools.)

    Kitchen Before

    Now, if you really want to see how far its come, as in how many walls we knocked down and the re-arranging we did, you can see the initial kitchen renovation here.

    It was a pretty kitchen. I liked it. It got me in Better Homes and Gardens and for that, I will always love that kitchen….but it wasn’t this kitchen.

    Modern Kitchen • Navy and White Painted Cabinets • DIY Island • Kelly Green & Brass Accents

    And this kitchen, I love.

    I would also like to take this moment to say how appreciative I am of the italics and bold features for fonts. It makes writing so much fun. Obviously, I’m a big fan.

    All that being said, I’m sure you are wondering why you are seeing my kitchen. Again. You already saw the finished results in the spring and summer home tours.

    Well the thing is, I’ve been meaning to do a post on how we got this beloved new kitchen for about oh, five months or so now. But my friend Kellie, who helped me paint my cabinets, just had to do a video about it and then I just had to wait until she had the video in just perfect viewing condition before she would let me post.

    Ok, I might have just thrown her under the bus a little there. She can handle it though. 

    So finally, here are more pretty kitchen pictures including details about the makeover and a video at the end.

    Modern Kitchen • Navy & White Painted Cabinets • Brass Hardware

    All of the kitchen cabinets got painted. We used Velvet Finishes Minimalistic on the top and Velvet Finishes Handsome on the bottom.

    Modern Kitchen • Navy & White Painted Cabinets • Brass Hardware

    The weather was horrendous the week that we opted to do this – so much so that Grunt Labor was even off work due to it one day – so we painted everything inside.

    Modern Kitchen • White Painted Cabinets • Brass Hardware

    The old black hardware just didn’t jive with the navy, so I got all new knobs, pulls, and hinges from D. Lawless Hardware. I think it works perfectly with both the white and navy.

    Modern Kitchen • Navy & White Painted Cabinets • Brass Hardware

    The old faucet was oil-rubbed bronze which definitely wasn’t jiving either. After a long search, we settled on the Delta Trinsic in Champagne Bronze.

    Modern Kitchen • Open Shelving • Navy Painted Cabinets

    Mohawk Lollipop Holder / Scales of Justice (similar) / Vintage Letters (similar) / Antlers (similar) / Red Glasses (similar)

    The open shelving also got a coat of Minimalistic. The rustic wood color that it was before clashed. I also did some editing on the shelves and rearranging. Personally, my favorite thing about the shelving is the contrast between the mohawk lollipop holder, my grandmother’s red glasses and the deer antlers I had to skin myself.

    If that’s not character, I don’t know what is.

    Modern Kitchen • DIY Island • Kelly Green Barstools

    Brass Bowl (similar) / Bar Stools

    The barstools remained the same – I am still mad over the kelly green – but the DIY kitchen island did get a nice fresh coat of white paint and some re-decorating as well.

    Kellie has more images of us actually painting the cabinets – go let her have it because she harassed me the whole time about how I never vacuumed my rug. I swear, I wasn’t mean to her at all to cause her to do such a thing.

    Of course, I’m not lying.

    And here’s the video of the whole shebang…I look very odd in the beginning because I was trying my damnedest not to laugh. There’s no doubt in my mind that the camera man was never happier when he was finally done with us.

    You might also want to see…

    Types of Paint To Use on Cabinets - list of paints that are good for painting kitchen or bathroom cabinets.

    Types of Paint to Use on Cabinets

    pin-this-post-2

    Modern Kitchen • Navy & White Painted Cabinets • DIY Island • Kelly Green and Brass Accents

    You know you don’t wanna miss any of this crazy.

    Sign up to get my posts delivered to your inbox here.

    Stalk Me Here:

    Bloglovin / Pinterest / Facebook / Twitter / Google+ / Instagram

    blog-signature-summer-15

  • Best Sources for Affordable Wall Art and Favorites Under $50

    Best Sources for Affordable Wall Art and Favorites Under $50

    In case you didn’t know, I’m not an art connoisseur.

    Now a cheap beer connoisseur, I am.

    Ok, really just Miller High Life.

    Here’s how I decide what art to hang on my walls:

    I browse online and/or thrift stores.

    Ooooo, I like it.

    Look at the price tag.

    Ooooo, its cheap.

    Buy it.

    Ooooo, its expensive.

    Leave it.

    Pretty straightforward, no?

    While there may never be a priceless hand painted original piece of art hanging in my home, excluding the circus’ art, these pieces either already reside here or will at some point.

    Because they’re pretty.

    And cheap.

    And nothing beats pretty and cheap together.

    Best Sources for Affordable Wall Art & Favorites Under $50

    This post contains affiliate links. 

    1. Etsy

    Best Sources for Affordable Wall Art and My Favorite Picks Under $50 - Etsy

    Abstract / Tallulah Shaw / To The Night / Gemstones

    Etsy should probably be a given for anyone. Its packed with hundreds and hundreds of talented artists who thankfully sell their prints at affordable prices. Not only can you find actual prints, but you can find loads of printables to use as wall art for usually $5 or less. I don’t have that glorious abstract in my house yet, but you’d better believe I will soon. I love the colors. Tallulah Shaw is from the Janet Hill Studio. I love every single one of her pieces, but can’t choose just one or find the perfect place for it yet. The bottom two are both hanging on the black and white gallery wall in my living room.

    2. Kirkland’s

    Best Sources for Affordable Wall Art and My Favorite Picks Under $50 - Kirkland's

    Buffalo Canvas

    Ahh, Kirkland’s. I could sing of your glorious home decor deals for days. Not only can you snag super cheap and pretty accessories at Kirkland’s, but its also a great place for snagging wall art at an amazing price – like this big Buffalo Canvas for $25. Twenty-five freakin’ dollars.

    3. Society6

    Best Sources for Affordable Wall Art and My Favorite Picks Under $50 - Society6

    Cow Watercolor / Lips Watercolor / Banana Leaves / Donkey

    I just discovered Society6 when I started working on my gallery wall (I know- I was living under a rock), but its one of my new favorite places for art. Its a marketplace full of individual artists. You can buy their prints at great prices, but you can also get most of those prints on pillows, totes, and just about anything else you can dream up. I’m not kidding. Every print above, excluding the cow, is on my gallery wall. The cow will be someplace soon though. And a few family members may even get one for Christmas presents.

    4. Furbish Studio

    Best Sources for Affordable Wall Art and My Favorite Picks Under $50 - Furbish

    Ginger Jar / Everyone’s a Dumb Whore / Neon Headdress

    Ahhh, Furbish. You are like my go-to place for random colorfulness. I mean really, who wouldn’t want that dumb whore cross-stitch hanging in their office. And also, who thinks to cross-stitch dumb whore into something?! Genius, I say, genius! And a neon headdress? A NEON HEADDRESS.

    5. Waiting on Martha

    Best Sources for Affordable Wall Art and My Favorite Picks Under $50 - Waiting on Martha

    Lion Watercolor

    And then there’s Waiting on Martha. She’s full of a little bit of everything – wall art, yes, but also barware, bedroom decor and more. Have you ever seen a more precious lion?

    And my favorite source for frames…Target.

    Best Sources for Affordable Wall Art and My Favorite Picks Under $50 - Favorite Frame from Target

    Room Essentials White Wood Frame

    This simple white frame is my go-to for any style of art. This frame is the kind I used all around my gallery wall. It comes with a white mat and works great to highlight even the smallest pieces of art. If you aren’t into white, you can always spray paint it a different color. I opted to leave them all white for my gallery wall though.

    STUNNING Black and White Gallery Wall! Simple to do - such a great accent wall!

    Ok, spill the beans. What are your go-to art sources and faves? You know, we don’t keep secrets around here.

    You might also want to see…

    Free Printable Horse Art - color, black and white, watercolor - perfect for framing for wall art.Free Printable Horse Art

    These would be GORGEOUS framed - and so much cheaper than other art! They are FREE! Instant Art: Banana Leaves Watercolor Printables via RainonaTinRoof.com

    Free Banana Leaves Watercolor Printables

    pin-this-post-2

     Affordable Wall Art | Cheap Wall Decor | Cheap Wall Art | Where to Buy Wall Art | Where to Buy Wall Decor

    You know you don’t wanna miss any of this crazy.

    Sign up to get my posts delivered to your inbox here.

    Stalk Me Here:

    Pinterest / Facebook / Twitter / Instagram

    blog-signature-summer-15

    SaveSave

  • 9 Simple and Easy Bed Makeovers and Hacks

    9 Simple and Easy Bed Makeovers and Hacks

    I can’t tell you how many times I’ve ran across DIY headboards on Pinterest.

    I’m confident DIY headboards could run Pinterest all by themselves.

    Now, I’m not bashing on DIY headboards at all.

    If you have patience and an insane amount of upholstery and tufting skills, then by all means make your own headboard.

    However, I don’t.

    I’m in favor of using what I’ve got.

    This could also mean that I’m cheap. That’s cool too. I’ll own it.

    I can paint a headboard faster than I can build one and cheaper too.

    No, it might not look as chic as a velvet upholstered one would, but if it looks like any of these bed makeovers, I wouldn’t turn my nose up at it.

    This post is sponsored by HomeRight, however all opinions are 100% mine. This post contains affiliate links for your shopping convenience. Click here to read my full disclosure policy.

    Simple and Easy Bed Makeovers and Hacks

    Americana style, anyone?

    Headboard Makeovers - Patriotic Shades, Red and Blue. Painted with the HomeRight Finish Max paint sprayer - gives a flawless finish and easy to use.

    That red. Oh my. Makely Home killed it with this bold red headboard. Gail from My Repurposed Life went with a classic navy for this twin headboard makeover. Navy is always a good pick – it will never fail you. Both of them used their HomeRight Finish Max Sprayers to makeover the beds.

    Shades of Green

    Headboard Makeovers: Shades of Green - Awesome furniture makeovers!

    I love the lines of Refresh Restyle’s headboard makeover, but I am also totally digging the bolder green hue on Jesse Coulter’s makeover.

    I know. Jenna likes the green. Imagine that.

    Play It Safe White

    Bed Makeovers: Shades of White

    Play it safe with a classic white like Finding Silver Pennies and 11 Magnolia Lane did.

    When in doubt, go for polka dots.

    Bed Makeovers: Easy to do polka dot bed.

    I’ve never been able to resist a good (and really easy to paint!) polka dot. After I sprayed this bed with my Finish Max, I popped on a few polka dots.

    And if you just have to make your own headboard…

    You can use these ideas to repurpose your old bed.

    Bed Hacks: Turn old headboards and footboards into benches and coat racks!

    Domestically Speaking made a charming bench from an old bed and My Repurposed Life made simple coat racks. So clever! They both used their paint sprayers to get in the nooks and crannies with ease.

    So are you a bed makeover or a DIY bed kinda person?

    pin-this-post-2

    Bed Makeover Ideas | Bed Makeover Paint | How to Paint a Bed Frame | Bed Makeover DIY | Bed Makeover DIY Head Boards

    You know you don’t wanna miss any of this crazy.

    Sign up to get my posts delivered to your inbox here.

    Stalk Me Here:

    Pinterest / Facebook / Twitter / Instagram

    blog-signature-summer-15