Blog

  • 4 Home Decor Projects You Don’t Want to Miss

    It’s time for the features from last weeks GMTG party!

    My picks this week are four fabulous home decor projects that you must see!

    4 Home Decor Projects You Don't Want to Miss {rainonatinroof.com} #homedecor

    4 Home Decor Projects You Don't Want to Miss {rainonatinroof.com} #homedecor

    Pink and White Dresser Makeover from 24 Cottonwood Lane

    4 Home Decor Projects You Don't Want to Miss {rainonatinroof.com} #homedecor

    DIY Easy Pleated Curtains from The Turquoise Home

    4 Home Decor Projects You Don't Want to Miss {rainonatinroof.com} #homedecor

    DIY Wood Bead Chandelier from Life On Virginia Street

    4 Home Decor Projects You Don't Want to Miss {rainonatinroof.com} #homedecor

    West Elm Inspired Herringbone Floor Mirror from Home Coming

    Most Viewed Link:

    4 Home Decor Projects You Don't Want to Miss {rainonatinroof.com} #homedecor

    Cozy and Bright Living Room from Grace Lee Cottage

  • Mailbox Makeover in less than an hour

    Mailbox Makeover in less than an hour

    Before we start this, I just have to say how touched I was by all of your sweet, sweet comments on my whole sappy dreams coming true post yesterday. Y’all seriously floored me and I’m still going through responding to each of you. All I can say is wow. I’m so blessed to have you as not only readers, but friends.

    Ok, that’s all the sappiness I can do for one day. Onto the mailbox makeover.

    Disclosure: This post is sponsored by Thompson’s, but ya’ll know how I roll, all opinions are 100% mine. This post contains affiliate links for your shopping convenience. Click here to read my full disclosure policy.

    Does anyone else tend to sometimes forget about their outdoor decor? (Ooo, she’s rhyming this morning.)

    I do. I don’t forget about my porch, but things like my mailbox that aren’t as close to my actual living space, often get overlooked. I tend to focus on decorating inside. Needless to say, my mailbox was looking rough.

    Mailbox Makeover Ideas | Mailbox Ideas | Mailbox Decor | Mailbox Makeover Curb Appeal | Mailbox Makeover Paint | Ideas for Mailboxes

    Grunt Labor had put some stain on the mailbox post a couple years ago when we first moved in our beloved foreclosure. It hadn’t been touched since.

    Mailbox Makeover in less than an hour {rainonatinroof.com} #mailbox #makeover #thompsons

    Mailbox Makeover in less than an hour {rainonatinroof.com} #mailbox #makeover #thompsons

    Mailbox Makeover in less than an hour {rainonatinroof.com} #mailbox #makeover #thompsonsSee what I mean? Now, those mums are the bee’s knees, Grunt Labor is an excellent gardener, but the mailbox needed a facelift.

    I started by giving the post a quick wipe-down to remove any spiderwebs and grossness. I also removed the actual mailbox. I gave the post a coat of Thompson’s Exterior Wood Stain in Traditional Brown.

    Mailbox Makeover in less than an hour {rainonatinroof.com} #mailbox #makeover #thompsonsThis was my first rodeo with a spray stain. It worked just like a regular canned stain, except of course its a spray. But, just like with regular stain, you can wipe off any excess stain you don’t want depending on how dark you want the stain. I wanted my post pretty brown, so I didn’t wipe off any stain and I gave it two coats.

    Just after the first and second coats, this is what the post looked like:

    Mailbox Makeover in less than an hour {rainonatinroof.com} #mailbox #makeover #thompsons

    Don’t worry about that unevenness look, it all soaks in and evens out in the end. If you do have any runs though, you will want to wipe those away.

    While the post was drying, I decided to give the numbers a facelift as well with a coat of green spray paint and I cleaned the bird poo off the mailbox itself. I’m sure my postman is grateful.

    In under an hour the post was dry and I had the numbers and mailbox reattached.

    Mailbox Makeover in less than an hour {rainonatinroof.com} #mailbox #makeover #thompsons

    Mailbox Makeover in less than an hour {rainonatinroof.com} #mailbox #makeover #thompsons

    Mailbox Makeover in less than an hour {rainonatinroof.com} #mailbox #makeover #thompsons

    Sorry, I have no idea how I managed to get that crooked of a picture.Mailbox Makeover Ideas | Mailbox Ideas | Mailbox Decor | Mailbox Makeover Curb Appeal | Mailbox Makeover Paint | Ideas for MailboxesI’ve got high hopes that this will hold up its beauty for a while now! Have you used spray stains before?

    Update: You have to see how I used this spray stain to update my lattice in under an hour! Huge change, y’all!

    More outdoor projects you might want to see:

    Staining Pressure Treated Wood – No Waiting Required – fastest way to stain a deck!

    12 Outdoor Furniture Makeovers – easy makeovers to refresh that tired outdoor furniture!

    13 Fantastic Outdoor Projects – everything from furniture to curb appeal!

    You know you don’t wanna miss any of this crazy.

    Sign up to get my posts delivered to your inbox here. 

    Stalk Me Here:

    Pinterest / Facebook / Twitter / Instagram

    SaveSave

  • DIY Bamboo Mirror {Trash to Treasure}

    I have a confession to make.

    A couple months ago, I had this huge DIY fail.

    But don’t we all? You see, I had seen this bamboo table and I just thought for sure I could make it myself.

    I was wrong.

    So wrong.

    I made it, but stable, it was not.

    Ok, not only was it not stable, but it doesn’t even really stand on its own unless you position it just correctly.

    Just correctly to where it is supported by the wall.

    Heaven help.

    I can do a furniture makeover like nobody’s business. Build furniture, I cannot.

    Even though the bamboo table was an utter and complete failure, I kept the bamboo from the legs. I love bamboo and thought maybe I could salvage something out of my failure.

    And I did with this DIY bamboo mirror.

    DIY Bamboo Mirror {rainonatinroof.com} #trashtotreasure #bamboo #mirror

    This post contains affiliate links for your shopping convenience. Click here to read my full disclosure policy.

    Here’s how I did it:

    First, I picked up this square beveled mirror at Michael’s. It is $4.99 at regular price, but I used a 40% off coupon, so you can figure out how much it was, because math is not my thing.

    DIY Bamboo Mirror {rainonatinroof.com} #trashtotreasure #bamboo #mirrorI have to entertain myself in some way, people.

    Next, I got out my leftover bamboo sticks.

    DIY Bamboo Mirror {rainonatinroof.com} #trashtotreasure #bamboo #mirrorOf course, this bamboo came from the failed table, but originally I bought the bamboo at Pier One on clearance for $5. Not bad for three big sticks of bamboo. I cut two pieces to go across the top and bottom of the mirror, a little longer than the mirror.

    DIY Bamboo Mirror {rainonatinroof.com} #trashtotreasure #bamboo #mirrorNext, I measured the sides of the mirror and cut bamboo pieces to fit on the sides between the top and bottom pieces.

    DIY Bamboo Mirror {rainonatinroof.com} #trashtotreasure #bamboo #mirrorI also cut four small pieces to extend on each corner, then spray painted all the pieces green.

    Because I love kelly green.

    DIY Bamboo Mirror {rainonatinroof.com} #trashtotreasure #bamboo #mirrorOnce the pieces were dry, I used Gorilla Glue brand epoxy (affiliate link) to adhere the bamboo pieces to the mirror.

    DIY Bamboo Mirror {rainonatinroof.com} #trashtotreasure #bamboo #mirrorI started with the top and bottom pieces.

    DIY Bamboo Mirror {rainonatinroof.com} #trashtotreasure #bamboo #mirrorAfter mixing the epoxy, I used that small sliver of a wood shim to smear the epoxy on the top and bottom bevels, and then on the sides. I used hot glue to adhere the small corner pieces.

    DIY Bamboo Mirror {rainonatinroof.com} #trashtotreasure #bamboo #mirrorKelly green and bamboo are two of my favorite things.

    DIY Bamboo Mirror {rainonatinroof.com} #trashtotreasure #bamboo #mirror

    I am so in love with this mirror’s goodness.

    DIY Bamboo Mirror {rainonatinroof.com} #trashtotreasure #bamboo #mirrorAnd no, I’m not leaving it just propped against pillows on my entry bench.

    The kid would have this bad boy broken and skinning a squirrel with the pieces in five minutes flat.

    I adhered a hanging bracket to the back of the mirror with the epoxy and popped it on a nail in my entry way. DIY Bamboo Mirror {rainonatinroof.com} #trashtotreasure #bamboo #mirrorHowever, I was lazy and just popped it on a nail that was already in the wall, so I have to move it and even it up some.

    It may even end up on my gallery wall at some point. I’m just glad the failed table brought forth some good. haha.

    DIY Bamboo Mirror {rainonatinroof.com} #trashtotreasure #bamboo #mirror

    Like what you see?

    Follow along:
    Trash to Treasure Series with Thistlewood Farms, Rain on a Tin Roof, So Much Better with Age and AKA DesignDon’t miss the rest of the Trash to Treasure goodness!
    French Finish Mirror from AKA Design
    be-thankful-wreath-project
    Be Thankful Wreath from Thistlewood Farms
    crate-thumbnail
    Kitchen Crate from So Much Better With Age

    SaveSave

  • How to Paint a Refrigerator (It’s actually easy!)

    How to Paint a Refrigerator (It’s actually easy!)

    So, can you paint a refrigerator? The answer is a big YES! When you don’t have the budget to upgrade that dated fridge, just give a good ol’ DIY paint job. Find out how to paint a refrigerator below – it’s actually not that hard at all!
     
    Hi! My name is Madalyn and I nest over at Home Hearted where I share my latest crafting, homemaking and diy projects. My husband and I just bought our first house and since it took most of our resources to get it I have been trying to do what I can to restore and utilize what we already have. First on my list was to take our rusty old refrigerator that we inherited from our rental house and make it into something a little more pretty.
     
    I had grand ideas, but my dad who is a painter talked me out of them and into restoring my fridge to its former glory, a simple white. And to compromise on the chalkboard he suggested I paint a large magnet in chalkboard paint and put it on the fridge.
     
    How to Paint a Refrigerator Easily

    DIY Refrigerator Paint Job

    This post contains affiliate links for your shopping convenience. Click here to read my full disclosure policy.
     
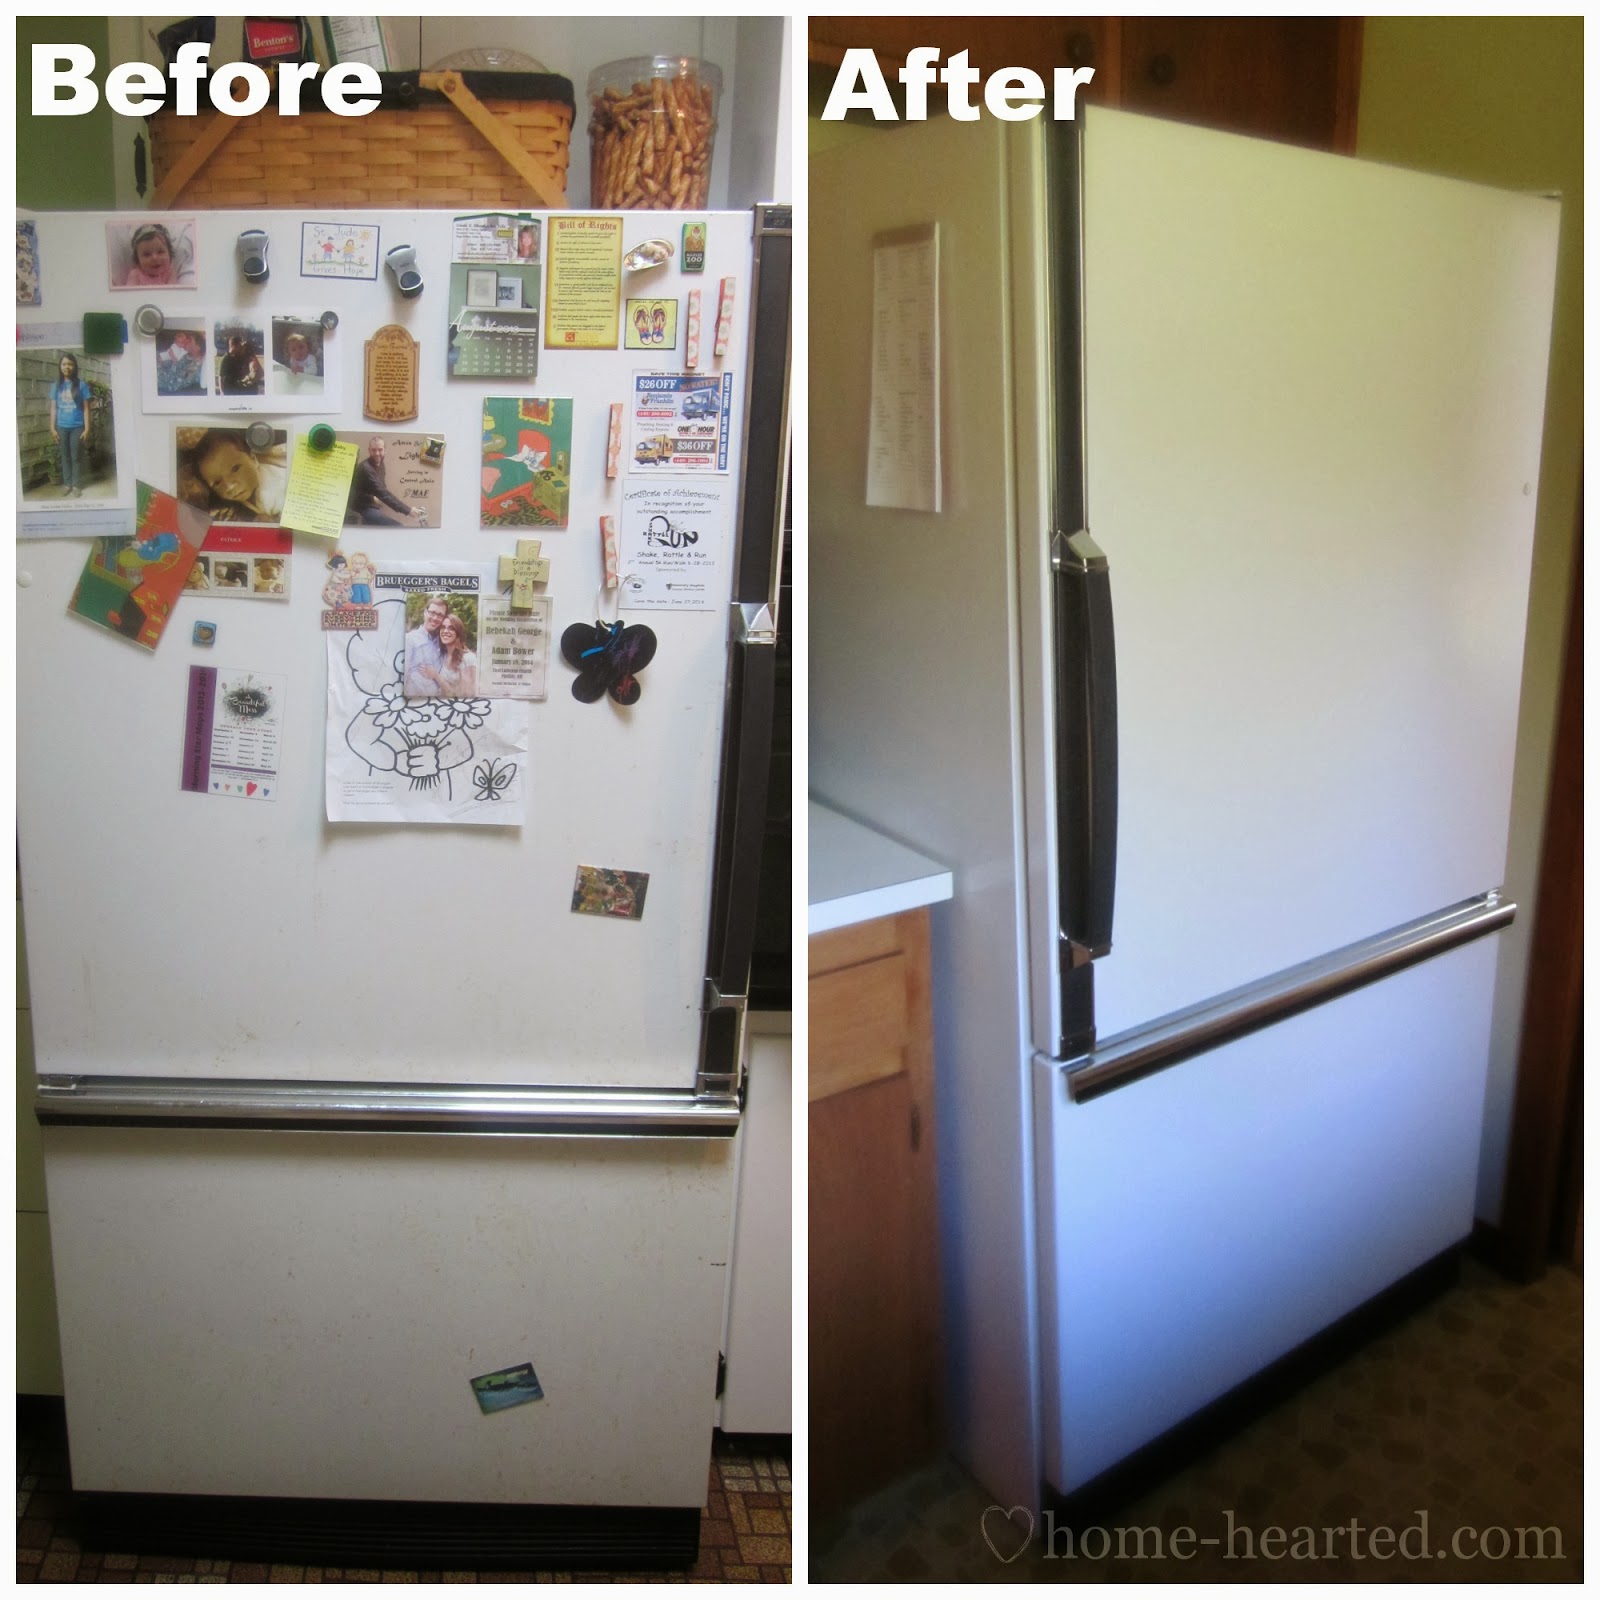
    Let’s start out with a good before and after shot, shall we?
     
    Can You Paint a Refrigerator
     
    As you can see, we also switched the door handle to function better in our new kitchen. The above picture doesn’t do the before any justice. It was so rusted and gross as you can clearly see in these pictures below.
     
    Refrigerator Paint DIY
     
    This refrigerator was obviously in need of some major loving!
     
    Materials and Supplies Needed:
    Steps
     
    Step 1
     
    If you have rusted areas on your refrigerator, you’ll want to take care of those first.
     
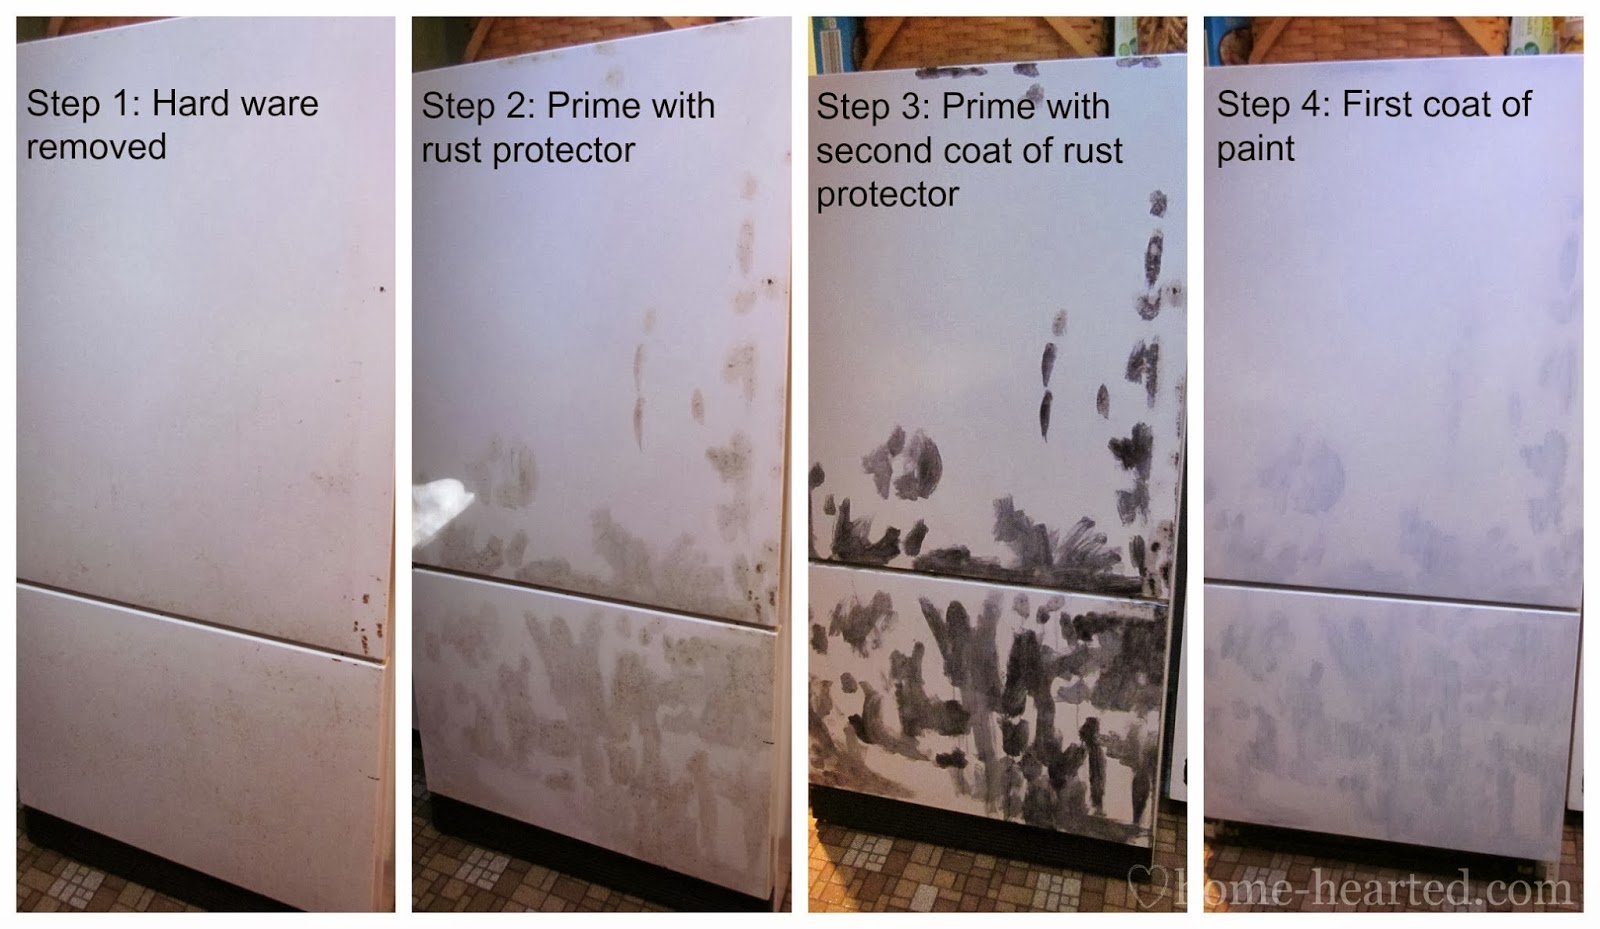
    Start by lightly sanding the rusted areas, wiping them clean with a tack cloth and then applying two coats of Loctite Extend Rust Neutralizer. See image below for step-by-step shots.
     
    Step 2
     
    After the rust neutralizer is completely dry, apply Rust-Oleum’s Protective Enamel in Gloss White or another appliance paint color of your choice.
     
    Because the rust was so bad on the front of my fridge and thus where I applied the rust treatment, I had to apply two coats of the paint here. The rest of the fridge was fine with a light sanding and one coat of paint. Remember to always wipe the entire surface clean with a tack cloth after sanding to get a smooth finish in the end.
     
    I used a small roller for most all of the painting. I used a small artists paint brush for one tiny area that I couldn’t get to with the roller. 
     
    How to Paint a Fridge
     
    Step 3
     
    To top off this little home improvement project, I also spray painted the bottom vent on the refrigerator a nice black. That really cleaned things up and adds to the “brand new” look.
     
    Can You Paint a Fridge
     
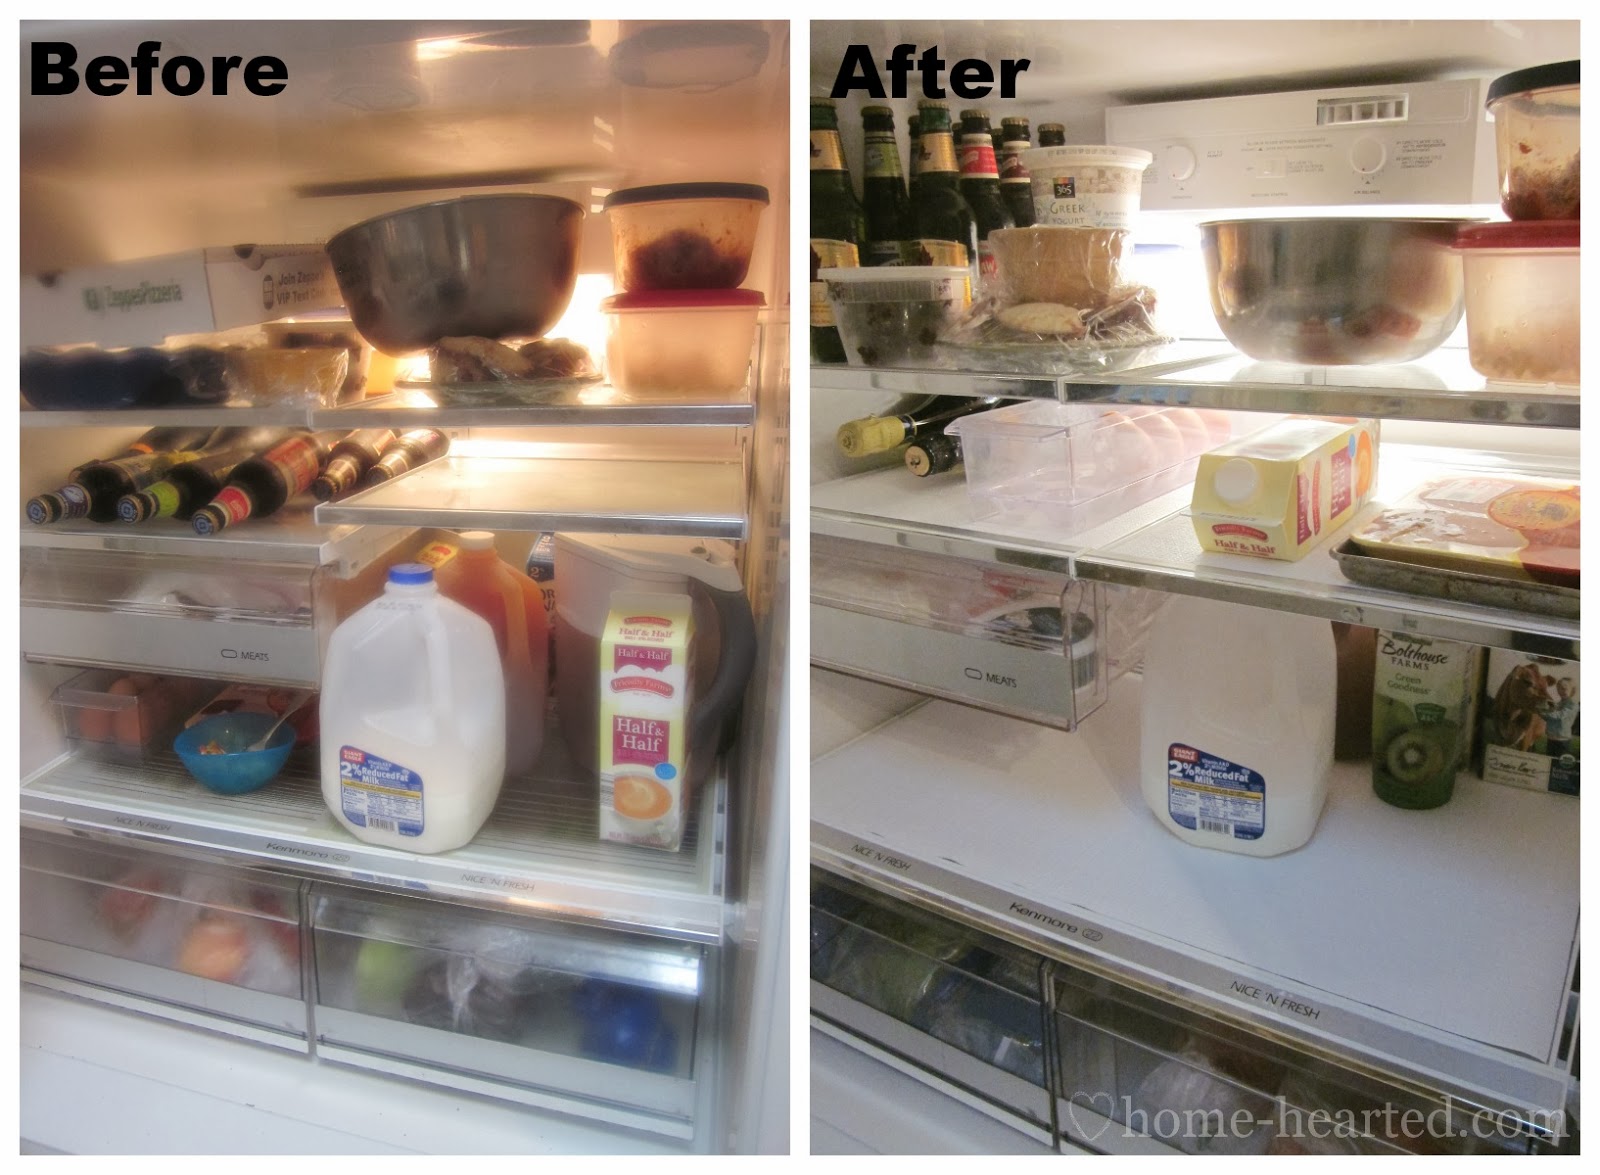
    While I was at it I also took the time to clean up the inside of the refrigerator as the etched glass had received a stain at some point. I love the liner, it keeps things very simple as you can just pull it out and wash it, keeps things cleaner and easier!
    DIY Painting a Refrigerator
    DIY Refrigerator Painting
     
    When all was said and done I spent a total of $36.83 which includes the magnet, fabric rollers, paint and spray paint.
     
    I hope you enjoyed this post and if you have any questions about painting a refrigerator, please leave a comment!
     
    Need more DIY kitchen project ideas?
     
    See how I made my laminate countertops look like stone here!
     
    Need DIY kitchen island ideas? See these!
     
    Want more countertop makeover ideas? There are nine here!
     
    And finally, get 10+ ideas for decorating, organizing and storage in your kitchen here!
     
    Want to come back to this post later? Just pin the picture below! 
    DIY Refrigerator Paint Job

    Sign up to get my posts delivered to your inbox here. 

    Stalk Me Here:

    Pinterest / Facebook / Twitter / Instagram

     
  • Simple Fall Decorating Ideas

    If you remember my post from last Saturday, I told you about the modern and fresh fall tours I am participating in this month.

    When I think modern and fresh, I think simple.

    Fall Home Tour {rainonatinroof.com} #fall #tour

    And if there is one thing I am all about it is simple seasonal decorating.

    (more…)

  • My Fright-Tastic Halloween Home Tour

    My Fright-Tastic Halloween Home Tour

    If you’ve read my fall decor posts, you know I’m a Halloween girl.

    I love it.

    I live for it.

    Well, I live for it and cheap beer.

    Oh, yea, and Grunt Labor and the kid.

    This post contains affiliate links for your shopping convenience. Click here to read my full disclosure policy.

    I believe it started early on with my love for ghosts and scary movies. I’ve spent a ridiculous amount of time in my life reading about ghosts and witches and such. I’ll blame it on Mrs. Maxwell, my elementary school librarian who read us a story about the Bell Witch.

    I’ve been hooked ever since.

    It could also be due to staying up late as a nine year old entranced by Freddy Krueger on USA’s Up All Night show with that Gilbert Gottfried guy.

    I’m warped.

    And I fully embrace it.

    Let us begin now.

    One, two, Freddy’s coming for you…

    halloween home tour

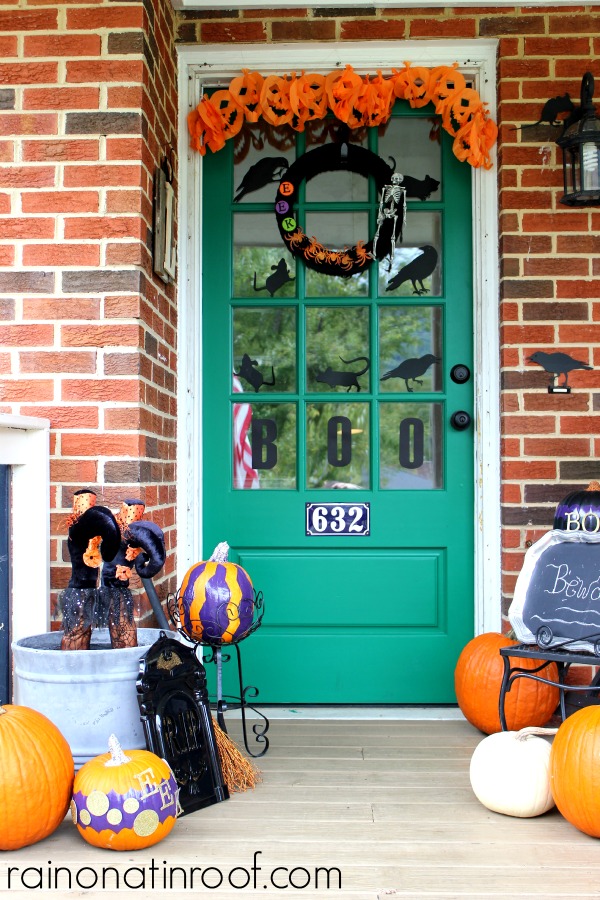
    I didn’t realize how many Halloween decorations I had on my front porch until I started photographing it.

    Fright-Tastic Halloween Home Tour {rainonatinroof.com} #halloween #hometour #diy

    I created a “witch’s grave” with an upcycled tombstone from the Dollar Tree and by sticking her feet upside down in the flower pot.

    Fright-Tastic Halloween Home Tour {rainonatinroof.com} #halloween #hometour #diy For the gravestone, I just spray painted it black and stuck gold glittery cardstock, left over from my DIY cheers banner, behind the letters to make them pop.

    Fright-Tastic Halloween Home Tour {rainonatinroof.com} #halloween #hometour #diyThe “feet” are actually two chair leg covers I purchased at Pier 1 Imports a few years back. They are designed to go around table legs or chair legs to look like a witch is sitting there, but I like them better sticking straight up on my porch.

    The “EEK” pumpkin’s scallop design was used with Shape Tape. See how I made it here.

    Beside the grave is the witch’s broom and my chevron pumpkin.

    Fright-Tastic Halloween Home Tour {rainonatinroof.com} #halloween #hometour #diy

    I found the broom at World Market a few years ago as well. I made the chevron pumpkin when I made the chevron witch’s hat. They were both so easy!

    On the other side of the door is my BOO scalloped pumpkin, as well as a skeleton entombed in a lantern. The glitter on the pumpkins stems came from Meyers-Imports. They are a glitter mecca!

    Fright-Tastic Halloween Home Tour {rainonatinroof.com} #halloween #hometour #diy

    Watch out, he may be waiting for you…

    Fright-Tastic Halloween Home Tour {rainonatinroof.com} #halloween #hometour #diyA little closer….

    Fright-Tastic Halloween Home Tour {rainonatinroof.com} #halloween #hometour #diyThe pumpkin was a find at Kirkland’s on clearance after Halloween. That’s when I make a lot of seasonal decorating purchases. You can save tons of money and if you’re like me, when you open up your Halloween stuff the next year, its a big surprise because you forgot about what you bought!

    The skeleton is from the Dollar Tree. He came in a wierd greenish glowy shade when I got him, so I gave him a coat of white spray paint to make him more skeleton-y.

    I don’t know that there is any room left to decorate on my front door.

    Fright-Tastic Halloween Home Tour {rainonatinroof.com} #halloween #hometour #diyI cut out the “BOO” on my Silhouette.

    The orange pumpkin garland came from a local store, Chrysalis, a couple years ago. It has a fun vintage feel.

    I made the wreath last year from yarn, a skeleton from an old wreath, and other Halloween decor I found at Hobby Lobby.

    Fright-Tastic Halloween Home Tour {rainonatinroof.com} #halloween #hometour #diy

    Fright-Tastic Halloween Home Tour {rainonatinroof.com} #halloween #hometour #diyHere’s hoping the front porch creeps some trick or treaters out this year…

    Shall we continue this fright-tastic Halloween tour inside, now?

    Proceed at your own risk >>>

    Like what you see?

    Follow along:

    Pinterest / Facebook / Twitter 

    SaveSave

  • Scalloped Pumpkins

    Scalloped Pumpkins

    I’ve ranted and raved over Frogtape®’s new chevron Shape Tape™. In fact, you may be sick of me going on and on about it and may be sick of seeing my ridiculously easy chevron tray and chevron witch hat.

    But, now, I’m going to blow your mind with Shape Tape™ again.

    Friends, let me introduce you to Frogtape® Scallop Shape Tape™.

    This is a sponsored post written by me on behalf of FrogTape. All opinions are 100% mine. This post contains affiliate links for your shopping convenience. Click here to read my full disclosure policy.

    Scalloped Pumpkins {rainonatinroof.com} #frogtape #shapetape #halloween #pumpkin

    I’ll give you a second to collect yourselves.

    Yep, not only is there chevron Shape Tape™, but there is also a scallop pattern, which is what I used to make these fabulous scalloped pumpkins.

    Making these was, just like my chevron tray and witch’s hat, ridiculously simple.

    I started out with the tape and two pumpkins.

    Scalloped Pumpkins {rainonatinroof.com} #pumpkin #halloween #frogtape #shapetape #scallop

    One pumpkin is real and one is a faux one I picked up at a local craft store. We’ll start with the faux black one.

    First, I put a band of Shape Tape™ around the middle of the pumpkin. Since this was a curved surface, you have to work in sections to keep it level, or from turning downward. After it was level, I pressed the tape down really well to remove any air bubbles.

    I repeated this with two more bands of tape along the top and bottom of the pumpkin. However, with these I left half of the tape (on the top, the half going toward the stem, and on the bottom the half going toward the bottom) open. I wanted to keep this part black, so I put plastic wrap over those portions, then pressed the tape down around the plastic wrap.

    Scalloped Pumpkins {rainonatinroof.com} #scallop #pumpkin #halloween #frogtape #shapetape

    With the real pumpkin, I put two bands of Shape Tape™ around the top and bottom, once more leaving half of it open where I could apply plastic wrap. I also turned this tape with the scallop points inward to change up the pattern a bit.

    Scalloped Pumpkins {rainonatinroof.com} #scallop #pumpkin #halloween #shapetape #frogtape

    After I put the plastic wrap around the top and bottom, I pressed the tape down well again to remove air bubbles and spray painted both pumpkins purple. Just like regular FrogTape®, ShapeTape™ has PaintBlock® Technology which means when it meets paint, it forms a gel barrier to prevent paint bleed.

    After spray painting the pumpkins, I removed the tape and plastic wrap. To snaz up the stems some, I added some glitter. I also added some gold embelishments to the pumpkins to “spook” them up a bit.

    Scalloped Pumpkins {rainonatinroof.com} #scallop #pumpkin #halloween #shapetape #frogtape

    Scalloped Pumpkins {rainonatinroof.com} #scallop #pumpkin #halloween #shapetape #frogtape

    These fabulous pumpkins were so easy to make and took less than an hour! An easy and stylish Halloween craft!

    Scalloped Pumpkins {rainonatinroof.com} #frogtape #shapetape #halloween #pumpkin

    Get more Halloween craft and DIY project ideas:

    Easy DIY Halloween Decorations – easy, but with big impact!

    Spooky Halloween Home Tour – we love Halloween and we do it up big around here!

    Glittery DIY Witch Brooms – using stuff from the Dollar Tree!

    DIY Skull Sconce – another one using items from The Dollar Tree!

  • Dollar Tree Skulls Upcycle

    Dollar Tree Skulls Upcycle

    Maybe last week, when I showed you the easy chevron witch’s hat, you noticed that fabulous skull it was sitting atop.

    Dollar Tree Skull Upcycle {rainonatinroof.com} #halloween #upcycle #skull

    This post contains affiliate links for your shopping convenience. Click here to read my full disclosure policy.

    That’s the skull.

    After my Dollar Tree pumpkins upcycle, I was hooked on some fall / Halloween upcycling.

    Enter this Dollar Tree skull upcycle.

    If you run out to your local Dollar Tree, you may find these skulls in this state:

    Dollar Tree Skull Upcycle {rainonatinroof.com} #halloween #upcycle #skullHe’s definitely not bad as is.

    He’s freaky looking.

    And freaky looking for Halloween is good.

    But, you guys know I love me some glitter and maybe even a little more freakishness than the average person.

    As Carrie Bradshaw would say, “Let your freak flag fly.”

    I’m beginning to think I should add “Sex and the City references” to my blog description. Hmmm…

    Anyway, to add more of those two things, glitter and freakishness, I gave him a good coat of this glossy black spray paint, and then used glue in his eye sockets to adhere some orange glitter.

    But that wasn’t good enough.

    I felt this skull needed to really be put on display. He wanted to be noticed.

    He didn’t just want his freak flag to fly, he wanted it to soar.

    I pulled out a couple of thrift store candlestick holders and spray painted them orange.

    Dollar Tree Skull Upcycle {rainonatinroof.com} #halloween #upcycle #skullJust like with the chevron witch’s hat, I threw some glitter on them while the paint was still wet.

    The candlestick holders took a full day to really dry. When they were dry, I added some hot glue around the top rims and stuck those skulls on there.

    Dollar Tree Skull Upcycle {rainonatinroof.com} #halloween #upcycle #skullThe disco ball skull, as I call him, is not a Dollar Tree upcycle. I bought him a few years back after Halloween when he was on clearance for a few bucks. I felt him and the other skulls could be great freakshows together.

    Dollar Tree Skull Upcycle {rainonatinroof.com} #halloween #upcycle #skull

    Dollar Tree Skull Upcycle {rainonatinroof.com} #halloween #upcycle #skull

    When Grunt Labor saw it, he said, “Whoa, those are freaky.”

    Mission accomplished.

    Looking for more Halloween goodness? See these:

    Glam and Spooky Halloween Home Tour – I love Halloween; this is how I do it!

    Double Double Toil and Trouble Printable Art – perfect for easy Halloween art!

    DIY Skull Candleholder – so easy and uses skulls from The Dollar Tree!

    Like what you see?

    Follow along:

    SaveSave

  • Metal Cabinet Makeover {Roadside Rescue}

    I’m sure you remember my sweet neighbor who gave me the fishy tray that I turned into a chevron masterpiece.

    Bless her. Just to summarize, she was moving in with her daughter and gave me multiple treasures including that tray, several mason jars, more furniture than my garage can hold and even more that I won’t go on and on about.

    Well, about two days before she moved, I came home after ice cream with Grunt Labor and the kid one evening to see this vintage metal cabinet and a metal cart on the roadside in front of her house. In all honestly, I had lusted after this cabinet since I saw it in her garage one afternoon. Now, this sweet lady had asked me if I wanted every single thing she was giving away before she gave it away, so, I thought that maybe someone was already coming to pick up that cabinet and cart. But, just in case it wasn’t earmarked for anyone, I ran over to her house and asked her if anyone was coming to pick it up.

    The sweet thing said no and that she was too embarrassed to even ask me if I wanted something so old and beat up like that cabinet.

    Bless her heart. Little did she know, I love beat up stuff.

    And a metal cabinet makeover was right up my alley.

    And even more, I seriously needed some storage in my craft room. Metal Cabinet Makeover {rainonatinroof.com} #metalcabinet #makeover #roadsiderescue

    Disclosure: This post is sponsored by Rust-Oleum, but y’all know how I roll, all opinions are 100% mine. This post contains affiliate links for your shopping convenience. Click here to read my full disclosure policy.

    Even though, this piece would be in my craft room where no one but really me, Grunt Labor and the kid would see it, I still wanted it to be pretty and reflect me.

    And what best reflects me?

    Navy blue and kelly green.

    You knew it was coming. Just deal with it.

    First though, this cabinet was seriously gross.

    Metal Cabinet Makeover {rainonatinroof.com} #metalcabinet #makeover #roadsiderescue

    There was dirt.Metal Cabinet Makeover {rainonatinroof.com} #metalcabinet #makeover #roadsiderescueAnd there was rust.
    Metal Cabinet Makeover {rainonatinroof.com} #metalcabinet #makeover #roadsiderescueI started by just hosing the entire thing down and scrubbing it really well.

    I removed all the hardware, and then gave the entire piece, as well as the hardware, a good coat of gray primer to seal out the rust. Next, I took kelly green (ok, really its called meadow green) and went over the edges of the doors and drawer with it. I didn’t need to cover the entire thing with the green because part of it would have just gotten covered up by navy as you will see.

    Before taping up where I wanted to keep green, I gave the cabinet a full twenty-four hours to dry.

    After the 24 hours, I taped along the edges of the doors and drawer to kind of make the green a frame around the blue.

    Metal Cabinet Makeover {rainonatinroof.com} #metalcabinet #makeover #roadsiderescue

    Metal Cabinet Makeover {rainonatinroof.com} #metalcabinet #makeover #roadsiderescueI pulled out my deep blue spray paint and went to town.

    Metal Cabinet Makeover {rainonatinroof.com} #metalcabinet #makeover #roadsiderescueI used my comfort grip spray paint holder for all the painting. It makes spray painting so much easier. No more tired and sore fingers! It just clips right onto the can and you can get to work!

    So that I didn’t peel any of the blue paint off after it had dried, I pulled all the tape off the cabinet while the blue spray paint was still wet.

    Finally, I topped it all off with a couple gloss topcoats.

    It all resulted in amazing storage for my craft room.

    Metal Cabinet Makeover {rainonatinroof.com} #metalcabinet #makeover #roadsiderescueI know these photos are not the best, but my craft room is in my basement, so great lighting there is a luxury we don’t have.

    I went for gold on the handles. Initially, I tried a yellow color, but it just took away from the blue and green too much.

    Metal Cabinet Makeover {rainonatinroof.com} #metalcabinet #makeover #roadsiderescueMy craft table is now actually a table and doesn’t have to hold all my supplies. They are stylishly hidden away in my roadside rescue.

    Wait, does it still count as a roadside rescue if it was just next door?

    Need more furniture makeover inspiration? See my entire gallery of just that right here!

    You know you don’t wanna miss any of this crazy.

    Sign up to get my posts delivered to your inbox here. 

    Stalk Me Here:

    Pinterest / Facebook / Twitter / Instagram

    SaveSaveSaveSaveSaveSaveSaveSaveSaveSaveSaveSaveSaveSaveSaveSave

  • Simple Chevron Witch Hat and Pumpkin

    Simple Chevron Witch Hat and Pumpkin

    Remember that fabulous navy and white chevron tray I made?

    I knew you would.

    It was just so simple and fabulous that I couldn’t keep myself from putting some chevron love into my Halloween decor.

    Chevron Witch Hat & Pumpkin {rainonatinroof.com} #frogtape #chevron #witchYep, I made a chevron witch hat with my beloved FrogTape Chevron Shape Tape.

    Disclosure: This post is sponsored by FrogTape, but y’all know how I roll, all opinions are 100% mine. This post contains affiliate links for your shopping convenience. Click here to read my full disclosure policy.

    Just like my chevron tray, this was so simple! I started with this cardboard witch’s hat I picked up at a local craft store for a few bucks.

    Chevron Witch Hat & Pumpkin {rainonatinroof.com} #frogtape #chevron #witchIt was screaming for chevron and glitter, don’t you think?

    Before putting on any shape tape, I spray painted the entire hat glossy black, then pulled out my chevron shape tape and got to work.

    Chevron Witch Hat & Pumpkin {rainonatinroof.com} #frogtape #chevron #witch

    Chevron Witch Hat & Pumpkin {rainonatinroof.com} #frogtape #chevron #witchTo get the round, contoured cut on the tape where the cone meets the hat brim, I cut lightly with an X-Acto blade. And just like with my chevron tray, I used a small piece of the tape to measure the distance between where I applied the tape. After all the tape was where I wanted it, I made sure to press it down hard and remove any air bubbles, so there was a secure seal. Shape Tape is just like regular FrogTape, it has the PaintBlock® Technology that forms a barrier to keep the paint from bleeding!

    This is what I came up with:

    Chevron Witch Hat & Pumpkin {rainonatinroof.com} #frogtape #chevron #witchI apologize for the blurriness, but you get the idea.

    I took it out to the garage and gave it coat of orange spray paint. Right after I gave it a coat of spray paint, I threw some orange glitter (throw some glitter, make it rain!) on it, to accentuate that fabulous chevron effect.

    Chevron Witch Hat & Pumpkin {rainonatinroof.com} #frogtape #chevron #witchSo now my garage floor sports not only green, navy, white and orange colors, but glitter as well.

    I let it sit for 5 minutes or so and then pulled off the tape.

    The base looked fabulous, however, I didn’t like how I had positioned the shape tape on the cone, so I taped off the base and sprayed the entire cone orange and added glitter to it.

    And then, I had this fabulous end result:

    Chevron Witch Hat & Pumpkin {rainonatinroof.com} #frogtape #chevron #witchGrunt Labor came home and asked if I had really made that.

    Oh, ye, of little faith. He was pretty impressed. I don’t know if he has figured out about the shape tape yet and just how easy that makes projects. Maybe I won’t tell him just yet….It’s good to be queen.

    Chevron Witch Hat & Pumpkin {rainonatinroof.com} #frogtape #chevron #witchThe hat is the perfect topper to my upcycled skull, which I’ll be telling you about next week.

    And because I love me some chevron so much, I just had to do a chevron pumpkin:

    Chevron Witch Hat & Pumpkin {rainonatinroof.com} #frogtape #chevron #witchBeware, I still have some chevron shape tape left, there may be more chevron-ness in the future!

    Watch out, world.

    Need more Halloween decorating ideas?

    Easy DIY Halloween Decorations – a roundup of some of my favorite Halloween decor!

    Glittery DIY Witch Brooms – to make these, all you’ll need is something from your yard and a few things from The Dollar Tree!

    Free Printable Spell Book Cover and Potion Labels – Turn any book into a spell book!

    DIY Skull Drink Stirrers – these will take all of five minutes to make and are perfect for parties!

    You know you don’t wanna miss any of this crazy.

    Sign up to get my posts delivered to your inbox here. 

    Stalk Me Here:

    Pinterest / Facebook / Twitter / Instagram

    SaveSave

  • Black and Gold French Desk Makeover

    Black and Gold French Desk Makeover

    Remember that fabulous french country chair that got a simple makeover last month?

    This desk was its mate.

    Black and Gold French Desk Makeover {rainonatinroof.com} #makeover #homeright #french

    Disclosure: This is a sponsored post by HomeRight. But, y’all know how I roll, all opinions are 100% mine. This post contains affiliate links for your shopping convenience. Click here to read my full disclosure policy.

    Yep, I’m fully aware they do not match one another.
    From the time I got both pieces, I knew they wouldn’t stay together. No matter how badly I wanted to keep both. I kept the chair and planned on selling the desk.

    If you remember, both pieces had came from a yard sale. A dear friend found them for me. Here’s how this French desk makeover started out:

    Black and Gold French Desk Makeover {rainonatinroof.com} #makeover #homeright #french

    Black and Gold French Desk Makeover {rainonatinroof.com} #makeover #homeright #frenchThe desk was solid. It was just covered in some sort of sticky substance and a gross amount of cat hair.

    Eww.

    The inlay on top was pretty gross. There was no way that design would be staying.

    First, I gave the entire piece a coat of primer with my HomeRight FinishMax.

    Black and Gold French Desk Makeover {rainonatinroof.com} #makeover #homeright #frenchYes, I just referenced Carrie Bradshaw in that photo. If you know who/what she said it to, you are fabulous.

    Next, I pulled out the gold spray paint to define the top edge of the desk and add some interest. I just went right over the top edges with the spray paint. Once it was dry, I took plastic wrap and painters tape and wrapped up the top.Black and Gold French Desk Makeover {rainonatinroof.com} #makeover #homeright #frenchWhen the top was good and covered with plastic wrap, I loaded my FinishMax back up with black paint and went over the desk base and all the drawers. Then, I pulled off the plastic wrap and hand brushed and rolled the inlay black for some added contrast against the gold. Finally, the whole thing got a coat of polycrylic.

    A few readers have asked about how difficult it is to clean up the FinishMax sprayer. Trust me, I understand your concerns. If you remember from my toy chest makeover, I told you I had tried out two other sprayers that I detested before I found my FinishMax. Part of the detested-ness was the clean-up. Fortunately, this sprayer takes less than 10 minutes to clean up and is super easy. So easy, I made you a little graphic to show you how.

    Black and Gold French Desk Makeover {rainonatinroof.com} #makeover #homeright #frenchGo here to get the simple instructions and photos for cleaning the Finish Max.

    And now for the final reveal of the desk:

    Black and Gold French Desk Makeover {rainonatinroof.com} #makeover #homeright #french

    Black and Gold French Desk Makeover {rainonatinroof.com} #makeover #homeright #french

    Black and Gold French Desk Makeover {rainonatinroof.com} #makeover #homeright #french

    Black and Gold French Desk Makeover {rainonatinroof.com} #makeover #homeright #frenchThe classic contrast of the black and gold turned out better than I ever could have expected. The finish was professional and perfect, thanks to the FinishMax.

    Liked this one? You might want to check these out too…

    DIY Chippendale Desk  – a gorgeous DIY desk that isn’t that hard at all to build!

    How I Built a Desk from an Old Kitchen Table – it might be narrow, but it packs the storage!

    And you can see all my Furniture Makeovers Here.

    Sign up to get my posts delivered to your inbox here. 

    You know you don’t wanna miss any of this crazy.

    Stalk Me Here:

    Pinterest / Facebook / Twitter / Instagram

    SaveSave

  • Fall Home Tour

    Fall Home Tour

    Every once in a while I surprise myself.

    If you read my DIY fall decor posts last month, you may recall that I’m not much of a fall decorator.

    But, I do love my Halloween decorating.

    So, when I was asked to be part of the Falliday Tour of Homes, I was a little intimidated. But, I said yes. And instead of stressing out over elaborate fall decor, I went for simple touches and shopped my home for decor.

    Fall Home Tour {rainonatinroof.com} #fall #tour (more…)

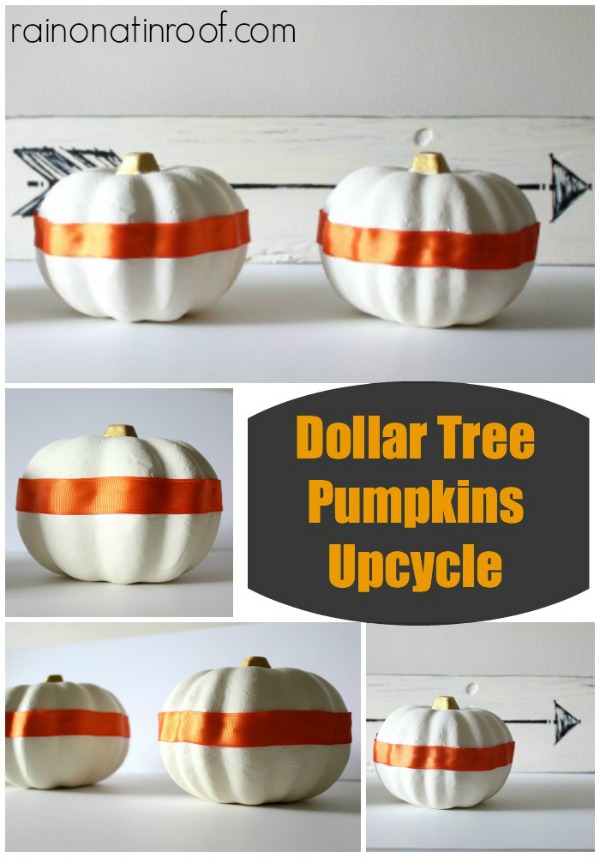
  • Dollar Tree Pumpkins Upcycle

    Dollar Tree Pumpkins Upcycle

    This could be it.

    This could be the last fall DIY decor project.

    Until next year.

    I’m just itchin’ to move along to Halloween.

    Dollar Tree Pumpkins Upcycle {rainonatinroof.com} #upcycle #dollartree #pumpkins (more…)

  • 10 Navy Projects and Ideas

    10 Navy Projects and Ideas

    Maybe you have figured it out by now.

    Maybe it was the barstools, or the chevron tray, or the new buffet.

    You have most likely figured out, that I love navy.

    Its classic and can work with most any color. My favorite navy combination being navy and kelly green.

    Here are some of my favorite navy projects and ideas.

    10 Navy Projects and Ideas {rainonatinroof.com}  #navy #diy

    (more…)

  • Dresser turned Stylish Buffet

    Dresser turned Stylish Buffet

    I’ve been keeping a secret.

    I know, its not nice to keep secrets.

    Please forgive me.

    I’ve been doing a mini-makeover on my dining room.

    You may not even recognize it, since the last time you saw it was on my home tour.

    It all started when I found this dresser at a yard sale for $10.

    Dresser Makeover | Dresser Makeover DIY | Dresser Redo | DIY Dresser Makeover | Painted Dresser Ideas | Painted Dresser DIY

    This post contains affiliate links for your shopping convenience. Click here to read my full disclosure policy.

    Yep, the dresser was only $10.

    Dresser turned Buffet {rainonatinroof.com} #furnituremakeover #diyGrunt Labor says it was only $10 because they didn’t want to carry it back inside their house. He may be right. This thing was so heavy. And I have lifted a lot of furniture in my time.

    But, when I saw the $10 dresser, I knew there was a buffet in my future. Come hell or high water.

    So, I had my electrician move my chandy so I could scoot the dining room table over.

    All in the name of a buffet.

    And now back to the $10 dresser.

    It doesn’t look bad from afar, but upon further inspection, one can see that the paint job was horrendous. They had just painted right over the handles while still attached to the drawers, therefore, causing runs in the paint and making my job harder.

    But, I persevered and after I had done enough sanding to my satisfaction (which really means, I gave up), I sprayed the entire thing down with Zinnser primer in my HomeRight Finish Max Paint Sprayer.

    Dresser turned Buffet {rainonatinroof.com} #furnituremakeover #diy

    Dresser turned Buffet {rainonatinroof.com} #furnituremakeover #diyWhy, yes, my garage floor is multi-colored. Its the new look, don’t you think?

    Or maybe I just paint too much.

    After the primer dried, I painted the base and drawers navy, once more with my paint sprayer and let it dry.

    After the navy was good and dry, I took a can of Rust-Oleum Metallic Gold Spray Paint and sprayed the top edge and bottom lip of the buffet body as well as the inside trim of drawers.

    Dresser turned Buffet {rainonatinroof.com} #furnituremakeover #diy

    Dresser turned Buffet {rainonatinroof.com} #furnituremakeover #diyI know, you are wondering why I went and messed up my beautiful navy paint job. Well, this was the easiest and most efficient way I could come up with to get this piece how I wanted it to look. I didn’t want to use a paint brush to paint all those nooks and crannies with the gold, but there isn’t a good metallic paint I can use in my sprayer, so I stuck with the trusty gold spray paint.

    After the spray paint dried, I got back out my blue paint and touched up any places where the gold was that I didn’t want it to be.

    You are thinking this took me forever.

    I thought it would take forever as well.

    We are both wrong. I figured out a trick.

    With the navy, as long as I painted into the outer crevice of the molding, it was pretty easy and quick. This is what I mean:

    Dresser turned Buffet {rainonatinroof.com} #furnituremakeover #diyYou can’t really see inside the crevice, so wrong paint colors there wasn’t an issue.

    After all the navy was dried, I went back with a creamy white along the insides of the drawer fronts and all the old hardware got a coat of gold spray paint. Finally, I finished it off with a coat of Polycrylic.

    Dresser turned Buffet {rainonatinroof.com} #furnituremakeover #diy

    Dresser turned Buffet {rainonatinroof.com} #furnituremakeover #diy

    Dresser turned Buffet {rainonatinroof.com} #furnituremakeover #diyHello ridiculous amounts of extra storage!

    Here’s a little look at what else I’ve been doing in the dining room. The dining room wall has got a makeover since my home tour.

    Dresser turned Buffet {rainonatinroof.com} #furnituremakeover #diyI’ll be showing you how I made that tassel garland and the silhouettes soon!

    What do you think of the new look?

    Need more furniture makeover inspiration? 

    See how I made over a 70’s credenza here!

    And how I gave a dresser a pink and aged dark wax finish here!

    Need help learning to paint furniture? Look no further – here is the ultimate guide!

    And you can always see all my past furniture makeovers right here!

    Sign up to get my posts delivered to your inbox here. 

    You know you don’t wanna miss any of this crazy.

    Stalk Me Here:

    Pinterest / Facebook / Twitter / Instagram

    SaveSave

  • Top Furniture Makeovers at Rain on a Tin Roof

    Top Furniture Makeovers at Rain on a Tin Roof

    You guys know I love a good furniture makeover.

    There are furniture makeovers I’ve done that I haven’t even posted about.

    There is so much furniture waiting for a makeover in my garage, that I can’t park in there.

    And sometimes Grunt Labor can’t park in there either.

    And he does not like that.

    But, he grins and bears it.

    Here’s a re-cap of the top furniture makeovers here at Rain on a Tin Roof:

    Best Furniture Makeovers | Furniture Makeover DIY | Furniture Makeover Ideas | Furniture Makeover Before and After

    Top Furniture Makeovers {rainonatinroof.com} #makeover

     Toy Chest Makeover

    I was totally shocked at how much you guys liked this little toy chest! I thought it was cute, but you guys seemed to love it! Totally made my day!

    Top Furniture Makeovers {rainonatinroof.com} #makeover

    Restored Rocking Chair

    Same thing with this 100 year old rocking chair! Have you ever read why I paid someone $400 to help me save it?

    Top Furniture Makeovers {rainonatinroof.com} #makeover

    Ralph Lauren Inspired Barstools

    Ahhh, my barstools. They speak for themselves.

    Top Furniture Makeovers {rainonatinroof.com} #makeover

    Wrapping Paper Topped Table

    What does Jenna do when she can’t fix a tabletop? She puts wrapping paper on it!

    Top Furniture Makeovers {rainonatinroof.com} #makeover

    Burlap Entry Bench from Chairs

    Cut the backs off chairs and create stools – put two together to form a bench!

    Top Furniture Makeovers {rainonatinroof.com} #makeover

    Wrapping Paper Lined Cabinet

    The $0.50 liquor cabinet makeover. Priceless.

    It was once my great-grandmother’s china cabinet. And I turned it into a liquor cabinet. That too, is priceless.

    Top Furniture Makeovers {rainonatinroof.com} #makeover

    French Country Dresser Makeover

    Such a beauty…

    Top Furniture Makeovers {rainonatinroof.com} #makeover

    French Country Chair Makeover

    This chair turned out beautifully, thanks to a simple combination of white paint and green velvet upholstery.

    Top Furniture Makeovers {rainonatinroof.com} #makeover

     How to Upholster a Cane Chair

    The Jonathan Adler inspired cane chair.

    One word: LOVE.

    Like what you see?

    Follow along:
  • How I Find Money To Feed My Decorating Addiction…And Sometimes My Family

    How I Find Money To Feed My Decorating Addiction…And Sometimes My Family

    Sign up to get my posts delivered to your inbox here.

    I’ve been back and forth in my head as to whether or not to write this post. Some of this info may be nothing new to some of you, some of it may be really helpful. Take it or leave it. Either way, here it is.

    Decorating can be expensive. And I do it cheaper than most.

    Sometimes, DIY projects cost more money than I thought they would. Its still cheaper than paying someone else to do it or buying something new, but sometimes I just spend more money on it than I thought I would or I look back at what I spent and am like, “Wow, maybe I should have waited on that one.” Seriously, it seems like I can’t go to the Home Depot once a week without spending $75 on projects.

    That may not sound like a lot to you, but to this frugal gal, it is.

    And it adds up.

    I have learned to be resourceful and find money.

    You see, I go out to my backyard and start digging, hoping to find mason jars full of cash that someone before me forgot they had buried.

    Ok. I lied.

    I don’t do that, but I know of a place where that is rumored to be true.

    And no, I won’t tell you where.

    Here’s how I find money to pay for all my DIY projects.

    And occasionally to feed my family. I mean really, projects or my family eating?

    Its a clear decision.

    Projects!

    I’m joking.

    Money Saving Tips | Money Saving Ideas | Budget Ideas | Budget Ideas Saving Tips

    1. Sell items on Craigslist

    I keep Craigslist in business. Seriously. I sell anything that my family no longer uses on Craigslist. When the kid outgrows clothes, they go on Craigslist, when I get tired of those candles sconces, they go on Craigslist, when I switched out my living room chairs, they went on Craigslist. People on Craigslist probably know my phone number by heart now. Which is scary. Y’all if something happens to me, find out who viewed my Craigslist postings last.

    • Clean out your closets

    This may be a no-brainer to some folks, but go through your closets. Get rid of what you haven’t worn in a while. Go through your kids closet. If it doesn’t fit, don’t keep it! Group all the same sized items together and list them on Craigslist. I typically ask $1 – $3 per piece of clothing and give a discount if they buy it all. Usually, someone ends up buying it all. Its out of my way and its money in my pocket.

    • Get rid of decorative pieces as your style changes

    Once I get tired of decorative accessories, I first ask myself if I can make it over in some way that I would still like it. If the answer to that is no, then it goes on Craigslist. I always ask a little more than what I’m willing to take for it, because people will want to bargain with you.

    • Go through your garage and craft room

    If you are a DIY-er or crafter like me, you may have random things laying around that at one point, you thought you must have for a project, but now you don’t really need it or like it anymore. Maybe you are like me and have 15 bottles of old glass jugs that resemble moonshine bottles and you really don’t need all 15. Put them on Craigslist. Those jugs I thought no one would want, sold in a day.

    • Sell your old furniture as you buy new

    When I purchased my new Ikea wingback chairs you may have noticed in my home tour, I knew in order to pay for them, I would need to sell the chairs that were presently in my living room. I sold one to a friend and one on Craigslist. Selling the old chairs paid for more than half of my new chairs.

    • Be sure to renew your listings on Craigslist

    There are thousands of new posts on Craigslist every day. If you don’t renew your postings, they will get lost in oblivion. Once you post to Craigslist, go into your account and hit that renew button beside your listings every couple of days. This simply moves your post back to the top of the category you are selling in.

    2. Sell items on Local Facebook Yard Sale Groups

    Did you know that many areas have local yard sale groups on Facebook? Yep. I’m a member of four different yard sale groups in my area that have thousands of members. I post on there regularly. Those people know me well now too. To find the yard sale groups in your area, just do a search for them. Type in something like “Chicago yard sale” or be more specific and type in an area or suburb around you. You may have to hit the “Request to Join” button in the right corner of the page.

    • When you put an item on Craigslist, put it on your Facebook Yard Sale Groups as well

    A huge timesaver and great way to get your items out there in more than one place is by listing them on Craigslist as well as on Facebook. Every time you renew a listing on Craigslist, go to the Facebook yard sale groups and “bump” your items back to the top, by simply commenting on them. I usually just write “bump” as my comment or “Still available.”

    • Make sure you follow the rules of the Facebook groups

    Many groups will typically have rules that are pinned  to the top, they will usually tell you how many times you are allowed to bump a post or how to go about selling an item on there. Also, if you have your item listed in more than one group, list it as cross-posted, so others will know it is listed elsewhere as well.

    3. Yard Sales

    I keep an ongoing pile of items I no longer want. Some of the larger items or ones I think would sell on Craigslist or Facebook get listed there, but if they don’t sell, they stay in the pile until its time for the yearly shindig that we call a yard sale. And if they don’t sell at the yard sale, its off to Goodwill with them.

    How do you find money?

    Liked this one? See these too then!

    Three Things That Could Cut Your Electric Bill in Half – don’t miss these simple ideas to save you a little green!

    15 Days to a Clutter-Free Home & Some Extra Cash– declutter and make a little money in the process!

    pin-this-post

    Money Saving Tips | Money Saving Ideas | Budget Ideas | Budget Ideas Saving Tips

    You know you don’t wanna miss any of this crazy.

    Sign up to get my posts delivered to your inbox here.

    Stalk Me Here:

     Pinterest / Facebook / Twitter / Instagram

  • Glittery Fall Garland

    Glittery Fall Garland

    Want to add a touch of shimmer to your fall home decor? This glittery DIY fall garland should do just the trick! This fall craft is simple and to make and a great one to get the kids involved with too!

    This post is a total fail on my part.

    The project turned out fabulously.

    But, I took no pictures of how it came together.

    I thought I did.

    But, there was also a 15 month old running around with a can of spray paint in one hand and trying to pry the cap off with the other.

    She is most definitely my offspring.

    Maybe you understand why I have no pictures now?

    But, here it is anyway.

    A glittery fall garland for your fall decor.

    DIY Fall Garland (more…)

  • French Country Chair Makeover

    After using my HomeRight FinishMax Paint Sprayer to re-hab my daughter’s future toy chest, I was just itching to use it on something else too.
    French Country Chair Makeover {rainonatinroof.com} #frenchcountry #makeover

    This post contains affiliate links for your shopping convenience. Click here to read my full disclosure policy.

    This thing was a total game changer. Enter the French Country Chair makeover. Luckily, I had this old chair waiting on me in my basement.

    French Country Chair Makeover {rainonatinroof.com} #frenchcountry #makeoverA friend had picked up this chair, along with that desk beside it, for me at  a yard sale. The chair doesn’t look that bad in this image, but  a quick removal of that cat hair ridden cushion….

    French Country Chair Makeover {rainonatinroof.com} #frenchcountry #makeover

    Yep, the caning was shot. But before, I worried about that, I had to paint this bad boy.

    French Country Chair Makeover {rainonatinroof.com} #frenchcountry #makeover

    After removing the fabric on the arms, I got it all set up to spray. With as many curves, nooks, and crannies as this thing has, I was not going to hand brush it.

    I plugged in my HomeRight Finish Max Sprayer and got started.

    French Country Chair Makeover {rainonatinroof.com} #frenchcountry #makeover

    The fabulous thing about this paint sprayer is that it doesn’t require an air tank to run, you simply plug it in to an electrical outlet.

    After giving the chair a coat of primer, a couple coats of paint, (all of which I thinned with a little water), and topcoat of Polycrylic, I brought it in to start the job of re-upholstering it. Obviously, it needed a new seat bottom. I did not want to re-cane the chair and I didn’t want to just put wood strips there to hold a cushion in place, because I absolutley did not want to sew a cushion with that many curves. Grunt Labor decided he would just make a piece of wood to replace the broken cane in the shape of the seat. Bless his heart, he tried so hard, but just couldn’t get those curves right and the piece of wood just never would sit on there perfectly.

    After an evening of failed attempts that almost ended our marriage, I finally got a piece of wood cut that fit pretty well.

    French Country Chair Makeover {rainonatinroof.com} #frenchcountry #makeoverI laid it on my foam padding, and cut the foam out.

    French Country Chair Makeover {rainonatinroof.com} #frenchcountry #makeoverI covered that with batting to smooth any rough edges, and there were many. I finished the seat off with green velvet fabric and some decorative trim that I just hot-glued to the bottom.

    French Country Chair Makeover {rainonatinroof.com} #frenchcountry #makeoverFor the arms, I put a layer of batting, then the green fabric, stapled it down, and finally hot glued more of the trim around the edges to hide the staples.

    French Country Chair Makeover {rainonatinroof.com} #frenchcountry #makeoverSince the trim had that extra piece to glue around edges, I just cut it off close to the actual trim and hot-glued that side down.

    French Country Chair Makeover {rainonatinroof.com} #frenchcountry #makeoverAnd I love it.

    French Country Chair Makeover {rainonatinroof.com} #frenchcountry #makeoverI was worried I may have concentrated in some areas too much with the paint sprayer and caused some drips or runs.

    But there isn’t a drip or run in sight.

    French Country Chair Makeover {rainonatinroof.com} #frenchcountry #makeover

    Oh and no, nothing is wrong with the back.

    I just like that pillow.

    A lot.

    French Country Chair Makeover {rainonatinroof.com} #frenchcountry #makeover

    The finish is just flawless.

    French Country Chair Makeover {rainonatinroof.com} #frenchcountry #makeoverThank you, HomeRight for making my life so much easier.

    The sad part:

    The chair doesn’t work for the space I intended it for.

    Boo.

    But, I’m keeping it.

    I. Will. Find. A. Place.

    Oh, and by the way, cleaning the Finish Max is a breeze. It only takes 10 minutes!

    UPDATE: This French Country chair has gotten a new, modern makeover! See it here! 

    More Chair Makeovers & Upholstery Posts:

    How to Waterproof & Repel Stains on Fabric – trust me, you’re going to want to do this!

    Polka Dot Painted Chair Makeover – learn how to paint upholstery!

    How to Upholster a Cane Chair  – a vintage can chair gets a modern look!

    Upholstered Box Spring – a great way to cover your box spring without having to deal with a bedskirt!

    Sign up to get my posts delivered to your inbox here. 

    You know you don’t wanna miss any of this crazy.

    Stalk Me Here:

    Pinterest / Facebook / Twitter / Instagram

    SaveSave

  • Sassy Fabric Covered Message Board

    Trash is most definitely a relative word.

    I may or may not be the creepy lady stalking her neighbors as they take trash out to make sure they aren’t throwing something away I may want.

    A similar occurrence as mentioned above may or may not have happened just last night.

    And since I may or may not have a fondness for what others consider trash, I am stoked about this new series:

    Trash to Treasure Series {rainonatinroof.com}

    (more…)

  • DIY Fall Door Decor: My Take on the Fall Wreath

    DIY Fall Door Decor: My Take on the Fall Wreath

    I heart wreaths.

    I have a whole Pinterest board dedicated solely to wreaths.

    I still like my fall wreath from the last couple years. Although there was an unfortunate accident with it when the kid got a hold of it.

    But, this fall, I was feeling that a little something different was in order.

    Enter the Fall Rectangle Wreath.

    Fall Door Decor {rainonatinroof.com} #falldecor #wreath #fall

    (more…)

  • 13+ Fantastic Outdoor Projects that you can do!

    13+ Fantastic Outdoor Projects that you can do!

    As soon as spring hits the air, my head starts spinning with outdoor projects. I have this urge to be outside and soak up all that wonderful weather.

    Here are 13 fantastic outdoor projects  that anyone can do!

    Great DIY projects that are easy and affordable! 13+ Fantastic Outdoor Projects

    13+ Fantastic Outdoor Projects

    DIY Outdoor Daybed / Simple Build / Make it for $200 or less

    DIY Outdoor Daybed

    DIY Outdoor Sectional with Built-In Umbrella and Drink Coolers

    DIY Outdoor Sectional

    This is so cool - just add legs to an old barn door and you have an instant picnic table! How to Build a Picnic Table out of a Barn Door via RainonaTinRoof.com

    DIY Barn Door Picnic Table

    How to Clean Your Sidewalk via RainonaTinRoof.com #diy #ad

    How to Clean Your Sidewalk

    DIY Floating Curtain Panels via RainonaTinRoof.com #curtains #drapery #diy #fabric #ad #onlinefabricstore #porch

    DIY Floating Curtain Panels

    DIY Painted AstroTurf Rug Tutorial via RainonaTinRoof.com #diy #rug #homedecor #outdoordecor

    Painted AstroTurf Rug

    Painted Porch Floor via RainonaTinRoof.com #porch #summer #diy

    Painted Porch Floor

    Colorful Porch Makeover (because I like to drink cheap beer in colorful places) via RainonaTinRoof.com #porch #outdoors #porchdecor #diy #decorating

    Colorful Porch Makeover

    Rocking Chair Restoration {rainonatinroof.com} #rockingchair

    Restored Rocking Chair from Rain on a Tin Roof

    I spent $400 to restore that bad boy. It was worth every single last penny! Click over to find out why.

    How to Stain Wood the Easy Way {Lattice Refresh} via RainonaTinRoof.com #stain #wood #lattice #Thompsons

    Lattice Refresh in under an hour

    Staining Pressure Treated Wood via RainonaTinRoof.com #deck #staining #Thompsons

    Staining Pressure Treated Wood – No Waiting Required!

    7 Fantastic Outdoor Projects {rainonatinroof.com} #outdoor

    Simple Outdoor Pillows from Napkins from Southern Color

    From napkins?! Love those colors! I don’t think they could be more bright and cheery!

    7 Fantastic Outdoor Projects {rainonatinroof.com} #outdoor

    Potting Bench from Little Brags

    Grunt Labor totally needs one of those! He would love it.

    7 Fantastic Outdoor Projects {rainonatinroof.com} #outdoor

    Buxton Blue Door and Shutters from Finding Silver Pennies

    Such a beautiful, classic entry.

    7 Fantastic Outdoor Projects {rainonatinroof.com} #outdoor

    Outdoor Tea Cart Makeover from Pies and Puggles

    The yellow is so bright and cheery! Its just begging for a drink to be sat on it.

    7 Fantastic Outdoor Projects {rainonatinroof.com} #outdoor

    Pallet Swing from Twelve Oaks Manor

    I WANT one of these. So. Bad. How great would this be for warm summer evenings spent gazing at the stars?

    7 Fantastic Outdoor Projects {rainonatinroof.com} #outdoor

    DIY Painted Rug from At the Corner of Happy & Harried

    There is nothing like a great rug to greet guests and make them feel welcome!

    Do you have any outdoor projects you want to tackle? 

    Want a little more outdoor inspiration?

    10+ Creative Planter Ideas – some of these will blow your mind!

    10+ Fantastic Outdoor Projects – from easy furniture makeovers to swings made from pallets, it’s all here!

    9 Outdoor Living Spaces You’ll Never Want to Leave – get ready to be inspired!

    You know you don’t wanna miss any of this crazy.

    Sign up to get my posts delivered to your inbox here. 

    Stalk Me Here:

    Pinterest / Facebook / Twitter / Instagram

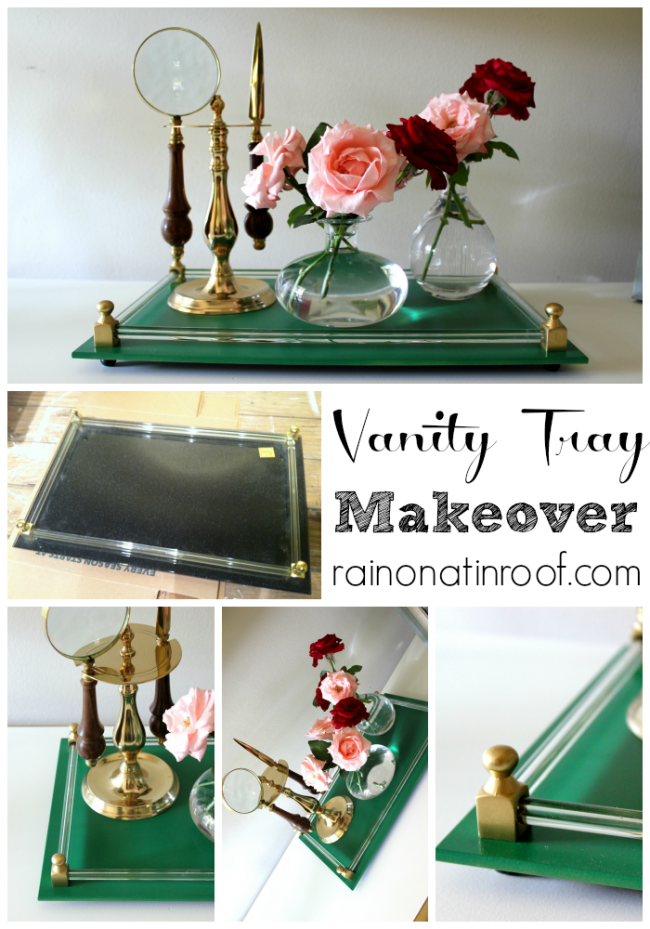
  • Glass Vanity Tray Makeover and Rules of Goodwill 1/2 off Day

    This tray is a living miracle.

    Really.

    Vanity Tray Makeover {rainonatinroof.com} #tray #makeover

    Ok. Maybe not living.

    But a miracle none the less.  (more…)

  • 8 Jonathan Adler Knock-Off Projects

    8 Jonathan Adler Knock-Off Projects

    I am so sad to see the Summer Soiree come to an end.

    But, I am so happy and grateful for all the amazing inspiration I have found through it!

    Here are 8 of my favorite Jonathan Adler Inspired Projects from our last soiree:

    Jonathan Adler Inspired Projects {rainonatinroof.com} #jonathanadler

    8 Jonathan Adler Inspired Projects

    The Jonathan Adler version will cost you $98. This version will cost you $10. Mohawk Lollipop Holder - A Jonathan Adler Knock-Off

    Jonathan Adler Mohawk Lollipop Holder Knock-Off

    Jonathan Adler Inspired Projects {rainonatinroof.com} #jonathanadler

    Jonathan Adler Silhouette Pillow from Effortless Style

    Jonathan Adler Inspired Projects {rainonatinroof.com} #jonathanadler

    Jonathan Adler Inspired Makeup Brushes from Our Fifth House

    Jonathan Adler Inspired Projects {rainonatinroof.com} #jonathanadler

    Ikea Lack Table Hack Jonathan Adler Style from Amy Krist Interiors

    Jonathan Adler Inspired Projects {rainonatinroof.com} #jonathanadler

    Jonathan Adler Stool Makeover from Fresh Idea Studio

    Jonathan Adler Inspired Projects {rainonatinroof.com} #jonathanadler

    Jonathan Adler Inspired Chair Makeover from Rain on a Tin Roof

    Jonathan Adler Inspired Projects {rainonatinroof.com} #jonathanadler

    Jonathan Adler Recovered Chair from Lucky Scarf

    Jonathan Adler Inspired Projects {rainonatinroof.com} #jonathanadler

    Jonathan Adler No Sew Curtains from Pies and Puggles

    Jonathan Adler Inspired Projects {rainonatinroof.com} #jonathanadler

    Jonathan Adler Knock-Off Monogram Pillow from Southern State of Mind

    Need a few more great designer inspired projects? Here ya go!

    You like Ralph Lauren style? See these projects then!

    Kate Spade girl? This way then!

    Love some bright Lilly Pulitzer style? Right this way!

    You know you don’t wanna miss any of this crazy.

    Sign up to get my posts delivered to your inbox here.

    Stalk Me Here:

    Pinterest / Facebook / Twitter / Instagram