Grunt Labor has lots of great project ideas.
Some of those ideas are born out of sheer creativity and genius.
Some of those ideas are born out of being annoyed by his wife’s ongoing accumulation of junk prized possessions.
This DIY picnic table made out of an old barn door was a combination of both Grunt Labor’s genius and annoyance.

Disclosure: This post is a collaboration with Thompson’s WaterSeal. However, all opinions and accumulation of junk is 100% mine. This post contains affiliate links for your shopping convenience. Click here to read my full disclosure policy.
How to Build a Picnic Table out of a Barn Door
After we got past a couple of hiccups with this project, the table is actually pretty easy to build. Of course, you can learn from our mistakes and it’ll be a breeze for you.
Also, if you don’t have a barn door lying around, you could make the base first and then add on some weathered pieces of wood or just 1x8s or 1x10s if you wanted to.
Tools & Materials Needed:
- Nail Gun or Drill
- Nails / Screws
- Old Barn Door
- Six pressure treated 2×6’s
- Scrub Brush
- Water Hose
- Paint Brush
- Garden Sprayer / Pump Sprayer / Spray Bottle or something to mix the cleaner in
- Thompson’s WaterSeal Oxy Foaming Action Cleaner
- Thompson’s WaterSeal Wood Stain Spray
- Thompson’s WaterSeal Advanced Clear Multi-Surface Waterproofer
Steps
Step 1:
Clean the barn door.
This barn door has made an appearance once more on this blog – when I used it as a backdrop for the kid’s 1st birthday party photo collage. Guess where its sat since then?
In the garage.
Collecting dust.
It was disgusting.
I wet both sides down with the water hose first, let it dry a little, then laid it down over two sawhorses. Next, I mixed up the Oxy Foaming Cleaner and sprayed it on one side of the door with a pump sprayer.

I let the cleaner sit on the door for about five minutes or so, then scrubbed it with a brush to really remove all that dirt. You could literally see the dirt coming off this thing. This is the same cleaner I used to get my sidewalk sparkling clean – and you remember how gross it was. After I scrubbed it good, I sprayed off the cleaner, then flipped the door and repeated it on the next side.
After you have cleaned both sides, prop the door upright and let it fully dry.
Step 2:
Cut the Wood.
Your 2×6’s will need to be cut down to the following sizes:
Two pieces should be cut down to 34 3/8″ long or the size of the top and bottom of your “Z” on the bottom of your barn door. No angles on either side of the wood, just straight cuts like the photo below shows.

Four pieces should be cut down to 48″ long, then miter them with a 45 degree angle on each end. However, you want your “long ends” on opposite sides, meaning the pieces should look the state of Tennessee when you have them cut correctly like the photo below.

Two more pieces should be cut down to 48″ long each then each should be angled at the ends with 45 degree angles to make them look like a trapezoid.
Step 3:
Nail on your base pieces.
Make sure your barn door is laying with the “Z” right side up. Apply glue to the ends of your “Z” on the door and then nail or screw down (we used our framing nailer for this project, just because it made it faster. You can totally use a drill though.) the straight 34 3/8″ long wood pieces.

Step 4:
Attach the legs.
Take the four pieces of wood that you cut to look like the state of Tennessee (don’t you love how technical I am?) and attach two on each side of your barn door. Simply nail / screw through the leg into the straight piece of wood that you just attached to the door as seen below.

This is where we ran into a bit of a snag. See how far out that leg is. That is what you are not supposed to do. When we turned our table right side up, we realized that and had to fix it. Move your legs right into the center of the door, with the tips of both pieces of wood touching as shown below. You will still attach them to the straight piece of wood that you first nailed to the door.

Step 5:
Attach the leg cross pieces.
You should have two long pieces of 2×6 left, the ones you cut to look like a trapezoid. Take those and nail them across your legs, making sure they are level before you nail them in.

Step 6:
Add a little extra support.
You probably don’t really have to do this step, but hey why not? You should have some scrap pieces of wood triangles lying around from where you cut the 2×6’s. Take a few of those and place them behind your legs at the top, where they meet the first piece of wood you secured to the door and nail them in as shown in the photo below.

It takes five minutes to do and doesn’t cost anything extra.
Step 7:
Trim your legs.
At this point, stand your picnic table up and see whether or not you like the height of your table legs. Test out the table with a chair. We wanted to shorten ours a bit, so Grunt Labor used a circular saw to trim them down some.

Step 8:
Stain the legs.
I wanted to keep the barn door’s color as it was, but it didn’t look great against the pressure treated legs.

I used Thompson’s WaterSeal wood spray stain in traditional brown to give the legs a quick and easy stain job. You literally just spray it directly on the wood and let it dry. I did about three light coats to get even coverage. This is the same stuff I have used to makeover my mailbox in under an hour and to refresh my lattice easily.
Step 9:
Seal the barn door.
Like I said, I wanted to keep the barn door the natural color that it had aged to, but I wanted to make sure it was protected. Did I mention this barn door came from my great-grandfather’s barn? And you guys know how attached I get to family heirlooms.
Yes, a barn door is absolutely a family heirloom.

To keep the barn door’s history intact, but protect it, I used Thompson’s WaterSeal Advanced Clear Waterproofer. It takes one single coat and you can use the piece you are protecting the next day.
Fast and easy – my kind of product.
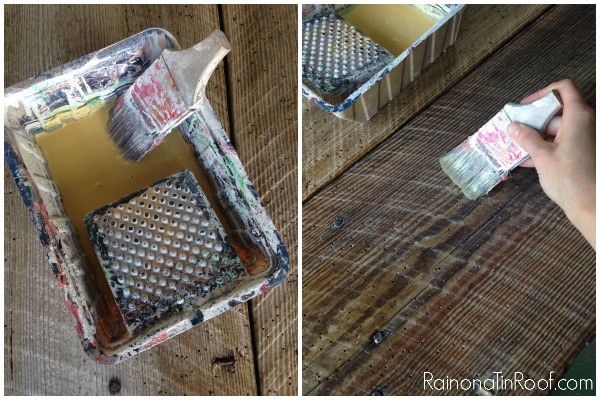
I just poured some out in a small paint container and brushed it on. I did one coat on the edges, top and bottom of the door, then let it dry for a day. The waterproofer did darken the wood a bit, but it definitely still has that old, rustic look to it.
Step 10:
Enjoy.

So, I’m going to be honest.
When Grunt Labor came up with this idea, I wasn’t too gung-ho on it. I was just more doing it because he wanted to.

But…..

I freakin’ love this table.

Like a lot.
A whole lot.
I can’t wait to have some cozy little dinners around this thing.
Want more outdoor project ideas?
Make your own DIY outdoor daybed – perfect for naps during summer afternoons.
This DIY Outdoor Sectional is great for parties – it even has a built in cooler!
And don’t miss these 9 outdoor living spaces to get great ideas for outdoor decorating and entertaining!
You know you don’t wanna miss any of this crazy.
Sign up to get my posts delivered to your inbox here.
Stalk Me Here:
Pinterest / Facebook / Twitter / Instagram


April Hoff says
Love this project! The barn door gives your table so much character! Pinning!
Jenna @ Rain on a Tin Roof says
Thanks, April! Yes, I love how much the door adds to the table!
charles young says
We have an old picnic table that needs some repair over the winter for next year plus the fwo chairs on front porch need a littl refresh. Like your table.
Jenna @ Rain on a Tin Roof says
Thanks, Charles! This would be perfect for your table!
Kristin says
I would love to make a large outdoor table!
Alina says
I’d use it on our deck!
Sean C says
We too have a picnic table and this would be wonderful to use on that!
Jamie says
Jenna, amazing! I really need to get that cleaner. I got some disgusting pieces lying around here too. Love the rustic wood of the picnic table 😉
Hugs, J.
Jenna @ Rain on a Tin Roof says
Thanks, Jamie! That cleaner is amaze balls!
chris aka monkey says
grunt was waving his freak flag on this awesome also love his face’s new look love beards xx
Jenna @ Rain on a Tin Roof says
Yes, he was Chris!!! Thanks!
Dad says
Great Job! Of course I saw it while it was a Work-In-Process. Amazing. Now let’s have some Homemade Fried Chicken, Mashed Taters, Pinto Beans, & Cornbread on a Sun afternoon! Mmmm. Love You! Roll Tide! Dad
Jenna @ Rain on a Tin Roof says
Are you cooking it all? If so, then ok!
Rachel says
How wonderfully creative! The table is awesome! I currently live in an apartment and haven’t had the opportunity to acquire a barn door (yet), but when I do . . . 😉
Jenna @ Rain on a Tin Roof says
Thanks, Rachel!! Your barn door table – or whatever you use it for – will ROCK!
Lindsay Eidahl says
You had me at “barn door”! Love it.
Jenna @ Rain on a Tin Roof says
haha! I know, right!? Thank you!
Lisa Cooper says
I would use it on an old bench I have that lives outdoors.
Mel Keene says
I have been wanting to build a farmhouse table for our backyard, but I also love the barn door table! This would be definitely something to use the sealer on to stand up to the weather!
Kari Cox says
Our wrap-around porch!!
Teddie says
I would use it on my new terra cotta pots. Thanks.
KC Coake says
Love this table! It looks so amazing!
Jenna @ Rain on a Tin Roof says
Thank you, KC!
Emily @ Two Purple Couches says
This is awesome, Jenna! The finished table is beautiful!!
Jenna @ Rain on a Tin Roof says
Thanks so much, Emily!
Chelsea says
ohhhhh, Jenna! Good thing for Grunt Labor – this is awesome!!
Jenna @ Rain on a Tin Roof says
Thanks, Chelsea! Yes, he was a total rockstar on this one!
Samantha says
Love it Jenna, what a great reuse of something that would otherwise be thrown out.
Jenna @ Rain on a Tin Roof says
Thanks, Samantha!
Amanda @ Dwelling in Happiness says
I LOVE that barn door!!! SUCH a great idea to turn it into a bench, it looks so amazing!! I love the rustic feel to it. There’s no way in HECK my hubby would want to tackle a project like that, but maybe I’ll keep whittling away at him. 😉
Jenna @ Rain on a Tin Roof says
Thanks, Amanda!! I am just loving its rustic goodness too!!
Claire @ A Little Claireification says
Love this! I want to make one!!
Jenna @ Rain on a Tin Roof says
Thanks, Claire!
Katie Reeves says
I would love to build an outdoor bench. The stain would work perfectly on it!
Liz says
I love this. GL did good!
Jenna @ Rain on a Tin Roof says
Yes, he did! Thanks, Liz!
Krista @the happy housie says
The barn door adds so much character Jenna -love how it turned out!
Jenna @ Rain on a Tin Roof says
Thanks, Krista! I love all that character goodness too!
Susan @ 2 cats & chloe says
I love this! Such a fun and creative idea! The barn door gives the picnic table a great touch of flair! I’m pinning this project now!
Jenna @ Rain on a Tin Roof says
Thanks so much, Susan!
Terri Hughes says
I would use the Thompson Water Sealer on my back porch. Love the barn door picnic table. Great job!
Jenna @ Rain on a Tin Roof says
Thanks, Terri!
carol clark says
i just put up a fence so i would use it o our fence
D SCHMIDT says
I would use it on some wooden chairs we have outside.
Janet W. says
I would use it on our back deck. It could definitely use a new coating!