If you’re looking for a piece of furniture to pull double duty outside, then this outdoor daybed is for you! Not only does it function as an outdoor bed, but it also makes a great outdoor sofa! Step-by-step instructions for making your own DIY Outdoor Daybed can be found below!
Remember how I made over my screened-in porch last year?
For the second year in a row?
Well, its gotten more changes this year too.
I never intended to change it any.
But we built a patio. And the patio got custody of the chaise lounge. And that meant I had no where to lay down and relax in the porch like I did before.
Even though that only happens a few times during the year.
When Furniture Medic challenged me to build an outdoor furniture project, I happily accepted and knew exactly what I wanted to build – an outside daybed.
If you aren’t familiar with Furniture Medic, they are literally a medic for furniture. They are one of the world’s largest wood and furniture repair & restoration companies. They can do on-site color touch-up and finish restoration, refinishing, polishing, and repairs.
See, they really are a medic for furniture.

I sketched out my drawings. I made a plan. Grunt Labor swooped in and figured out exactly what and how much lumber we would need, because otherwise I would have bought waaaayyyy too much or waaaayyy too little. Have I mentioned I’m terrible at guesstimating that kind of stuff?
I had fully intended on Grunt and I building this together, but the next thing I knew, I was running around the house trying to get the kid to use the potty and Nicky showed up to help Grunt make the daybed.
So Grunt and Nicky made it, but I had the idea and oversaw construction.
That counts for something, right?
DIY Outdoor Daybed
Disclosure: This post was a collaboration with Furniture Medic. However, all opinions and constant changing of my porch are 100% mine. This post contains affiliate links for your shopping convenience. Click here to read my full disclosure policy.
This cost us right around $200 to make. If you have an old twin mattress laying around, that will save you about $100.
Lumber, Supplies & Tools Needed:
- 2 – 4 in. x 4 in. x 8 ft. Pressure Treated Posts
- 1 sheet of 4′ x 8′ Pressure Treated Plywood
- 4 – 2 in. x 6 in. x 12 ft. Pressure Treated Lumber
- 1 – 2 in. x 6 in. x 8 ft. Pressure Treated Lumber
- 2 – 2 in. x 4 in. x 8 ft. Pressure Treated Lumber
- 4 – 1 in. x 6 in x 8ft. Pressure Treated Lumber
- 1 sheet of lattice
- Twin Size Mattress (We used something that my Dad found for me called a Bunkie from Cantrell’s. Its not quite as thick as a regular mattress. Either one will work. You could even use a large piece of foam too.)
- 3″ Exterior Wood Screws, 1 lb.
- Pocket Hole Jig
- Drill (We use this one.)
- Nail Gun (We use this one.)
- Saw (We used our miter saw for cutting the lumber and our circular saw for cutting the plywood and lattice.)
Before cutting anything, measure your mattress to make sure it is the same size as mine. Mine is 36″ x 72″. You may have to adjust your cuts a bit, but it shouldn’t be much.
Cut List:
- 4 – 4 in. x 4 in. posts, 36″ long
- 3 – 2 in. x 6 in. lumber, 81 5/8″ long
- 4 – 2 in. x 6 in. lumber, 30 7/8″ long
- 4 – 2 in. x 4 in. lumber, 37 3/4″ long
- 2 – 1 in. x 6 in. lumber, 39 5/8″ long
- 1 – 1 in. x 6 in. lumber, 74 1/2″ long
- 2 – 1 in. x 6 in. lumber, 30 7/8″ long
- 1 – 1 in. x 6 in. lumber, 74″ long
- Plywood – 74″ x 37 1/4″
- 2 Lattice Pieces – 30 7/8″ x 19 3/4″
- 1 Lattice Piece – 74″ x 19 3/4″
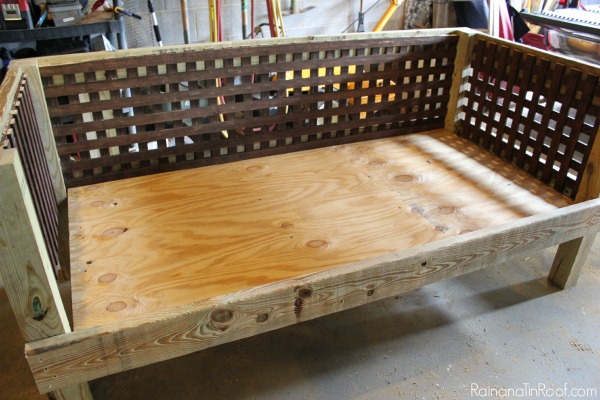
Steps
Step 1:
Attach the four 4 x 4 posts on the back and sides with one of the 81 5/8″ 2 x 6’s and two of the 30 7/8″ 2 x 6’s. The back 2 x 6 should go from outside edge to outside edge on the back of the 4 x 4 posts. The side 2 x 6’s should go on the inside of the 4 x 4’s, but on the outer edge. Each of the 2 x 6’s should be attached to the 4 x 4 posts at 18 inches high (the top of the 2 x 6’s should be at 18 inches on the 4 x 4’s).

For the back 2 x 6, we attached it using just a regular old drill and screws. For the sides, we used a pocket hole jig to hide the screws, but that isn’t necessary.

Step 2:
Attach another 81 5/8″ 2 x 6 at the top of the 4 x 4 posts in the back. Attach two more 30 7/8″ 2 x 6’s at the top of the 4 x4 posts on the sides.

Step 3:
Attach the lattice panels to the sides and back of the daybed along the 2 x 6’s. We used a nail gun to do this.

The lattice panels will not cover the entire length of the 2 x 6’s – put them in the middle. (We had leftover lattice from another project, thus why they are already stained.)
Step 4:
Attach the last 81 5/8″ 2 x 6 along the front of the daybed.

Step 5:
Attach all four of the 37 3/4″ 2 x 4’s along the bottom of the daybed between the front and back 2 x 6’s. Attach with screws. Place two 2 x 4’s in the corners and two in the middle.

Step 6:
Screw the plywood sheet onto the 2 x 4’s that you just attached.
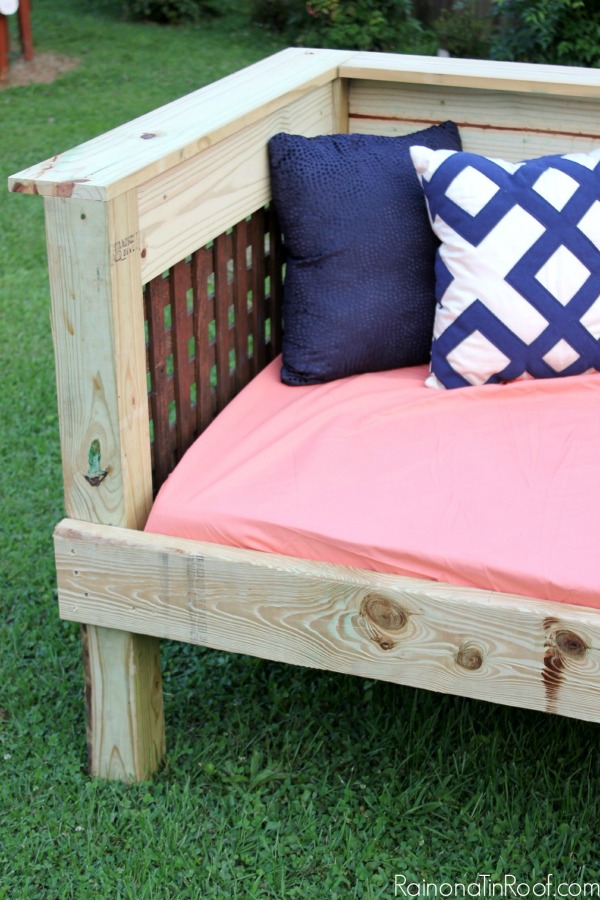
Step 7:
Attach the two 30 7/8″ 1 x 6’s along the inside sides of the daybed. Attach the 74″ 1 x 6 along the top back inside of the daybed.
Step 8:
Attach the two 39 5/8″ 1 x 6’s along the top sides of the daybed. Attach the 74 1/2″ 1 x 6 along the top back side of the daybed.
Cover the mattress with a fitted sheet, accessorize with pillows and enjoy!
My plan is to let all the pressure treated wood dry out and then paint the entire thing and move it into my screened-in porch. Now the question is, what color??
Is there a DIY outdoor bed in your future?
Looking for another great project for your outdoor space?
DIY Outdoor Sectional – Bonus: it has built-in drink coolers!
10+ Outdoor Furniture Makeovers – if you’ve got outdoor furniture that needs a pick-me-up, then don’t miss these!
How to Build a Picnic Table from an old Barn Door – the rustic outdoors at it’s finest!
Want to come back for the how-to later? Just pin the image below!

You know you don’t wanna miss any of this crazy.
Sign up to get my posts delivered to your inbox here.
Stalk Me Here:
Pinterest / Facebook / Twitter / Instagram


Marty@A Stroll Thru Life says
How fun is this. I love it, and the cutie on the bed is the best.
Jenna @ Rain on a Tin Roof says
Thanks, Marty! Yep, she is pretty great!
Jamie says
Wow, great job Jenna, I mean Grunt Labor lol. Just kidding girl. I love what you’ve been doing for your outdoors!
Hugs, Jamie
Jenna @ Rain on a Tin Roof says
hahahha! Thanks, Jamie!
Lindsay says
Love it!
Jenna @ Rain on a Tin Roof says
Thanks, Lindsay!
Karen says
GREEN…..BRIGHT green!!!!
Jenna @ Rain on a Tin Roof says
You’re speaking my language, Karen! 🙂
Sarah @ Little Red Brick House says
Love it, Jenna! Those lattice panels are so pretty. Your little cutie looks super comfortable, too.
Jenna @ Rain on a Tin Roof says
Thanks, Sarah! She loves this bed!!
Dad says
Jenna, In case your readers want to know where to find Cantrell’s Furniture where your bunk mattress came from they are located in Smithville, TN. 615 597 7871 is their number . Jerry Lee would be happy to assist anyone interested in a like mattress plus I believe he can ship. Now for the colour…….What about either Burgundy or Ford Blue?
Taryn @ Design, Dining and Diapers says
Oh my! I absolutely love this!!!! You did a great job in everything.
Jenna @ Rain on a Tin Roof says
Thank you, Taryn!
Virginia Fynes says
This is so super cute!! Love it
Jenna @ Rain on a Tin Roof says
Thanks, Virginia!
nancy says
Love the project…wish it came with drawings instead of pictures so I could print it out.
Jenna @ Rain on a Tin Roof says
Thanks, Nancy! I’m sorry – I’m not that technologically advanced to make it into drawings. 🙁
Melanie says
My eye is drawn to that pillow! Lovely!
Jamie @ Southern Revivals says
I have to one! The end.
Great Job!
Jenna @ Rain on a Tin Roof says
hahaha!! Thanks, Jamie!
kara says
Turned out great!
Jenna @ Rain on a Tin Roof says
Thanks, Kara!
Amy Anderson says
This is awesome! I love it!
Jenna @ Rain on a Tin Roof says
Thanks, Amy!
Mrs.LC@loosechangeliving says
Love the daybed! Great project for summer.
Jenna @ Rain on a Tin Roof says
Thanks so much!
Susan @ Gray Table Hom says
This turned out great! Would love to have one of these in my backyard 🙂
Jenna @ Rain on a Tin Roof says
Thanks, Susan!
Joyce De Vere says
Jenna,I love the daybed !!! It is beautiful!!! What color did yo finally paint it??? Could you send me a pic after you painted it?? Would love to see it!!! I have a wood shop, I just have way to many projects in there and can’t seem to get around to have the time to finish one!!! Do you have any suggestions??? I build pedestals for birdhouses, I make bookcases, and entertainments centers, also bookcase headboard. I don’t sell any thing BECAUSE my
kids ,says hey mom did you make that for me??? Whats a mom to do??? Anyway I would appreciate any advice you could give me!!! You can call me mamasan everyone else does.
Thanks again Jenna you have given me a need to keep going!!! JND
Jenna @ Rain on a Tin Roof says
Hi Joyce! Ya know what – I still haven’t painted this yet!! One thing just led to another and before I knew it, it was fall and now I’ll probably just wait until spring to paint it. I know what you mean though about not finishing projects – I have a ton of “to-do” items in my garage. My best advice is to give yourself a deadline and don’t let yourself start one before you finish another. As for the kiddos taking all your stuff (that is sweet!), I have a similar problem, but mine is that I get something done and then I’m like, “Oooo, I might need to hold onto this for a while. I might just need it somewhere.” Just call me a hoarder! haha!
Jill says
Have you had issues with weather and the mattress? Thinking of doing this and putting in on a screen porch but concerned about rain.
Jenna @ Rain on a Tin Roof says
We haven’t, Jill. Ours is also now on our screened-in porch. (It was just much easier to photograph in a big open area.) I will say though that the lower half of our screened in porch is solid, only the top portion is actually screened so there is less chance of rain coming through that way.
Debbie Perkins says
Love the day bed! I built, by myself,a swing bed. I had the PERFECT OLD box springs. I mean really old, blue stripe ticking and , it takes two people to move it. I was so stinkin proud of my self for totally doing this on my own, http://WWW.wooditsreal.com for the plans. (My bed is on there! Red and white.) anyway. Full of myself means shot down… Got the box springs out, which has a padded top, tried putting it in..crash. It wont fit. I didn’t measure it , and it had a wood frame around the bottom. Lesson learned. Took the twin mattress off my son’s bed, and wa lah! Swing bed. Long story, but I wouldn’t let my husband throw away the box spring thing. NOW I have a plan. Your daybed! Another place for the community cats to come lay. It is at the beach under my house. Thanks for the plans and the ideas. I hit thrift stores for euroshams. Buy them for cheap and cover. Always make your cover with zippers to wash them. Love it!
Jenna says
Thank you, Debbie! I’m so glad you’ve found a project for that box spring now – I bet it will be awesome!
creativejewishmom/sara says
love it! this is one of the first things I’d make if and when I ever have a chance to work with wood……thanks for sharing on craft schooling sunday!
Jenna says
Thanks! This is one of our favorite outdoor projects too!
Helen at Pleasures of the NW says
Perfect for a summer day! (I love the model on the top!) I’d be honored if you shared this at the Pleasures of the NW’s DIY party!
Jenna says
Yep, most definitely great for a summer day! We’re pretty partial to the model ourselves!
Mary Beth says
Oh my goodness, I love this! Maybe, hopefully, I can make one this summer….I know I would get a lot of use out of it. Thanks so much for sharing at this week’s Project Inspire{d}. Have an awesome Memorial Day!
Jenna says
Thank you, Mary Beth! This is one of our favorite outdoor projects!
Angie ~ ambientwares says
Such an amazing project! Love how it turned out and such a great how to. Pinned & sharing!
Jenna says
Thank you, Angie!
Theresa says
Perfect DIY for summer! Thanks for sharing at the #InspirationSpotlight party @DearCreatives Pinned & shared.
Jenna says
Thanks, Theresa!
Sheri says
Such a great project! Thank you for sharing at the To Grandma’s House We Go DIY, Crafts, Recipes and More link party! Pinned!
Rhonda says
I love this idea in place of a garden bench. I’ll be Pinning this post. Thanks for sharing on Sunday’s Best.
Nikki Gwin says
I have been wanting a daybed on my deck for a couple of years now and you might have just spurred me on to give it a try making one! Anyway, I love yours and I am featuring it on this weeks OVER THE MOON LINK PARTY which goes live today, Sunday at 5pm Central. Please stop by to see your feature and link up again.
🙂 gwingal
Jenna says
Oh awesome, Nikki! Thanks!
lance says
I’m curious why there’s a 2″x6″x8′ in the parts list? The four 2″x6″x12′ boards seem to cover all the cuts needed? Or these cuts could be achieved with THREE 12′ boards and ONE 8′ board.
selena says
With all the fabric designing, I have taken a bit of a break from quilt designing. Normally I would have my fall products all planned out by this time, but after the craziness of the last couple years I decided to skip fall market this year. Instead, I am taking some time for myself – to catch up on everything I have fallen behind on – to start new fun projects – and hopefully get back to enjoying the creative process. Those fun new projects have included redecorating a couple bedrooms. That whole process leads me to my post for today! Part of redecorating bedrooms means sewing new bed skirts (or dust ruffles), pillows, curtains, etc. When we came out with our “Shams with Style” book, I had lots of people ask me to come out with patterns for curtains and bed skirts. To me, a bed skirt doesn’t make an interesting enough pattern to put out on the market. However, I thought I would just do a quick tutorial for those who want to learn how I make their own. I don’t particularly like making bed skirts (boring!), but knowing how to make them means that I can make them out of the fabric of my choice. That can really help make the room!