Tag: porch

  • Easy Front Door Makeover

    Easy Front Door Makeover

    This is a sponsored post written by me on behalf of At Home. All opinions are 100% mine.

    I’m partial to lions.

    I find it hard to walk away from just about anything lion decor related.

    I have good reason for this though.

    Grunt Labor and I met while we were both teachers. Our school’s mascot was the lion. Grunt Labor has always coached the lions. The Circus knew how to say “Go Lions!” before she left the womb. She had her one year old pictures taken on the lion paw prints surrounding that same school’s football field. Bill played for the lions.

    So I’m partial to lions. 

    I have wanted a lion statue to go outside of our front door longer than I can remember. However, finding a good sized lion statue for a reasonable price was not as easy as I thought it would be. I had kind of quit looking.

    But it was when I quit looking that I found my perfect lion. 

    Lion Statues at At Home

    I was in At Home a few weeks ago for no particular reason other than to take a much needed break from the renovation at the 70’s Landing Pad. It was then, while wandering through the endless Outdoor Decor Collections aisles, that I found my lion. He was white, of good size, and only $30. I could hardly contain my excitement and having no one else with me to celebrate with, I pulled that lion right off the shelf and gave him a hug. Given that I’d been searching for him for years, I felt this was completely reasonable.

    Once I found my lion, my trip to At Home suddenly became a quest to whip the front door entry into shape at the 70’s Landing Pad.

    I decided the lion would go on one side of the front door, but I would need something of similar size to the lion to even out the other side of the door.

    At Home Outdoor Decor

    I went through shelves full of At Home Patio and Outdoor Entertaining items and tried out no less than 15 different plant stands, garden stools and small tables right there in the store. I’m sure people hate to turn down the aisles I’m on, because I tend to take up half of it testing out what works together and what doesn’t.

    After I found a garden stool that worked, I then did the same thing with flower pots.

    At Home Flower Pots

    And before I left, I figured I might as well get a new door mat while I’m at it.

    Here’s what the front door space looked like before:
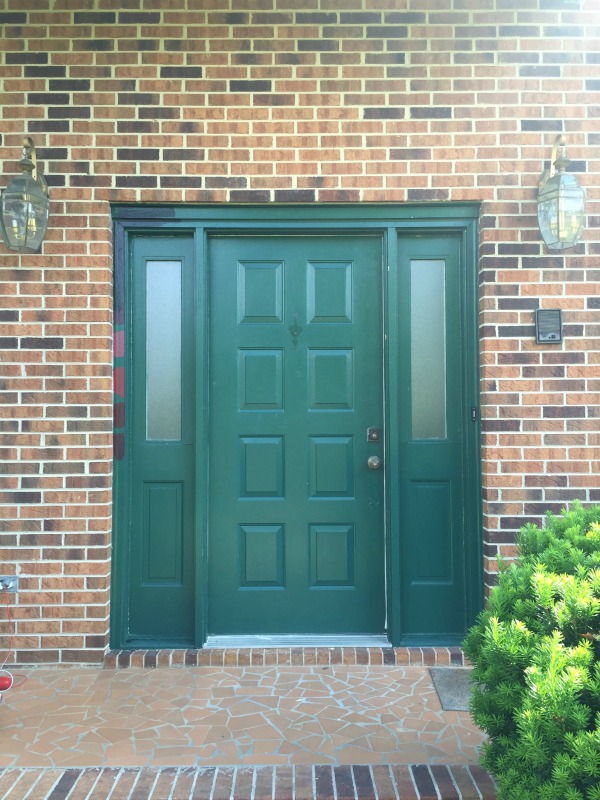
    Front Door Before

    Now friends, you know I love me some green. But that shade of green with those bricks just wasn’t doing it for me. And so to really make my new lion feel at home and shine, I painted the front door and trim for him.

    Front Door Makeover

    I went for a wine colored front door and opted for black trim because we have a lot of black in the house and that seemed to tie in well with the brick color and the front door color as well.

    Front Door Makeover

    Of course, Mr. Lion is taking up residence on one side of the door. By the way, he also has a solar light built into him – that’s what the light and black thing are on his base! The new doormat also brought some of the black down to the porch floor.

    Front Door Makeover

    On the other side of the door is a black and white planter on top of a garden stool I finally settled on at At Home to give it a bit more height and even out each side of the door.

    Front Door Makeover

    I think Mr. Lion likes his new home – especially when the Circus makes him a crown out of rocks. 

  • DIY Outdoor Daybed Tutorial – doubles as a sofa!

    DIY Outdoor Daybed Tutorial – doubles as a sofa!

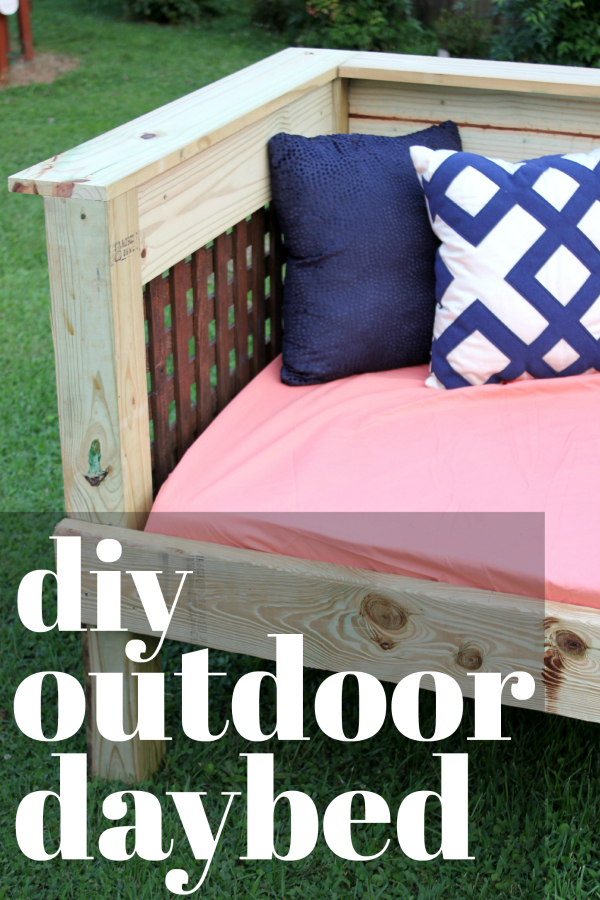
    If you’re looking for a piece of furniture to pull double duty outside, then this outdoor daybed is for you! Not only does it function as an outdoor bed, but it also makes a great outdoor sofa! Step-by-step instructions for making your own DIY Outdoor Daybed can be found below! 

    Remember how I made over my screened-in porch last year?

    For the second year in a row?

    Well, its gotten more changes this year too.

    I never intended to change it any.

    But we built a patio. And the patio got custody of the chaise lounge. And that meant I had no where to lay down and relax in the porch like I did before.

    Even though that only happens a few times during the year.

    When Furniture Medic challenged me to build an outdoor furniture project, I happily accepted and knew exactly what I wanted to build – an outside daybed.

    If you aren’t familiar with Furniture Medic, they are literally a medic for furniture. They are one of the world’s largest wood and furniture repair & restoration companies. They can do on-site color touch-up and finish restoration, refinishing, polishing, and repairs.

    See, they really are a medic for furniture. 

    DIY Outdoor Daybed / Simple Build / Make it for $200 or less

    I sketched out my drawings. I made a plan. Grunt Labor swooped in and figured out exactly what and how much lumber we would need, because otherwise I would have bought waaaayyyy too much or waaaayyy too little. Have I mentioned I’m terrible at guesstimating that kind of stuff?

    I had fully intended on Grunt and I building this together, but the next thing I knew, I was running around the house trying to get the kid to use the potty and Nicky showed up to help Grunt make the daybed.

    So Grunt and Nicky made it, but I had the idea and oversaw construction.

    That counts for something, right?

    DIY Outdoor Daybed

    Disclosure: This post was a collaboration with Furniture Medic. However, all opinions and constant changing of my porch are 100% mine. This post contains affiliate links for your shopping convenience. Click here to read my full disclosure policy.

    This cost us right around $200 to make. If you have an old twin mattress laying around, that will save you about $100.

    Lumber, Supplies & Tools Needed:

    Before cutting anything, measure your mattress to make sure it is the same size as mine. Mine is 36″ x 72″. You may have to adjust your cuts a bit, but it shouldn’t be much.

    Cut List:

    • 4 – 4 in. x 4 in. posts, 36″ long
    • 3 – 2 in. x 6 in. lumber, 81 5/8″ long
    • 4 – 2 in. x 6 in. lumber, 30 7/8″ long
    • 4 – 2 in. x 4 in. lumber, 37 3/4″ long
    • 2 – 1 in. x 6 in. lumber, 39 5/8″ long
    • 1 – 1 in. x 6 in. lumber, 74 1/2″ long
    • 2 – 1 in. x 6 in. lumber, 30 7/8″ long
    • 1 – 1 in. x 6 in. lumber, 74″ long
    • Plywood – 74″ x 37 1/4″
    • 2 Lattice Pieces  – 30 7/8″ x 19 3/4″
    • 1 Lattice Piece – 74″ x 19 3/4″

    Steps

    Step 1:

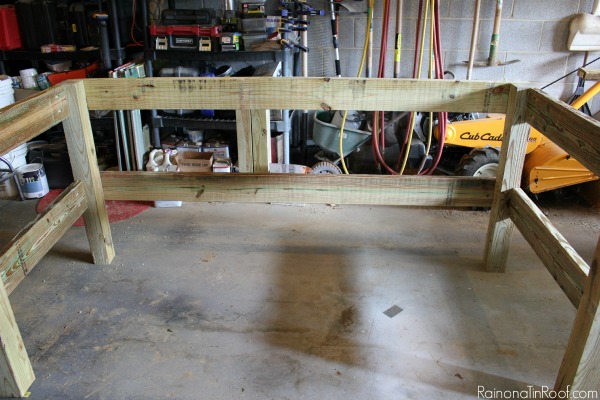
    Attach the four 4 x 4 posts on the back and sides with one of the 81 5/8″ 2 x 6’s and two of the 30 7/8″ 2 x 6’s. The back 2 x 6 should go from outside edge to outside edge on the back of the 4 x 4 posts. The side 2 x 6’s should go on the inside of the 4 x 4’s, but on the outer edge. Each of the 2 x 6’s should be attached to the 4 x 4 posts at 18 inches high (the top of the 2 x 6’s should be at 18 inches on the 4 x 4’s).

    DIY Outdoor Daybed - Assembly

    For the back 2 x 6, we attached it using just a regular old drill and screws. For the sides, we used a pocket hole jig to hide the screws, but that isn’t necessary.

    DIY Outdoor Bed - assembling the side supports

    Step 2:

    Attach another 81 5/8″ 2 x 6 at the top of the 4 x 4 posts in the back. Attach two more 30 7/8″ 2 x 6’s at the top of the 4 x4 posts on the sides.

    DIY Daybed - assembling the frame

    Step 3: 

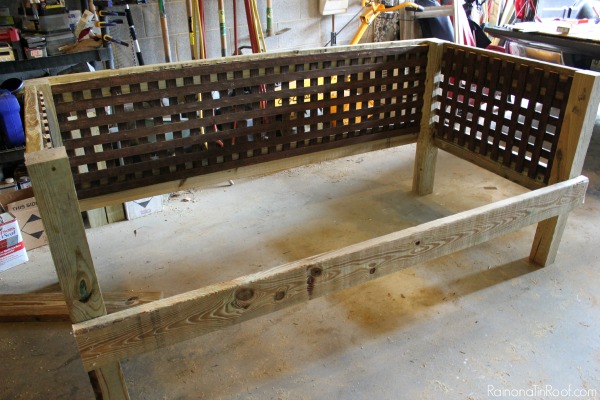
    Attach the lattice panels to the sides and back of the daybed along the 2 x 6’s. We used a nail gun to do this.

    Outside daybed tutorial - step by step instructions

    The lattice panels will not cover the entire length of the 2 x 6’s – put them in the middle. (We had leftover lattice from another project, thus why they are already stained.)

    Step 4: 

    Attach the last 81 5/8″ 2 x 6 along the front of the daybed.

    DIY Daybed Couch for Outside - attaching front support

    Step 5:

    Attach all four of the 37 3/4″ 2 x 4’s along the bottom of the daybed between the front and back 2 x 6’s. Attach with screws. Place two 2 x 4’s in the corners and two in the middle.

    Outdoor Bed DIY Project - attaching mattress support

    Step 6:

    Screw the plywood sheet onto the 2 x 4’s that you just attached.

    Day Bed for Outside - mattress platform

    Step 7: 

    Attach the two 30 7/8″ 1 x 6’s along the inside sides of the daybed. Attach the 74″ 1 x 6 along the top back inside of the daybed.

    Step 8:

    Attach the two 39 5/8″ 1 x 6’s along the top sides of the daybed. Attach the 74 1/2″ 1 x 6 along the top back side of the daybed.

    Cover the mattress with a fitted sheet, accessorize with pillows and enjoy!

    Outdoor Bed and Sofa DIY Project

    My plan is to let all the pressure treated wood dry out and then paint the entire thing and move it into my screened-in porch. Now the question is, what color??

    Outdoor daybed that also works as a sofa.

    Is there a DIY outdoor bed in your future?

    Looking for another great project for your outdoor space?

    DIY Outdoor Sectional – Bonus: it has built-in drink coolers!

    10+ Outdoor Furniture Makeovers – if you’ve got outdoor furniture that needs a pick-me-up, then don’t miss these!

    How to Build a Picnic Table from an old Barn Door – the rustic outdoors at it’s finest!

    Want to come back for the how-to later? Just pin the image below!

    DIY Outdoor Daybed Tutorial that uses a twin mattress

    You know you don’t wanna miss any of this crazy.

    Sign up to get my posts delivered to your inbox here.

    Stalk Me Here:

    Pinterest / Facebook / Twitter / Instagram

    blog-signature-summer-15

    Outdoor Furniture Plans - daybed

    SaveSave

  • How to Glitter Mason Jars

    How to Glitter Mason Jars

    These glitter mason jars are easy to make and add a fun touch to your home’s decor or a party. They also make a great gift idea! Find out how to make glitter mason jars yourself below!

    Is there anyone else out there that just feels the need to add a little bling everywhere?

    A little gold here, a little glitter there?

    It just makes everything a little more fun and pretty.

    When I made over the porch recently, I realized that these mason jars didn’t quite fit with the fun, colorful vibe going on out there. I wanted to keep them though to use as lanterns for extra lighting at night.

    My solution: Bling ‘Em Out.

    Now, I have sparkly glitter mason jars.

    DIY Glitter Mason Jars - easy mason jar crafts - Rain on a Tin Roof

    This post contains affiliate links for your shopping convenience. Click here to read my full disclosure policy.

    If you’re a fan of mason jar crafts, this one’s for you!

    DIY Glitter Mason Jars

    This is a really simple and relatively fast craft project – you guys know I love the fast projects with instant gratification.

    Materials Needed: 

    How to Make Glitter Mason Jars using Mod Podge - Rain on a Tin Roof

    • Mason Jars or Glass Jars (Mine came from Kirkland’s about three years ago, but they still have them for a whopping $3 a pop!!! They are here.)
    • Glitter in Colors of Your Choice
    • Mod Podge
    • Foam Brush or Paint Brush
    • FrogTape

    Steps

    Step 1

    Before starting the glittering process, I spray painted the handles of my jars gold. The gold just worked better with the porch. Painting the handles is completely optional.

    Grab your FrogTape and wrap a strip of it across the jar diagonally.

    Glitter Dipped Mason Jars - tape across jars - Rain on a Tin Roof

    I didn’t really do any sort of measurements with the tape. I just wrapped it around the jar as you can see in the photos above. I did keep a straight edge on the side of the jar – that’s why the straight vertical piece of tape is there. You don’t have to do this. You can just keep wrapping the tape if you want to.

    Step 2

    Starting at the bottom of the jar where the glass is still visible, use your foam brush or paint brush and apply Mod Podge where you want the glitter.

    Mod Podge Mason Jars to Add Glitter - Rain on a Tin Roof

    You don’t need a really thick coat, just an even coverage over the glass. Don’t let the Mod Podge sit too long – this stuff can dry fast on glass. As soon as you have put your Mod Podge on the glass, sprinkle your glitter on the jar, gently tap the excess glitter off and let it sit for five minutes or so.

    Step 3

    Remove your tape carefully. If you just want one swirl of glitter – you are done! If you want two swirls (like I did), then you can repeat the first two steps and add another color of glitter.

    How to Glitter Mason Jars - apply glitter to jars - Rain on a Tin Roof

    You can also skip the tape on this one and run your Mod Podge just along the edge of your first glitter color and apply your other glitter there.

    Putting Glitter on Mason Jars - Rain on a Tin Roof

    I have these hanging on large cup hooks in the screened-in porch.

    Mason Jar Crafts - Glittered Mason Jars - Rain on a Tin Roof

    Gold glitter just gets me every time and the pink works perfectly on the porch. Who knew putting glitter on mason jars could be so fun?

    Any glitter dipped mason jars in your future?

    Looking for more great craft and DIY projects for the home?

    17+ Easy Crafts and DIY Projects Under $10 – you won’t believe what all is here!

    Looking to make a little money on your projects? Take a look at these 10 Easy Crafts to Make and Sell.

    Want to remember this project? Just pin the image below! 

    Glittering Mason Jars with Mod Podge - Rain on a Tin Roof

    You know you don’t wanna miss any of this crazy.

    Sign up to get my posts delivered to your inbox here. 

    Stalk Me Here:

    Pinterest / Facebook / Twitter / Instagram

    Easy Crafts - DIY Glittered Mason Jars - Rain on a Tin Roof

    SaveSave

  • 9 Outdoor Living Spaces You’ll Never Wanna Leave

    9 Outdoor Living Spaces You’ll Never Wanna Leave

    As you guys know, my new favorite happy place is my screened-in porch. It’s colorful, it’s relaxing, and it’s the perfect place for a cheap beer or two. Or three. Here are my favorite outdoor spaces – both mine and others. A.K.A. places I wouldn’t mind have a few beers at…

    9 Outdoor Living Spaces You’ll Never Wanna Leave

    If you're looking for outdoor decorating ideas, this is the article for you! 9 Outdoor Living Spaces You'll Never Wanna Leave

    A Colorful Screened-In Porch Makeover

    Warning: It’s quite colorful! I dare you to not smile while looking at that porch! It’s my new favorite place!

    If you're looking for outdoor decorating ideas, this is the article for you! 9 Outdoor Living Spaces You'll Never Wanna Leave

    A Thrifty and Colorful Deck from The Happy Housie

    This deck is perfect for admiring that view of the water!

    If you're looking for outdoor decorating ideas, this is the article for you! 9 Outdoor Living Spaces You'll Never Wanna Leave

    A Patio Full of Pallet Furniture from Place of My Taste

    Short on cash? Use pallets to make your own porch furniture!

    If you're looking for outdoor decorating ideas, this is the article for you! 9 Outdoor Living Spaces You'll Never Wanna Leave

    Astroturf Patio from Makely Home

    I am a sucker for astroturf! I love how Makely Home used pieces of Astroturf on her porch.

    If you're looking for outdoor decorating ideas, this is the article for you! 9 Outdoor Living Spaces You'll Never Wanna Leave

    Refreshed Patio from Hi Sugarplum

    Hi Sugarplum never disappoints. I’m especially digging her layered rugs there.

    If you're looking for outdoor decorating ideas, this is the article for you! 9 Outdoor Living Spaces You'll Never Wanna Leave

    A Cozy Deck from Southern State of Mind

    Pretty sure I wouldn’t shake my head at chillin’ on this deck.

    If you're looking for outdoor decorating ideas, this is the article for you! 9 Outdoor Living Spaces You'll Never Wanna Leave

    Patio with Colorful Pallet Furniture from One Lucky Girl

    More ideas for reworking those pallets!

    If you're looking for outdoor decorating ideas, this is the article for you! 9 Outdoor Living Spaces You'll Never Wanna Leave

    Thrifted Patio Makeover from Liz Marie Blog

    Is that not an incredible makeover?! Liz Marie is full of thrifty ideas for outdoor spaces!

    If you're looking for outdoor decorating ideas, this is the article for you! 9 Outdoor Living Spaces You'll Never Wanna Leave

    Screened-In Porch and Deck Combo from Our Fifth House

    No one else but Carmel from Our Fifth House can combine lots of different elements and styles and create a space so gorgeous!

    Are you ready to get your outdoors on?

    I’ll bring the booze…. 😉

    What are your best tips for decorating outdoors?

    Need more great outdoor decorating ideas?

    12 Outdoor Furniture Makeovers – great ideas for refreshing that old patio furniture!

    13 Ideas for Sprucing Up Your Front Door and Entry – add some curb appeal to your home!

    Fantastic Outdoor Projects – from DIY swings to furniture and more, you’re sure to find something here you’ll want to make!

    Outdoor Living Space Ideas | DIY Outdoor Decor | Outdoor Living Space on a Budget | Outdoor Living Room | Outdoor Living Space DIY

    You know you don’t wanna miss any of this crazy.

    Sign up to get my posts delivered to your inbox here. 

    Stalk Me Here:

    Pinterest / Facebook / Twitter / Instagram

  • Colorful Screened-In Porch Makeover

    Colorful Screened-In Porch Makeover

    As I write this post, I am sitting in the most colorful space in my home.

    I dare you to step into the screened-in porch and not be happy.

    Double Triple Dog Dare You. 

    And if you do step out here, and you aren’t happy, I’ve got a cheap beer for ya and a kid is bound to turn the corner at any moment riding a plastic pink flamingo.

    Heck, you just smiled as you read that last sentence, didn’t you?

    Sweet friends, who put up with way too much craziness from me, welcome to my back porch.

    Colorful Porch Makeover (because I like to drink cheap beer in colorful places) via RainonaTinRoof.com #porch #outdoors #porchdecor #diy #decorating (more…)

  • Painted Porch Floor

    Painted Porch Floor

    Last week, I showed a little sneak peek of this project when you saw the leopard print table.

    I’ve been sitting over here antsy as all get out to show you the whole project.

    I’m pretty pumped about how this painted porch floor turned out.

    Painted Porch Floor via RainonaTinRoof.com #porch #summer #diy

    Last year, I did a makeover on the screened-in porch. Well, really it was like a semi-makeover. I painted the floor, bought new seat cushions, made a chalkboard, and that was about it.

    After adding on the deck this year, I really wanted to make this space more colorful, and an extension of our living area. So far, I’ve spruced up the chandelier, added a buffet table, and now this floor. There is still more to come, y’all, and with every change, I love this space even more!

    Here’s how I did my floor:

    Painted Porch Floor

    Disclosure: This post is sponsored by FrogTape, however all opinions and my love of black, white, and green are 100% my own. This post contains affiliate links for your shopping convenience. Click here to read my full disclosure policy.

    First, you want to start out with a clean floor. My old floor color was brown and I wanted to do a white, black and green color scheme, so the brown had to go. I cleaned the floor really well first, then painted on two coats of white exterior paint.

    Painted Porch Floor via RainonaTinRoof.com #porch #summer #diy

    Now, before you even think about putting that tape down, I want you to wait a minimum of seven days to let the paint fully cure.

    I know – it really stinks waiting that long, but trust me, you need to. You see, at first, I did not wait seven days. I waited three days and put the tape down, then when I pulled it up, some of the paint came with the tape. The paint hadn’t fully cured. So, I repainted the entire floor with another two coats of white paint and didn’t touch it for a week.

    Go have yourself a cocktail or two (per day of course), and just wait the seven days for it to fully dry. You’ll thank me later.

    Let’s all hum the Jeopardy theme in our head while we pretend that we just waited seven days for the paint to fully cure…….

    Ok, seven days later, we’re ready to tape. My concrete is very old school. Remember, I am dealing with a 1960s Rancher here. Needless to say, the concrete was uneven in places and had multiple bumps and divets, and just plain not smooth – anywhere really.

    Regular tape wouldn’t work – the paint would have bled through. To combat this, I used FrogTape for Textured Surfaces.

    Painted Porch Floor via RainonaTinRoof.com #porch #summer #diy

    It has a two part system – tape and liquid PaintBlock.

    The first thing you will do is measure out your sections. I did 28 1/2 inch wide sections – that width took up the entire porch floor, which was perfect. After measuring and marking out your sections, run the tape along the edge of each section.

    Painted Porch Floor via RainonaTinRoof.com #porch #summer #diy

    Next, run a damp cloth around the edge of the tape. This helps to activate the PaintBlock technology.

    Painted Porch Floor via RainonaTinRoof.com #porch #summer #diy

    Like I said, this tape is a two part system. Next, you will take the bottle of liquid PaintBlock sealer and apply it to the edges of the tape. Shake the bottle well, then remove the cap and replace it with the included brush applicator.

    Painted Porch Floor via RainonaTinRoof.com #porch #summer #diy

    Apply it generously along the seal, going back and forth to overlap. It goes on milky, but dries clear. Let it dry for 15 minutes and then paint! Remove the tape when the final coat of paint is dry to the touch.

    Painted Porch Floor via RainonaTinRoof.com #porch #summer #diy

    Don’t worry about the liquid PaintBlock keeping paint from adhering places where there was no tape – it just seals the tape edge.

    Painted Porch Floor via RainonaTinRoof.com #porch #summer #diy

    Isn’t is crazy how just three simple colors in stripes work so well together? No fancy pattern, just stripes, but an awesome impact.

    And I still got sharp paint lines even with the un-eveness of my concrete!

    I do recommend that you follow the rule of seven days after applying the rest of your paint colors as well. Don’t move any furniture back in until you are sure that baby is dry!

    Painted Porch Floor via RainonaTinRoof.com #porch #summer #diy

    I love the combination of the black, white, and green! Its the perfect shot of color, but allows me to work in many more colors – which are coming soon!

    Have you done a painted porch floor before?

    See the completed porch HERE!

    You know you don’t wanna miss any of this crazy.

    Sign up to get my posts delivered to your inbox here. 

    Stalk Me Here:

    Pinterest / Facebook / Twitter / Instagram

    I’m participating in the summer celebration!! Don’t miss all the other summer projects below and come back Thursday to link up with us! 

    250x250

    Here are even more ideas to kick off your summer in style…

    Monday…

    Tuesday…

    SaveSave

  • How to Stain Wood or Lattice the Easy Way {Lattice Refresh}

    How to Stain Wood or Lattice the Easy Way {Lattice Refresh}

    Remember back in November when I made a confession?

    I told you that I kinda, sorta, maybe, sometimes ignore the outside of my house.

    Well, a couple weeks ago it seemed as if spring was finally arriving here (it was a trick though!). It was sunny, it was nearly 70 degrees and the kid was at preschool (thank heaven).

    I certainly did not want to coop myself up in front of this computer all day. I thought it was a good time to spruce-up the porch a bit – seeing as how I have not touched it since its makeover nearly three years ago. And when I did do the makeover, I got pregnant half-way through and failed to touch the lattice on account of being tired all the time.

    At least that’s the excuse I’m giving.

    So, on that beautiful day a couple weeks ago, I figured out how to stain wood the easy way and gave my lattice a much needed refresh.

    How to Stain Wood Outdoors | How to Stain Lattice | Lattice Ideas | How to Clean Lattice

    How to Stain Wood the Easy Way

     Disclosure: This post was a collaboration with Thompson’s WaterSeal. However, all opinions and witty remarks are 100% mine. This post contains affiliate links for your shopping convenience. Click here to read my full disclosure policy.

    Seriously y’all, excluding drying time, this whole project took less than an hour.

    I have no idea when the last time was that this lattice had been touched.

    How to Stain Wood the Easy Way {Lattice Refresh} via RainonaTinRoof.com #stain #wood #lattice #Thompsons

    I hadn’t touched it since we bought the foreclosure and the house had sat vacant for a year before we got it. I know that the previous owner did not build the porch onto the front of the house, so I’m not sure if they ever spruced up the lattice or not.

    How to Stain Wood the Easy Way {Lattice Refresh} via RainonaTinRoof.com #stain #wood #lattice #Thompsons

    Either way, the lattice definitely needed a facelift.

    Ok, so let’s be real for a moment. Who really wants to stain lattice by hand? Do you see all those criss-crosses, nooks, and crannies? It would have taken forever for me to do this by hand. Like two days worth of preschool and ain’t nobody got time for that. The kid only goes to preschool two days a week and I need every second of that time to accomplish multiple projects.

    I had a trick up my sleeve, though. Remember when I did that mailbox makeover last year? I turned once more to Thompson’s WaterSeal Traditional Brown Wood Stain Spray.

    How to Stain Wood the Easy Way {Lattice Refresh} via RainonaTinRoof.com #stain #wood #lattice #Thompsons

    Yep, its just like spray paint, except its stain.

    To do the lattice, I didn’t tape anything off. I just took a piece of cardboard and held it up against the top of the lattice to keep the stain from getting on the painted wood. There were some places where the stain got on the painted wood, but it just wipes right off while wet or its an easy touch-up. Please excuse the fact that there is no picture showing me staining the lattice. I was all alone and I figured the roofers next door wouldn’t take time out of their work day to help a sister out.

    Here is a during photo though. The lattice on the left had just gotten the first coat and was still wet.

    How to Stain Wood the Easy Way {Lattice Refresh} via RainonaTinRoof.com #stain #wood #lattice #Thompsons

    Seriously y’all, I’m a little embarrassed to show you that photo. I don’t think I realized how bad the lattice was until I saw that huge difference.

    I did two coats total and it took about three cans for all of the lattice.

    How to Stain Wood the Easy Way {Lattice Refresh} via RainonaTinRoof.com #stain #wood #lattice #Thompsons

    How to Stain Wood the Easy Way {Lattice Refresh} via RainonaTinRoof.com #stain #wood #lattice #Thompsons

    Grunt Labor was quite impressed that I took some outdoor initiative when he got home. I didn’t tell him how easy it was. I just said I had worked all day and couldn’t possibly cook supper. hehehehe

    How to Stain Wood Outdoors | How to Stain Lattice | Lattice Ideas | How to Clean Lattice

    There you have it, how to stain wood the easy way.

    You can find Thompson’s WaterSeal spray stain at Wal-Mart and on Amazon.

    Now, I no longer have an excuse to neglect the outdoors. But please, don’t tell Grunt Labor about my secret weapon!

    More outdoor projects you might just want to see…

    Staining Pressure Treated Wood –No Waiting Required!

    DIY Cedar Planter Box – so pretty and a great way to display your house numbers as well!

    Mailbox Makeover– took less than an hour and such a big impact!

    How to Clean Your Sidewalk – had no idea mine was so dirty!

    You know you don’t wanna miss any of this crazy.

    Sign up to get my posts delivered to your inbox here. 

    Stalk Me Here:

    Pinterest / Facebook / Twitter / Instagram

  • 13+ Fantastic Outdoor Projects that you can do!

    13+ Fantastic Outdoor Projects that you can do!

    As soon as spring hits the air, my head starts spinning with outdoor projects. I have this urge to be outside and soak up all that wonderful weather.

    Here are 13 fantastic outdoor projects  that anyone can do!

    Great DIY projects that are easy and affordable! 13+ Fantastic Outdoor Projects

    13+ Fantastic Outdoor Projects

    DIY Outdoor Daybed / Simple Build / Make it for $200 or less

    DIY Outdoor Daybed

    DIY Outdoor Sectional with Built-In Umbrella and Drink Coolers

    DIY Outdoor Sectional

    This is so cool - just add legs to an old barn door and you have an instant picnic table! How to Build a Picnic Table out of a Barn Door via RainonaTinRoof.com

    DIY Barn Door Picnic Table

    How to Clean Your Sidewalk via RainonaTinRoof.com #diy #ad

    How to Clean Your Sidewalk

    DIY Floating Curtain Panels via RainonaTinRoof.com #curtains #drapery #diy #fabric #ad #onlinefabricstore #porch

    DIY Floating Curtain Panels

    DIY Painted AstroTurf Rug Tutorial via RainonaTinRoof.com #diy #rug #homedecor #outdoordecor

    Painted AstroTurf Rug

    Painted Porch Floor via RainonaTinRoof.com #porch #summer #diy

    Painted Porch Floor

    Colorful Porch Makeover (because I like to drink cheap beer in colorful places) via RainonaTinRoof.com #porch #outdoors #porchdecor #diy #decorating

    Colorful Porch Makeover

    Rocking Chair Restoration {rainonatinroof.com} #rockingchair

    Restored Rocking Chair from Rain on a Tin Roof

    I spent $400 to restore that bad boy. It was worth every single last penny! Click over to find out why.

    How to Stain Wood the Easy Way {Lattice Refresh} via RainonaTinRoof.com #stain #wood #lattice #Thompsons

    Lattice Refresh in under an hour

    Staining Pressure Treated Wood via RainonaTinRoof.com #deck #staining #Thompsons

    Staining Pressure Treated Wood – No Waiting Required!

    7 Fantastic Outdoor Projects {rainonatinroof.com} #outdoor

    Simple Outdoor Pillows from Napkins from Southern Color

    From napkins?! Love those colors! I don’t think they could be more bright and cheery!

    7 Fantastic Outdoor Projects {rainonatinroof.com} #outdoor

    Potting Bench from Little Brags

    Grunt Labor totally needs one of those! He would love it.

    7 Fantastic Outdoor Projects {rainonatinroof.com} #outdoor

    Buxton Blue Door and Shutters from Finding Silver Pennies

    Such a beautiful, classic entry.

    7 Fantastic Outdoor Projects {rainonatinroof.com} #outdoor

    Outdoor Tea Cart Makeover from Pies and Puggles

    The yellow is so bright and cheery! Its just begging for a drink to be sat on it.

    7 Fantastic Outdoor Projects {rainonatinroof.com} #outdoor

    Pallet Swing from Twelve Oaks Manor

    I WANT one of these. So. Bad. How great would this be for warm summer evenings spent gazing at the stars?

    7 Fantastic Outdoor Projects {rainonatinroof.com} #outdoor

    DIY Painted Rug from At the Corner of Happy & Harried

    There is nothing like a great rug to greet guests and make them feel welcome!

    Do you have any outdoor projects you want to tackle? 

    Want a little more outdoor inspiration?

    10+ Creative Planter Ideas – some of these will blow your mind!

    10+ Fantastic Outdoor Projects – from easy furniture makeovers to swings made from pallets, it’s all here!

    9 Outdoor Living Spaces You’ll Never Want to Leave – get ready to be inspired!

    You know you don’t wanna miss any of this crazy.

    Sign up to get my posts delivered to your inbox here. 

    Stalk Me Here:

    Pinterest / Facebook / Twitter / Instagram

  • Simple Screened-In Porch Makeover

    Simple Screened-In Porch Makeover

    I have teamed up with three other bloggers to bring you the Summer Spruce-Up Series. The series is all about sprucing-up our outdoor areas to get them ready for summer! What all of that means is that I had to get off my butt and get to work. Enter my screened-in porch makeover.

    Screened In Porch Makeover

    My screened-in porch had been so neglected until I was forced to tackle it (a good and needed forced, thanks gals). When we moved in two years ago, the last thing on our minds was the back porch. We were too busy with a kitchen, bathroom, and basically an overhaul of our entire house. I didn’t take a photo of the inside of the porch, but this was the outside, so you can get a pretty good idea of what it was like.

    Screened In Porch Makeover

    Rough, to say the least.

    We finally got around to working on it about six months after we moved in.

    But, then I got pregnant.

    And lazy.

    And tired.

    So, for the last year and a half, our screened-in porch has set like this. Partially finished.

    Screened In Porch Makeover
    Screened In Porch Makeover

    Grunt Labor had fixed the screening and added lattice to keep the dogs from getting in. We had also partially painted the woodwork, but that was it.

    And now, within the last three weeks, it has finally gotten its long overdue makeover.

    Screened In Porch Makeover

    With the exception of the chaise lounge and rocking chair, we already had the patio furniture.  I picked up the lounge at an antique store for $100. All of the furniture got a fresh coat of gloss black spray paint, which it was in desperate need of.

    Screened In Porch Makeover
    I am loving my outdoor chalkboard. We just bought a piece of pre-cut 4×8 plywood, slapped some chalkboard paint on it and nailed it up. The silver pail holds chalk.
    Screened In Porch Makeover
    We also purchased cushions from Home Depot for all the furniture.
    Screened In Porch Makeover
    I found that sweet little rocking chair at an antique store for $20. It was originally white and sporting some horrid circa 1991 floral fabric. I ditched that for some simple outdoor fabric that would match the new cushions.
    Screened In Porch Makeover
    Needless to say, that chaise lounge is this girl’s new favorite spot. Don’t sit in my chaise when I am present. It. Is. Mine.
    Screened In Porch Makeover
    I painted the floor the same color as the floor on the front porch. I finally got around to painting the rest of the trim / woodwork as well.
    Screened In Porch Makeover
    I love how all of the little decorative touches turned out. I really just threw some stuff together I had around the house. I made a monogrammed tray for us and put it in the middle of the table to hold napkins, condiments, and such. I pulled the lantern from the guest bedroom, since it will soon undergo a makeover.
    Screened In Porch Makeover
    I had these mason jars in the cabinet, with the hanging wire already attached. Luckily, the hooks were already in the ceiling as well, otherwise these boys may not have made it out. Right now, they have pebbles in them. And someday when I remember, I will pick up some candles for them.
    Screened In Porch Makeover
    We have had the chandelier for a few years now. I found it as-is at a yard sale for $3. Yes, I’ll take it.
    Screened In Porch Makeover
    We switched out the previous light fixture which was rusted and haunted-house-scary-looking for this one. I found it at Lowe’s on clearance for $25. Yes, I will take that as well.
    Screened In Porch Makeover
    Another favorite part of the porch for me is this clock. It is an old one with an electrical cord to make it run. I picked it up at an antique store for $15 a few years back. It still works, but there isn’t an electrical outlet on the porch. I wrapped the cord around the back, set the clock to 5:00, hung it up and then got myself a beer. 🙂
    Screened In Porch Makeover
    The tray was another yard sale find for $3. I gave it a coat of spray paint. Obviously, not a good one, considering there are bubbles on the side, but, hey, its outside, who cares? I pulled the metal pitchers from my open shelving, which recently got a makeover.
    Screened In Porch Makeover
    The screened-in porch is my new favorite place. It’s always 5:00 there, it’s a great outdoor dinner space, an awesome place to relax, keeps the kid contained, and did I mention it’s always 5:00 there?

    More outdoor projects you just might want to see:

    How to Stain Wood Outdoors the Easy Way (Lattice Makeover in an hour) – super easy with a big impact!

    Staining Pressure Treated Wood – No Waiting Required – for realz, no waiting!

    Mailbox Makeover in less than an  hour – another easy, but big impact project!

    Wanna snoop around my house more? Head here. 
     You know you don’t wanna miss any of this crazy.

    Sign up to get my posts delivered to your inbox here. 

    Stalk Me Here:

    Pinterest / Facebook / Twitter / Instagram