Category: Outdoors

  • Plant these flowers to get bountiful bouquets from your cutting garden this summer.

    Plant these flowers to get bountiful bouquets from your cutting garden this summer.

    There’s just something about fresh cut flowers, isn’t there? I love having my own cut flower garden to pull flowers from during the summer. Below, you’ll find my list of the best cut flowers to grow in your own cutting garden. You’ll be overflowing with gorgeous bouquets all summer!

    ‘Tis the season for getting those cutting gardens started!

    Our garden is prepped and just waiting on seeds to be planted. We’ve started some seeds already in containers, but it’s supposed to get cold here again this week, so I’ve held off on getting them in the ground. I’m not too worried about it though. I didn’t get anything in the ground until May last year and still had plenty of beautiful flowers. When will you be planting your seeds and flowers where you’re at?

    My cut flower garden is like therapy for me. It’s hard work – especially in the beginning, but getting out there and working in the soil, planting flowers, pulling weeds and watching it all come to life really helps to calm my soul. It’s something I do for me. There were a few years when I said I just didn’t have time to do the garden. Well a couple years back, I decided I was going to make time for it once more and let me just tell you, I didn’t realize how much I missed it and how much it helped me mentally. It’s a really great escape.

    I’m certainly not a master gardener. I learn more every year and am constantly referring to a 900 page gardening book from the 1960s that my great uncle handed down to me. I have found quite a few “surefire” cut flowers though – ones that have grown well for me and are easy to start out with if you’re new to this cutting garden thing.

    Best Cut Flowers - Teddy Bear Sunflowers

    This post contains affiliate links for your shopping convenience. Click here to read my full disclosure policy.

    Best Flowers for Cutting Garden

    I’m going to break this down into two different types of cutting garden flowers: annuals and perennials. You’ll have to plant annuals every year, but perennials will come back each year.

    Like I said, these are flowers I’ve grown myself and had success with. There are many more varieties of cut flowers, but I wouldn’t feel comfortable suggesting them to you if I haven’t had success with them myself. That being said, if you’ve had success with other types of cut flowers, please do leave them in the comments for the rest of us to give a try!

    And if you’re new to growing a cutting garden, then here’s my cut flower garden guide for beginners.

    Best Annual Flowers for Cutting

    Best Flowers for Cutting Garden - Zinnias

    Zinnias

    You can never ever ever go wrong with Zinnias. Not only are zinnias, in my opinion, one of the prettiest annual flowers that are out there, they are one of the easiest to grow and provide blooms all summer long. A few of my personal favorite varieties of Zinnias include:

    • Big Red – gorgeous deep red blooms with a long vase life.

    • Envy – lime green blossoms that are perfect for bright colorful, summer arrangement.

    • Cut and Come Again Mix – these are exactly what their name implies! The more you cut them, the more they come back with more blooms.

    • Purple Prince – these purple flowers are another favorite of mine. It pairs nicely with the envy zinnias as well.

    Growing from seed is easy with Zinnias. They can be started early indoors or planted right into the ground after the danger of the last frost. I’ve had success both ways.

    Sunflowers

    Best Annual Flowers for Cutting - Sunflowers

    Sunflowers are another foolproof cut flower. There are the huge varieties, which are great for photo backdrops, but my favorites for cutting are:

    • Sunflower Busy Bee – traditional look sunflowers, but not the super tall ones. These get about 3′ – 4′ feet tall.

    • Teddy Bear Sunflowers – I planted these for the first time last year and am completely hooked now. These double flowering sunflowers have a cushion like look and are gorgeous. The first picture in this post is of a teddy bear sunflower.

    Amaranthus

    I planted Amaranthus seeds for the first time last year after having gotten a few in a wildflower packet of seeds and loved them. I love the weeping, drapey look these add to arrangements. I’ve planted two different colors of these beauties:

    • Love Lies Bleeding – a gorgeous deep garnet color.

    • Green – this light green hue is the perfect compliment to brightly colored flowers.

    Best Cut Flowers to Grow in Your Cutting Garden - fresh cut flower arrangement.

    Gomphrena

    I planted these sweet little flowers for the first time last year and I adore them. They are great filler flowers for larger or medium sized arrangements, but also look precious solo. These get about 24 – 30 inches tall.

    • QIS Mix – this is the mix of Gomphrena I planted last year and had great success with. I’m planning to give this Strawberry Fields and Fireworks variety a whirl this year too. They look too pretty not to!

    Gerbera Daisies

    Best Cut Flowers for a Cut Flower Garden - Gerbera Daisies

    I won’t lie, these can be difficult to get going. But if you live in the south and can get these to take root, then they can actually become perennials. That’s how I had success with mine. I didn’t get many blooms that first summer, but the following one, it wasn’t too bad! I’ve found it’s best to buy these as plants instead of seeds. These flowers have long stems as well. A couple of my favorites are Gerbera Glow and these with pink petals and yellow centers, which I like to call Pink Lemonade.

    Best Perennial Flowers for Cutting

    Perennial flowers will come back year after year and tend to get bigger and bigger each year. Here are few of my favorites.

    Best Perennial Flowers for Cutting - Hydrangea

    Hydrangeas

    I absolutely adore hydrangeas. They are my favorite flower and Grunt even planted a whole row of them for me at one of our houses. There are loads of different hydrangea varieties to choose from here.

    Gladiolus

    These are bulbs that you can plant in the spring and bloom in the summer. There is a taller variety and a shorter one:

    • Fordhook Ruffled Pastel Mix – these are the taller variety and the ones that have done extremely well for me in my garden.

    • Butterfly – these are a shorter variety of Glads. My mother-in-law planted some of these last year and they are beautiful.

    Rudbeckia (Black Eyed Susans)

    You’ve really got to love these flowers to plant them. Because once you do, they will just multiply over and over every year. Of course, you can always pull up the flowers from anywhere that you don’t want them. They are very drought tolerant as well and easy to grow. Find them here.

    Echinacea (Coneflowers)

    Coneflowers are similar to Black Eyed Susans in that they will multiply year after year. I prefer Coneflowers to Black Eyed Susans. As these grow over the years, you can also divide them and plant in other places as well. I’ve had great success with this Deep Rose variety.

    Don’t forget – share your suggestions for good cutting flowers in the comments!

    Looking for more ways to get “growing” outside? Take a look at these:

    Cedar Planter Box – DIY this planter and add house numbers to it for killer curb appeal!

    DIY Flamingo Sprinkler – who knew watering the garden could look so cool?

    Flower Pot Ideas – Out-of-the-box creative ideas for planting flowers.

    Want to remember this list of flowers for later? Just pin the image below!

    Best Flowers for a Cutting Garden - zinnias, sunflowers, hydrangeas, black eyed susan, amaranthus, and more.

    Follow along on social to watch our garden grow this year:

    Facebook | Instagram | Pinterest | Twitter

  • Creating a Cut Flower Garden for Beginners

    Creating a Cut Flower Garden for Beginners

    Learn how to create a cut flower garden and enjoy fresh flower arrangements all summer long from your very own garden. Here, you’ll learn how to get started, the best cut flowers to grow and more tips for your new cutting garden.

    Before motherhood, before the blog became my full-time job, and before life became so busy and hectic, I loved growing flowers – particularly flowers for cutting.

    In the first house that Grunt and I bought together, we planted all kinds of flowers – rose bushes, zinnias, and Grunt even planted me a whole row of hydrangeas along the fence, which is my favorite kind of flower.

    When we moved from that house, we dug up just about everything we had planted and transplanted it to our new home. And for a year or two, we still had beautiful cut flowers throughout the summer.

    But as the Circus grew, our schedule got busier and busier and then trying to get the blog off the ground took up a huge portion of any other time I had on my hands. There wasn’t any time for growing cut flowers.

    Early last year, I decided it was well past time to create a little more time for doing things for me. It was kind of like when Allie in The Notebook realized that she didn’t paint anymore. I didn’t grow flowers anymore.

    So Grunt Labor helped me to create a spot in our yard specifically for a cutting garden.

    Cut Flower Garden

    And create a cutting garden we did.

    It wasn’t elaborate and it was filled mostly with easy to grow flowers, but it made me so damn happy. Going outside planting the flowers, weeding, then cutting the flowers turned out to also be a wonderful stress reliever.

    Best Flowers for Cutting Garden

    We had buckets and buckets of flowers throughout the summer – more than enough flowers for us and enough to create small arrangements to surprise friends and family with a little unexpected color to brighten their day, which had been another goal of mine with the cut flower garden.

    Best Cut Flowers to Grow

    I didn’t write about the garden on the blog last year, but I did share a lot from it on Instagram. A lot of people who followed me wanted to know more about getting a cutting garden started so here it is. As I said, my cut flower garden is not elaborate – it’s mostly filled with easy to grow plants, so this is a good guide for people who are just beginning with growing cut flowers.

    Creating a Cutting Garden for Beginners

    This post contains affiliate links for your shopping convenience. Click here to read my full disclosure policy.

    Step 1: Find the best spot for your garden.

    Most cut flowers need lots of sunshine, so keep that in mind when determining where to place your garden.

    Growing Cut Flowers

    We placed my garden along a portion of the outside of our fence in a sunny location. My space is about 6 feet wide x 26 feet long. Your garden certainly doesn’t have to be this big or this small – go with any size your wish!

    Step 2: Get your ground ready for planting.

    Of course, it didn’t just start out looking like the photo above. To get the ground here ready for planting, Grunt used our tiller to break up the soil a few times, then I pulled out all the grass and weeds from the tilled-up dirt, used a rake to spread the soil around evenly, then planted. I also put landscape edging around the garden to create a barrier from the outside grass and hold in the mulch that I would later add.

    No tiller? No problem.

    If you don’t have a tiller or don’t want to till up the ground, then you could instead do a raised cut flower garden. You can buy a kit like this one to create a raised bed or use a tutorial like this one to create your own.

    Step 3: Select your flowers/seeds.

    There are lots of different kinds of flowers that make great cut flowers for arrangements – some easier to grow than others and of course some need specific types of climates to grow well in. As you select your flowers to plant, be sure to look at the growing information and determine if the flower will grow well in your area. Use this tool to determine which growing zone you are in.

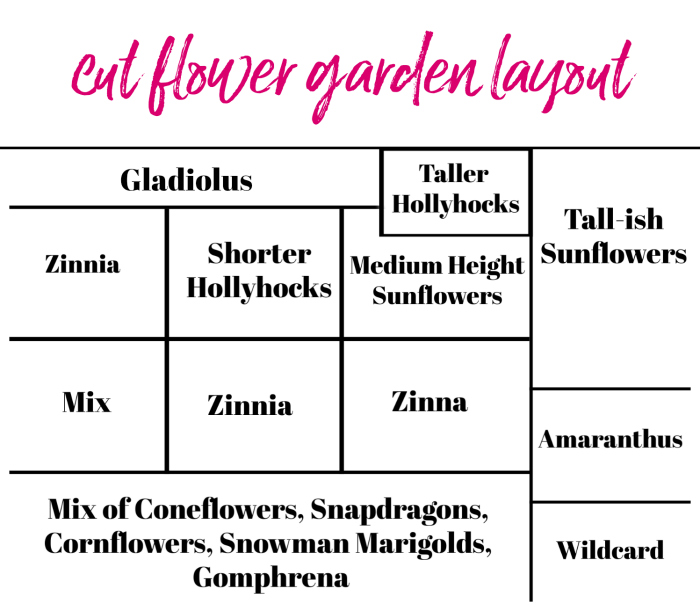
    This is the flower plan for my cut flower garden this year. For reference, I am in growing zone 7.

    Cut Flower Garden Layout

    Flowers for Cutting Garden:

    Most of the area in the front of my cut flower garden layout is kind of my “play” area this year. I’m trying out new flowers here that I haven’t planted before.

    • Gladiolus – Gladiolus are bulbs that can be planted in the spring and will bloom during the summer. These are taller plants, so I placed them in the back.
    • Hollyhocks – Hollyhocks are perennials, so they will come back every year. These aren’t necessarily great cut flowers, but I love their look so I wanted to add some here anyway. I just planted my hollyhock seeds last year, so I didn’t have any flowers from them last year, but hopefully I will this year. The plants are already starting to make an appearance.
    • Sunflowers – Sunflowers are a wonderful option for a cutting garden. I like to plant both taller sunflower varieties and medium height sunflowers to get a good mix. The ones I’m planning to go with this year are Sunflower Sunshine (I did these last year and they were wonderful!) and Teddy Bear Sunflowers (trying these out this year – I love their look!)
    • Zinnias – In my opinion, you can’t ever have too many Zinnias! Zinnias are so easy to grow and such beautiful colorful flowers. I tend to plant more zinnias than anything else. Zinnias are foolproof – the perfect flowers for beginning cut flower growers. This year, I’m going with these varieties of Zinnia: Big Red (these were stunning last year!), Purple Prince (always a favorite), Envy (I actually forgot to plant green zinnias last year and was so mad at myself), Dancing Girls (these have a bit of a Dahlia look) and this Cut and Come Again Mix (truly, the more you cut on these, the more they keep coming back!).
    • Amaranthus – a few of these seeds came in a mix of seeds I bought last year and I just fell in love with these weeping beauties. I’ve ordered both a green and deep purple variety of this flower to plant.
    • Coneflowers – Coneflowers and I have a good history. These are simple, easy to grow flowers that once they are bigger, you can divide over and over again and plant them all over the place. These are perennials as well, so they will come back every year. While I do tend to buy seeds for much of my cut flower garden, I’ve always had more luck with coneflower plants ready to go than growing these from seed.
    • Snapdragons – I tried snapdragons a long time ago and it didn’t work out too well, but this year, I’m giving them another go. This Madame Butterfly mix is just too pretty to not give a whirl.
    • Cornflowers – these are purely for the Circus. I’ve not planted cornflowers before, but the blues in this mix just scream the Circus’ name!
    • Snowman Marigolds – I usually turn my nose up at marigolds and I certainly wouldn’t consider them a cut flower, but this Snowman Hybrid variety stopped me in my tracks. They have a ruffled carnation look and I couldn’t resist trying them. It says they are good for cut flowers, so we shall see.
    • Gomphrena – another new one for me. These little globe type flowers are very cute and if they grow well, I think they will make great fillers and accent flowers in arrangements.
    • Wildcard – As of right now, I’m leaving this space open. There is a rose bush in this area I planted last year, but I’m not sure if it will stay there or not – we shall see!

    Step 4: Planting Your Flowers

    You’ll usually have a few options when it comes to planting – you can often choose from seeds, plants and of course, bulbs for some flowers.

    If you buy plants of course, you’ll put them right in the ground. Many seeds can go right in the ground as well, depending on the current weather. Always read your seed packets to determine if you need to start your seeds indoors first or if you can put them outside.

    Last year, I started my seeds indoors, but when I transplanted them outside, I also put some more seeds of the same varieties directly into the ground. Honestly, I couldn’t tell much difference between the flowers I had started indoors and the ones I started right in the ground. This year, I’ll be putting most of my seeds straight into the ground, unless the package suggests otherwise.

    Keep in mind that you’ll want to place your taller flowers in the back and work your way up to shorter flowers. Read the seed and flower labels for details on each flower’s growing height and width.

    Step 5: Water. Mulch. Weed.

    Seeds just planted and seedlings won’t need a whole lot of water to start with. You’ll want to keep the soil moist, but don’t overwater. As the seedlings get bigger and stronger and turn into plants, water more and you can use plant food as well.

    I also recommend that after the seedlings have grown quite a bit and are stronger to put a layer of mulch around around your plants. This helps to keep the water in and if you’re like me and you can’t get to watering every single day, this gives you a little leeway.

    Mulching will also help to keep weeds at bay, but you’ll still have some. If you aren’t sure if it’s a weed or a seedling (it’s ok! It’s happened to me too!), wait a while to see. While seedlings and plants are still small, I like to just pull weeds with my hands, but as the plants get bigger and stronger, you can get a hoe or a hand garden tool in there and do some serious weeding.

    Step 6: Enjoy all those gorgeous flowers!

    Cutting Garden

    We had bucketful after bucketful last summer and we enjoyed every bit of it.

    Try to go out and cut at least 2-3 times per week. Deadhead any flowers that died before you could cut them as this will help with reblooming.

    Flowers for a Cut Flower Garden

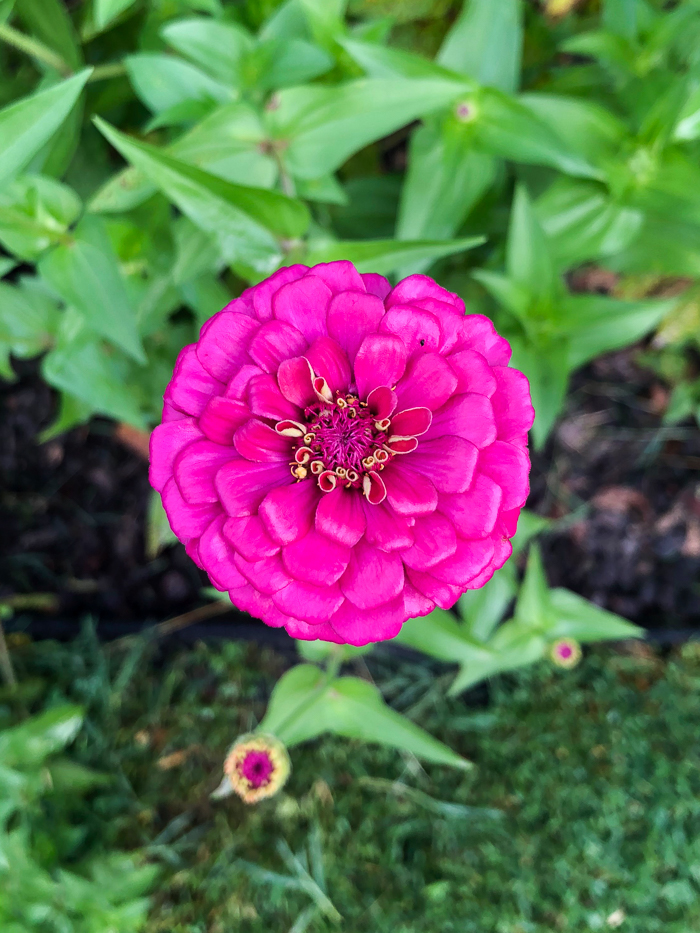
    This is one of those gorgeous red zinnias I mentioned above.

    Best Flowers for a Cutting Garden

    This color of Zinnia is another favorite.

    Best Cut Flowers to Grow in a Cutting Garden

    These sunflowers were beautiful last year!

    Growing Cut Flowers for Beginners

    Here’s a simple arrangement with some of the Gladiolus and Zinnias I grew.

    Creating flower arrangements from a cut flower garden.

    I love doing clusters of flowers and adding height with smaller flowers above them. I also keep as many leaves as I can -they add good interest to arrangements. Unfortunately, the sunflower leaves don’t look good for very long though.

    The biggest thing I can tell you to keep in mind is that, especially if you’re a beginner, don’t get discouraged if some of your flowers don’t do well or don’t take at all. Just enjoy what you have and try again next year with some new varieties. I had some that didn’t take at all last year and I’m sure that will be the case this year as well – it’s all part of it!

    If you have any tips for growing cut flowers or the best flowers for cutting gardens, please share below in the comments – I’d love to hear them!

    Looking for more outdoor inspiration?

    10+ Creative Flower Pot Ideas – you won’t believe some of these!

    DIY Flamingo Sprinkler – such a fun way to water!

    Tips for Beautiful Planters All Summer Long – keep those flowers gorgeous from the beginning right up till the very end!

    Our Front Yard Landscape Makeover – it’s a crazy difference!

    Want to come back to this flower garden guide later? Just pin the image below!

    Cut Flower Gardens for Beginners

    Get behind the scenes by following along on social media:

    Facebook | Instagram | Pinterest | Twitter

  • DIY Cedar Planter Box using a Snap Together Frame

    DIY Cedar Planter Box using a Snap Together Frame

    Add some curb appeal to your home with this DIY cedar planter box. These cedar planter box plans use a SnapFence frame that literally snaps together, making this a simple build even for new DIYers. If cedar isn’t your thing, you can easily customize the frame with a different material.

    I am always a sucker for a great planter or flower pot. I couldn’t snatch up a swan planter quick enough at a yard sale the other day even though the guy selling it made sure to point out how badly the paint was chipping. I’ve also been on the lookout for a donkey flower pot ever since I spotted the most adorable one at a yard sale, but sadly they weren’t for sale.

    I also love a great planter box that can pull double duty as an address marker.

    This post is sponsored by SnapFence. All opinions are 100% mine.

    DIY Cedar Planter Box with Shrubs

    Isn’t this one great? This DIY cedar planter was made using SnapFence components, which are rails and connections made of PVC that is built to withstand the elements and make outdoor building projects a whole lot easier.

    Cedar Planter Box DIY

    This post contains affiliate links for your shopping convenience. Click here to read my full disclosure policy.

    For reference, the overall dimensions of my cedar planter box is 24″ high x 18″ deep x 36″ long.

    Materials and Tools Needed: 

    Steps

    Step 1: Assemble the SnapFence frame.

    Cedar Planter Box DIY Frame Materials

    Use the instructions found here to assemble the SnapFence frame for the planter. Working from the bottom up, use a rubber mallet to secure all the rails into the connectors. The video below shows how easy it is to build the frame.

    [adthrive-in-post-video-player video-id=”skCLhoqb” upload-date=”2018-10-02T11:50:16.000Z” name=”DIY Cedar Planter Box using SnapFence” description=”Add some curb appeal to your home with this DIY cedar planter. These cedar planter box plans use a SnapFence frame that literally snaps together, making this a simple build even for new DIYers. If cedar isn’t your thing, you can easily customize the SnapFence frame with a different material.”]

    If you aren’t a video person, then you can use the photos below as a guide.

    Cedar Planter Box Plans - constructing the frame.

    Literally, the instructions lay out exactly how to connect the frame. It took me less than 10 minutes to assemble the frame.

    If you’re curious about how well the rails and connections truly stay snapped together, well I can assure you, they are pretty darn tight. In order for me to get both the video and photos of the process for you, I had to put the frame together, then take it apart and put it together all over again. (Yes, if I were a smart person, I would have stopped to take photos the first time around, but I forgot.) Anywho, I had to really bang on some of the rails and connections with my rubber mallet in order to get the frame broken down. This stuff is very well made and very secure when it’s put together.

    Step 2: Attach the cement board.

    Once you have your frame in place, use the included screws to attach the cement board (concrete board / backer board / whatever you want to call it) to the SnapFence frame.

    DIY Cedar Planter - assembling the side panels.

    Step 3: Finish the Planter Box.

    At this point, you can choose to stucco the planter box, paint it or whatever else your little heart desires. I opted to clad mine with cedar planks.

    You’ll want to start with the short sides of your planter box.

    Place two uncut cedar planks along the bottom of each long side, flush against the cement board.

    Building a cedar planter box.

    Measure the distance between the two planks and cut five cedar planks down to this size. For each cut, use a new cedar picket. Don’t cut again from the same picket. Instead, set these pickets aside and they will be long enough for the long sides of the cedar planter box.

    Lay the planter box on the opposite short side you are working on.

    Applying cedar to a planter box.

    Lay one of your cut cedar planks on the bottom of the short side. You want it to go past the cement board but not extend past the SnapFence PVC feet. Think of the cedar planks as “floating” just above the ground. Make sure there is roughly the same amount of plank hanging over on each side where the long side planks will eventually be placed.

    Put Fuze It on the back of the cedar plank, then clamp into place.

    DIY wooden planter box using cedar.

    Take the rest of your cut exterior wood boards, apply Fuze It to each of those, then line them up and lay them out across the rest of the exposed cement board on this side, pressing each firmly in place as you go.

    Applying cedar boards to the diy planter.

    Once you have them all in place, place a few heavy objects on top to help the glue get a good bond with the cement board.

    Step 4

    After a few hours, repeat Step 3 on the other short side of the cedar planter box.

    Step 5

    After both short sides have been clad with cedar planks, use the same process to cover the long sides of the planter box with cedar. This time when measuring to cut the cedar planks, you’ll just measure from end to end of the cedar boards on either short side, rather than between them.

    DIY Cedar Planter Box with House Numbers

    Attach house numbers to the front of the planter if you wish.

    Place the planter wherever you wish. I think it would look great beside a mailbox, on the front porch or near a garage.

    Related: 10+ Creative Flower Pot Ideas

    Cedar Planter Box DIY with shrubs planted in it.

    Fill with plants and enjoy! I opted to go with tall boxwoods for our planter. With big planter boxes like this, I like to always have something in them that will stay green all year long and then add in annuals as the seasons change. This cedar planter would also be great for planting bulbs in. If you don’t want to fill the entire planter with soil, then fill the bottom of the planter with plastic bottles and jugs to take up space.

    If you want to protect the wood, then apply a coat or two of exterior water seal.

    You can also use Snapfence post ground pilings that can be attached to the bottom connections and anchored into the ground. I opted to forgo those as after I got the entire thing put together it was pretty heavy as is – I couldn’t lift it by myself. I knew that filling it with dirt was only going to make it even heavier and keep it in place, so I didn’t think I needed those.

    I love DIY planter boxes because you can customize them to your home’s exterior. This one is no different. If the cedar look isn’t your thing, you can absolutely go another route! Just think of the SnapFence frame as your blank canvas. 😉 SnapFence also makes lots of other Snap n Build kits like pet enclosures, garden walls, fence kits and more. And yep, you just snap ’em together. 🙂

    What would you cover your planter frame with?

    Want more outdoor project ideas and tips?

    Creating a Cut Flower Garden – perfect for beginners!

    DIY Painted Planter Pots – take basic planters and kick ’em up a notch!

    Want to remember this planter for later? Just pin the image below!

    Cedar Planter Box Plans using a Snap Together Frame
  • How to Hang Shutters on Brick: Detailed Guide for Installing Vinyl Shutters

    How to Hang Shutters on Brick: Detailed Guide for Installing Vinyl Shutters

    If you’re looking for a DIY home improvement project that will add value and curb appeal to your home, then consider installing vinyl shutters on your home! You might just be surprised at how much they add to your home. Below, you’ll find a step-by-step guide for how to hang shutters on brick.

    This post / project has been six months in the making. Six months.

    It should not take an average person six months to get shutters installed on their home.

    But apparently, we’re not average. We ran into a few hiccups.

    Last week, I revealed our new front yard landscape makeover. We went from this:

    How to Hang Shutters on Brick

    To this:

    Shutters on Brick House

    Mid-America Shutters provided me with shutters for our home. However, opinions and installation struggles are 100% mine. This post contains affiliate links for your shopping convenience. Click here to read my full disclosure policy.

    One of the big changes there besides the landscaping was the replacement of our old windows and shutters.

    Yes, we still have to get the hideous green painted over, but it takes time, y’all. And money. 😉

    Now windows, that’s not a DIY job – not for us anyway. The shutters though, I was pretty confident we could tackle. We had discussed painting the old louvered ones, but I really wanted a paneled shutter and seriously, who wants to paint all those louvers anyway? Not me.

    We went with standard raised panel shutters from Mid-America.

    How to Hang Shutters

    I knew the classic style wouldn’t date easily and it would also go well with our brick house exterior.

    For the color, we opted for Midnight Blue. I wanted something with a little color that would also go well with the brick, the beige-grey window trim and the white windows. Midnight Blue fit that bill perfectly. We’re also planning to paint our garage doors this color to bring it around to that side of the house too.

    Eventually, all the green trim will be replaced with that beige-grey window trim color as well, so it will all go nicely together. Mid-America also offers lots of different length options in their shutters, which was great for us since we have both tall and short windows. The finish is supposed to stand up really well over time too, which was a must for us since our home gets so much direct sunlight.

    So let’s talk about the vinyl shutter installation. This was where we ran into some issues – not the fault of the shutters at all, but, how should I put this, installer error. 😉

    How to Install Shutters on Brick

    Tools and Supplies Needed:

    *It’s also important to note that this job is best done with two people.

    Steps

    Step 1

    Remove your old shutters. Que the first hiccup for us.

    When we went to remove our old shutters, we discovered that nearly all of the screw heads on the old shutters were stripped. So, we had to pry the old shutters off, then twist the screws out one by one with pliers. Oh what fun! Hopefully, yours won’t be that way though.

    Step 2

    Remove a set of shutters from the box and hold one shutter up on one side of the window you are putting it on.

    How to Install Shutters on Brick

    Place it were you want it – if you get paneled ones like we did, one panel is slightly longer than the other and it should be on the bottom.

    Place a level on top of the shutter, level it up, then mark a spot on both sides at the top and bottom of the shutter where you want the shutter fasteners to go. We just eyeballed this. The shutter fasteners are the same color as the shutters so they blend in really well and you can’t tell if you’re off by a little bit or not. If you can place the fasteners where they will go into mortar rather than brick, thus, you will drill into the mortar, rather than brick, it will make your job easier.

    Step 3

    Installing Shutters on Brick

    Take the shutter and using your regular drill, drill a 1/4″ hole using the 1/4″ regular drill bit in each of your marked spots.

    Step 4

    Put your shutter back in place and make sure it’s level once more. Now, you need two people for this part. You’re going to drill pilot holes into the brick/mortar for your shutter fasteners.

    While one person is holding the shutter in place, the other should use the hammer drill to go through the holes you just made with the regular drill and make small holes to mark where the holes should go in the brick / mortar.

    Hanging Shutters

    Que our second hiccup. The hammer drill is a must for drilling into brick and mortar. We did not know this. We tried to use our regular corded drill at first and it flat out didn’t work. There were tears, there were words. It was stressful. After some research, we decided a hammer drill might work better – total game changer.

    Step 5

    Remove the shutter and use the hammer drill to finish drilling out the holes you just marked in the brick.

    Installing Vinyl Shutters

    Step 6

    After you’ve drilled all the holes in the brick with the hammer drill, place a shutter fastener into each of the holes in the shutter.

    How to Install Vinyl Shutters

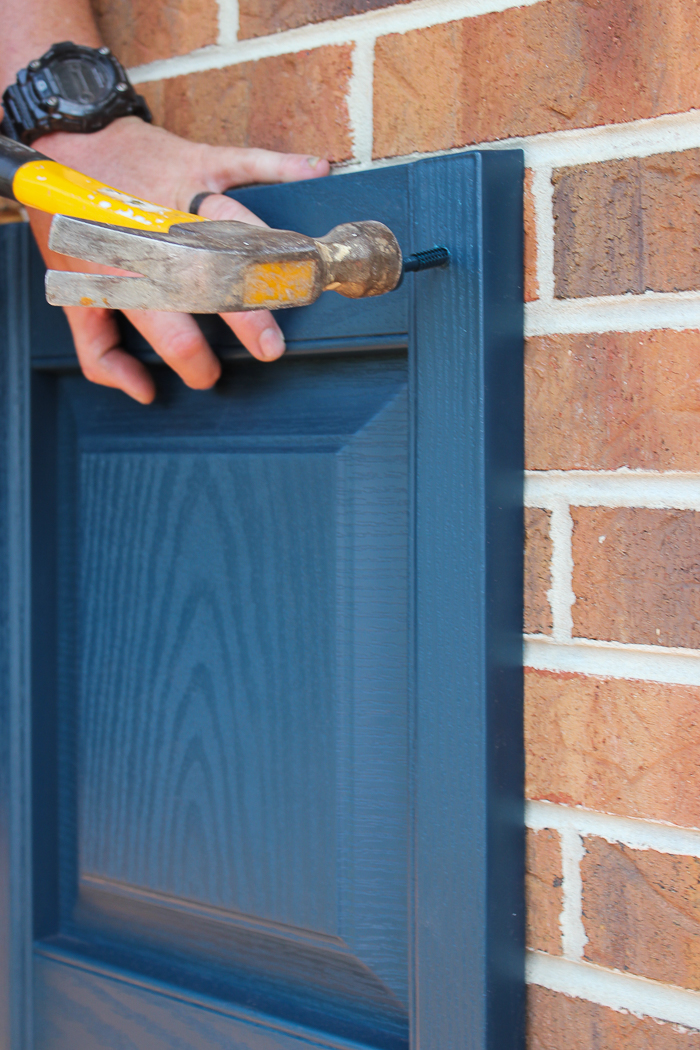
    Line up the fasteners with the holes in the brick, then gently tap the fasteners in with a hammer to attach the shutter to your home’s exterior.

    That’s it! The installation is actually really simple, you just have to have the right tools, which was our problem.

    Those fasteners are serious business too – the shutters don’t budge at all once they are held in with the Shutter-Lok Fasteners.

    How to Install Shutters

    Another thing to note is that we used four fasteners on the lower, shorter windows, one in each corner, but six on the higher, longer windows, one in each corner and one on each side of the middle of the shutter.

    Don’t the shutters look great, though? I love, love, love the midnight blue – it was exactly the color that the house needed!

    Step by Step Guide for Installing Vinyl Shutters on Brick

    Now, just to nix that green and paint the trim around the door!

    Looking for more home improvement projects to boost curb appeal? 

    Here’s a DIY Cedar Planter Box that is great for both flowers and displaying your house numbers.

    If you have lattice anywhere on your home, here’s an easy lattice refresh technique!

    Don’t miss this mailbox makeover I did in less than an hour.

    And here are 13 ideas for sprucing up your front door and entry.

    Want to come back here later? Just pin the image below! 

    How to Hang Vinyl Shutters on Brick Exteriors

    Hanging Shutters on Brick Houses

  • Our Front Yard Landscape Makeover

    Our Front Yard Landscape Makeover

    It is much overdue, but our home’s exterior has finally started getting the facelift it so desperately needs.

    We have wanted to update the exterior of the 70’s Landing Pad from the time we bought it…but there wasn’t anything necessarily wrong with it then – it was just flat out ugly.

    Landscape Before

    And so instead of updating the exterior, we put our resources toward the interior where there were a lot of fixes that needed to be made.

    Then earlier this year, a storm came through and caused some roof damage, which led to a new roof. Close on the heels of the new roof came new windows, quickly followed by new shutters and new landscaping.

    Front Yard Landscape Makeover

    We still have to get rid of that green trim color, but doesn’t it look so much better?

    I’m sure the neighbors really appreciate it too because for a while, it looked like this in our front yard…

    Disclosure: This post is in partnership with Proven Winners, however all opinions are 100% mine. 

    Landscape Before

    Grunt Labor was over all the overgrown shrubbery one day and so he and Nicky did what they do best and hooked a chain to each shrub, then pulled them out.

    And then weeds grew and grew and grew until we were able to finally tackle the space this month…

    Front Yard Landscape Makeover

    Front Yard Landscape Makeover

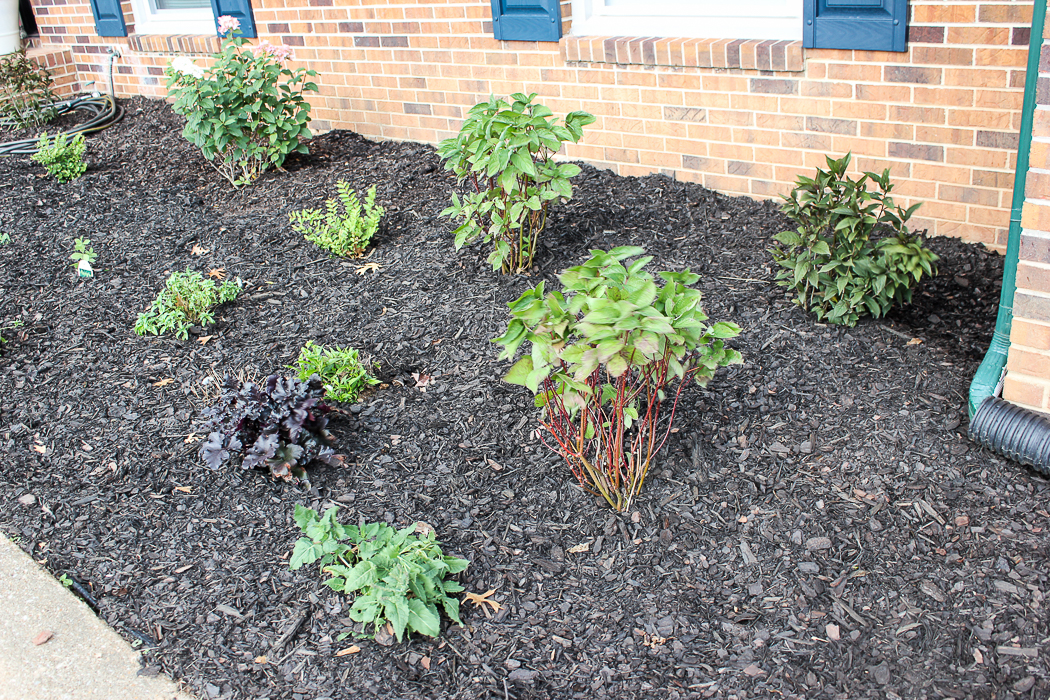
    And while these plants are still babies so to speak, I think it looks so much better already and I can’t wait to see them grow and really highlight the house. Let’s get down to the details of re-landscaping this space, shall we?

    Prepping the Beds

    Like I said earlier, all of the old shrubbery had been pulled out. Before we planted the new stuff, we dug up the monkey grass that was on the lower end of the house and then sprayed all the weeds to kill them.

    After the weeds were all dead, we pulled out the larger ones and Grunt ran our tiller through it all.

    Front Yard Landscape Makeover

    After that, I came back through, smoothed it all out with a rake, then covered everything with weed paper.

    Front Yard Landscape Makeover

    Planning the Beds

    I worked with Proven Winners on this project and they were so great about helping us figure out a plan that would work well with our home and lifestyle in terms of what colors would go best with the brick, our home’s location and how much sun it gets, getting low maintenance plants, etc.

    With the exception of night time and a few hours in the morning, the front of our home has the sun beating down on it all day. We also live in Tennessee where it’s hot and humid often, so all of our plants and shrubs were chosen with those things in mind. So if you have a place in your yard that has similar conditions, this is a great list of plants and shrubs to get your landscaping wheels a turnin’.

    Sun Lovin’ Shrubs

    Since my plants are still babies, I’ve linked below to what they will look like as they mature.

    Shiny Dancer Viburnum

    Front Yard Landscape Makeover - Shiny Dancer Viburnum

    I really love the deep, but shiny green on the Shiny Dancer Viburnum. In the spring, it will have white flowers.

    Emerald Envy Viburnum

    Front Yard Landscape Makeover - Emerald Envy Viburnum

    We have an Emerald Envy Viburnum on each end of the house. These too will have white flowers in the spring.

    Fire Light Hydrangea

    Front Yard Landscape Makeover - Fire Light Hydrangea

    Hydrangeas are my favorite. In fact, Grunt Labor planted me a whole row of them one time and you can read about that story here. Anywho, I was really excited to get a hydrangea in the mix here. And I’ve even got a flew blooms on this one! This one is a Fire Light Hydrangea. It starts with white flowers in the summer and they age to red.

    Pearl Glam Callicarpa

    Front Yard Landscape Makeover - Pearl Glam Callicarpa

    This one is a Pearl Glam Callicarpa. It may not look like much now, but it gets white flowers in the summer that turn to purple fall berries and the berries are beautiful – such a gorgeous color of purple!

    Arctic Sun Dogwood

    Front Yard Landscape Makeover

    This Arctic Sun Dogwood will have gorgeous yellow and coral stems in the winter.

    Laced Up Elderberry

    Front Yard Landscape Makeover - Laced Up Elderberry

    This is a Laced-Up Elderberry. The leaves have kind of a deep purple hue with a lacy look to them.

    Infiniti White Lagerstroemia

    Front Yard Landscape Makeover - Infiniti White Lagerstroemia, a dwarf, low-growing crape myrtle.

    Grunt Labor is a big fan of crape myrtles, so I was also excited to get these, which are Infiniti White Dwarf Low-Growing Crape Myrtles.

    Scentsation Honeysuckle

    Front Yard Landscape Makeover - Scentsation Honeysuckle

    This is a Scentsation Honeysuckle. They will be trained up the porch columns and will have very fragrant, yellow flowers in the early summer.

    Sun Lovin’ Perennials

    We of course wanted to have mostly shrubs in the front that would always have some sort of foliage interest throughout the year, however, we are big fans of perennials too that come back each spring with gorgeous flowers, so we mixed some of those in the plan as well.

    Decadence Lemon Meringue BaptisiaFront Yard Landscape Makeover - Decadence Lemon Meringue Baptisa

    These Decadence Lemon Meringue Baptisia came in a small little container, but promise big, beautiful yellow flowers.

    Cat’s Meow Nepeta

    Front Yard Landscape Makeover

    After seeing what these Cat’s Meow Nepeta look like when they are in bloom, I cannot wait to see them next spring!

    Color Spires Crystal Blue Salvia

    Front Yard Landscape Makeover - Color Spires Crystal Blue Salvia

    This Color Spires Crystal Blue Salvia will have a spiky look with light blue blooms in the summer.

    Primo Black Pearl Coral Bells

    Front Yard Landscape Makeover - Primo Black Pearl Coral Bells

    I’ve always been a fan of these coral bells – I love that deep hue.

    Opening Act White Phlox

    Front Yard Landscape Makeover - Opening Act White Phlox

    Phlox has always been another favorite of mine, so I was happy to get these Opening Act White Phlox in the ground here as well.

    Magic Show White Wands Veronica

    Front Yard Landscape Makeover - Magic Show White Wands

    I don’t think I have ever saw these before, but this Magic Show White Wands really does look a little magical when they bloom.

    Fruit Punch Maraschino Dianthus

    Front Yard Landscape Makeover - Fruit Punch Maraschino Dianthus

    I’ve never had any of these perennials before, but I’ve always thought they were so adorable. They are Fruit Punch Maraschino Dianthus. They have little red flowers that will pop up.

    Planting the Beds

    Once everything got here, I brought all the plants around front and started placing them in the beds where they would go without actually planting them first.

    Front Yard Landscape Makeover

    This helped me to see if I had too many perennials in one spot, some shrubs too close together, some too close to the house, etc. Once I got everything where I wanted it, I planted them.

    Over 40 shrubs and perennials all in one day.

    Because I am a rock star. Or because I’m insane. Most likely the latter.

    The neighbor literally came out and told me I was going to kill myself.

    I laughed in the face of this so called planting danger.

    I also drank a lot afterwards. 😉

    Anywho, when you’re planting in a bed with weed paper that is down, just use a box cutter to cut an X or circle in the weed paper, then dig your hole, put the plant in and fill back in with dirt.

    After everything was in the ground, we put mulch down all over the bed to help retain moisture and of course, to make it look pretty.

    Front Yard Landscape Makeover

    I see a weed that’s gotten through the weed paper there on the edge though. Womp, womp, womp.

    And don’t forget to water!

    Front Yard Landscape Makeover

    We’re looking forward to seeing these babies grow!

    Front Yard Landscape Makeover

    And also getting rid of that hideous green paint…

  • 5 Tips for Beautiful Planters All Summer Long

    5 Tips for Beautiful Planters All Summer Long

    Disclosure: This post is sponsored by Proven Winners, however all opinions and flower pot mishaps are 100% mine. 

    A few weeks ago, I was perusing the Home Depot completely unaware of the valuable life lesson that was about to play out before my very eyes.

    The Circus and I had a slew of errands to run before her birthday party that was in just a few days and picking up spray paint at the Home Depot was one of those things on the list. Prior to leaving the house that morning, I had actually showered, washed my hair and even applied a little makeup.

    I was on top of my game.

    This was a Friday and by washing my hair that morning, I was good to go for another few days sans hair washing.

    You know you hate washing your hair everyday too. Just own it already. 

    After we picked up our spray paint, the Circus and I decided to take a quick peek at the planters in the garden center. I had been on the hunt for some new ones to flank either side of our front door.

    I spied some nice, classic large cream planters on a shelf a tad higher than myself. They were stacked upside down on top of one another and as I reached up to tilt them down and pull them off the shelf, I thought nothing about the fact that it had rained earlier this morning.

    I thought nothing about that fact until the water which had collected on the bottom side of the planters hit me right on top of the head and totally ruined my freshly washed and styled hair.

    I looked at the Circus, not knowing whether I wanted to laugh or cry and trying hard to keep the long list of expletives from emerging out of my mouth. She didn’t know what to say either, but after about 10 seconds of just staring at me with her mouth slightly open, she finally said, “You look funny, Mama.”

    So we just went with it. For the rest of the day, we completed our errands – gross hair and all.

    And yes, we bought the planters.

    Tips for Beautiful Planters All Summer Long

    So besides sharing life lessons learned at the Home Depot, I also thought that today I would share some easy tips for beautiful planters all summer long.

    Something great needs to come out of water on my freshly washed hair, right?

    5 Tips for Beautiful Planters All Summer Long

    Tip #1

    Drill drainage holes in the bottom of your planters if they don’t already have them.

    Tips for Beautiful Planters All Summer Long - be sure to drill drainage holes in the bottom of your planters if they aren't there already.

    Do not skip this, y’all! Lots of planters already come with predrilled drainage holes, but some don’t. The planters I bought had places to drill out the holes, but they weren’t pre-drilled out. To drill the drainage holes, just put a drill bit on your drill and put a few holes in the bottom of the planter. If the excess water can’t drain from the planter, your flowers aren’t going to make it.

    Tip #2

    If I would have filled these planters completely with soil, there’s no telling how much money I would have spent just in soil! To reduce the amount of soil you need, use fillers in the bottom of your planter pots.

    Tips for Beautiful Planters All Summer Long - fill the bottom of your planters with plastic bottles to help drainage and reduce the amount of soil you need.

    For these planters, I used an old plastic pot that came from another plant and then used plastic bottles around that pot. I probably came about 1/3 – halfway up with the filler in these pots. I left plenty of room for dirt and the roots of the flowers to grow.

    Tip #3

    Choose the right annuals for your space.

    Tips for Beautiful Planters All Summer Long - choose annuals that are proven to perform well.

    Planting flowers that will perform well in your area as well as in the space you are planting them is crucial to getting and keeping beautiful planters all summer long.

    These planters are on our front porch, which faces west and is in full sun pretty much all day. We have zero shade in the front of our house and we live in Tennessee, so it gets pretty darn hot around here in the summer. For this reason, we needed flowers that were very heat tolerant and liked the sun.

    Tips for Beautiful Planters All Summer Long

    We went with Angelface Perfectly Pink Angelonia, Indigo Charm Petunia, and Sweet Caroline Bewitched After Midnight Ipomoea all from the Proven Winners line of annuals.

    Besides being flowers that will perform well on our front porch, this combination of flowers also goes along with the filler, spiller and thriller approach to container gardening – to really make a planter pop, you want one flower in it that fills, one that spills and one that thrills. A thriller plant is going to add height to your planter; for me, these were the Angelface Perfectly Pink Angelonias. The filler is going to help your planter look more full and will usually be more of a mounded flower – like the petunia. The spiller is going to be a plant that is literally going to spill over and hang over the edge of your planter – like the sweet potato vine.

    Tip #4

    Now you’ve got the perfect flowers and you just need to arrange them.

    Tips for Beautiful Planters All Summer Long - arrange the annuals correctly.

    You want to put your thriller (the taller one) in the back of the planter and then your filler and spillers side-by-side in the front of your planter.

    Tips for Beautiful Planters All Summer Long

    After you plant your flowers, give them a good drink of water.

    Tip #5

    Don’t forget to water and feed throughout the summer!

    Annuals aren’t plant ’em and forget ’em flowers. At a minimum, they need to be watered regularly, but if you really want to knock your planters out of the park, then feed them on a regular basis with good plant food. So that I don’t forget to water and feed my planters this year, right after planting them, I put a daily reminder in my phone to water them and then at around the three week mark, I put a reminder in to feed them weekly. Now, if your planters aren’t under cover like mine are, then if it rains, you don’t have to worry about watering them as often.

    Tips for Beautiful Planters All Summer Long

    I can’t wait to see how gorgeous these planters get this summer!

    You can find great container recipe ideas from Proven Winners here – they do all the work for you and tell you exactly what works well together! You can also snag a free copy of their Gardener’s Idea Book here and they have a slew of gardening ideas and tips on their Proven Beauty website.

    Happy Planter Season!

    You might also want to see…

    DIY Cedar Planter Box  – using a simple snap-together frame!

    10+ Flower Pot Ideas – unique ideas for beautiful flower pots!

    Pin This Post

    Take the guesswork out of container gardening with these easy tips for beautiful planters all summer long - anyone can do this!

  • Easy Front Door Makeover

    Easy Front Door Makeover

    This is a sponsored post written by me on behalf of At Home. All opinions are 100% mine.

    I’m partial to lions.

    I find it hard to walk away from just about anything lion decor related.

    I have good reason for this though.

    Grunt Labor and I met while we were both teachers. Our school’s mascot was the lion. Grunt Labor has always coached the lions. The Circus knew how to say “Go Lions!” before she left the womb. She had her one year old pictures taken on the lion paw prints surrounding that same school’s football field. Bill played for the lions.

    So I’m partial to lions. 

    I have wanted a lion statue to go outside of our front door longer than I can remember. However, finding a good sized lion statue for a reasonable price was not as easy as I thought it would be. I had kind of quit looking.

    But it was when I quit looking that I found my perfect lion. 

    Lion Statues at At Home

    I was in At Home a few weeks ago for no particular reason other than to take a much needed break from the renovation at the 70’s Landing Pad. It was then, while wandering through the endless Outdoor Decor Collections aisles, that I found my lion. He was white, of good size, and only $30. I could hardly contain my excitement and having no one else with me to celebrate with, I pulled that lion right off the shelf and gave him a hug. Given that I’d been searching for him for years, I felt this was completely reasonable.

    Once I found my lion, my trip to At Home suddenly became a quest to whip the front door entry into shape at the 70’s Landing Pad.

    I decided the lion would go on one side of the front door, but I would need something of similar size to the lion to even out the other side of the door.

    At Home Outdoor Decor

    I went through shelves full of At Home Patio and Outdoor Entertaining items and tried out no less than 15 different plant stands, garden stools and small tables right there in the store. I’m sure people hate to turn down the aisles I’m on, because I tend to take up half of it testing out what works together and what doesn’t.

    After I found a garden stool that worked, I then did the same thing with flower pots.

    At Home Flower Pots

    And before I left, I figured I might as well get a new door mat while I’m at it.

    Here’s what the front door space looked like before:

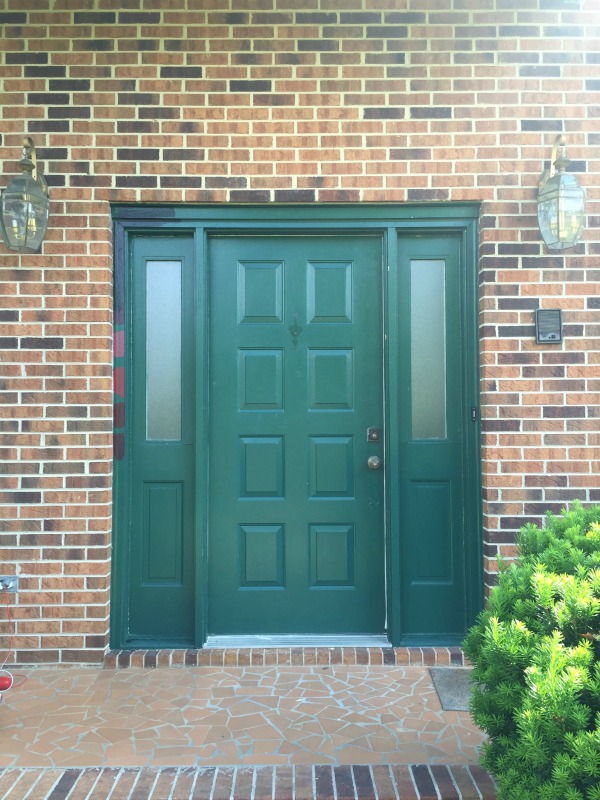
    Front Door Before

    Now friends, you know I love me some green. But that shade of green with those bricks just wasn’t doing it for me. And so to really make my new lion feel at home and shine, I painted the front door and trim for him.

    Front Door Makeover

    I went for a wine colored front door and opted for black trim because we have a lot of black in the house and that seemed to tie in well with the brick color and the front door color as well.

    Front Door Makeover

    Of course, Mr. Lion is taking up residence on one side of the door. By the way, he also has a solar light built into him – that’s what the light and black thing are on his base! The new doormat also brought some of the black down to the porch floor.

    Front Door Makeover

    On the other side of the door is a black and white planter on top of a garden stool I finally settled on at At Home to give it a bit more height and even out each side of the door.

    Front Door Makeover

    I think Mr. Lion likes his new home – especially when the Circus makes him a crown out of rocks. 

  • Snazzy Painted Planter Pots

    Snazzy Painted Planter Pots

    I am willing spring to come with this project. Willing the cold cold cold air of yesterday to go away and the warmth that we enjoyed just on Monday to return. Living in the Tennessee valley, you literally never know what the weather may bring.

    And now, I just realized I sound like an old man talking about the weather.

    Let’s move on to the snazzy painted planter pots, shall we?

    I actually made these toward the end of last summer. Thus why, when you see the images, it’s all bright and sunny. However, when I went to post them, the weather had quickly changed and I decided it would be best to wait – so here they are now, getting thrown into internet land along with a little wish for spring.

    Instead of paying $50 on a planter pot, buy a cheap one and dress it up with spray paint! Easy Painted Planter Pots | Gardening | Fiddle Leaf Fig | Geometric | Painting Patterns

    Snazzy Painted Planter Pots

    Affiliate links may be contained in this post.

    Materials & Supplies Needed:

    Step 1: 

    To make the planter that has vertical triangles that meet in the middle, start by creating the pattern below with the smaller width FrogTape®.

    Instead of paying $50 on a planter pot, buy a cheap one and dress it up with spray paint! Easy Painted Planter Pots | Gardening | Fiddle Leaf Fig | Geometric | Painting Patterns

    I didn’t really measure on these much, just eyeballed it.

    Step 2: 

    Next, you will want to use your craft knife to trim up all the edges of the tape.

    Instead of paying $50 on a planter pot, buy a cheap one and dress it up with spray paint! Easy Painted Planter Pots | Gardening | Fiddle Leaf Fig | Geometric | Painting Patterns

    For the largest triangle, you will want to cut out the section where the triangles meet as shown below.

    Instead of paying $50 on a planter pot, buy a cheap one and dress it up with spray paint! Easy Painted Planter Pots | Gardening | Fiddle Leaf Fig | Geometric | Painting Patterns

    Step 3: 

    Begin creating the same pattern as you did at the top, except on the bottom of the pot now.

    Instead of paying $50 on a planter pot, buy a cheap one and dress it up with spray paint! Easy Painted Planter Pots | Gardening | Fiddle Leaf Fig | Geometric | Painting Patterns

    Step 4: 

    After you have created the pattern, tape off the surrounding area of the planter with the larger width FrogTape®.

    Instead of paying $50 on a planter pot, buy a cheap one and dress it up with spray paint! Easy Painted Planter Pots | Gardening | Fiddle Leaf Fig | Geometric | Painting Patterns

    Use your fingernail to firmly adhere the FrogTape® edges to the planter.

    Step 5:

    For the other planter, simply place six strips of the 0.94″ FrogTape® on the side of the planter in triangle formations as shown below.

    Instead of paying $50 on a planter pot, buy a cheap one and dress it up with spray paint! Easy Painted Planter Pots | Gardening | Fiddle Leaf Fig | Geometric | Painting Patterns

    Step 6: 

    Even up your edges with a craft knife and tape off the rest of the planter with the 1.88″ FrogTape®.

    Instead of paying $50 on a planter pot, buy a cheap one and dress it up with spray paint! Easy Painted Planter Pots | Gardening | Fiddle Leaf Fig | Geometric | Painting Patterns

    Step 7: 

    Use your fingernail to firmly apply pressure to all the edges of the FrogTape® to create a good seal.

    Instead of paying $50 on a planter pot, buy a cheap one and dress it up with spray paint! Easy Painted Planter Pots | Gardening | Fiddle Leaf Fig | Geometric | Painting Patterns

    Step 8: 

    Spray paint your designs.

    Step 9: 

    After your last coat of spray paint (I did two coats), immediately remove the FrogTape®.

    Let the planters fully dry, then fill them with your favorite plants.

    Instead of paying $50 on a planter pot, buy a cheap one and dress it up with spray paint! Easy Painted Planter Pots | Gardening | Fiddle Leaf Fig | Geometric | Painting Patterns

    Instead of paying $50 on a planter pot, buy a cheap one and dress it up with spray paint! Easy Painted Planter Pots | Gardening | Fiddle Leaf Fig | Geometric | Painting Patterns

    Instead of paying $50 on a planter pot, buy a cheap one and dress it up with spray paint! Easy Painted Planter Pots | Gardening | Fiddle Leaf Fig | Geometric | Painting Patterns

    Instead of paying $50 a pop, you’ve spent about $15 per planter.

    Not too shabby.

    Now, come on spring!!

    Do you have any great pattern ideas for planters? 


    You might also wanna check out…

    DIY Cedar Planter Box  – using a simple snap-together frame!

    Tips & Tricks for the Perfect Container Garden

    Teapot Planter – turn an old teapot into an adorable planter!

    My Green Thumb Trick

    pin-this-post-2

    DIY Painted Planter Pots | Flower Pot Ideas | Flower Pot Crafts | DIY Flower Pots | Planter Ideas | DIY Planter Ideas | DIY Planter Pots

    blog-signature-summer-15

    frogtape-disclosure

  • How to Start a Fire Fast

    How to Start a Fire Fast

    This post is sponsored by HomeRight, however all opinions are 100% mine. Affiliate links may be contained in this post.

    I didn’t fall in love with Grunt Labor on a fire pit night. But he definitely got a few brownie points the first time we set around a fire pit.

    There are many things that seem to be imprinted on your DNA when you are born in the country. One of those things is a love for fire pit nights. There aren’t many things better than a weekend night spent around a fire pit with good friends, good drinks and good music. In fact, I feel I should also write you a fire pit playlist now that I think about it. But I digress. A good fire is imperative though to the night’s success. You need it big, but not too big and you don’t want to have to waste too much time starting it. So let me introduce you to the coolest new fire lighting tool you have ever seen…

    How to Start a Fire FAST - takes 2-3 minutes and not a single match is required! You won't believe this!!

    HomeRight’s latest toy, the Electro-Light Fire Starter. The Electro-Light makes it possible for you to light up your fire pit, charcoal grill or anything else you want to add a little heat to in 2-3 minutes flat. Without lighting a single match.

    Now, before we go any farther. Let’s get a few things straight. I am not responsible if you catch yourself on fire or catch something else on fire that wasn’t supposed to be set on fire. Follow the instructions included with the tool and use caution and common sense, y’all. Do not get too close to fires. Do not let children be around fires without supervision. Make sure there isn’t anything around the fire that could easily catch on fire. Got it?

    How to Start a Fire FAST - takes 2-3 minutes and not a single match is required! You won't believe this!!

    All you do is plug it in (no lighter fluid or anything like that required) and push the red button. You will start to hear a sound that resembles a vacuum. The Electro-Light is actually blowing 1300°F air onto your wood or charcoal. After 2-3 minutes, you should have a good fire going. If the flames start to die out, just turn the Electro-Light back on and fan the flames.

    We tested it out a few weeks back when the Circus insisted upon roasting marshmallows, but neglected to eat a single one of them that she roasted. #imaginethat

    How to Start a Fire FAST - takes 2-3 minutes and not a single match is required! You won't believe this!!

    That picture was after we already had the fire going. I started taking a video after we had the Electro-Light going for about a minute before any of the fire had started. It’s really cool to see it light up.

    [adthrive-in-post-video-player video-id=”2zLXF63I” upload-date=”Wed Jul 20 2016 13:33:20 GMT+0000 (Coordinated Universal Time)” name=”Rain on a Tin Roof – How to Start a Fire Fast” description=”How to Start a Fire Fast by Rain on a Tin Roof”]

    Isn’t that awesome? P.S. Great fire starter helpers are evergreen branches from old Christmas trees and lint. 🙂

    This bad boy will probably be making the rounds as a gift to quite a few of our fire pit loving friends and grill loving guys. You can find it on Amazon.

    Are you a fire pit lover? 

    How to Start a Fire FAST - takes 2-3 minutes and not a single match is required! You won't believe this!!

    blog-signature-summer-15

    You know you don’t wanna miss any of this crazy.

    Sign up to get my posts delivered to your inbox here.

    Stalk Me Here:

    Pinterest / Facebook / Twitter / Google+ / Instagram

    Disclosure: This post was a collaboration with HomeRight. However, all opinions and love of fire pit nights are 100% mine.

    SaveSave

  • Achieving Green Thumb Status

    Achieving Green Thumb Status

    This post is sponsored by Nimbus pot, however all opinions are 100% mine. Affiliate links may be contained in this post. 

    One summer, my great uncle and I got into gardening.

    Ok well, it was more me and he just listened to me rant on about it.

    We visited every Lowe’s, Home Depot, plant nursery and any store basically within an hour of us that was selling plants.

    He bought each of us a rose bush.

    I bought each of us a tropical plant of some sort.

    As if I know the name, I just thought it was pretty.

    The rose bushes lived.

    The tropical plants died.

    As did anything else I purchased. 

    I read his mother’s book on gardening that was thicker than the Bible.

    I’m not kidding. I still have it.

    I attempted to propogate hydrangeas.

    I divided irises.

    I ordered a ridiculous amount of flower seeds from a specialty seed company and planted every last one of them.

    Much to my dismay, not a darn thing lived except for a few irises.

    It was apparent that summer that me and flowers didn’t get along too well.

    When I realized Grunt Labor was such a fantastic gardener, I jumped for joy and didn’t worry with anything flower related again.

    Things have changed though.

    I have now achieved green thumb status, y’all.

    And I didn’t have to lie, cheat or steal to get it.

    Ok, I did cheat a little…

    How I Water My Indoor Plants Only ONCE Every Few Months - And yes, they are thriving! / Nimbus Pot

    Recently, I have a newfound love for indoor plants.

    The problem is that I forget to water them.

    Poor Fiddle Leaf Fig.

    That poor fiddle leaf fig is still recovering from when I forgot to water it for three weeks. The really sad thing is that I was super pumped about getting that plant and then forgot all about it.

    But now, I have a friend who gives me instant green thumb status.

    How I Water My Indoor Plants Only ONCE Every Few Months - And yes, they are thriving! / Nimbus Pot

    The Nimbus Pot.

    Its just like any other flower pot – except its magical.

    Because it waters your plant for you. For up to 4 months.

    All you need to do is plant your plant as you normally would in any planter and water it.

    How I Water My Indoor Plants Only ONCE Every Few Months - And yes, they are thriving! / Nimbus Pot

    P.S. You can use this inside or outside. There’s a specific plug on the bottom for inside or outside.

    Then, remove the handle.

    How I Water My Indoor Plants Only ONCE Every Few Months - And yes, they are thriving! / Nimbus Pot

    Fill the reservoir with water and replace the handle.

    You can also add plant food in the reservoir to help your plants really kick butt and take names. 😉

    How I Water My Indoor Plants Only ONCE Every Few Months - And yes, they are thriving! / Nimbus Pot

    When the cute little blue float drops, you need to add more water.

    So y’all, my plant (as if I actually know the name of it), has been in the Nimbus pot for about a month now. It has done so well – it even had new leaves growing within two weeks of being in the pot.

    I may or may not have done a happy plant dance.

    How I Water My Indoor Plants Only ONCE Every Few Months - And yes, they are thriving! / Nimbus Pot

    I was seriously amazed with my green thumb abilities.

    Ok, the Nimbus’ green thumb abilities.

    You can place the Nimbus pot inside a pretty container if you want to and it won’t affect the watering at all.

    How I Water My Indoor Plants Only ONCE Every Few Months - And yes, they are thriving! / Nimbus Pot

    I have mine inside a thrifted gold container I found. Its actually a little too small at the top for the Nimbus, but not enough to bother me. I think it looks great in front of the confetti wall.

    pin-this-post-2

    How to Grow Indoor Plants | When to Water Plants | Growing Plants Indoors

    Is there anyone else who is ready to achieve instant green thumb status?

    blog-signature-summer-15

    Disclosure: This post was a collaboration with Nimbus Pot. However, all opinions and admittance of lack of watering plants are 100% mine.

    SaveSave

  • Tips and Tricks for The Perfect Container Garden

    Tips and Tricks for The Perfect Container Garden

    This post contains affiliate links. 

    The last time I wrote about gardening or flowers in general, I was apparently misleading.

    You see the post was titled how to get a yard full of hydrangeas, but all I did to get a yard full of beautiful hydrangeas was have a husband who heard me say I’d never leave if I had them.

    So I see where you may have been a bit miffed with me. 

    But it was a good story, no? 

    This time though, I promise, I actually have real tips and tricks for you on how to get those glorious container gardens that we all lust after at the plant nurseries.

    Tips & Tricks for the Perfect Container Garden

    Tips & Tricks for the Perfect Container Garden

    *Husband and child not required for this, but helpful.

    First, let’s talk about what you need to start with:

    Tips & Tricks for the Perfect Container Garden

    First, you want to fill your planter about halfway up with soil.
    Tips & Tricks for the Perfect Container Garden

    Next, start adding in your plants. Start with the tall plant. Break up the roots some and place it toward the back of your planter.

    Tips & Tricks for the Perfect Container Garden

    Place your other plants toward the front while creating a triangle with all the plants.

    Then, fill the planter up with more soil as needed.

    Tips & Tricks for the Perfect Container Garden

    Now, water, water, water!

    Tips & Tricks for the Perfect Container Garden

    And feed, feed, feed!

    You can’t skimp on the watering and feeding. Its important to keep feeding and watering throughout the summer to get and keep those big, beautiful blooms longer.

    Plus, y’all its just really hot right now.

    I think us and the plants could use a little extra food and water, no?

    Tips & Tricks for the Perfect Container Garden

    The MiracleGro LiquaFeed System is what we use since its so easy to feed the plants while watering. Just hook the system up to your spigot, turn it to feed and you’re in business. The food comes right out through the hose with the water.

    Tips & Tricks for the Perfect Container Garden

    My last tip for container gardens…

    Tips & Tricks for the Perfect Container Garden

    Try to keep the marigold blooms away from the three year old who wants to squeeze them to pieces.

    Do you have any container gardening tips?

    If you liked this, you’re probably going to want to see this…

    This is so fun and quirky! Super affordable too! DIY Flamingo Sprinkler

    DIY Flamingo Sprinkler

    pin-this-post-2

    How to Plant a Container Garden | How to Make Flowers Last Longer | How to Make Flowers Live Longer | Tips for Growing Flowers

    You know you don’t wanna miss any of this crazy.

    Sign up to get my posts delivered to your inbox here.

    Stalk Me Here:

    Bloglovin / Pinterest / Facebook / Twitter / Google+ / Instagram

    blog-signature-summer-15

    If it waters, now it feeds with Miracle-Gro® LiquaFeed® Universal Feeder. It’s a great tool to help you reach your gardening goals by providing the essential nutrients your plants need to thrive all season long.

    This is a sponsored conversation written by me on behalf of Miracle-Gro. The opinions and text are all mine.

    SaveSaveSaveSave

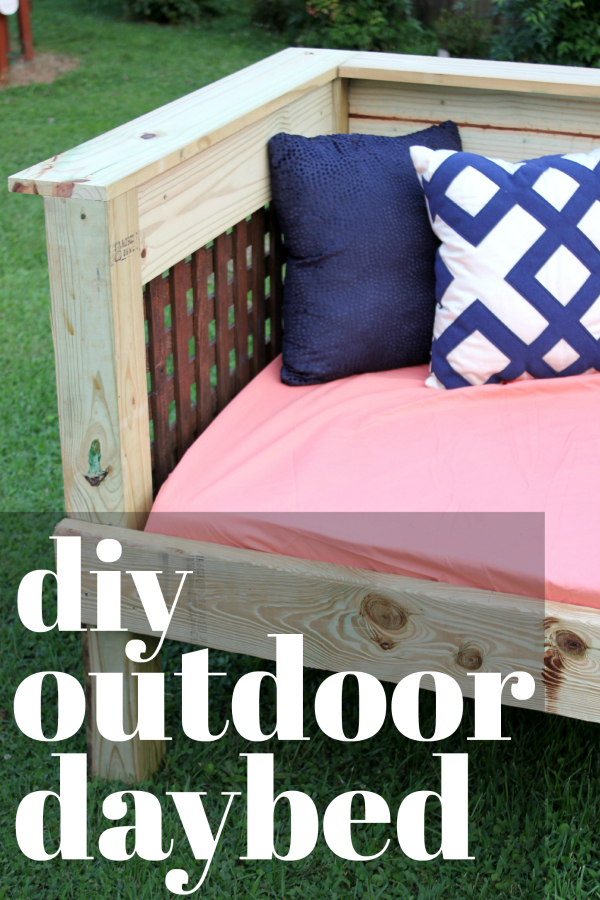
  • DIY Outdoor Daybed Tutorial – doubles as a sofa!

    DIY Outdoor Daybed Tutorial – doubles as a sofa!

    If you’re looking for a piece of furniture to pull double duty outside, then this outdoor daybed is for you! Not only does it function as an outdoor bed, but it also makes a great outdoor sofa! Step-by-step instructions for making your own DIY Outdoor Daybed can be found below! 

    Remember how I made over my screened-in porch last year?

    For the second year in a row?

    Well, its gotten more changes this year too.

    I never intended to change it any.

    But we built a patio. And the patio got custody of the chaise lounge. And that meant I had no where to lay down and relax in the porch like I did before.

    Even though that only happens a few times during the year.

    When Furniture Medic challenged me to build an outdoor furniture project, I happily accepted and knew exactly what I wanted to build – an outside daybed.

    If you aren’t familiar with Furniture Medic, they are literally a medic for furniture. They are one of the world’s largest wood and furniture repair & restoration companies. They can do on-site color touch-up and finish restoration, refinishing, polishing, and repairs.

    See, they really are a medic for furniture. 

    DIY Outdoor Daybed / Simple Build / Make it for $200 or less

    I sketched out my drawings. I made a plan. Grunt Labor swooped in and figured out exactly what and how much lumber we would need, because otherwise I would have bought waaaayyyy too much or waaaayyy too little. Have I mentioned I’m terrible at guesstimating that kind of stuff?

    I had fully intended on Grunt and I building this together, but the next thing I knew, I was running around the house trying to get the kid to use the potty and Nicky showed up to help Grunt make the daybed.

    So Grunt and Nicky made it, but I had the idea and oversaw construction.

    That counts for something, right?

    DIY Outdoor Daybed

    Disclosure: This post was a collaboration with Furniture Medic. However, all opinions and constant changing of my porch are 100% mine. This post contains affiliate links for your shopping convenience. Click here to read my full disclosure policy.

    This cost us right around $200 to make. If you have an old twin mattress laying around, that will save you about $100.

    Lumber, Supplies & Tools Needed:

    Before cutting anything, measure your mattress to make sure it is the same size as mine. Mine is 36″ x 72″. You may have to adjust your cuts a bit, but it shouldn’t be much.

    Cut List:

    • 4 – 4 in. x 4 in. posts, 36″ long
    • 3 – 2 in. x 6 in. lumber, 81 5/8″ long
    • 4 – 2 in. x 6 in. lumber, 30 7/8″ long
    • 4 – 2 in. x 4 in. lumber, 37 3/4″ long
    • 2 – 1 in. x 6 in. lumber, 39 5/8″ long
    • 1 – 1 in. x 6 in. lumber, 74 1/2″ long
    • 2 – 1 in. x 6 in. lumber, 30 7/8″ long
    • 1 – 1 in. x 6 in. lumber, 74″ long
    • Plywood – 74″ x 37 1/4″
    • 2 Lattice Pieces  – 30 7/8″ x 19 3/4″
    • 1 Lattice Piece – 74″ x 19 3/4″

    Steps

    Step 1:

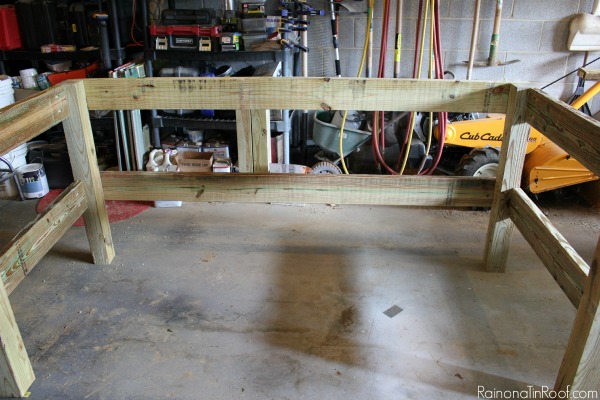
    Attach the four 4 x 4 posts on the back and sides with one of the 81 5/8″ 2 x 6’s and two of the 30 7/8″ 2 x 6’s. The back 2 x 6 should go from outside edge to outside edge on the back of the 4 x 4 posts. The side 2 x 6’s should go on the inside of the 4 x 4’s, but on the outer edge. Each of the 2 x 6’s should be attached to the 4 x 4 posts at 18 inches high (the top of the 2 x 6’s should be at 18 inches on the 4 x 4’s).

    DIY Outdoor Daybed - Assembly

    For the back 2 x 6, we attached it using just a regular old drill and screws. For the sides, we used a pocket hole jig to hide the screws, but that isn’t necessary.

    DIY Outdoor Bed - assembling the side supports

    Step 2:

    Attach another 81 5/8″ 2 x 6 at the top of the 4 x 4 posts in the back. Attach two more 30 7/8″ 2 x 6’s at the top of the 4 x4 posts on the sides.

    DIY Daybed - assembling the frame

    Step 3: 

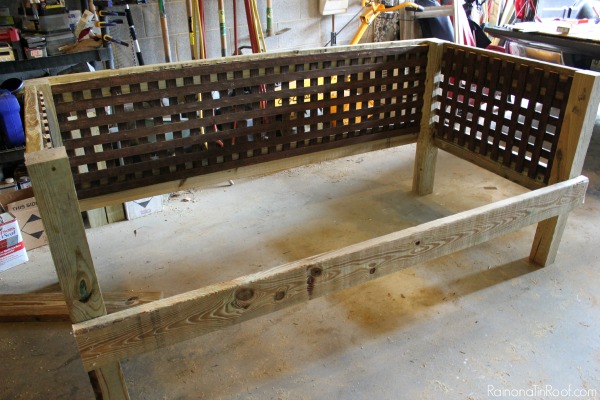
    Attach the lattice panels to the sides and back of the daybed along the 2 x 6’s. We used a nail gun to do this.

    Outside daybed tutorial - step by step instructions

    The lattice panels will not cover the entire length of the 2 x 6’s – put them in the middle. (We had leftover lattice from another project, thus why they are already stained.)

    Step 4: 

    Attach the last 81 5/8″ 2 x 6 along the front of the daybed.

    DIY Daybed Couch for Outside - attaching front support

    Step 5:

    Attach all four of the 37 3/4″ 2 x 4’s along the bottom of the daybed between the front and back 2 x 6’s. Attach with screws. Place two 2 x 4’s in the corners and two in the middle.

    Outdoor Bed DIY Project - attaching mattress support

    Step 6:

    Screw the plywood sheet onto the 2 x 4’s that you just attached.

    Day Bed for Outside - mattress platform

    Step 7: 

    Attach the two 30 7/8″ 1 x 6’s along the inside sides of the daybed. Attach the 74″ 1 x 6 along the top back inside of the daybed.

    Step 8:

    Attach the two 39 5/8″ 1 x 6’s along the top sides of the daybed. Attach the 74 1/2″ 1 x 6 along the top back side of the daybed.

    Cover the mattress with a fitted sheet, accessorize with pillows and enjoy!

    Outdoor Bed and Sofa DIY Project

    My plan is to let all the pressure treated wood dry out and then paint the entire thing and move it into my screened-in porch. Now the question is, what color??

    Outdoor daybed that also works as a sofa.

    Is there a DIY outdoor bed in your future?

    Looking for another great project for your outdoor space?

    DIY Outdoor Sectional – Bonus: it has built-in drink coolers!

    10+ Outdoor Furniture Makeovers – if you’ve got outdoor furniture that needs a pick-me-up, then don’t miss these!

    How to Build a Picnic Table from an old Barn Door – the rustic outdoors at it’s finest!

    Want to come back for the how-to later? Just pin the image below!

    DIY Outdoor Daybed Tutorial that uses a twin mattress

    You know you don’t wanna miss any of this crazy.

    Sign up to get my posts delivered to your inbox here.

    Stalk Me Here:

    Pinterest / Facebook / Twitter / Instagram

    blog-signature-summer-15

    Outdoor Furniture Plans - daybed

    SaveSave

  • The Ultimate DIY Outdoor Sectional

    The Ultimate DIY Outdoor Sectional

    Grunt Labor is working on creating the ultimate backyard.

    Last year, we built the deck and made over the screened-in porch.

    This year, we added on a patio.

    And if this summer heat gets any worse, there’s going to be a new pool with me in it on a pink flamingo float.

    After said patio was finished, we looked at it and asked ourselves what in the world we were going to put on it.

    Didn’t think that one through.

    So we built an outdoor sectional.

    Ok, I came up with the idea and Grunt Labor mostly built it.

    Oh, and Nicky helped a little. He got mad that I didn’t mention him in my Facebook post about the sectional, so I have to mention him here. He’s such a girl sometimes. 

    Of course, the ultimate backyard must include ultimate seating and this is the ultimate DIY outdoor sectional.

    Disclosure: Home Depot provided us with a gift card to build this DIY outdoor sectional. However, all opinions and love of glass coke bottles are 100% mine. 

    DIY Outdoor Sectional with Built-In Umbrella and Drink Coolers

    Because it has a built-in cooler.

    DIY Outdoor Sectional with Built-In Umbrella and Drink Coolers

    And individual drink coolers.

    DIY Outdoor Sectional with Built-In Umbrella and Drink Coolers

    And a place for an umbrella.

    Boom.

    We partnered with The Home Depot on this project that I still can’t quite believe we built ourselves.

    The full tutorial is on The Home Depot’s Apron Blog.

    Head over there for the how-to and see if you can spot what’s wrong with the kid’s attire in the last photos – #momfail

    Want to see more great outdoor furniture projects?

    Here’s a DIY Outdoor daybed we built.

    And a picnic table made out of a barn door…

    And here are 12 ideas for making over outdoor furniture you already have.

    You know you don’t wanna miss any of this crazy.

    Sign up to get my posts delivered to your inbox here.

    Stalk Me Here:

    Pinterest / Facebook / Twitter / Instagram

    DIY Outdoor Sectional | DIY Outdoor Couch | Outdoor Furniture Plans | Outdoor Furniture Ideas | DIY Outdoor Furniture | DIY Outdoor Sofa

  • 12 Outdoor Furniture Makeovers That Are Easier Than You Think

    12 Outdoor Furniture Makeovers That Are Easier Than You Think

    Its that time of the year, friends.

    Time for sipping drinks, preferably ones with little umbrellas, on porches, decks and patios.

    Furthermore, we should all be enjoying those beverages in pretty outdoor chairs, chaises and other comfortable perches. No?

    If you are like me though, as you were dusting the three inches or so of pollen off your outdoor furniture, you may have discovered the furniture needed a little facelift of its own.

    These outdoor furniture makeovers have my head brewing with ideas. The best part – they were all done with a HomeRight Paint Sprayer. That means they were easy as pie to re-hab.

    Now, if only a real facelift were that easy…and that inexpensive. 😉

    Outdoor Furniture Makeovers

    This post is sponsored by HomeRight, however all opinions are 100% mine. This post contains affiliate links for your shopping convenience. Click here to read my full disclosure policy.

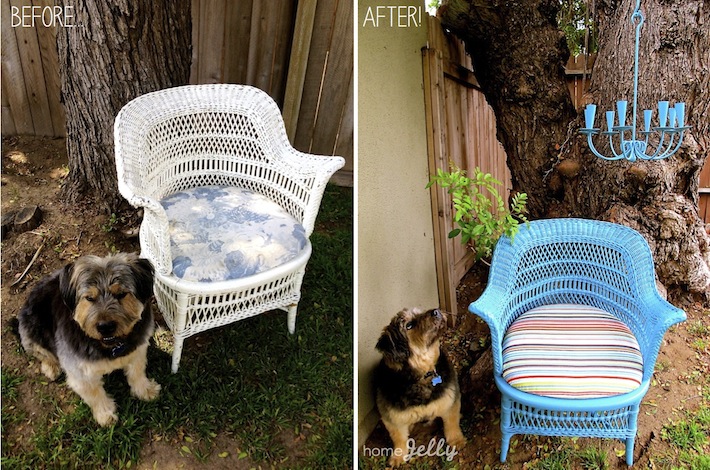
    Wicker Furniture Makeovers

    Wicker Chair Makeover

    I am digging the classic white spin that Debbie from Refresh Restyle put on this wicker chair. The pattern on the cushion and pop of color on the pillows seals the deal.

    Wicker Chair Makeover

    And quite the opposite, but just as awesome is this bright blue wicker chair makeover from HomeJelly.

    Painted Outdoor CushionsPainting Outdoor Cushions

    Christy at 11 Magnolia Lane completely transformed her patio set (and saved herself a ton of money in the process!) by painting, yep painting her outdoor cushions – with a paint sprayer! I love how the green and white pillows pop off the white.

    Metal Outdoor Furniture Makeover

    Outdoor Metal Table Makeover

    Farm Fresh Vintage Finds took her old rusty table to brand new in no time at all and saved herself cans and cans of spray paint. Yes, friends, you can paint metal with something besides spray paint – you just need a sprayer!

    Adirondack Chair Makeovers

    Adirondack Chair Makeover

    My mouth is still open at this adirondack chair rehab from Virginia Sweet Pea. Do you see the before?! #nailedit

    Adirondack Chair Makeover

    If you want to add a pop of color to your adirondack chairs, go with a bold red and yellow like Front Porch Mercantile did. These totally belong right beside a beach.

    Bamboo & Rattan Chair MakeoversRattan Chair MakeoverWhen I saw all six of these chairs on Craigslist for $25, I couldn’t pass them up. I gave them a super colorful paint job, but anchored them with black and white upholstery.

    Outdoor Bench Makeovers 
    Park Bench MakeoverA Prudent Life did a killer job on stripping and then re-staining this outdoor park bench.

    Outdoor Bench Makeover

    This red bench makeover from Four Generations One Roof does go perfectly with the fall, but it could totally rock a 4th of July party as well.

    Outdoor Bench Makeover

    The Painted Chandelier opted for a light blue color on her outdoor bench. I love how it pops against the bright pink flowers above it.

    And its not furniture, but let’s all admit that the paraphernalia that comes with circus’ could use some sprucing up more than we care to admit…
    Playhouse Makeover

    I’m just going to go ahead and say it. I want this playhouse for myself. Seriously. This playhouse makeover from Ciburbanity could quite possibly look better than my house. Staining a Swingset

    Ummm. Fo Realz? That swing set looks brand spankin’ new! HeartWorkOrg killed it! Yes, the HomeRight Finish Max and Finish Max Pro can both be used with stain.

    Looking for more outdoor furniture projects?

    DIY Outdoor Daybed – we love this thing!

    The Ultimate DIY Outdoor Sectional – complete with built-in ice buckets!

    How to Build a Picnic Table from a Barn Door – this picnic table is full of character.

    You know you don’t wanna miss any of this crazy.

    Sign up to get my posts delivered to your inbox here.

    Stalk Me Here:

    Pinterest / Facebook / Twitter / Instagram

    pin-this-postOutdoor Furniture Makeovers | Outdoor Furniture DIY | Outdoor Furniture Ideas | How to Paint Outdoor Furniture

    SaveSave

  • DIY Flamingo Sprinkler

    DIY Flamingo Sprinkler

    I have a thing.

    For pink plastic flamingos. 

    Some consider them tacky.

    I consider them fun.

    And the perfect symbol of summer.

    Since I have a deep love for this plastic being, Grunt Labor decided we should make a pink flamingo sprinkler.

    We did. 

    But the really cool thing about it is that its not only a sprinkler, but also feeds your plants at the same time.

    World rocked. 

    DIY Flamingo Sprinkler | How to Make a Sprinkler | DIY Sprinkler | Sprinkler DIY

    Miracle-Gro® sponsored this blog post. The opinions and text are all mine. This post contains affiliate links for your shopping convenience. Click here to read my full disclosure policy.

    Isn’t that just the most fun sprinkler you ever did see?

    I thought you would agree. 

    How to Make a Flamingo Water Sprinkler

    To make your own sprinkler & plant feeder, you will need:

      • Small piece of 1/2″ PVC pipe
      • 1/2″ male adapter with threads PVC pipe on one end and female adapter on other end
      • Female adapter with threads PVC pipe
    • Drill, Small Drill Bit, 1/2″ spade drill bit

    Steps

    Step 1: 

    Using a 1/2″ spade drill bit, drill an opening into the bottom of the flamingo.

    drill-hole

    Be careful not to push too hard, or you may crack the flamingo. Let the drill do the work.

    Step 2: 

    Connect your piping and place it in the flamingo.

    pipe-parts

    Using pipe glue, glue a small piece (about 2 inches) of the 1/2″ pipe into the female end of the male adapter. You can put waterproof caulk around this area if you wish.

    Step 3: 

    Cover the area around the pipe really well with a strong and waterproof glue.

    Use gorilla glue around pipe.

    Let this all dry for a couple of days.

    Step 4: 

    To make your sprinkler feed your plants as well, hook up the Miracle-Gro® Liqua Feed® Universal Feeder.

    Miracle-Gro Liqua Feed Universal Feeder

    All you do is screw the universal feeder onto the bottom of your water spigot and place the bottle of Miracle-Gro® LiqiaFeed® All-Purpose Plant Food in the feeder.

    Miracle-Gro Liqua Feed Universal Feeder

    You can switch between watering and feeding by turning the switch on the right to feed or water. It can connect to any watering device to feed as you water. My favorite thing about it is that there is no mixing required – I am always worried I will over or under-mix the plant food.

    Step 5:

    After you have given your flamingo plenty of time to dry, drill a few small holes in the top of the flamingo.

    Drill small holes in top of flamingo.

    Step 6:

    Hook the female adapter with threads onto your flamingo and then onto your water hose.

    Oh my goodness!! How awesome is this - a flamingo sprinkler!

    Let the fun flamingo watering and feeding begin!

    I spray-painted my piping after the glue was dry to blend it in with the hose a little better.

    That’s it!

    How do you feel about pink flamingos?

    Specifically fun DIY flamingo sprinklers? 😉

    Love flamingos? Be sure to see this fun summer flamingo wreath then.

    Want more great outdoor DIY projects? Right this way…

    You know you don’t wanna miss any of this crazy.

    Sign up to get my posts delivered to your inbox here.

    Stalk Me Here:

    Pinterest / Facebook / Twitter / Instagram

    pin-this-post

    DIY Flamingo Sprinkler | How to Make a Sprinkler | DIY Sprinkler | Sprinkler DIY

    SaveSave

  • How to Clean Concrete Blocks

    How to Clean Concrete Blocks

    Typically, I leave the outdoor arena to Grunt Labor.

    He is amazing at growing flowers.

    He loves to keep the grass looking good.

    He puts his heart and soul into our garden.

    He’s currently working on building a new patio.

    However, cleaning outdoors isn’t necessarily his thing. 

    That’s usually left to me – and that’s ok – especially when its as easy as it was to clean these concrete blocks.

    Wow! Gotta check this cleaning method out! How to Clean Concrete Blocks

    Just before you go into our garage, we have a retaining wall full of these concrete blocks..

    Before: How to Clean Concrete Blocks

    And up until just a few days ago, they all looked like that.

    Now they look like this…

    After: How to Clean Concrete Blocks

    This is a sponsored conversation written by me on behalf of Scotts® Outdoor Cleaner plus OxiClean™ via Burst Media. The opinions and text are all mine.

    Yep, that is the same block.

    How to Clean Concrete Blocks

    Supplies & Materials Needed: 

    Step 1: 

    Spray Scotts® Outdoor Cleaner plus OxiClean™ onto the dirty, gross and grimy area.

    How to Clean Concrete Blocks

    The great thing about this cleaner is that its safe to use around grass and plants. I didn’t have to worry about covering up my boxwoods that are just on the other side of the wall. It has a fast-foaming action that starts working as soon as you spray it on the affected area.

    Step 2: 

    Scrub.

    How to clean concrete blocks

    You may be an excellent homeowner that cleans your outdoor areas regularly. If you are, you may not have as bad of stains as we did and not have to scrub. Us, well….ummm….we had never cleaned these before – so its been a while to say the least.

    As you scrub, you can see the dirt and grime coming off. It gets rid of stains from moss, mold, mildew and algae.

    Step 3: 

    Rinse off the blocks and bask in your awesome cleanliness.

    WOW! Have to check this out! How to Clean Concrete Blocks

    Ya’ll, that’s a minimum of five years worth of gunk that came off. Scotts® Outdoor Cleaner plus OxiClean™ can also be used on fabrics, wood, siding, patio furniture and more.

    I used the Scotts® Outdoor Cleaner plus OxiClean™ in the Ready to Use Trigger sprayer, but if you have a bigger area, you can also buy it in concentrate form. You can find it at the Home Depot, Lowe’s, and Walmart.

    Need more easy outdoor cleaning tips? 

    How to Clean Your Sidewalk – you won’t believe how dirty mine was and you won’t believe how clean it came!

    How to Refresh Your Lattice – in under an hour!

    12 Outdoor Furniture Makeovers – before you toss it, think about giving your outdoor furniture one of these makeovers!

    9 Must Read Cleaning Tips – Outside and inside cleaning tricks!

    pin-this-post

    Wow! Gotta check this cleaning method out! How to Clean Concrete Blocks

  • How to Build a Picnic Table out of a Barn Door

    How to Build a Picnic Table out of a Barn Door

    Grunt Labor has lots of great project ideas.

    Some of those ideas are born out of sheer creativity and genius.

    Some of those ideas are born out of being annoyed by his wife’s ongoing accumulation of junk prized possessions.

    This DIY picnic table made out of an old barn door was a combination of both Grunt Labor’s genius and annoyance.

    DIY Picnic Table | Outdoor Furniture Plans | DIY Outdoor Furniture | Outdoor Furniture Ideas | Picnic Table Plans | Outdoor Furniture DIY

    Disclosure: This post is a collaboration with Thompson’s WaterSeal. However, all opinions and accumulation of junk is 100% mine. This post contains affiliate links for your shopping convenience. Click here to read my full disclosure policy.

    How to Build a Picnic Table out of a Barn Door

    After we got past a couple of hiccups with this project, the table is actually pretty easy to build. Of course, you can learn from our mistakes and it’ll be a breeze for you.

    Also, if you don’t have a barn door lying around, you could make the base first and then add on some weathered pieces of wood or just 1x8s or 1x10s if you wanted to.

    Tools & Materials Needed: 

    Steps

    Step 1: 

    Clean the barn door.

    This barn door has made an appearance once more on this blog – when I used it as a backdrop for the kid’s 1st birthday party photo collage. Guess where its sat since then?

    In the garage.

    Collecting dust.

    It was disgusting.

    I wet both sides down with the water hose first, let it dry a little, then laid it down over two sawhorses. Next, I mixed up the Oxy Foaming Cleaner and sprayed it on one side of the door with a pump sprayer.

    This is so cool - just add legs to an old barn door and you have an instant picnic table! How to Build a Picnic Table out of a Barn Door via RainonaTinRoof.com

    I let the cleaner sit on the door for about five minutes or so, then scrubbed it with a brush to really remove all that dirt. You could literally see the dirt coming off this thing. This is the same cleaner I used to get my sidewalk sparkling clean – and you remember how gross it was. After I scrubbed it good, I sprayed off the cleaner, then flipped the door and repeated it on the next side.

    After you have cleaned both sides, prop  the door upright and let it fully dry.

    Step 2:

    Cut the Wood.

    Your 2×6’s will need to be cut down to the following sizes:

    Two pieces should be cut down to 34 3/8″ long or the size of the top and bottom of your “Z” on the bottom of your barn door. No angles on either side of the wood, just straight cuts like the photo below shows.

    This is so cool - just add legs to an old barn door and you have an instant picnic table! How to Build a Picnic Table out of a Barn Door via RainonaTinRoof.com

    Four pieces should be cut down to 48″ long, then miter them with a 45 degree angle on each end. However, you want your “long ends” on opposite sides, meaning the pieces should look the state of Tennessee when you have them cut correctly like the photo below.

    This is so cool - just add legs to an old barn door and you have an instant picnic table! How to Build a Picnic Table out of a Barn Door via RainonaTinRoof.com

    Two more pieces should be cut down to 48″ long each then each should be angled at the ends with 45 degree angles to make them look like a trapezoid.

    Step 3:

    Nail on your base pieces.

    Make sure your barn door is laying with the “Z” right side up. Apply glue to the ends of your “Z” on the door and then nail or screw down (we used our framing nailer for this project, just because it made it faster. You can totally use a drill though.) the straight 34 3/8″ long wood pieces.

    This is so cool - just add legs to an old barn door and you have an instant picnic table! How to Build a Picnic Table out of a Barn Door via RainonaTinRoof.com

    Step 4:

    Attach the legs.

    Take the four pieces of wood that you cut to look like the state of Tennessee (don’t you love how technical I am?) and attach two on each side of your barn door. Simply nail / screw through the leg into the straight piece of wood that you just attached to the door as seen below.

    This is so cool - just add legs to an old barn door and you have an instant picnic table! How to Build a Picnic Table out of a Barn Door via RainonaTinRoof.com

    This is where we ran into a bit of a snag. See how far out that leg is. That is what you are not supposed to do. When we turned our table right side up, we realized that and had to fix it. Move your legs right into the center of the door, with the tips of both pieces of wood touching as shown below. You will still attach them to the straight piece of wood that you first nailed to the door.

    This is so cool - just add legs to an old barn door and you have an instant picnic table! How to Build a Picnic Table out of a Barn Door via RainonaTinRoof.com

    Step 5:

    Attach the leg cross pieces.

    You should have two long pieces of 2×6 left, the ones you cut to look like a trapezoid. Take those and nail them across your legs, making sure they are level before you nail them in.

    This is so cool - just add legs to an old barn door and you have an instant picnic table! How to Build a Picnic Table out of a Barn Door via RainonaTinRoof.com

    Step 6:

    Add a little extra support.

    You probably don’t really have to do this step, but hey why not? You should have some scrap pieces of wood triangles lying around from where you cut the 2×6’s. Take a few of those and place them behind your legs at the top, where they meet the first piece of wood you secured to the door and nail them in as shown in the photo below.

    This is so cool - just add legs to an old barn door and you have an instant picnic table! How to Build a Picnic Table out of a Barn Door via RainonaTinRoof.com

    It takes five minutes to do and doesn’t cost anything extra.

     Step 7:

    Trim your legs.

    At this point, stand your picnic table up and see whether or not you like the height of your table legs. Test out the table with a chair. We wanted to shorten ours a bit, so Grunt Labor used a circular saw to trim them down some.

    This is so cool - just add legs to an old barn door and you have an instant picnic table! How to Build a Picnic Table out of a Barn Door via RainonaTinRoof.com

    Step 8:

    Stain the legs.

    I wanted to keep the barn door’s color as it was, but it didn’t look great against the pressure treated legs.

    This is so cool - just add legs to an old barn door and you have an instant picnic table! How to Build a Picnic Table out of a Barn Door via RainonaTinRoof.com

    I used Thompson’s WaterSeal wood spray stain in traditional brown to give the legs a quick and easy stain job. You literally just spray it directly on the wood and let it dry. I did about three light coats to get even coverage. This is the same stuff I have used to makeover my mailbox in under an hour and to refresh my lattice easily.

    Step 9:

    Seal the barn door.

    Like I said, I wanted to keep the barn door the natural color that it had aged to, but I wanted to make sure it was protected. Did I mention this barn door came from my great-grandfather’s barn? And you guys know how attached I get to family heirlooms.

    Yes, a barn door is absolutely a family heirloom.

    This is so cool - just add legs to an old barn door and you have an instant picnic table! How to Build a Picnic Table out of a Barn Door via RainonaTinRoof.com

    To keep the barn door’s history intact, but protect it, I used Thompson’s WaterSeal Advanced Clear Waterproofer. It takes one single coat and you can use the piece you are protecting the next day.

    Fast and easy – my kind of product.

    This is so cool - just add legs to an old barn door and you have an instant picnic table! How to Build a Picnic Table out of a Barn Door via RainonaTinRoof.com

    I just poured some out in a small paint container and brushed it on. I did one coat on the edges, top and bottom of the door, then let it dry for a day. The waterproofer did darken the wood a bit, but it definitely still has that old, rustic look to it.

    Step 10: 

    Enjoy.

    This is so cool - just add legs to an old barn door and you have an instant picnic table! How to Build a Picnic Table out of a Barn Door via RainonaTinRoof.com

    So, I’m going to be honest.

    When Grunt Labor came up with this idea, I wasn’t too gung-ho on it. I was just more doing it because he wanted to.

    This is so cool - just add legs to an old barn door and you have an instant picnic table! How to Build a Picnic Table out of a Barn Door via RainonaTinRoof.com

    But…..

    This is so cool - just add legs to an old barn door and you have an instant picnic table! How to Build a Picnic Table out of a Barn Door via RainonaTinRoof.com

    I freakin’ love this table. 

    This is so cool - just add legs to an old barn door and you have an instant picnic table! How to Build a Picnic Table out of a Barn Door via RainonaTinRoof.com

    Like a lot.

    A whole lot. 

    I can’t wait to have some cozy little dinners around this thing.

    Want more outdoor project ideas?

    Make your own DIY outdoor daybed – perfect for naps during summer afternoons.

    This DIY Outdoor Sectional is great for parties – it even has a built in cooler!

    And don’t miss these 9 outdoor living spaces to get great ideas for outdoor decorating and entertaining!

    You know you don’t wanna miss any of this crazy.

    Sign up to get my posts delivered to your inbox here.

    Stalk Me Here:

    Pinterest / Facebook / Twitter / Instagram

    pin-this-post

    DIY Picnic Table | Outdoor Furniture Plans | DIY Outdoor Furniture | Outdoor Furniture Ideas | Picnic Table Plans | Outdoor Furniture DIY

    SaveSave

  • How to Clean A Ridiculously Gross & Dirty Sidewalk

    How to Clean A Ridiculously Gross & Dirty Sidewalk

    I am almost ashamed to show you just how gross my sidewalk was.

    Almost.

    But I know that you guys understand the concept of real life.

    Real life that involves neglecting things such as the sidewalk while focusing on much more important and fun things such as a kitchen makeover or just chasing around the circus at the park.

    When we bought the beloved foreclosure, the exterior was the last thing on our minds. It may not have been that pretty, but there was nothing wrong with it and we would have rather had a functional kitchen and bathroom rather than a pretty exterior.

    So we didn’t really touch the exterior except for some painting on the porch and a semi-makeover on the screened-in porch.

    This summer I kicked the screened-in porch up quite a few notches with a complete (and super colorful) makeover.

    And then I looked at our sidewalk.

    And realized just how disgustingly gross it was.

    How to Clean A Sidewalk | Outdoor Cleaning Tips | Outdoor Cleaning Hacks | Exterior Cleaning | Cleaning Concrete

    Disclosure: This post is sponsored by HomeRight and Thompson’s provided me with their products. However, all opinions and ridiculously dirty sidewalks are 100% mine. This post contains affiliate links for your shopping convenience. Click here to read my full disclosure policy.

    You guys.

    I had no idea just how dirty my sidewalk was until after it was cleaned.

    Here is the before:

    How to Clean A Sidewalk | Outdoor Cleaning Tips | Outdoor Cleaning Hacks | Exterior CleaningI knew there were some stains and a strange funk growing on it, but I had no idea how it was really supposed to look. Honestly guys, I don’t think that this sidewalk had been cleaned in at least 15 years.

    I’m trying to be optimistic on that timeframe. I’m probably wrong.

    Grunt Labor doesn’t think that it was ever cleaned before now.

    Here’s how we cleaned this bad boy up.

    How to Clean a Sidewalk

    Supplies Needed: 

    Steps

    Step 1

    Give your sidewalk a light scrubbing with the scrub brush to remove any loose dirt or grass and loosen up any stuck on dirt.

    How to Clean A Sidewalk | Outdoor Cleaning Tips | Outdoor Cleaning Hacks | Exterior Cleaning

    Step 2

    You don’t want your sidewalk to be soaking wet, only lightly wet when you apply the cleaner. Let your sidewalk dry for a bit and mix up your cleaner. The cleaner must be used within an hour of mixing it, so don’t mix it until right before you are ready to use it.

    How to Clean A Sidewalk | Outdoor Cleaning Tips | Outdoor Cleaning Hacks | Exterior CleaningI filled up my tank sprayer with two gallons of hot water (hot water is recommended) and added in eight capfuls of the oxy foaming cleaner. The directions say to use at least three capfuls per gallon or four capfuls per gallon if you have a very dirty area.

    As y’all well know, mine was ridiculously dirty.

    Step 3

    Shake up your tank to dissolve all the cleaner crystals and spray the cleaner onto your sidewalk.

    How to Clean A Sidewalk | Outdoor Cleaning Tips | Outdoor Cleaning Hacks | Exterior Cleaning

    Let the cleaner sit for 5-10 minutes depending on how dirty your sidewalk is. I let mine sit for the full ten minutes.

    While you are waiting, you can use the time to clean off your driveway with the deck brush.

    How to Clean A Sidewalk | Outdoor Cleaning Tips | Outdoor Cleaning Hacks | Exterior Cleaning

    I found it to be pretty perfect for that.

    Step 4

    After the allotted time, give the area you sprayed a good scrubbing with just the brush. You will literally see the dirt and grime lift off the concrete. After you have scrubbed it good, turn on the water to your brush and scrub some more while rinsing the sidewalk off.

    How to Clean A Sidewalk | Outdoor Cleaning Tips | Outdoor Cleaning Hacks | Exterior Cleaning

    Step 5

    Depending on how dirty your sidewalk is, you may have to repeat the cleaning process twice. I did. After the second cleaning, I still had these little black spots lingering just near the porch steps.

    How to Clean A Sidewalk | Outdoor Cleaning Tips | Outdoor Cleaning Hacks | Exterior Cleaning

    Since this sidewalk hadn’t been cleaned in the history of ever, they weren’t budging very easily. Grunt Labor did a quick run over of those spots near the steps with a pressure washer.

    Here is our after:

    How to Clean A Sidewalk | Outdoor Cleaning Tips | Outdoor Cleaning Hacks | Exterior Cleaning

    Why hello, nice and pretty sidewalk.

    It’s nice to meet you.

    I’m the one who neglected you for the past three years.

    How to Clean A Sidewalk | Outdoor Cleaning Tips | Outdoor Cleaning Hacks | Exterior Cleaning | Cleaning Concrete

    The cleaning and scrubbing removed a huge amount of dirt and grime and brightened it up like nobody’s business.

    Need more cleaning tips? 

    How to Clean Concrete Blocks– clean up all those landscaping blocks!

    How to Remove Rust and Polish Chrome– you won’t believe how much rust I got off this one chair!

    9+ Must Read Cleaning Tips– all sorts of cleaning tips for around the house!

    You know you don’t wanna miss any of this crazy.

    Sign up to get my posts delivered to your inbox here. 

    Stalk Me Here:

    Pinterest / Facebook / Twitter / Instagram

    SaveSave

  • 9 Outdoor Living Spaces You’ll Never Wanna Leave

    9 Outdoor Living Spaces You’ll Never Wanna Leave

    As you guys know, my new favorite happy place is my screened-in porch. It’s colorful, it’s relaxing, and it’s the perfect place for a cheap beer or two. Or three. Here are my favorite outdoor spaces – both mine and others. A.K.A. places I wouldn’t mind have a few beers at…

    9 Outdoor Living Spaces You’ll Never Wanna Leave

    If you're looking for outdoor decorating ideas, this is the article for you! 9 Outdoor Living Spaces You'll Never Wanna Leave

    A Colorful Screened-In Porch Makeover

    Warning: It’s quite colorful! I dare you to not smile while looking at that porch! It’s my new favorite place!

    If you're looking for outdoor decorating ideas, this is the article for you! 9 Outdoor Living Spaces You'll Never Wanna Leave

    A Thrifty and Colorful Deck from The Happy Housie

    This deck is perfect for admiring that view of the water!

    If you're looking for outdoor decorating ideas, this is the article for you! 9 Outdoor Living Spaces You'll Never Wanna Leave

    A Patio Full of Pallet Furniture from Place of My Taste

    Short on cash? Use pallets to make your own porch furniture!

    If you're looking for outdoor decorating ideas, this is the article for you! 9 Outdoor Living Spaces You'll Never Wanna Leave

    Astroturf Patio from Makely Home

    I am a sucker for astroturf! I love how Makely Home used pieces of Astroturf on her porch.

    If you're looking for outdoor decorating ideas, this is the article for you! 9 Outdoor Living Spaces You'll Never Wanna Leave

    Refreshed Patio from Hi Sugarplum

    Hi Sugarplum never disappoints. I’m especially digging her layered rugs there.

    If you're looking for outdoor decorating ideas, this is the article for you! 9 Outdoor Living Spaces You'll Never Wanna Leave

    A Cozy Deck from Southern State of Mind

    Pretty sure I wouldn’t shake my head at chillin’ on this deck.

    If you're looking for outdoor decorating ideas, this is the article for you! 9 Outdoor Living Spaces You'll Never Wanna Leave

    Patio with Colorful Pallet Furniture from One Lucky Girl

    More ideas for reworking those pallets!

    If you're looking for outdoor decorating ideas, this is the article for you! 9 Outdoor Living Spaces You'll Never Wanna Leave

    Thrifted Patio Makeover from Liz Marie Blog

    Is that not an incredible makeover?! Liz Marie is full of thrifty ideas for outdoor spaces!

    If you're looking for outdoor decorating ideas, this is the article for you! 9 Outdoor Living Spaces You'll Never Wanna Leave

    Screened-In Porch and Deck Combo from Our Fifth House

    No one else but Carmel from Our Fifth House can combine lots of different elements and styles and create a space so gorgeous!

    Are you ready to get your outdoors on?

    I’ll bring the booze…. 😉

    What are your best tips for decorating outdoors?

    Need more great outdoor decorating ideas?

    12 Outdoor Furniture Makeovers – great ideas for refreshing that old patio furniture!

    13 Ideas for Sprucing Up Your Front Door and Entry – add some curb appeal to your home!

    Fantastic Outdoor Projects – from DIY swings to furniture and more, you’re sure to find something here you’ll want to make!

    Outdoor Living Space Ideas | DIY Outdoor Decor | Outdoor Living Space on a Budget | Outdoor Living Room | Outdoor Living Space DIY

    You know you don’t wanna miss any of this crazy.

    Sign up to get my posts delivered to your inbox here. 

    Stalk Me Here:

    Pinterest / Facebook / Twitter / Instagram

  • DIY Floating Curtain Panels

    DIY Floating Curtain Panels

    As you guys well know, I will stretch a dollar as far as I possibly can.

    And then some.

    The same is true with fabric.

    When I started the colorful porch makeover, Grunt Labor had one request:

    Curtains.

    Well he had other requests too, like a fireplace and a television, but at the current moment, those aren’t attainable.

    He was adamant on the curtains though. He thought it would make the space feel more homey.

    Yes, that coming from a male who even refers to himself as Grunt Labor is a little odd, but he was right. And really, the man rarely asks for anything around here – there was no way I could say no.

    My problem was that I only had three yards of fabric for the curtains. Typically, I would be lucky to get two curtain panels out of three yards – and they would be skinnier panels at that.

    My other problem here was that even though the porch is screened-in, the curtains were still going to get dirty at the bottom pretty quickly.

    Luckily at Home Depot one day, the lightbulb went off.

    Does anyone else have moments of genius at Home Depot? I swear sometimes that’s the only place I get them. I will have ran in for one can of spray paint and by the time I get to the checkout line, I’m struggling to hold onto everything that I’ve picked up and apologizing for knocking over a display with the 10 foot piece of pipe I’m barely holding under my arm.

    Yep, I’m that girl.

    But it was that stroke of genius that solved both problems – I would make Floating Curtain Panels.

    DIY Floating Curtain Panels | DIY Outdoor Curtains | How to Make Outdoor Curtains | Outdoor Curtains for Porch or Patio | DIY Outdoor DecorThis post contains affiliate links for your shopping convenience. Click here to read my full disclosure policy.

    DIY Floating Curtain Panels

    If you can sew a straight semi-straight line (my lines are never totally straight) and make a couple of simple cuts with a hand saw or electrical saw, you can totally do these. Seriously, they aren’t hard at all.

    Materials Needed:

    -3 yards of fabric of your choice (I used this outdoor fabric and it made three panels for me that were 19 in wide x 89 in long before being hemmed. I did have a little leftover. If these are going outdoors and you don’t find an outdoor fabric you like, you can always waterproof, color protect, and stain repel the fabric yourself by using this tutorial.

    -10′ piece of 1/2″ PVC pipe

    –Gold Spray Paint

    -Regular Hand Saw or Circular Saw or Miter Saw (I used our Miter Saw)

    -12 Screw Eyes 

    –Neon Pink Cord (or other color of your choice – you guys know I love my bright flashy colors)

    -Scissors

    -Sewing Machine & Thread or Stitch Witchery

    -Straight pins

    -Measuring Tape

    Steps

    Step 1

    Cut your pipe down to whatever your desired length is. I was fitting my pipe between the 2×4 supports on my porch. Of course, no measurement between the 2x4s were the same. That’s just what you get with older houses and foreclosures, people. I thought it would look funny to have different size panels, so I opted to make all my pipes the same size, which was 19 inches. I marked my pipe and cut it with a miter saw.

    DIY Floating Curtain Panels via RainonaTinRoof.com #curtains #drapery #diy #fabric #ad #onlinefabricstore #porchMost of the pipe will be covered by the panels, however, the ends do still show. I didn’t want them to be white, so I spray painted the ends gold.

    Step 2

    Lay out your fabric and cut it into panels. Each of my panels were 19 inches wide x 89 inches long.

    DIY Floating Curtain Panels via RainonaTinRoof.com #curtains #drapery #diy #fabric #ad #onlinefabricstore #porch

    After you have cut your panels, pin down the long side edges only (not the top or bottom edges) and hem them. If you want to go the no-sew route, use the stitch witchery here.

    And by the way, if I can sew a decently straight line on this….

    DIY Floating Curtain Panels via RainonaTinRoof.com #curtains #drapery #diy #fabric #ad #onlinefabricstore #porch

    Anyone can sew a decently straight line. That sewing machine was my great grandmother’s, my grandmother’s, and now mine. I’ve cursed it, hit it (that hurt), ran my finger through it on more than one occasion (that hurt more), but I wouldn’t think of sewing with anything else.

    We have a history.

    Step 3

    Now you need to hem your top edges, but leave an opening for the pipe to fit through.

    DIY Floating Curtain Panels via RainonaTinRoof.com #curtains #drapery #diy #fabric #ad #onlinefabricstore #porch

    Do this by placing the pipe long the top edge, then pulling the fabric over the pipe and pinning the edges in place (#1 in the photo above). Remove the pipe and pin down the rest of the edge (#2 above). Finally, sew the edge down (#3). Repeat this with the top and bottom edges for all the panels.

    Step 4

    Take your screw eyes and screw one into each corner where your panels will hang from (top and bottom). Since my pipes were 19 inches long, I put my screw eyes about 19 inches apart.

    DIY Floating Curtain Panels via RainonaTinRoof.com #curtains #drapery #diy #fabric #ad #onlinefabricstore #porch

    Next, thread the nylon cord through your pipe and tie each end onto the screw eyes.

    Stand back and observe your amazingness.

    DIY Floating Curtain Panels via RainonaTinRoof.com #curtains #drapery #diy #fabric #ad #onlinefabricstore #porch

    Go grab a cheap beer or a cocktail.

    DIY Floating Curtain Panels via RainonaTinRoof.com #curtains #drapery #diy #fabric #ad #onlinefabricstore #porch

    And relax in the shade of your new floating curtain panels that you made all by yourself.

    Because you are a superstar.

    DIY Floating Curtain Panels | DIY Outdoor Curtains | How to Make Outdoor Curtains | Outdoor Curtains for Porch or Patio | DIY Outdoor Decor

    Do you have any DIY curtain hacks?

    See the full porch makeover here and this little DIY flamingo wreath that embellishes these curtain panels now!

    Love a good curtain hack? Be sure to see these duck tape trimmed curtains too!

    You know you don’t wanna miss any of this crazy.

    Sign up to get my posts delivered to your inbox here. 

    Stalk Me Here:

    Pinterest / Facebook / Twitter / Instagram

    SaveSave

  • Colorful Screened-In Porch Makeover

    Colorful Screened-In Porch Makeover

    As I write this post, I am sitting in the most colorful space in my home.

    I dare you to step into the screened-in porch and not be happy.

    Double Triple Dog Dare You. 

    And if you do step out here, and you aren’t happy, I’ve got a cheap beer for ya and a kid is bound to turn the corner at any moment riding a plastic pink flamingo.

    Heck, you just smiled as you read that last sentence, didn’t you?

    Sweet friends, who put up with way too much craziness from me, welcome to my back porch.

    Colorful Porch Makeover (because I like to drink cheap beer in colorful places) via RainonaTinRoof.com #porch #outdoors #porchdecor #diy #decorating (more…)

  • DIY Painted AstroTurf Rug

    DIY Painted AstroTurf Rug

    It all started with Nancy Drew.

    The Hidden Staircase to be exact.

    After reading the book as a middle schooler, and being a lover of all ghost stories and mysteries, I became convinced that a secret staircase was nearby.

    Under my grandparent’s screened-in porch.

    As I was walking around my grandparent’s house one sunny spring day collecting old glass I found buried in the ground (convinced it held a secret meant for only me), I stumbled onto their screened-in porch and began to examine it.

    The porch was a simple square structure that came off their dining room. It wasn’t above their basement though, as the rest of the house was. It was supported by four sturdy walls of brick.

    There had to be something under that porch, and there had to be a staircase that led to whatever was under there.

    I immediately rushed up to the porch and started stomping my feet on the AstroTurf covered floor to find a hollow spot where a door leading to the staircase might be.

    My feet were met by the sound of concrete.

    I persisted, making my way to the outer edges of the porch where the AstroTurf carpeting ended.

    I attempted to pull it up, but discovered it was securely glued down.

    Darn the AstroTurf.

    The secrets of the porch were never uncovered.

    However, I’m now coming to love AstroTurf very very much.

    Seriously, what other 6 ft. x 8 ft. rug can you find for $20?

    Only AstroTurf baby. 

    DIY Painted AstroTurf Rug Tutorial via RainonaTinRoof.com #diy #rug #homedecor #outdoordecor

    This post contains affiliate links for your shopping convenience. Click here to read my full disclosure policy.

    DIY Painted AstroTurf Rug Tutorial

    This is picture heavy, but stick with me.

    Materials Needed

    AstroTurf Rug

    1 – 2 quarts of gloss exterior paint depending on how intense you want your colors. I used two quarts.

    Paint Roller and Tray

    FrogTape

    Steps

    Step 1

    Roll out the rug and begin marking your border off with FrogTape.

    DIY Painted AstroTurf Rug Tutorial via RainonaTinRoof.com #diy #rug #homedecor #outdoordecor

    As you can see, I was super technical with measurements and used tape as my guide. I started on the very edge of the rug and placed three small strips of tape that would remain AstroTurf underneath, then two strips that would be painted white, then another strip for Astroturf. You want to paint inside of the tape marked Astroturf. See the photo above.

    Step 2

    Finish taping the rest of your border around the edges of the rug.

    DIY Painted AstroTurf Rug Tutorial via RainonaTinRoof.com #diy #rug #homedecor #outdoordecor

    See photo above. You want to repeat this on each side of the rug, using the same “tape measurements.”

    Step 3

    You will have some overlap that needs to be cut out on the corners where the tapes meet.

    DIY Painted AstroTurf Rug Tutorial via RainonaTinRoof.com #diy #rug #homedecor #outdoordecor

    Cut out the small pieces of tape that would keep your border from being continuous as shown above.

    After cutting out the small pieces, your rug should look like this:

    DIY Painted AstroTurf Rug Tutorial via RainonaTinRoof.com #diy #rug #homedecor #outdoordecor

    Step 4

    Paint your border.

    DIY Painted AstroTurf Rug Tutorial via RainonaTinRoof.com #diy #rug #homedecor #outdoordecor

    I found the best way to paint AstroTurf is with a roller. I did three coats and went in different directions with each coat to get every side of the AstroTurf fiber.

    Step 5

    Remove the tape around your border after your final coat. I didn’t wait for it to dry, however if you put the paint on pretty heavy, you may want to wait a bit to make sure you don’t get leakage.

    Begin taping off the stripes for the inside of your border.

    DIY Painted AstroTurf Rug Tutorial via RainonaTinRoof.com #diy #rug #homedecor #outdoordecor

    I just chose a spot in the middle of the rug to start a diagonal line with tape and went with it. Once more, I used tape as my measuring guides as you can see above.

    Step 6

    DIY Painted AstroTurf Rug Tutorial via RainonaTinRoof.com #diy #rug #homedecor #outdoordecor

    Continue with your diagonal stripes in the middle of the rug until it is covered.

    It should look similar to this when its done:

    DIY Painted AstroTurf Rug Tutorial via RainonaTinRoof.com #diy #rug #homedecor #outdoordecor

    Be sure to run tape along the white edges where your diagonal stripes meet it.

    Step 7

    Paint your diagonal stripes using the same method as with the border, then remove the tape.

    The finished product: 

    DIY Painted AstroTurf Rug Tutorial via RainonaTinRoof.com #diy #rug #homedecor #outdoordecor

    I love how fun this rug is. I put it on the screened-in porch for photos, but am planning on moving it to the front porch when the floor out there is finished.

    DIY Painted AstroTurf Rug Tutorial via RainonaTinRoof.com #diy #rug #homedecor #outdoordecor

    I did somehow mess up my “tape measurements” at one point. You can see where some of my diagonal lines are skinnier than others. No biggie – nothing’s perfect around here.

    DIY Painted AstroTurf Rug Tutorial via RainonaTinRoof.com #diy #rug #homedecor #outdoordecor

    I love the Juicy Passionfruit and stark white against the green. Its a fun, unexpected element.

    DIY Painted AstroTurf Rug Tutorial via RainonaTinRoof.com #diy #rug #homedecor #outdoordecor

    What do you think?

    Too tacky?

    If its not a little tacky, its no fun, right?!

    How can you jazz up an AstroTurf rug?

    Want more great ideas for rugs? Then don’t miss these 14 painted rug hacks!

    Love a great cowhide rug? Here’s how I made a faux cowhide rug for about $15.

    Oh, and here’s my little trick for keeping rugs from sliding on your floors.

    You know you don’t wanna miss any of this crazy.

    Sign up to get my posts delivered to your inbox here. 

    Stalk Me Here:

    Pinterest / Facebook / Twitter / Instagram

    SaveSave

  • Painted Porch Floor

    Painted Porch Floor

    Last week, I showed a little sneak peek of this project when you saw the leopard print table.

    I’ve been sitting over here antsy as all get out to show you the whole project.

    I’m pretty pumped about how this painted porch floor turned out.

    Painted Porch Floor via RainonaTinRoof.com #porch #summer #diy

    Last year, I did a makeover on the screened-in porch. Well, really it was like a semi-makeover. I painted the floor, bought new seat cushions, made a chalkboard, and that was about it.

    After adding on the deck this year, I really wanted to make this space more colorful, and an extension of our living area. So far, I’ve spruced up the chandelier, added a buffet table, and now this floor. There is still more to come, y’all, and with every change, I love this space even more!

    Here’s how I did my floor:

    Painted Porch Floor

    Disclosure: This post is sponsored by FrogTape, however all opinions and my love of black, white, and green are 100% my own. This post contains affiliate links for your shopping convenience. Click here to read my full disclosure policy.

    First, you want to start out with a clean floor. My old floor color was brown and I wanted to do a white, black and green color scheme, so the brown had to go. I cleaned the floor really well first, then painted on two coats of white exterior paint.

    Painted Porch Floor via RainonaTinRoof.com #porch #summer #diy

    Now, before you even think about putting that tape down, I want you to wait a minimum of seven days to let the paint fully cure.

    I know – it really stinks waiting that long, but trust me, you need to. You see, at first, I did not wait seven days. I waited three days and put the tape down, then when I pulled it up, some of the paint came with the tape. The paint hadn’t fully cured. So, I repainted the entire floor with another two coats of white paint and didn’t touch it for a week.

    Go have yourself a cocktail or two (per day of course), and just wait the seven days for it to fully dry. You’ll thank me later.

    Let’s all hum the Jeopardy theme in our head while we pretend that we just waited seven days for the paint to fully cure…….

    Ok, seven days later, we’re ready to tape. My concrete is very old school. Remember, I am dealing with a 1960s Rancher here. Needless to say, the concrete was uneven in places and had multiple bumps and divets, and just plain not smooth – anywhere really.

    Regular tape wouldn’t work – the paint would have bled through. To combat this, I used FrogTape for Textured Surfaces.

    Painted Porch Floor via RainonaTinRoof.com #porch #summer #diy

    It has a two part system – tape and liquid PaintBlock.

    The first thing you will do is measure out your sections. I did 28 1/2 inch wide sections – that width took up the entire porch floor, which was perfect. After measuring and marking out your sections, run the tape along the edge of each section.

    Painted Porch Floor via RainonaTinRoof.com #porch #summer #diy

    Next, run a damp cloth around the edge of the tape. This helps to activate the PaintBlock technology.

    Painted Porch Floor via RainonaTinRoof.com #porch #summer #diy

    Like I said, this tape is a two part system. Next, you will take the bottle of liquid PaintBlock sealer and apply it to the edges of the tape. Shake the bottle well, then remove the cap and replace it with the included brush applicator.

    Painted Porch Floor via RainonaTinRoof.com #porch #summer #diy

    Apply it generously along the seal, going back and forth to overlap. It goes on milky, but dries clear. Let it dry for 15 minutes and then paint! Remove the tape when the final coat of paint is dry to the touch.

    Painted Porch Floor via RainonaTinRoof.com #porch #summer #diy

    Don’t worry about the liquid PaintBlock keeping paint from adhering places where there was no tape – it just seals the tape edge.

    Painted Porch Floor via RainonaTinRoof.com #porch #summer #diy

    Isn’t is crazy how just three simple colors in stripes work so well together? No fancy pattern, just stripes, but an awesome impact.

    And I still got sharp paint lines even with the un-eveness of my concrete!

    I do recommend that you follow the rule of seven days after applying the rest of your paint colors as well. Don’t move any furniture back in until you are sure that baby is dry!

    Painted Porch Floor via RainonaTinRoof.com #porch #summer #diy

    I love the combination of the black, white, and green! Its the perfect shot of color, but allows me to work in many more colors – which are coming soon!

    Have you done a painted porch floor before?

    See the completed porch HERE!

    You know you don’t wanna miss any of this crazy.

    Sign up to get my posts delivered to your inbox here. 

    Stalk Me Here:

    Pinterest / Facebook / Twitter / Instagram

    I’m participating in the summer celebration!! Don’t miss all the other summer projects below and come back Thursday to link up with us! 

    250x250

    Here are even more ideas to kick off your summer in style…

    Monday…

    Tuesday…

    SaveSave

  • Staining Pressure Treated Wood

    Staining Pressure Treated Wood

    When it comes to wood staining, there are a few differences between staining regular wood and staining pressure treated wood. You can typically stain regular wood immediately. With pressure treated lumber, you might be able to stain it immediately or you might have to wait a bit. Read on to see how I was able to stain my new deck without waiting!

    I am not a patient person.

    I do not like to wait. On anything.

    Good things come to those who wait, right? Well, I guess I’m more of a go out there and get it done now kind of girl.

    Case in point, our new deck.

    Yep, I said new deck. Over the past month, Grunt Labor built a deck. Isn’t he just awesome, y’all?

    Of course that deck was built with pressure treated wood. Many people say you should wait at least six months before staining pressure treated wood.

    Six months. 

    Negative.

    Ain’t nobody got time for that.

    So being a real rebel, I stained that pressure treated wood after only two weeks of the deck being completed.

    All that being said, if you do have time to wait, then by all means wait.

    Staining Pressure Treated Wood - Before and After New Deck Staining - Rain on a Tin Roof

    Disclosure: This post is sponsored by Thompson’s WaterSeal. However, all opinions and impatient-ness are 100% mine. This post contains affiliate links for your shopping convenience. Click here to read my full disclosure policy.

    Can You Stain Pressure Treated Wood?

    Yes, you can absolutely stain pressure treated wood. The key is knowing when to stain it. As I said, it’s typically recommended that you wait six months before staining new installed pressure treated wood. But as I said, I did not.

    I was able to do mine sooner because of a stain I used that is specifically for new pressure treated lumbers builds that can be used much sooner than the six month wait time. The stain I used was Thompson’s Waterproofing Stain.

    To determine if your treated wood is ready for stain, simply flick a little bit of the stain onto the wood in a small spot. If the stain bubbles up on the wood, you are not ready to stain. If the stain soaks in, you’re ready to stain. After two weeks, my deck was ready for stain.

    Staining Treated Wood

    Because we all love a good before and after, here is the deck before staining:

    Can You Stain Pressure Treated Wood - The New Deck Before - Rain on a Tin Roof

    I’m sure you are looking at that photo and saying, “Ummmm…..Jenna, sweetie, you do realize that there are no steps up or down to the deck, right? How are you going to use it?”

    I have stellar jumping skills, y’all. Stellar.

    Not.

    The deck is right beside the screened-in porch and you access the deck through a soon-to-be-door from the screened-in porch. We could have put steps down from the deck, but we didn’t really want the dog running up there anytime she wanted. No steps also help to contain the kid. I can just let her go on the screened in porch and deck without me having to worry she will fall off it.

    As you guys know, I am a fan of Thompson’s WaterSeal products. I used their spray stain to give my lattice and mailbox a quick makeover. For the deck stain, I turned to them again.

    Staining Treated Wood - Outdoor wood stain for new decks - Rain on a Tin Roof

    Tools and Supplies Needed:

    • Thompson’s WaterSeal Waterproofing Stain – I went with their Acorn Brown Waterproofing Stain in Transparent. You can also get it in semi-transparent. It only takes one coat and dries in two hours – perfect for impatient people like myself.
    • Paint Brush made for stain
    • Stain Stick – makes it super easy to stain the deck floor boards.

    Steps

    Step 1. 

    Pour some of the stain into a container and stir the stain well.

    Using a brush, apply the stain to the rails and spindles.

    Can you stain treated wood - brush on the stain - Rain on a Tin Roof

    Don’t be scared when you see that the stain looks like this. When it first comes out of the can, it is this mauve-y brown color and I totally freaked out. It’s ok, though. It doesn’t dry like that.

    This is what it looked like as I was brushing it on.

    Staining a New Deck - brushing the stain onto the rails - Rain on a Tin Roof

    It does dry pretty quickly, but you need to give it two hours to fully dry or recoat – if you aren’t impatient like me and want a second coat. If you think you want a lighter stained deck, then definitely do multiple coats and have a cloth on hand to wipe up excess stain as you put it on.

    Step 2.

    You can also brush the stain on the floor, but I went with my HomeRight Stain Stick.

    Can pressure treated wood be stained - using a stain stick on the deck floor - Rain on a Tin Roof

    The Stain Stick has an attached stain pad and a padded roller that easily applies the stain into the crevices between each board. The stain is pulled up through the stick and you push it out as needed.
    Let the stain fully dry before applying another coat or putting the deck to use.

    A couple hours later this is what we had…..

    How to Stain Pressure Treated Wood - new deck stained two weeks after - Rain on a Tin Roof

    That one single coat will act as a water repellent and protect the deck for three years. Holla.

    Here’s a little close-up after the sun had went down a bit:

    Staining Pressure Treated Lumber after two weeks - Rain on a Tin Roof

    There were some places where I overlapped the stain a bit on the floor and it made it more dark. Ya know what, though? I like it like that – gives it a bit more depth and character.

    Do you have any tips to share for staining treated lumber?

    More outdoor projects you might just want to see…

    DIY Cedar Planter Box – a beautiful planter box that’s great for also displaying your house numbers!

    How to Clean Your Sidewalk – I was shocked at how gross mine was!

    Lattice Makeover in an Hour – got rough looking lattice somewhere? Give it a quick refresh – you won’t believe how good it looks after!

    Easy Mailbox Makeover – another easy project with big impact!

    Want to come back to this post later? Just pin the image below!

    Tips for Staining Pressure Treated Wood on a New Deck - Rain on a Tin Roof

    You know you don’t wanna miss any of this crazy.

    Sign up to get my posts delivered to your inbox here. 

    Stalk Me Here:

    Pinterest / Facebook / Twitter / Instagram

    Staining a New Deck - Rain on a Tin Roof

    SaveSave