Tag: dining room

  • Black and White Dining Room Mini-Makeover

    Black and White Dining Room Mini-Makeover

    Sometimes living in black and white isn’t so boring and this black and white dining room proves it! You just need a few shots of color to add into the mix! Don’t miss the decorating ideas in this glam dining room!

    When I showed you the new room dividers between my dining and living room, you may have noticed that the whole room got a bit of an update.

    The dividers led to some reshuffling of furniture, which led to adding a few things in, taking a few things out and in the end, me being much more pleased with how our dining room looks.

    Remember last week when I shared the plan for the Circus’ bathroom makeover and how I told you that I felt like we just got rooms finished ok enough when we remodeled? Well, the dining room was one of those spaces.

    Black and White Dining Room Makeover

    I basically threw paint on the walls, my stuff in there and called it a day.

    Glam Dining Room

    Let’s all be honest – it was lacking.

    I did love the bones and some of the larger things though like the black paint, the oversized art, my chandelier, curtains, rug. Those things. But there wasn’t much else in ways of personality in here.

    It’s better now though.

    This post contains affiliate links for your shopping convenience. Click here to read my full disclosure policy.

    Glam Dining Room

    Black and White Dining Space

    Red Drapes / Rug / Art Piece / Dining Chairs (similar) / Wall Color

    The dining area is still primarily black and white, but filled with pops of color and wonderful textures and character. Obviously, a big part of that is owed to the room dividers.

    The really great thing about this little mini-makeover/falling in love with my dining room thing though is that, with the exception of the room dividers and the plants, I hardly spent any money on this space. I shopped my house and closets for most of the “new” things and then landed a couple great secondhand finds.
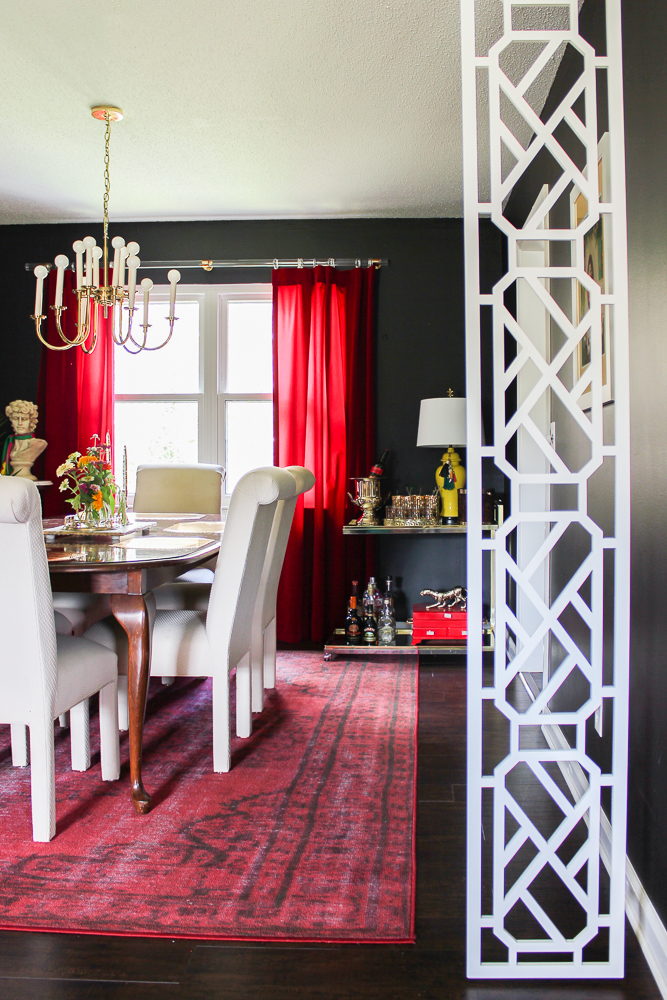
    Glam Dining Room Makeover

    Red Drapes / Rug / Dining Chairs (similar)

    If you haven’t seen how I did those yet, don’t miss it – DIY Room Dividers here!

    Black and White Dining Area

    I had actually switched out both my dining room table and chairs a while back. I really loved my glass dining room table, but it started to freak me out a little. The Circus has obviously grown since we first got the table and as she bounced and moved around more while eating, if she pushed against it, the glass top would slide some. Going from zero to 100 as I always do, I could just see the top sliding off and hurting someone. So when the bestie was selling a wood dining room table at our last yard sale for $25, I grabbed it.

    I also didn’t dislike my old dining room chairs. But they were low and I felt like I wanted chairs with more of a presence in the room. My friend Carol didn’t want these anymore, so I happily took them off her hands. I may recover them at some point, but I’m good with the off white they are right now.

    Glam Dining Area

    Palm / Art Print / Acrylic Floor Lamp (similar)

    When I hung the divider on the left side of the dining room, it made the bar cart that was here feel way too squished in. Thus prompting a small furniture shuffle. I moved the lamp that had been in the corner over here and switched out the lampshade. Funny enough, I was thisclose to ditching this lamp altogether because I just never felt like it looked “right.” Well, after shopping my own house and giving that lamp shade a whirl, I fell in love with that lamp.

    The leopard was my first world’s longest yard sale purchase this year. After seeing him from the car, I made a quick turnaround and practically ran down the street to get to him. He was only $10!

    Modern Dining Room

    Palm / Art Print / Acrylic Floor Lamp (similar)

    I left the small art piece I already had in the space right where it was. I’ve always loved this piece and I think it works well here. A palm plant added the perfect touch of color and texture to this little area too.

    Contemporary Dining Room

    The bar cart moved to one of the back corners of the dining room.

    Black and White Dining Room with Pops of Color

    Yellow Lamp (similar) / Bar Cart / DIY Lamp Tassels / Red Flatware Chest Details

    I don’t know that it had really been living up to its potential in its old home either. I rearranged, edited, and added some things to the cart.

    Yellow Lamp in Black and White Dining Room

    Yellow Lamp (similar) / DIY Lamp Tassels

    I wanted to work some more color into the space beside just the reds in the curtains and rug and this lamp did the job beautifully. I had bought it as part of a set at a rummage sale last spring. I think I paid $5 for the set, maybe? I just know it was a hell of a deal, because I practically bounced away from that sale. The other one is in my office. I also crowned this beauty with one of my lamps tassels for an extra touch of color and fun.

    Pops of Color in Dining Room

    Red Flatware Chest Details

    My recently remade silverware chest finally found it’s home on the bottom of the bar cart. After its makeover, the chest still didn’t have a home and I hated it because I loved it so much. Even Grunt felt bad for it having come such a long way and no place to rest. haha. It’s happy now though.

    Black and White Design

    Moving to the other side of the room, I kept my oversized artwork on the wall. I still love this print as much as when I first got it and it does a great job of covering lots of wall space and adding more interest to the dining space.

    Black and White Decor

    I moved the high marble top table over to this corner. I’ve always loved this table – it’s a family hand me down – but it always looked lonely by itself before or overpowered whatever I put on it. I decided to try out one of my larger busts on it and that worked out perfectly. Then, I just layered in another palm for more color and texture and finally my little elephant table that needed a new home since it had to leave my office to make space for my Roomba.

    What do you think of the dining room’s new look?

    Black and White Room Decor

    I’ll leave you with this shot of flowers from my cut flower garden. This is probably the last good bunch to come from it this year. We’ve been through a heat wave here and have had very little rain on top of that – needless to say, the garden isn’t doing so good right now.

    Want more easy decorating ideas that don’t break the bank?

    5 Ways to Decorate Your Home on a Tiny Budget – I’m a firm believer in the power of thrift store decor. 🙂

    How to Decorate with Black Walls – ready to paint the walls black, but not sure where to go after that? Don’t miss this post then!

    6 Decorating Ideas to Distract from Popcorn Ceilings – got popcorn ceilings? Before you go to all the trouble of scraping them off, try a few of these ideas first!

    Knotty Pine Walls Decorating Ideas – before you reach for that paintbrush to paint over it, look at these ideas for decorating with your knotty pine! You might just fall in love with it!

    Want to hang on to these dining room decorating ideas for later? Just pin the image below!

    Black and White Room

    Follow on social media:

    Facebook | Instagram | Pinterest | Twitter

  • Easy DIY Room Divider

    Easy DIY Room Divider

    Looking for an easy way to divide a space without it being permanent? This DIY room divider screen might just be your answer! It’s super simple to make and it’s easily removable!

    I know many people are all about “open concept” when it comes to homes these days. People want their kitchen, living and dining areas to all be together and open and “flowy”.

    Me? Not so much.

    That being said, the main living area at our previous home, the Beloved Foreclosure, was open concept. In fact, we tore down a couple walls to make it that way. The kitchen, living and dining room were all open to another. For that house, it was best that way though – the rooms felt really closed in otherwise.

    I really love having a little division between my kitchen and living room now though. I can jam out to my heart’s content while cooking dinner and not bother a soul.

    While our kitchen at the 70’s Landing Pad is it’s own space, separated by walls, from the living room and dining room, the living room and dining room open up to one another. It’s obvious that they are meant to be two different “rooms,” but there are no walls.

    For a while, I’ve been wanting to separate this space more. Not put up walls, but have a more clear definition of where the living room ends and the dining room begins. I wanted to be able to “fancy up” the dining room a bit more than the living room without it looking like I had only gussied up part of the space and never did anything with the rest.

    Enter gorgeous room dividers.

    DIY Room Divider

    Rug / Art Piece / Dining Chairs (similar)

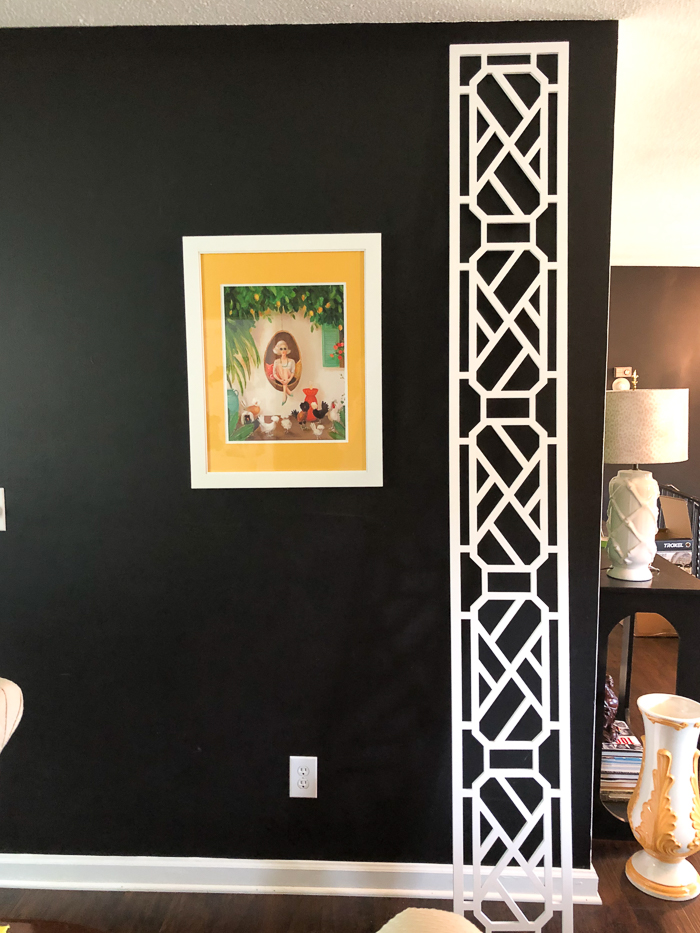
    These hanging room dividers were the perfect solution to my dilemma. Best of all, they are super easy to make (I used prefab panels!) and they are easily removable if you ever need to take them down for any reason.

    O’verlays provided the panels for this project, however all opinions are 100% my own. This post contains affiliate links for your shopping convenience. Click here to read my full disclosure policy.

    DIY Hanging Room Divider

    Materials Needed

    *A note about the panels: If you get your panels from O’verlays, you’ll want to contact them for a custom panel. Your panel(s) will need to be about 1 1/2″ – 2″ shorter than your ceiling height. You’ll also want to get the 1/2″ thick panels so they will be a bit more sturdy than the usual panel thickness. You can choose the width of your panels depending on your room and taste.

    *For reference, I have 8′ ceilings and my panels are 94 1/8″ tall x 12 1/4″ wide and 1/2″ thick.

    Steps

    Step 1

    O’verlays come painted white. If you would like your panels a different color, go ahead and paint them first.

    Lady with Chickens Art

    Step 2

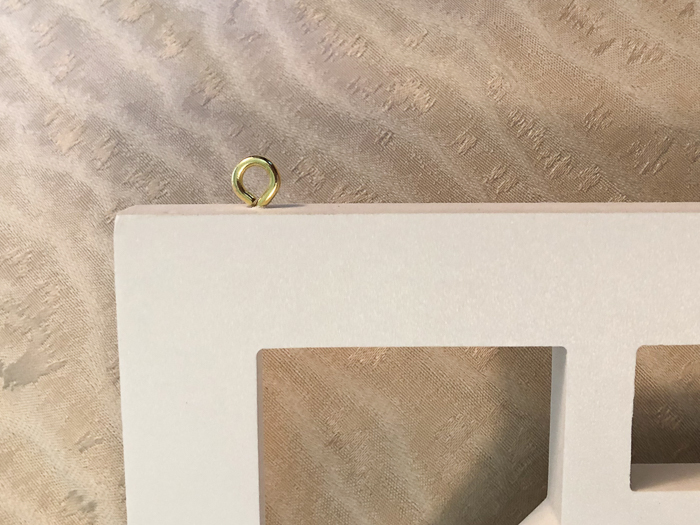
    Install screw eyes on the top edge of each panel. Place a screw eye 1″ in from the outer edge on each side.

    If you get wider panels than mine are, you may want to put in more than two screw eyes per panel.

    Step 3

    Place drywall anchors in the ceiling where you will hang your panels. The anchors should be the same distance apart as the screw eyes you just installed are.

    Using a framing square will help you keep the anchors in line with one another.

    Step 4

    Screw a cup hook into each of the anchors.

    Hang the panel on the hooks by placing the screw eyes at the top of the panels onto the hooks.

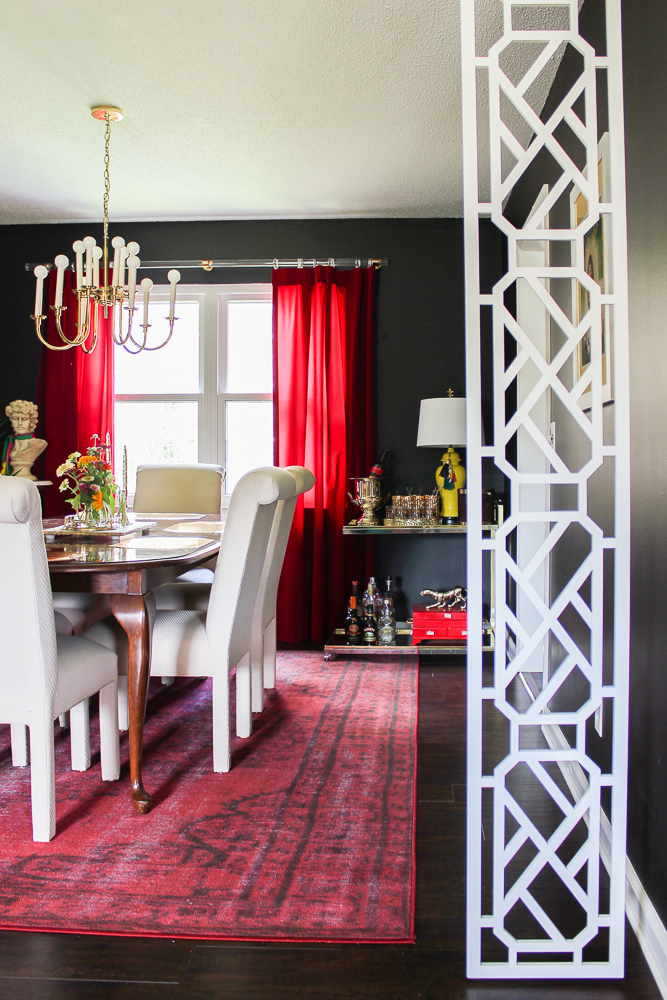
    Red Drapes / Rug / Art Piece / Dining Chairs (similar)

    Not only did these create a visual separation of the two spaces, but they added a gorgeous touch of drama and architectural detail to the space.

    Red Drapes / Rug / Dining Chairs (similar) / Bar Cart

    You may have noticed that they even prompted a little mini dining room makeover – I’ll share that soon!

    If you ever want to take them down, just slide them off the hooks.

    Isn’t this such an easy way of separating spaces without big effort or serious construction? What do you think of them?

    Looking for more big impact, little effort projects?

    DIY Louvered Closet Door Makeover – cover up those dated, dust-catching louvers easily!

    DIY Lucite Handrail – huge wow factor, easy project!

    How to Make Laminate Countertops Look Like Stone – easy and will just cost you around $20!

    Want to easily come back to this project later? Just pin the image below!

    Are you keeping up with use on social media?

    Facebook | Instagram | Pinterest | Twitter

  • Eclectic Home Tours: The 70’s Landing Pad Home Tour, Part 1

    Eclectic Home Tours: The 70’s Landing Pad Home Tour, Part 1

    I cannot believe I actually just typed that title, y’all.

    We just moved into the 70’s Landing Pad about three weeks ago. By no stretch is the house completed, but the fact that I can actually share a home tour with y’all that doesn’t include a three inch thick layer of dust on the floors is a huge accomplishment for me. There still aren’t curtains in the living room and dining room and things aren’t exactly the way I want them just yet, but that takes time and it is what it is. #reallife #itaintalwayspretty

    Today, I’ll share the living room, dining room, hall bathroom and my office as part of the Eclectic Home Tours. Next week, I’ll have the Circus’ bedroom, the master bath and the den for you, so stay tuned. I’ve already revealed the Well Traveled Master Bedroom and if you haven’t seen it yet, it’s here.  Don’t miss the rest of the tours in the Eclectic Home Tours either – links are at the end of this post – I promise you won’t be disappointed.

    I’m not going to do much talking in this one. Instead, I’ll come back over the next few weeks and share all the details of each space separately and what all we did to each room along with before shots of the rooms when we bought the house. Also there’s the fact that this post is supposed to be published along with everyone else’s on the tour today at 8am EST and I’m just now writing the post at 7:48 AM EST. #storyofmylife

    Without further ado, I present to you the semi-finished 70’s Landing Pad.

    Affiliate links may be contained in this post.

    Living Room

    JAW DROPPING! The 70's Landing Pad Living Room Tour: Full of vintage finds paired with modern pieces and pops of color. Living Room Design | Black and White Interior Decorating | Vintage Decor | Retro Decor

    Snakeskin Print Rug / Ghost Chairs / Lion Print / Brass Floor Lamp

    *Ignore the hideous chandelier behind the couch – that will be replaced soon!

    JAW DROPPING! The 70's Landing Pad Living Room Tour: Full of vintage finds paired with modern pieces and pops of color. Living Room Design | Black and White Interior Decorating | Vintage Decor | Retro Decor

    Leopard Print Pillow / Palm Print Pillow

    JAW DROPPING! The 70's Landing Pad Living Room Tour: Full of vintage finds paired with modern pieces and pops of color. Living Room Design | Black and White Interior Decorating | Vintage Decor | Retro Decor | Snakeskin Print Rug

    Gold Sphere / Snakeskin Rug / Acrylic Napkin Holder Coasters

    P.S. Notice the leg of my tripod in the photo above. #mybad

    JAW DROPPING! The 70's Landing Pad Living Room Tour: Full of vintage finds paired with modern pieces and pops of color. Living Room Design | Black and White Interior Decorating | Vintage Decor | Retro Decor | Ghost Chairs

    Lion Print / Ghost Chairs

    JAW DROPPING! The 70's Landing Pad Living Room Tour: Full of vintage finds paired with modern pieces and pops of color. Living Room Design | Black and White Interior Decorating | Vintage Decor | Retro Decor

    Brass Unicorn (similar ones)

    JAW DROPPING! The 70's Landing Pad Living Room Tour: Full of vintage finds paired with modern pieces and pops of color. Living Room Design | Black and White Interior Decorating | Vintage Decor | Retro Decor | Ghost Chairs

    Green Velvet Pillow / Ghost Chair / Acrylic Napkin Coasters

    JAW DROPPING! The 70's Landing Pad Living Room Tour: Full of vintage finds paired with modern pieces and pops of color. Living Room Design | Black and White Interior Decorating | Vintage Decor | Retro Decor

    JAW DROPPING! The 70's Landing Pad Living Room Tour: Full of vintage finds paired with modern pieces and pops of color. Living Room Design | Black and White Interior Decorating | Vintage Decor | Retro Decor

    To The Night Art Print

    JAW DROPPING! The 70's Landing Pad Living Room Tour: Full of vintage finds paired with modern pieces and pops of color. Living Room Design | Black and White Interior Decorating | Vintage Decor | Retro Decor

    Rolling Stone 70’s Book / Elvis Book

    JAW DROPPING! The 70's Landing Pad Living Room Tour: Full of vintage finds paired with modern pieces and pops of color. Living Room Design | Black and White Interior Decorating | Vintage Decor | Retro Decor

    Elvis Bust (similar ones)

    JAW DROPPING! The 70's Landing Pad Living Room Tour: Full of vintage finds paired with modern pieces and pops of color. Living Room Design | Black and White Interior Decorating | Vintage Decor | Retro Decor | WTF Pillow

    I know – isn’t that pillow epic?

    Dining Room

    A STUNNING HOME! The 70's Landing Pad Home Tour: The Dining Room | Black and White Decor / Moody Interior Design / Vintage Interior Design / Glass Dining Table / Vintage Brass Chandelier / Vintage Round Cantilever Chairs

    Rug / Glass Dining Table (similar) / Cantilever Chairs (similar) 

    A STUNNING HOME! The 70's Landing Pad Home Tour: The Dining Room | Black and White Decor / Moody Interior Design / Vintage Interior Design / Glass Dining Table / Vintage Brass Chandelier / Vintage Round Cantilever Chairs

    A STUNNING HOME! The 70's Landing Pad Home Tour: The Dining Room | Black and White Decor / Moody Interior Design / Vintage Interior Design / Minted Art Print, Ivy / Glass Dining Table

    Ivy Art Print

    Hall Bathroom

    Such an adorable bathroom for a kid, but also stylish for adults! The 70's Landing Pad Hall Bathroom | Gray Walls / Black and White Decor / Kid's Bathroom / Purple Bathroom Vanity / Gray Rectangle Floor Tiles

    Shower Curtain / Yellow Hand Towel

    Such an adorable bathroom for a kid, but also stylish for adults! The 70's Landing Pad Hall Bathroom | Gray Walls / Black and White Decor / Kid's Bathroom

    Bonkers Art

    Such an adorable bathroom for a kid, but also stylish for adults! The 70's Landing Pad Hall Bathroom | Gray Walls / Black and White Decor / Kid's Bathroom / Purple Bathroom Vanity / Gray Rectangle Floor Tiles

    Faucet / Cabinet Pulls / Cabinet Knobs

    Such an adorable bathroom for a kid, but also stylish for adults! The 70's Landing Pad Hall Bathroom | Gray Walls / Black and White Decor / Kid's Bathroom / Round Black Mirror / Vintage Style Globe Pendant Lights

    My Office

    Great ideas for incorporating family trinkets and treasures into your decor! The 70's Landing Pad Office Tour: Full of family treasures and trinkets, but decorated tastefully and with a touch of flair.

    Curtains

    Great ideas for incorporating family trinkets and treasures into your decor! The 70's Landing Pad Office Tour: Full of family treasures and trinkets, but decorated tastefully and with a touch of flair.

    Great ideas for incorporating family trinkets and treasures into your decor! The 70's Landing Pad Office Tour: Full of family treasures and trinkets, but decorated tastefully and with a touch of flair.

    Gemstones Print / Dream Big Hustle Hard Print

    Great ideas for incorporating family trinkets and treasures into your decor! The 70's Landing Pad Office Tour: Full of family treasures and trinkets, but decorated tastefully and with a touch of flair.

    Great ideas for incorporating family trinkets and treasures into your decor! The 70's Landing Pad Office Tour: Full of family treasures and trinkets, but decorated tastefully and with a touch of flair. | Black and White Painted Closet Doors

    DIY Painted Pattern Closet Doors

    Great ideas for incorporating family trinkets and treasures into your decor! The 70's Landing Pad Office Tour: Full of family treasures and trinkets, but decorated tastefully and with a touch of flair.

    Curtains

    Great ideas for incorporating family trinkets and treasures into your decor! The 70's Landing Pad Office Tour: Full of family treasures and trinkets, but decorated tastefully and with a touch of flair. | Malachite Credenza

    Malachite Credenza / Design Sponge Book / Sarah Richardson Style Book / Modern Mix Book 

    What do you think? How’s the 70’s Landing Pad coming along so far?

    Shop the Home Tour…

    [show_shopthepost_widget id=”1867007″]

    Don’t miss these other stops in the Eclectic Home Tours today…

    SaveSave

  • Fall Home Tour: Cowboys and Elvis

    Fall Home Tour: Cowboys and Elvis

    This fall tour is not at all about pumpkins.

    Sorry if you were ready for pumpkins.

    Instead its about some of my favorite fall-ish things…cowboy hats and boots…red plaid blankets…and Elvis.

    Ok, Elvis isn’t really fall-ish, but its my house and I’ll do what I want to.

    If you want pumpkins and leaves and all that jazz, check back in a few weeks when I’ve actually had time to remember where I stored all that decor from last year.

    #storyofmylife

    A huge thanks to Marty at A Stroll Thru Life for organizing this Fall Tour of Homes. She is so on top of her game – don’t miss her tour. If you are new here from A Thoughtful Place or another blog on the tour, welcome! Fair warning that I’m not near as talented as all those other ladies and also don’t speak as eloquently as they do. I’m also just weird. And random. You’ve been warned.

    So, let me tell you something.

    I love country music. 

    You may have already figured that out.

    But in the fall, I love it a little bit more. 

    Which I didn’t even know was possible.

    I don’t even know why I love it a little more in the fall besides the fact that I drink a bit more Jack in the fall and what pairs better with Jack than country music?

    Nothing I tell you. Nothing.

    Fall Home Tour / The Entryway / Kelly Green, Black and White accents / Cowboy Accents

    So in the fall, instead of leaving my grandfather’s cowboy hat tucked safely away with the vintage cowboy blanket, I pull them both out.

    And decorate with them.

    Because what’s better than a kelly green pillow paired with a modern black and white one and cowboy paraphernalia all against a confetti wall?

    Random? Yes. But it makes me smile.  

    Fall Home Tour / The Living Room / Cowgirl DIY Lampshade

    And I might play a little bit of musical lamps.

    And put the cowgirl lampshade in the living room.

    Just because.

    Fall Home Tour / The Living Room / Kelly Green Accents

    And mix in a little red and gray plaid with another green velvet pillow.

    Because you can’t have enough comfy green velvet pillows.

    And to top it all off…

    Fall Home Tour / The Stairwell / Easy Abstract Circles Accent Wall / Elvis Bust / Lips Watercolor Art

    We’ll put Elvis against a random abstract circle wall beside red watercolor lips.

    Because every home needs a little Elvis in their lives – whether its fall-ish or not.

    Am I right or am I right?

    P.S. That abstract circle wall is the stairwell! I finally figured out what to do with it – it only took me five months – more on it soon!

    What are your favorite fall-ish decorating pieces? Besides pumpkins!

    The next tour stop is Style Your Senses – I promise Mallory won’t let you down!

  • Summer Home Tour: The Details Make The Space

    Summer Home Tour: The Details Make The Space

    It doesn’t matter how many times I paint a piece of furniture or upholster a chair – if the accessories around it don’t look good, the furniture or chair won’t shine and the space will fall short.

    The details make the space. 

    It took me a really long time to realize that.

    And a lot of backaches and wasted paint. 

    I get it now though – and even if we are just talking about decorating – the pain was worth the reward.

    As dramatic as that sounds. 

    So this summer home tour is about the details.

    The quirky little objects that I love.

    That some may find ugly.

    Or even tacky.

    But for me, they make my space a reflection of my family.

    And that’s all that matters.

    So if you love it or hate it, either way, I don’t care.

    Because we love it.

    And its how we fly our freak flag.

    Welcome to our freak show.

    This post contains affiliate links for your shopping convenience. Click here to read my full disclosure policy.

    A fun and easy to do confetti wall treatment. Summer Home Tour: The details make the space.

    Entryway / Confetti Accent Wall

    The entryway hasn’t changed since the last home tour.

    That’s good considering I just made it over in February. 

    Its still full of fun with the confetti accent wall. Guests feel like they are walking right into a party and turn around to go buy booze.

    Or at least that’s the effect I wish it had on them. 

    Eclectic but Modern Living Room. Summer Home Tour: The details make the space.

    Living Room

    You just saw the completed living room on Tuesday, so it definitley hasn’t changed since then.

    Ain’t nobody got time fo’ that.

    Here are my favorite details from the space though…

    A fun book atop a navy end table. Summer Home Tour: The details make the space.

    The Perfect Navy End Table

    The perfect navy end table paired with Kate Spade’s Places to Go, People to See Book and a faux snakeskin lamp I scored at Bargain Hunt for $5.

    P.S. I’d be lying if I said that book always sat open, perfectly placed like that. You and I both know the  circus would have it turned into a sticky apple juice mess in 2.0 seconds flat. 

    Coral paired with Kelly Green. Summer Home Tour: The details make the space.

    Kelly Green Curtains

    The coral lamp against the kelly green curtains and the pop of glam the pillow adds to the gray chair – I just can’t quit you. Oh and the tray, can’t forget the giraffe print tray.

    In my opinion, every room should have a little animal print.

    Roar.  

    A vintage bull planter. Summer Home Tour: The details make the space.

    My new favorite thing in the giraffe tray is the vintage bull planter.

    Right beside the metallic angel wing.

    Whoever told you that a bull, giraffe, and angel made a bad combination was lying.

    Add a simple pop of color to a boring console table. Summer Home Tour: The details make the space.

    I’m also quite smitten with the new pop of coral on the console table.

    And the $2 brass duck that was supposed to have went out of style in 1989.

    A dramatic, but easy to make black and white gallery wall. Summer Home Tour: The details make the space.

    Black & White Gallery Wall / Stripped & Re-Stained Buffet

    And then there’s the gallery wall. The gallery wall that is almost a sin because its so damn pretty.

    Almost. 

    Sconces on a gallery wall. Summer Home Tour: The details make the space.

    Let’s be honest though.

    Without the art and the sconces, its just a black wall with a white border.

    And that’s just boring. 

    Let’s not dismiss the bowl of cotton and lilies either.

    And then there’s the kitchen.

    Navy and White Kitchen. Stunning. Summer Home Tour: The details make the space.

    Kitchen Makeover / Barstools / Island

    The navy and white kitchen in all its glory.

    Its the stuff dreams are made of.

    Navy and White Kitchen. Summer Home Tour: The details make the space.

    Hardware

    But the hardware is so good, I refer to it as hardware porn.

    I’m nothing if not blunt.

    Navy and White Kitchen. Summer Home Tour: The details make the space.

    Faucet

    The faucet is right behind the hardware porn show.

    Navy and White Kitchen with Quirky Elements. Summer Home Tour: The details make the space.

    Mohawk Lollipop Holder

    And to top the kitchen off, we have open shelving that consists of a mohawk lollipop holder, antlers, the scales of justice and my grandmother’s red glasses among other things.

    I’m also nothing if not random.

    A bold accent wall in the dining room. Summer Home Tour: The details make the space.

    Criss-Cross Accent Wall / Blue and White Buffet / Entire Dining Room

    The dining room hasn’t changed one bit.

    Oh wait – I’m lying. 

    I did move the corner cabinet into the living room and painted it red, but didn’t have time for photos so you’ll have to stick around for that one. 😉

    Nothing else has changed. Seriously, I’m not lying this time.

    What do you think? Are you a details person?

    Either way, keep flying your freak flag.

    pin-this-post

    A gorgeous home tour, but also a breath of fresh air! Decorate with what you love! Summer Home Tour: The details make the space.

    SaveSave

  • Spring Home Tour: Design Ideas for Small Budgets

    Spring Home Tour: Design Ideas for Small Budgets

    You guys.

    You guys.

    No really, you guys.

    So much has changed since the last time I did a full home tour.

    Especially my living room. And my kitchen.

    I’m almost pee-my-pants excited to show you.

    And now that I think about the things that have changed in the past two months, I realize I have no clue how it all got done and that I must be insane.

    Oh wait, we already knew that.

    Even though, I know you’ve already seen the entryway, let’s start there since its still new-ish.

    Disclosure: Kirkland’s provided me with a gift card to do a little shopping for my home tour. However, all opinions are 100% mine.

    Confetti Style Entryway: Spring Home Tour

    Entryway Makeover / DIY Confetti Wall

    I still love the entryway so much. Its light, bright, and most importantly – fun.

    The living room….

    Wait for it…

    Wait for it…

    Vintage Modern Rustic Living Room: Spring Home Tour

    Boom.

    Such a big difference from last time, right?

    There’s a new rug, the red buffet has been stripped, and my most favorite new feature of the living room – the black and white framed gallery wall.

    Black and White Framed Accent Wall: Spring Home Tour

    Stripped & Restained Buffet / Black & White Gallery Wall

    Living Room: Spring Home Tour

    There is still a lot of gold, green, navy, and red in this space. Those are my favorites. 

    Vintage Modern Living Room: Spring Home Tour

    IKEA Tarva turned Drink Bar / DIY Cowhide Rug

    I love all the black and white that anchors it as well.

    Black and White Gallery Wall: Spring Home Tour

    The gallery wall turned out far better than I ever could have dreamed.

    Fo Realz. I never thought I could make anything that pretty. 

    The gray chair is sporting a new shimmery gold pillow, that’s a new white bust as well, and yes, those sconces are new on the wall. The pouf ottoman is new-to-the-space. I may or may not have stolen it from the man cave…..shhhhhh…..

    Black and White Gallery Wall: Spring Home Tour

    Same thing with the pink ottoman – except I stole it from my office. Moving pieces around is my favorite way to decorate. I was tickled pink to find the gold sphere for a whopping $13.

    Let’s move on to the kitchen…

    Navy and White Kitchen with a DIY Island: Spring Home Tour

    Kitchen Makeover / DIY Kitchen Island / Green & Navy Barstool Makeover

    Spot anything different??

    NAVY CABINETS!

    I die. 

    Navy and White Kitchen: Spring Home Tour

    And pretty new brass hardware…

    I die again.

    Me, overdramatic? Whatever…

    I loved my kitchen before.

    Now, I love my kitchen. Painting the base cabinets navy and adding that brass hardware made it 100% Jenna…and Grunt Labor too..he really likes it..

    Navy, White, and Brass Kitchen: Spring Home Tour

    Coffee Station & 10+ Kitchen Ideas

    The entire kitchen got a makeover in three days. It was a total whirlwind and there’s no way I could have done it alone. Kellie, who makes Velvet Finishes, actually came with her crew to pitch in and filmed it all! All that will be posted soon too.

    After the cabinets were done, I did some editing and redecorating on the open shelving.

    Open Shelving in the Kitchen: Spring Home Tour

    Knock-Off Jonathan Adler Mohawk Lollipop Holder

    The Knock-Off Jonathan Adler Mohawk Lollipop Holder graces the top of the shelving. I added a few more touches of brass with the eagle thing (no clue what its called, but it was $1 at a thrift store) and the brass bowl on the bottom. I also switched up the clear glasses for my Grannie’s red ones. I can’t believe I didn’t have those babies showcased before. I love ’em. The antlers didn’t make it into the new gallery wall in the living room, so I hung them in the kitchen. The touch of rustic they add is perfect for the space.

    And the dining room…

    Black and White Dining Room: Spring Home Tour

    Not much is different here. I am plotting to strip the table and stain it to connect the space with the living room more.

    Dining Room: Spring Home Tour

    That would be an ice bucket holding those roses, ’cause I’m a genius like that. You may have seen that tray when I instagrammed it. Its Jonathan Adler and was $4 at Burlington. Score.

    Dining Room: Spring Home Tour

    Navy, White, & Gold Buffet

    I’m still quite smitten with the buffet makeover. Its perfect for tying in the navy cabinets in the kitchen, since that whole space is open.

    Black and White Accent Wall / Buffet Makeover: Spring Home Tour

    Criss-Cross Accent Wall

    Everyone who has entered my house for the first time since the Criss-Cross Accent Wall was completed can’t get over the fact that it isn’t wall paper – its paint. And then they totally can’t believe it when I tell them it actually wasn’t that hard.

    More on the Dining Room…

    Last but not least, the master bedroom…

    Pop of Color with the bedding. Spring Home Tour

    Very little has changed in here since the master bedroom mini-makeover. I did switch out the white lamps for mid-century modern style lamps like you see above. The shape of those lamps pulled me in and had me buying them in five minutes flat.

    Stacks of books for decorating: Spring Home Tour

    I added another of the gold pillows to the reading nook and to make the books look less like clutter and more like decor, I topped them off with faux peonies. I’m usually not a faux flower person, but these were really cute and I adore the black and white striped pot.

    More on the Master Bedroom…

    I didn’t include the kid’s room, guest bedroom + office, and bathroom in the tour since nothing has really changed there at all. You can tour them here though if you https://ovo188exp.com/ haven’t seen them before.

    You know you don’t wanna miss any of this crazy.

    Sign up to get my posts delivered to your inbox here.

    Stalk Me Here:

    Pinterest / Facebook / Twitter / Instagram

    pin-this-post

    Great and Realistic Design Ideas for Small Budgets: Home Tour

  • Criss-Cross Accent Wall for $30 or Less

    Criss-Cross Accent Wall for $30 or Less

     First off, the title of this post totally has me singing the Kriss Kross Jump song – you’ll think me later for sharing that link.

    Other than Criss-Cross, I couldn’t think of a better description for this wall though – besides of course amazingly-awesome-and-total-game-changer-for-my-dining-room.

    But that would have been a really long title.

    Now, in true “Jenna” fashion, I discovered how and how not to do this type of accent wall.

    I started out doing it one way and then ended up doing it another way.

    Either way, this criss-cross accent wall was truly a huge game changer for my dining room and does make me wanna jump-jump.

    Criss-Cross Accent Wall for $30 or Less via RainonaTinRoof.com #diy

    Disclosure: This post is sponsored by FrogTape. However, all opinions, game-changing black and white accent walls, and references to Kriss Kross are 100% mine.  This post contains affiliate links for your shopping convenience. Click here to read my full disclosure policy.

    Depending on what colors you want to use and how big your wall is, you can totally get by with $30 for creating this wall.

    Yes, $30 for one huge impact.

    Jump jump!

    Ok, I’ll quit referencing Kriss Kross songs now. Maybe.

    Materials & Supplies Needed:

    Steps

    Step 1

    If you are cool with the current paint color on your wall and just want to add in the criss-cross, leave your wall color as is and just choose a color for the criss-cross. If not, go ahead and paint your wall. I wanted the crisp black and white combo, so I painted the wall first with my paintstick and Snowfall by Behr.

    Step 2

    To make the criss-cross pattern, you are essentially creating squares that you will paint around. To start it off, take a piece of 12 x 12 cardboard or 12 x 12 scrapbook paper and place it in the top center of your wall turned sideways. Trace around the cardboard / paper.

    Criss-Cross Accent Wall for $30 or Less via RainonaTinRoof.com #diy

    After you have traced it, place your FrogTape along your lines. You want the outside edge of your FrogTape to go right along the traced lines, therefore keeping your overall square 12 x 12, but making the white space within the tape smaller than that. Make sense?

    Step 3

    From here, you can go about making the rest of the pattern two ways. The first way is to place two pieces of tape along the edges of your square you just made and then trace another square, and repeat steps two and three until your wall is covered. Like this:

    Criss-Cross Accent Wall for $30 or Less via RainonaTinRoof.com #diy

    I did this method for a little while and then saw that my pattern was becoming quite uneven. I removed some of my uneven spots and started using a good old ruler and pencil to measure out the rest of my pattern. Either way you do it, I suggest using the 12 x 12 piece of cardboard or scrapbook paper to make your first square. The measurements below are what you should be using to get your squares right:

    Criss-Cross Accent Wall for $30 or Less via RainonaTinRoof.com #diy

    Just take your ruler and make tick marks, then put your tape along those marks and repeat.

    Criss-Cross Accent Wall for $30 or Less via RainonaTinRoof.com #diy

    Step 4

    Once you have all your pattern taped out, you need to go back and even up your tape edges, so that you have perfect squares and can paint around them. I did this with an X-Acto knife and ruler.

    Criss-Cross Accent Wall for $30 or Less via RainonaTinRoof.com #diy

    Step 7

    After your tape is squared up, take a credit card and use it to press firmly along the edges to seal the tape.

    Criss-Cross Accent Wall for $30 or Less via RainonaTinRoof.com #diy

    Step 6

    Paint around your squares.

    Criss-Cross Accent Wall for $30 or Less via RainonaTinRoof.com #diy

    Step 7

    After your final coat of paint, remove the tape.

    And just so we remember how this space started, here’s the before:

    Criss-Cross Accent Wall for $30 or Less via RainonaTinRoof.com #diy

    And now:

    Criss-Cross Accent Wall for $30 or Less via RainonaTinRoof.com #diy

    Criss-Cross Accent Wall for $30 or Less via RainonaTinRoof.com #diy

    Criss-Cross Accent Wall for $30 or Less via RainonaTinRoof.com #diy

    Ya know it makes ya wanna jump jump!

    Yea, I lied about the whole “I’ll stop referencing Kriss-Kross” thing.

    I’m sure it seems like this took forever to do. It actually really didn’t. Once you get in the hang of marking your measurements, it goes really fast.

    If you want to see the whole new dining room, you can tour it here.

    Need more accent wall ideas? I’m your girl!

    Cane Inspired Accent Wall for $25 or Less – a gorgeous wall that packs a big punch for not a lot of money!

    Black & White Gallery Wall – one of my favorite accent walls of all time, and an easy one to do!

    Easy Confetti Accent Wall – super easy and super fun accent wall!

    9 Accent Walls for $30 or Less – on a tight budget? Check these out!

    You know you don’t wanna miss any of this crazy.

    Sign up to get my posts delivered to your inbox here.

    Stalk Me Here:

    Pinterest / Facebook / Twitter / Instagram

    SaveSave

  • Vintage Modern Rustic Dining Room Tour

    Vintage Modern Rustic Dining Room Tour

    There is always that one room that I don’t get along with.

    It never likes anything I do. It never feels quite right.

    I will rearrange furniture, add this accessory, take away this, paint that – and it always ends with me throwing my hands in the air, saying screw it, and having a drink.

    The dining room was that room.

    Emphasis on the was.

    Once I finally decided to stop worrying so much about it, it evolved into a space that I love.

    It now has that same Vintage-Modern-Rustic vibe that the rest of the house has.

    Vintage Modern Rustic Dining Room Tour via RainonaTinRoof.com #homedecor (more…)

  • Repose Gray Walls + The Easiest Way to Paint a Room

    Repose Gray Walls + The Easiest Way to Paint a Room

    Gray is the hot new choice for wall color these days and after just giving my kitchen, living room and dining room walls a fresh coat of Repose Gray, I can see why! This color is a true gray color and was the perfect choice for us! And the icing on the cake? I used a cool, new tool for painting my walls and it made the job so much easier! 

    That’s right.

    I went gray.

    Not with my hair yet, though.

    Thank the Lord.

    Because when the kid tries my patience, its like I can just feel the color fading from my hair, as well as my sanity quickly disappearing.

    But right now, just my walls are gray, repose gray to be exact.

    Things do change quickly around here though, so here’s hoping there are no gray hairs in my near future.

    Repose Gray Walls
    Repose Gray Walls + The Easiest Way to Paint a Room

    Disclosure: This post is sponsored by HomeRight. Y’all know how I roll though, all opinions are 100% mine. This post contains affiliate links for your shopping convenience. Click here to read my full disclosure policy.

    Tools & Supplies Used:

    • Sherwin Williams Repose Gray Paint – while this is a Sherwin Williams color, we actually had it mixed in Behr paint at Home Depot. They can mix colors of just about any paint brand, just tell ’em the name and brand!
    • HomeRight PaintStick EZ-Twist – makes painting a breeze!
    • QuickPainter for edging around trim and the ceiling.

    Ever since we moved into our rancher and made a mad rush to finish the renovation in two months, I was never really 100% happy with our previous wall color. No doubt, it was my fault – the mad rush took over and I lost all sight of actually taking my time on selecting colors. The same happened in my bathroom, the nursery, the guest room, and our bedroom.

    And that’s pretty much every room in our house.

    And that’s a lot of re-painting.

    Its no big surprise that it took me two years to even begin thinking about re-painting our main living space.

    Enter the HomeRight PaintStick EZ-Twist.

    Repose Gray Walls + The Easiest Way to Paint a Room via RainonaTinRoof.com #homeright #paintstickeztwist #reposegrayY’all I painted our entire main living area (that includes the kitchen, living room, dining room, entryway, and hallway) in about four hours with this bad boy.

    How to Use the EZ-Twist for Painting Walls

    It comes with a big paint stick (as if its name didn’t already allude to that), a roller, a roller cover, and a suction tube and cover for your paint can.

    Step 1

    Attach the roller to the stick.

    Repose Gray Walls + The Easiest Way to Paint a Room via RainonaTinRoof.com #homeright #paintstickeztwist #reposegray

    Step 2

    Attach the roller cover to the roller.

    Repose Gray Walls + The Easiest Way to Paint a Room via RainonaTinRoof.com #homeright #paintstickeztwist #reposegray

    Step 3

    Place the suction tube and cover over your gallon of paint.

    Repose Gray Walls + The Easiest Way to Paint a Room via RainonaTinRoof.com #homeright #paintstickeztwist #reposegray

    Step 4

    Put your PaintStick EZ-Twist onto the suction tube and pull the paint into the handle of the tube by pulling back on the inner tube.

    Repose Gray Walls + The Easiest Way to Paint a Room via RainonaTinRoof.com #homeright #paintstickeztwist #reposegray

    Step 5

    Take the EZ Twist to your walls, twist on the end of it to make the paint come up into the roller cover and start rolling your paint on the walls!

    There is no running back and forth to your paint tray hundreds of times.

    There is no messy tray to trip over and track paint all over your floors.

    Yes. That has happened to me before.

    When your roller needs more paint, you simply twist the handle and keep rolling.

    Repose Gray Walls + The Easiest Way to Paint a Room via RainonaTinRoof.com #homeright #paintstickeztwist #reposegrayWhen you have finally ran out of paint in the handle, just go fill it back up.
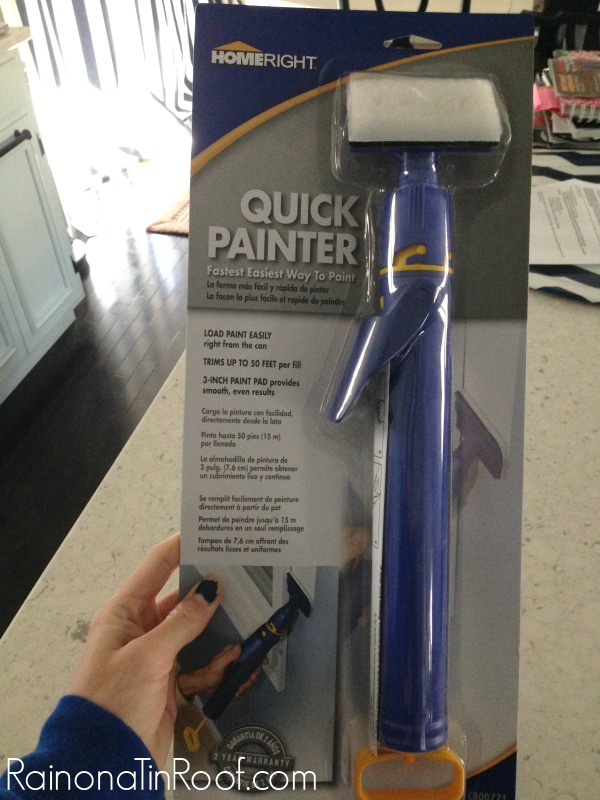
    To edge around all the trim in the areas we painted, I used the HomeRight Quick Painter.

    Repose Gray Walls + The Easiest Way to Paint a Room via RainonaTinRoof.com #homeright #paintstickeztwist #reposegray

    How to Use the Quick Painter

    Step 1

    Suction the paint right into the handle of the Quick Painter.

    Repose Gray Walls + The Easiest Way to Paint a Room via RainonaTinRoof.com #homeright #paintstickeztwist #reposegray

    Step 2

    Place the paint pad on the handle, squeeze the trigger and paint the town, I mean edges.Repose Gray Walls + The Easiest Way to Paint a Room via RainonaTinRoof.com #homeright #paintstickeztwist #reposegray

    Want to see the final product?

    The Repose Gray in all its glory?

    The Entryway

    Sherwin Williams Repose Gray Paint

    Repose Gray Walls + The Easiest Way to Paint a Room via RainonaTinRoof.com #homeright #paintstickeztwist #reposegray

    Repose Gray Walls + The Easiest Way to Paint a Room via RainonaTinRoof.com #homeright #paintstickeztwist #reposegray

    Repose Gray Walls + The Easiest Way to Paint a Room via RainonaTinRoof.com #homeright #paintstickeztwist #reposegray

    The Kitchen

    Repose Gray Walls + The Easiest Way to Paint a Room via RainonaTinRoof.com #homeright #paintstickeztwist #reposegray

    I especially love how the gray made the subway tile pop a bit more in the kitchen.

    Repose Gray Walls + The Easiest Way to Paint a Room via RainonaTinRoof.com #homeright #paintstickeztwist #reposegray

    Gray Walls in The Dining Room

    Gray Walls in the Dining Room

    Repose Gray Walls + The Easiest Way to Paint a Room via RainonaTinRoof.com #homeright #paintstickeztwist #reposegray

    Repose Gray Walls + The Easiest Way to Paint a Room via RainonaTinRoof.com #homeright #paintstickeztwist #reposegray

    Gray Living Room

    Repose Gray Walls + The Easiest Way to Paint a Room via RainonaTinRoof.com #homeright #paintstickeztwist #reposegray

    Gray Living Room

    Repose Gray Walls + The Easiest Way to Paint a Room via RainonaTinRoof.com #homeright #paintstickeztwist #reposegray

    Repose Gray Walls + The Easiest Way to Paint a Room via RainonaTinRoof.com #homeright #paintstickeztwist #reposegray

    Repose Grey WallsYou can see the boring beige walls of yesterday here. They weren’t terrible, they just weren’t that pretty.

    And we all know I like pretty things.

    And functional things.

    That make my life so much easier.

    Sign up to get my posts delivered to your inbox here. 

    You know you don’t wanna miss any of this crazy.

    Sherwin Williams Repose Gray Walls + The Easiest Way to Paint a Room

    SaveSave

  • Dresser turned Stylish Buffet

    Dresser turned Stylish Buffet

    I’ve been keeping a secret.

    I know, its not nice to keep secrets.

    Please forgive me.

    I’ve been doing a mini-makeover on my dining room.

    You may not even recognize it, since the last time you saw it was on my home tour.

    It all started when I found this dresser at a yard sale for $10.

    Dresser Makeover | Dresser Makeover DIY | Dresser Redo | DIY Dresser Makeover | Painted Dresser Ideas | Painted Dresser DIY

    This post contains affiliate links for your shopping convenience. Click here to read my full disclosure policy.

    Yep, the dresser was only $10.

    Dresser turned Buffet {rainonatinroof.com} #furnituremakeover #diyGrunt Labor says it was only $10 because they didn’t want to carry it back inside their house. He may be right. This thing was so heavy. And I have lifted a lot of furniture in my time.

    But, when I saw the $10 dresser, I knew there was a buffet in my future. Come hell or high water.

    So, I had my electrician move my chandy so I could scoot the dining room table over.

    All in the name of a buffet.

    And now back to the $10 dresser.

    It doesn’t look bad from afar, but upon further inspection, one can see that the paint job was horrendous. They had just painted right over the handles while still attached to the drawers, therefore, causing runs in the paint and making my job harder.

    But, I persevered and after I had done enough sanding to my satisfaction (which really means, I gave up), I sprayed the entire thing down with Zinnser primer in my HomeRight Finish Max Paint Sprayer.

    Dresser turned Buffet {rainonatinroof.com} #furnituremakeover #diy

    Dresser turned Buffet {rainonatinroof.com} #furnituremakeover #diyWhy, yes, my garage floor is multi-colored. Its the new look, don’t you think?

    Or maybe I just paint too much.

    After the primer dried, I painted the base and drawers navy, once more with my paint sprayer and let it dry.

    After the navy was good and dry, I took a can of Rust-Oleum Metallic Gold Spray Paint and sprayed the top edge and bottom lip of the buffet body as well as the inside trim of drawers.

    Dresser turned Buffet {rainonatinroof.com} #furnituremakeover #diy

    Dresser turned Buffet {rainonatinroof.com} #furnituremakeover #diyI know, you are wondering why I went and messed up my beautiful navy paint job. Well, this was the easiest and most efficient way I could come up with to get this piece how I wanted it to look. I didn’t want to use a paint brush to paint all those nooks and crannies with the gold, but there isn’t a good metallic paint I can use in my sprayer, so I stuck with the trusty gold spray paint.

    After the spray paint dried, I got back out my blue paint and touched up any places where the gold was that I didn’t want it to be.

    You are thinking this took me forever.

    I thought it would take forever as well.

    We are both wrong. I figured out a trick.

    With the navy, as long as I painted into the outer crevice of the molding, it was pretty easy and quick. This is what I mean:

    Dresser turned Buffet {rainonatinroof.com} #furnituremakeover #diyYou can’t really see inside the crevice, so wrong paint colors there wasn’t an issue.

    After all the navy was dried, I went back with a creamy white along the insides of the drawer fronts and all the old hardware got a coat of gold spray paint. Finally, I finished it off with a coat of Polycrylic.

    Dresser turned Buffet {rainonatinroof.com} #furnituremakeover #diy

    Dresser turned Buffet {rainonatinroof.com} #furnituremakeover #diy

    Dresser turned Buffet {rainonatinroof.com} #furnituremakeover #diyHello ridiculous amounts of extra storage!

    Here’s a little look at what else I’ve been doing in the dining room. The dining room wall has got a makeover since my home tour.

    Dresser turned Buffet {rainonatinroof.com} #furnituremakeover #diyI’ll be showing you how I made that tassel garland and the silhouettes soon!

    What do you think of the new look?

    Need more furniture makeover inspiration? 

    See how I made over a 70’s credenza here!

    And how I gave a dresser a pink and aged dark wax finish here!

    Need help learning to paint furniture? Look no further – here is the ultimate guide!

    And you can always see all my past furniture makeovers right here!

    Sign up to get my posts delivered to your inbox here. 

    You know you don’t wanna miss any of this crazy.

    Stalk Me Here:

    Pinterest / Facebook / Twitter / Instagram

    SaveSave