Category: Holidays and Seasonal

  • Vintage Storybook Garland

    Vintage Storybook Garland

    I am a sucker for old Christmas storybooks.

    Doesn’t matter if they are barely bound together anymore, I buy them.

    They just have the best vintage-y Christmas colors and are so sweet.

    Last year, I made a vintage storybook garland to go around my tree with some of the pages from books that were falling apart. I didn’t post about it because I didn’t think it was a big deal. Then, when I did my Christmas tour last year and shared photos on Facebook recently, so many people said they loved the garland.

    And when the people talk, I listen.

    For the most part.

    So here it is.

    I don’t have step-by-step photos, but you won’t need them – its pretty simple.

    So sweet and simple to make! Vintage Storybook Garland via RainonaTinRoof.com

    This post contains affiliate links for your shopping convenience. Click here to read my full disclosure policy.

    DIY Christmas Tree Garland

    Materials & Supplies Needed:

    Steps

    Step 1:

    Lay the bunting template over the book pages, trace it onto your page, then cut it out.

    Step 2:

    With a small paintbrush, apply Mod Podge just around the edges of your now bunted (for lack of better wordage), book page. After applying the Mod Podge, immediately shake on some glitter and let it dry.

    Step 3: 

    After its dry, use your X-Acto knife to cut small slits into the upper edges of each page.

    Step 4:

    Run your string, twine, or ribbon through each page and hang it on your tree.

    So sweet and simple to make! Vintage Storybook Garland via RainonaTinRoof.com

    Like I said, I used a total of 18 pages for the garland, however I do cheat a bit and just string it back and forth on the front and sides – I didn’t have enough to go around the back of the tree.

    Judge if you want – I don’t care.

    So sweet and simple to make! Vintage Storybook Garland via RainonaTinRoof.com

    Lots of our pages also feature Mickey and friends – the kid loves him.

    Do you have a favorite garland or vintage storybook? 

    More kid-friendly holiday crafts and decorating ideas:

    Elf Hat Tree Topper – super simple to make and a fun topper for kiddos!

    7 Unusual but Meaningful Ornaments You Have Laying Around the House – break out the mementos for this one!

    Easily come back to this garland tutorial later by pinning the image below!

    So sweet and simple to make! Vintage Storybook Garland via RainonaTinRoof.com

    You know you don’t wanna miss any of this crazy.

    Sign up to get my posts delivered to your inbox here.

    Stalk Me Here:

    Pinterest / Facebook / Twitter / Instagram

    SaveSave

  • DIY Elf Hat Tree Topper

    DIY Elf Hat Tree Topper

    Looking for a fun tree topper this holiday season, but don’t want to spend a fortune? Here’s your answer! This elf hat tree topper is adorable, cheap to make and easily customizable!

    This is so easy to do, it almost feels wrong to post about it.

    But I’ve never let that stop me before.

    I have this cute little white Christmas tree I picked up at Goodwill a few years back, but its top has always been naked – no tree topper.

    This year as I was adding sparkly blue ornaments to it (the only color coordinated Christmas tree you will find here), I spied the kid’s birthday hat out of the corner of my eye and it hit me.

    Well, the hat didn’t actually hit me, but you know what I mean.

    Make an elf hat tree topper.

    That’s what hit me.

    This post contains affiliate links for your shopping convenience. Click here to read my full disclosure policy.

    Elf Hat Tree Topper

    As I said, this is so easy, it’s almost a sin.

    Almost.

    How to Make an Elf Hat

    Materials

    Steps

    Step 1

    Print out the paper pattern template from this post, then cut it out.

    Trace that pattern onto the green card stock, then cut that out.

    You could also use any color of card stock for make the hat, then cover it with green felt for a more realistic look if you wish!

    Step 2

    Form your card stock into a cone and hot glue along the seam.

    Step 3

    Freehand a triangle pattern (as seen below) onto the red card stock, cut it out, then hot glue onto the hat.

    You could also embellish with pom poms instead or add them on top of the red band!

    How to Make an Elf Hat

    Step 4

    Top off the hat with a pom pom, jingle bells or any other embellishment of your choice!

    I like to turn the hat at an angle on top of the tree to give it a playful feel.

    Even a kid could do this. Just don’t let them near the hot glue gun. Or anything hot for that matter, like say, a ummm, flat iron. It hasn’t happened here before or anything, I’m just sayin’.

    Do you have an easy go-to DIY tree topper? 

    More easy Christmas and holiday crafts….

    DIY Christmas Ornament Drink Stirrers – so easy to make and so fun for holidays parties!

    How to Make Character Stocking Holders – mine rocks a miniature Barbie from an 80’s McDonald’s Happy Meal. 🙂

    Simple & Affordable Christmas Decoration Ideas – gorgeous holiday decorating, without breaking the bank.

    Want to come back to this elf hat tutorial later? Just pin the image below!

    DIY Elf Hat Tree Topper

    You know you don’t wanna miss any of this crazy.

    Sign up to get my posts delivered to your inbox here.

    Stalk Me Here:

    Pinterest / Facebook / Twitter / Instagram

  • 7 Unusual but Meaningful Ornaments You Have Around the House

    7 Unusual but Meaningful Ornaments You Have Around the House

    Before you go buying all those color coordinated glass ornaments this year, first take a look at these unique Christmas ornaments! The best part? You’ve already got them in your house! These may seem like weird ornaments to some, but they’ll be special to you.

    If you were around here last year, you may remember my Christmas tree is not what many would consider a “pretty” tree.

    I don’t color coordinate.

    I don’t have a whole lot of beautifully detailed ornaments.

    There aren’t even many breakable ones on there.

    But it is filled with meaningful ornaments – some that aren’t even supposed to be ornaments.

    And many are unusual.

    But so am I.

    Unique Christmas Ornaments

    Today, I’m going to chat about some of our meaningful, but also unusual Christmas ornaments. The great thing about these, besides them being sentimental of course, is that you’ll only have to go as far as your own home for them.

    Special Christmas Ornaments

    1. Baby Shoes

    Special Christmas Ornaments

    I’m not one to get the kid’s shoes bronzed. I’ve never really been a fan of that. However, those very first Nikes of hers I will keep forever. Her first pair grace our tree (complete with dirt) every year.

    2. Sentimental Family Heirlooms(?)

    Unusual Christmas Ornaments

    Ok, so glasses aren’t technically considered an heirloom. However, these were my Grannie’s glasses that were in her beloved Cadillac Sedan Deville. They usually stay in a tray in my office so I can look at them and smile every once in a while, but during Christmas I like to put them on the tree so everyone can enjoy them.

    3. Keys

    Weird Ornaments

    Speaking of that Cadillac, there’s the key that opened its door. Us southerners tend to get attached to vehicles very easily. We can usually tell you exactly what make and model we were driving when we learned to drive a stick shift (1989 Chevrolet Cheyenne Long Bed Truck), caused our grandfather to beat on the dash because he thought we were going to run off the mountain (1994 Dodge Dakota), got pulled over for the first time (1989 Cadillac Sedan Deville), and ran into the ditch and couldn’t get out (2003 Dodge Ram 1500).

    P.S. – I think a special key and tag like this would make a great gift!

    4. Special Toys

    Unique Ornaments

    These keys have been around for as long as I can remember. I played with them at my grandparent’s house as a kid and my dad and uncle did too.

    Weird Christmas Tree Ornaments

    Anyone else remember the snap bead necklaces? When I was a little girl, my dad and I would go and buy my great-grandfather his groceries every week. He would usually give me a dollar to two to get something, and I always opted for these bead necklaces.

    5. Cake Toppers

    Unique Christmas Tree Ornaments

    Fun Fact: Mine and Grunt Labor’s cake topper was what you see above – a Barbie and GIJOE figurine. Instead of them staying in a box all year long, they are on the tree. I’m sure you could take a normal cake topper too and nestle it into the Christmas tree. Heck, you could even make it your tree topper!

    6. Small Stuffed Animals

    Special Christmas Tree Ornaments

    It just occurred to me that this probably falls under toys. Whatevs. When I was a little girl, my grannie would put stuffed animals on the Christmas tree for me. These are two of the ones she put on the tree for me and I still put them on my tree every year. My daughter loves these animal ornaments.

    7. PEZ Dispensers

    Unique Christmas Tree Ornaments

    These aren’t quite as meaningful as the rest – besides the fact that I just love Batman – but they are pretty fun. At a yard sale a few months back, I found a box full of PEZ dispensers for a quarter each. I snagged this Batman one and a few other favorite characters that are gracing my Christmas tree. And really – who doesn’t just love PEZ candy? It kind of takes you back to your childhood, right?

     What are your favorite unique ornaments on your Christmas tree?

    Looking for more unique ways to decorate for the season?

    DIY Stocking Holders – not your average stocking holders. 😉

    Vintage Storybook Garland – my family adores this Christmas tree garland featuring pages from holiday storybooks. It’s so easy to make too!

    How to Make an Elf Hat Tree Topper – a super fun craft for kiddos!

    Want to remember these ornament ideas for later? Just pin the image below!

    Unusual Christmas Tree Ornaments

    You know you don’t wanna miss any of this crazy.

    Sign up to get my posts delivered to your inbox here.

    Stalk Me Here:

    Pinterest / Facebook / Twitter / Instagram

  • Pumpkin Place Card Holders (with Dollar Tree Pumpkins!)

    Pumpkin Place Card Holders (with Dollar Tree Pumpkins!)

    These little gems are the perfect fall place card holders – they’ll carry you through the entire season! And they are super affordable – you can make these pumpkin place card holders with items from the Dollar Tree!

    I would like to thank the Dollar Tree for two things.

    1. Having an abundant supply of plastic toys for me to spray paint.

    2. Having cheap pumpkins that make fabulous place card holders.

    I know, I said I wasn’t doing any more fall crafts, but really how can I turn down $1 pumpkins that can be made into fabulous pumpkin place card holders?

    I thought you’d agree.

    They are also really for my Thanksgiving tablescape coming up tomorrow, so that doesn’t really qualify as a fall craft…

    Pumpkin Place Card Holders

    Disclosure: This post was a collaboration with Velvet Finishes. All opinions and love of Dollar Tree pumpkins are 100% mine. This post contains affiliate links for your shopping convenience. Click here to read my full disclosure policy.

    I really really really wanted to paint these green.

    Imagine that.

    But, I had just done the green pumpkins for my other fall decor and I did want these to look a bit harvest-y. So, I opted for a deep red. I also made some “aged” pumpkins for the centerpiece that I’ll show you too.

    Dollar Tree Place Card Holders

    Materials & Supplies Needed:

    Dollar Tree Place Card Holders

    Materials & Supplies for the Name Cards:

    Steps

    Step 1:

    To get the deep red that I used on the pumpkins, I mixed together Vivid & Luxurious.

    Fall Place Card Holders with Painted Pumpkins

    I started with three parts vivid and one part luxurious. Easy peasy. After I mixed up my concoction, I wanted a bit more red, so I added just a large dollop of red to the mix and mixed again.

    Then, I painted it on the pumpkins with a plain old non-fancy chip brush.

    DIY Pumpkin Place Card Holders

    I did two coats on each pumpkin.

    Step 2:

    After the pumpkins dried, I applied Mod Podge to the stem and then sprinkled on gold glitter.

    Painted Pumpkin Dollar Tree Place Card Holders

    Step 3:

    To make the name cards, I just used the same method I did on my DIY Silhouette Gift Tags last Christmas. I cut out the actual tag and silhouette on my Silhouette Cutting Machine and then glued down the silhouette to the tag. With these, I ran some Mod Podge along the edges and then poured glitter on top. I wrote the name with a gold Sharpie paint pen.

    Step 4:

    To attach the feather and card together, simply tie a few feathers together, and then tie them onto the place card. I just put a piece of tape on the back of the card to attach it to the pumpkin.

    I also made these super cute little pumpkins as part of the centerpiece you’ll see tomorrow.

    Aged Pumpkin Place Card Holders

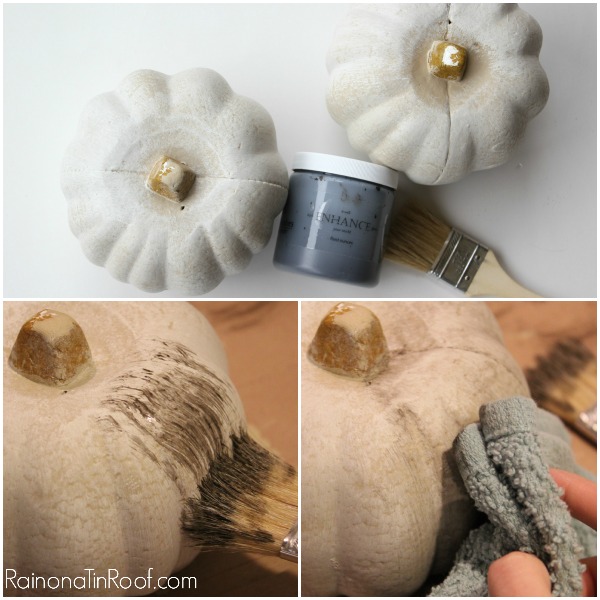
    To make these, first paint your pumpkins with Soulful.

    DIY Aged Pumpkins from the Dollar Tree

    I did two coats. After its dried, come back and dry brush on Rococo.

    How to Make Aged Pumpkins

    You don’t want to have hardly any paint on your brush. Dip it in the paint, dab most of it off, then just do quick swipes up and down the pumpkin.

    After that dried, I did a very light coat of the Enhance Dark Glaze.

    DIY Aged PumpkinsAs soon as I painted on a few swipes, I came back with my rag and wiped it off.

    DIY Aged Pumpkins with pumpkins from the Dollar Tree

    If you have been around here long enough, you know I typically suck at glazes. This one is so much easier to use than any I’ve tried before. I used it on my IKEA Tarva Drink Bar and was honestly scared I would ruin the whole thing with the glaze, but I didn’t! It looked fab!

    Instead of using these “aged pumpkins” as place card holders, I wrote Give Thanks on them.

    More easy fall crafts: 

    DIY Ampersand Pumpkin – fall decor, but with a chic twist.

    Fall Mums Watercolor Printables – free printable art in five different styles.

    7 Simple and Frugal Fall Crafts and Decorating Ideas – easy on the wallet, high on style.

    Want to come back to these later? Just picture the image below!

    DIY Pumpkin Place Card Holders with stuff from the Dollar Tree

    You know you don’t wanna miss any of this crazy.

    Sign up to get my posts delivered to your inbox here.

    Stalk Me Here:

    Pinterest / Facebook / Twitter / Instagram

    SaveSave

  • Ampersand Pumpkin

    Ampersand Pumpkin

    I did it guys.

    I’m sorry, but I lied to you. I didn’t mean to lie to you. It just happened.

    When I posted the 7 simple & frugal fall crafts, I said there probably wouldn’t be many new fall crafts around here – if any.

    And then I decided I needed a green pumpkin…with an ampersand symbol.

    Before I knew it, I was in the driver’s seat and my car was practically steering itself to Michael’s.

    Story of my life.

    Hello Ampersand Pumpkin.

    Ampersand Pumpkin via RainonaTinRoof.com #fallcrafts

    This post contains affiliate links for your shopping convenience. Click here to read my full disclosure policy.

    Even though I caved and did a fall craft, luckily this is one of those pumpkins that will be around forever.

    Because its fake.

    Let’s be honest, it may not always have an ampersand symbol, seeing as how I change things up often, but I didn’t waste my time painting and poking holes in a pumpkin that will rot in a few weeks.

    I do wish though that they would start making these fake pumpkins with bigger stems. Someone needs to tell those people that bigger stems make a pumpkin prettier.

    I like big stems and I cannot lie.

    Preferably gold or glittered ones.

    How to Make an Ampersand Embellished Pumpkin

    Materials Needed: 

    • Pumpkin – Fake or real. Mine is a fake one from Michael’s.
    • Paint – I used this spray paint.
    • Paper copy of an ampersand symbol – I just searched for one online, then saved it and printed it out.
    • Scissors
    • Decorative furniture tacks or thumb tacks – I used the furniture tacks because I had a lot laying around.
    • Pencil

    Steps

    Step 1

    Paint your pumpkin whatever color you want to. I went with green. It works with the rest of my decor. I don’t really care if everyone else says that green is not a fall color and that I should be using orange, red, or yellow. I’m a rebel like that.

    Step 2

    After your pumpkin has dried, cut out your ampersand symbol. Place it on your pumpkin with a few of the tacks.

    Ampersand Pumpkin via RainonaTinRoof.com #fallcrafts

    Take a pencil and trace around the ampersand. Be sure to trace on the inside of the symbol as well.

    Step 3

    Take the ampersand off your pumpkin, but don’t remove the tacks. Just tear it away from the tacks.

    Ampersand Pumpkin via RainonaTinRoof.com #fallcrafts

    This just helps to give you a few anchor points. Fill in the symbol with the tacks.

    Ampersand Pumpkin via RainonaTinRoof.com #fallcrafts

    How easy was that?

    Have you done any fall crafts with furniture or thumb tacks?

    Need more fall crafting inspiration? 

    5 Free Fall Mums Watercolor Printables – so so so pretty!

    7 Simple & Frugal Fall Crafts – fall decor shouldn’t cost an arm and a leg!

    Fall Home Tour – thing blue jeans and guitars. 🙂

    You know you don’t wanna miss any of this crazy.

    Sign up to get my posts delivered to your inbox here.

    Stalk Me Here:

    Pinterest / Facebook / Twitter / Instagram

    SaveSave

  • Blue Jean Jackets, Cowboy Boots, and a few Pumpkins: Fall Home Tour

    Blue Jean Jackets, Cowboy Boots, and a few Pumpkins: Fall Home Tour

    I know I told you I wouldn’t be doing much fall decorating this year – and I haven’t; I hadn’t even planned on doing a fall home tour, but when Lindsay from The White Buffalo Styling Co. asked me to join in on her Blogger Stylin’ Fall Home Tours, I simply couldn’t say no – and then I thought of a story I wanted to share with you along with the tour, so it was destiny.

    Ok, I’m a little over dramatic.

    Blogger Stylin' Home Tours Fall 2014

    If you are coming over from Decorchick, welcome! There’s no doubt in my mind that Emily left you in awe with her talent.

    If you happen to have some Conway Twitty, Loretta Lynn, or maybe some Merle Haggard nearby, go ahead and turn it on…it will go nicely with this tour.

    Blue jean jackets, cowboy boots, and pumpkins: Fall Home Tour via RainonaTinRoof.com #falldecor (more…)

  • 7 Simple and Frugal Fall Crafts & Decorating Ideas

    7 Simple and Frugal Fall Crafts & Decorating Ideas

    Want to get your home decor ready for fall on a budget? You’re in the right place! These simple fall crafts are perfect for just that! Not only are these easy fall crafts to make, but they are also made with budget in mind!

    I’m going to be real honest with you guys. There most likely will not be lots of new fall decor at my house this year. I would just rather spend my time working on stuff I will see all year long than just for a month or two. That doesn’t mean I don’t love fall – I do. And I will still put out my fall decor from years past, just not anything new. So, here are my favorite fall crafts and decorating ideas I’ve done in the past that may be oldies, but still goodies.

    Simple Autumn Crafts to Make

    Fall Mums Printables

    Simple Fall Crafts

    Free Fall Mums Watercolor Printables – There are multiple different scenes and varieties available to print. Simply print out and you’ve got instant fall decor. How much easier could it be?

    Dollar Store Pumpkin Place Card Holders

    Simple Autumn Crafts to Make

    How about some pumpkin crafts? These Pumpkin Place Card Holders were made with Dollar Tree Pumpkins – so easy to make!

    Ribbon Wrapped Pumpkins

    Easy Fall Crafts

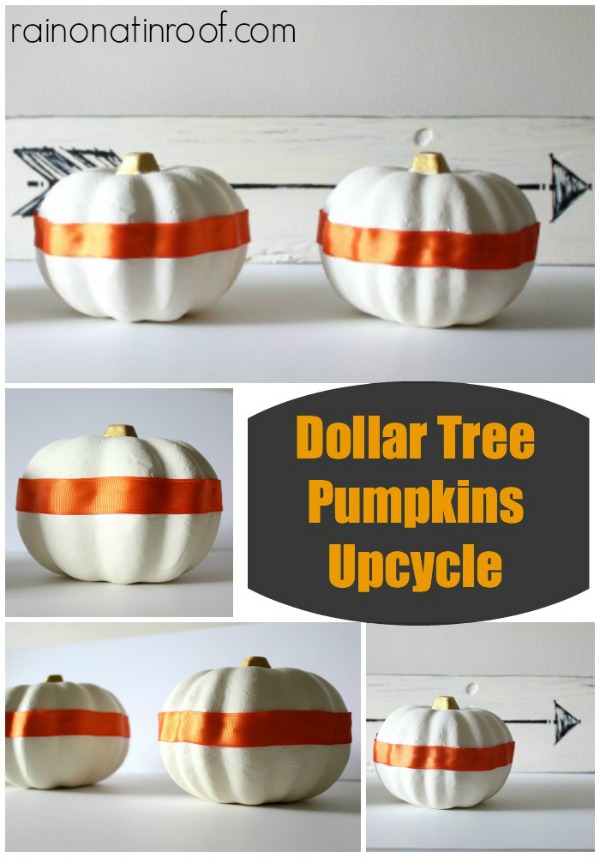
    Dollar Tree Pumpkins Upcycle – more pumpkins from the Dollar Tree that got a much needed makeover! Isn’t the little orange ribbon sweet? The Dollar Tree is always full of potential DIY fall crafts!

    Ampersand Pumpkin

    DIY Fall Crafts

    Ampersand Pumpkin – I adore how this pumpkin turned out – still one of my favorite fall decor pieces! It adds a chic touch to fall decorating.

    Simple Fall Decorating Ideas

    Easy Fall Home Decor

    Simple Fall Decorating Ideas – lots beautiful, but easy fall decor ideas here.

    DIY Fall Door Decor

    Autumn Crafts

    DIY Fall Door Decor – a little spin on the traditional fall wreath!

    Glittery Fall Garland

    Autumn Craft Ideas

    Glittery Fall Garland – another oldie, but always a favorite! This garland has just the right amount of color! This one is also a great one for the kiddos to get involved with.

    Fall Wreath

    Fall Craft Ideas

    I made this fall wreath simply by wrapping yarn around a wreath form and embellishing it!

    Can you share any easy fall crafts with us?

    See all my seasonal decorating ideas here!

    Want to come back here later? Just pin the image below!

    Simple and Easy Fall Crafts

    You know you don’t wanna miss any of this crazy.

    Sign up to get my posts delivered to your inbox here. 

    Stalk Me Here:

    Pinterest / Facebook / Twitter / Instagram

  • Christmas Mantel Decorating

    Christmas Mantel Decorating

    You guys know I don’t have a mantel.

    *sigh*

    Its ok, though. I live vicariously through you and your mantels.

    Here is some Christmas mantel decorating that is sure to impress.

    Christmas Mantel Decorating via RainonaTinRoof.com (more…)

  • Four Easy DIY Gift Ideas

    Just a quick little post today to share some easy DIY gift ideas with you!

    I am trying to get caught up around here so I can take some time off during Christmas!

    Four Easy DIY Gift Ideas via RainonaTinRoof.com #diy #giftideas (more…)

  • An Eclectic Christmas Home Tour {Part 2}

    An Eclectic Christmas Home Tour {Part 2}

    Hi there. Are you hopping over from Desert Domicile?

    I’m so happy you are here – wherever you came from.

    I hope you are ready for the final installment of my Christmas tour.

    And for a little story.

    And I hope you like a random smattering of styles and items thrown together.

    Because that is what this eclectic Christmas home tour is all about.

    That and really special people.

    Eclectic Christmas Home Tour via RainonaTinRoof.com #christmas #hometour (more…)

  • DIY Silhouette Gift Tags

    DIY Silhouette Gift Tags

    Maybe when you read about my daily circus, oh, I mean quick and simple holiday decorating, you noticed how I used wrapped gifts as decor.

    And maybe, just maybe, you noticed those silhouette gift tags on those wrapped gifts.

    DIY Silhouette Gift Tags via rainonatinroof.com #silhouette

    This post contains affiliate links for your shopping convenience. Click here to read my full disclosure policy.

    These were so easy to make! For the actual tag, I just drew lines and angled them into the shape of a gift tag on my Silhouette. I drew a little circle in the upper center for string. Then, I grouped all the lines and circle together to make one design.

    Whoa, people, watch out, she is actually using her Silhouette to draw.

    I know, not really all that impressive.

    DIY Silhouette Gift Tags via rainonatinroof.com #silhouette

    I bought the silhouette shapes in the Silhouette store. They were $0.99 each and really, y’all know I ain’t got no time to attempt to draw a silhouette on my own.

    So, yea, I cut silhouettes on my Silhouette. hahahaha.

    DIY Silhouette Gift Tags via rainonatinroof.com #silhouette

    She even has terrible jokes.

    I adhered the silhouette to the tag with a glue runner and used a gold Sharpie paint pen to draw the designs and write the names.DIY Silhouette Gift Tags via rainonatinroof.com #silhouette

    If you look closely, you will see that the string holding the tag is actually white and gold. I found it at the Target dollar spot when I found the dollar trays I hacked.

    DIY Silhouette Gift Tags via rainonatinroof.com #silhouette

    I do have to say, thanks to these gift tags and the fab wrapping paper I scored at HomeGoods, my gift wrapping is looking 100 times better than last year.

    See how I used these tags to create pumpkin place card holders for Thanksgiving right here!

    Stalk me:

    Pinterest / Facebook / Twitter

  • 10+ DIY Holiday Wreaths

    10+ DIY Holiday Wreaths

    This week, we are talking DIY holiday wreaths, baby! Lots of them!

    10+ DIY Holiday Wreaths via rainonatinroof.com #wreath

    10+ DIY Holiday Wreath Ideas

    10+ DIY Holiday Wreaths via rainonatinroof.com #wreath

    Paint Stick Evergreen Wreaths from Me!

    10+ DIY Holiday Wreaths via rainonatinroof.com #wreath

    Vintage Santa Tinsel Wreath from Me

    10+ DIY Holiday Wreaths via rainonatinroof.com #wreath

    Vintage Elf Yarn Wrapped Wreath from Me 🙂

    10+ DIY Holiday Wreaths via rainonatinroof.com #wreath

    Cotton Ball Wreath from Learning Creating Living

    10+ DIY Holiday Wreaths via rainonatinroof.com #wreath

    Burlap, Boughs and Blades Winter Wreath from The Happy Housie

    10+ DIY Holiday Wreaths via rainonatinroof.com #wreath

    The Grinch Wreath from Style BluePrint

    10+ DIY Holiday Wreaths via rainonatinroof.com #wreath

    Anthropologie Inspired Wool Wreath from View From the Fridge

    10+ DIY Holiday Wreaths via rainonatinroof.com #wreath

    Colorful Vintage Style Wreath from Silly Old Suitcase

    10+ DIY Holiday Wreaths via rainonatinroof.com #wreath

    Jute and Glitter Wreaths from So Much Better With Age

    10+ DIY Holiday Wreaths via rainonatinroof.com #wreath

    Boxwood Christmas Wreath from Heather Bullard

    10+ DIY Holiday Wreaths via rainonatinroof.com #wreath

    Fresh Holiday Monogrammed Wreath from House in the Heights

    Looking for more holiday decorating inspiration? 

    Simple and Affordable Christmas Decoration Ideas – they’re gorgeous too! 

    Don’t get your tinsel in a tangle! – here are ideas for decorating with tinsel during the holidays!


  • Quick and Simple Holiday Decorating

    Quick and Simple Holiday Decorating

    Welcome, friends! Quick and Simple Holiday Decorating {Holiday Home Tour} via rainonatinroof.com #holidaydecorating

    Let me give you a glimpse of my everyday life.

    I wake up around 6:30 a.m., have a cup of coffee, count my blessings, write posts, edit photos, etc. until the kid wakes up, with any luck at least an hour and a half later.

    Quick and Simple Holiday Decorating {Holiday Home Tour} via rainonatinroof.com #holidaydecorating

    Then God gets a cup of coffee and gets ready for his daily entertainment of the three ring circus that is about to begin at my house.

    Quick and Simple Holiday Decorating {Holiday Home Tour} via rainonatinroof.com #holidaydecorating

    Quick and Simple Holiday Decorating {Holiday Home Tour} via rainonatinroof.com #holidaydecorating

    For the next 4-6 hours, I try to keep the kid from falling down stairs, jumping off the couch & breaking a limb, booty dancing on the coffee table, climbing on the dining room table & swinging from the chandelier, eating questionable items, pestering the dog, laying on the dog bed, coloring on the walls, playing in the toilet, pouring her milk on the floor, pulling heavy objects on top of herself and somewhere in between it all, I try to make sure she actually eats more than a strawberry for breakfast and a chicken nugget for lunch.

    Besides enjoying the circus, I hope God is listening to my prayers for patience throughout the day.

    Quick and Simple Holiday Decorating {Holiday Home Tour} via rainonatinroof.com #holidaydecorating

    If I’m lucky, at some point she will take a 1 1/2 – 2 hour nap.

    Quick and Simple Holiday Decorating {Holiday Home Tour} via rainonatinroof.com #holidaydecorating

    If I’m lucky.

    And during that time, I do some more post writing, pay bills, take more photos, edit more photos, etc.

    And I do it all very quietly in hopes she will sleep longer.

    But she never does.

    Because evidently, God really likes the circus.

    Quick and Simple Holiday Decorating {Holiday Home Tour} via rainonatinroof.com #holidaydecorating

    And when she wakes up, I crack open a cheap beer and turn on Mickey Mouse because I need a break in order to maintain the little mental stability I had to begin with.

    Quick and Simple Holiday Decorating {Holiday Home Tour} via rainonatinroof.com #holidaydecorating

    Sure, there are those two days a week that she goes to preschool for 4 1/2 hours. And during that time, I am painting beds, re-upholstering chairs, and turning trash into treasure.

    Quick and Simple Holiday Decorating {Holiday Home Tour} via rainonatinroof.com #holidaydecorating

    And now, I’m supposed to decorate for Christmas on top of it all.

    And I love Christmas. I told you all about how much I love gift giving.

    Quick and Simple Holiday Decorating {Holiday Home Tour} via rainonatinroof.com #holidaydecorating

    Can my gift be a personal assistant?

    Pretty please, Santa? Grunt Labor? Dad? Anyone?

    Quick and Simple Holiday Decorating {Holiday Home Tour} via rainonatinroof.com #holidaydecorating

    Quick and Simple Holiday Decorating {Holiday Home Tour} via rainonatinroof.com #holidaydecorating

    Please don’t get me wrong, I wouldn’t trade my little circus for anything. I mean, I totally understand her. She is 100% her mama’s child, God bless it.

    Quick and Simple Holiday Decorating {Holiday Home Tour} via rainonatinroof.com #holidaydecorating

    Quick and Simple Holiday Decorating {Holiday Home Tour} via rainonatinroof.com #holidaydecorating

    So, over here, this girl is all about quick and simple holiday decorating.

    Quick and Simple Holiday Decorating {Holiday Home Tour} via rainonatinroof.com #holidaydecorating

    My quick and simple holiday decorating tips:

    Throw some ornaments, make it rain.

    Quick and Simple Holiday Decorating {Holiday Home Tour} via rainonatinroof.com #holidaydecorating

    My favorite Christmas decorating items are ball ornaments. Preferably vintage ones, but I will take any. Anytime I see them at Goodwill, on clearance, or in an antique store for a good price, I buy them.

    Quick and Simple Holiday Decorating {Holiday Home Tour} via rainonatinroof.com #holidaydecorating

    So, throw some of those bad boys everywhere.

    Quick and Simple Holiday Decorating {Holiday Home Tour} via rainonatinroof.com #holidaydecorating

    In bowls. On Goodwill trays. Hang them from chandeliers. Unless you have a circus that likes to hang from chandeliers, then you shouldn’t do that.

    Use Wrapped Gifts as Decor

    Quick and Simple Holiday Decorating {Holiday Home Tour} via rainonatinroof.com #holidaydecorating

    The other day, I was talking with Mama and she was saying how she read in a magazine about using gifts as decor.

    Quick and Simple Holiday Decorating {Holiday Home Tour} via rainonatinroof.com #holidaydecorating

    It was like angels started singing.

    Quick and Simple Holiday Decorating {Holiday Home Tour} via rainonatinroof.com #holidaydecorating

    Duh. You have to wrap presents. We usually try to make them pretty. Why do they have to stay under the tree? Spread those bad boys around the house.

    Quick and Simple Holiday Decorating {Holiday Home Tour} via rainonatinroof.com #holidaydecorating

    I even used mine as my dining room table centerpiece this year.This is also fabulous for keeping them out of reach of the little circus. Until the little circus climbs on the table. And on a side note, I will show you how I made those gift tags on Monday!

    Quick and Simple Holiday Decorating {Holiday Home Tour} via rainonatinroof.com #holidaydecorating

    Oh, and don’t let me fool you for a minute. The gifts you see on my table are the same gifts you saw in the entryway. As if I have had time to wrap all the presents yet.

    Personal assistant??

    Anyone? Anyone?

    Tinsel is My Friend

    Quick and Simple Holiday Decorating {Holiday Home Tour} via rainonatinroof.com #holidaydecorating

    As you will see more of next week in part 2 of my home tour, I love tinsel.

    Quick and Simple Holiday Decorating {Holiday Home Tour} via rainonatinroof.com #holidaydecorating

    I drape it around wall decor, use it as a filler in bowls and lay it out anywhere a little more bling is needed. There are some fab tinsel ideas here.

    I think tinsel has a way of making it feel more like a party, instead of holiday decorations.

    And I like that.

    Curly Gold Ribbon Makes Everything Better

    Quick and Simple Holiday Decorating {Holiday Home Tour} via rainonatinroof.com #holidaydecorating

    Go buy a roll of gold, or another color of your preference, curling ribbon. Cut pieces off and throw it on the ornaments that you rained all over the house. Instant glam.

    Quick and Simple Holiday Decorating {Holiday Home Tour} via rainonatinroof.com #holidaydecorating

    Where Ornaments Won’t Go, Use Greenery

    Quick and Simple Holiday Decorating {Holiday Home Tour} via rainonatinroof.com #holidaydecorating

    Not enough ornaments? Or they won’t fit in your containers? Fill them with live greenery!

    Quick and Simple Holiday Decorating {Holiday Home Tour} via rainonatinroof.com #holidaydecorating

    I have an evergreen tree that I take clippings from, but Lowe’s (and maybe HomeDepot?) gives away their greenery clippings from Christmas trees.

    Quick and Simple Holiday Decorating {Holiday Home Tour} via rainonatinroof.com #holidaydecorating

    If I can, I love to pop a few ornaments on top of the greenery – I can’t get enough of that contrast.Quick and Simple Holiday Decorating {Holiday Home Tour} via rainonatinroof.com #holidaydecorating

    Wreaths aren’t just for doors

    Quick and Simple Holiday Decorating {Holiday Home Tour} via rainonatinroof.com #holidaydecorating

    As you may have picked up on now, I am a wreath lovin’ fool. Quick and Simple Holiday Decorating {Holiday Home Tour} via rainonatinroof.com #holidaydecorating

    I love to put my vintage elf wreath over the mirror in my entryway. I just use ribbon and a thumbtack.

    And my paint stick evergreen wreaths graced my liquor cabinet this year.

    Quick and Simple Holiday Decorating {Holiday Home Tour} via rainonatinroof.com #holidaydecorating

    Be sure to come back next Tuesday to see the rest of my Christmas tour.

    Ya know, like the tree. Cause that is supposed to be the biggest holiday decoration, right?

    There is lots more in store for you next Tuesday.

    I have to go catch the circus now.

    Need more easy Christmas decorating ideas? Be sure to see these simple and affordable Christmas decoration ideas then!

    Like what you see?

    Follow along:
  • Don’t Get Your Tinsel in a Tangle: Ideas for Decorating with Tinsel

    Don’t Get Your Tinsel in a Tangle: Ideas for Decorating with Tinsel

    I have a confession to make.

    Just like I’m a tray whore, I’m a tinsel whore.

    I have one large rubbermaid container dedicated to tinsel.

    Guys, that’s a lot of tinsel.

    I may even use it so much that some would consider it borderline tacky.

    That’s their problem.

    Here’s some of my favorite ideas for decorating with tinsel:

     Ideas for Decorating with Tinsel via rainonatinroof.com #tinsel #holidaydecorating (more…)

  • Paint Stick Evergreen Wreaths

    Paint Stick Evergreen Wreaths

    Create gorgeous evergreen Christmas wreaths this holiday season using paint sticks! Yes, paint sticks! Read on to learn how to make an evergreen wreath in all shapes and sizes….

    Update: To everyone who is freaking out about me stealing these paint sticks and think that I’m a thief: I have talked to my paint guy at Home Depot. They give these things away for free all the time – without you purchasing paint. Just a little FYI.

    Please Home Depot, don’t hate me.

    You see, when I was buying paint at your store the other day, I may have picked up more paint sticks than I was allotted.

    I bought two gallons and one quart of paint. But, I took 15 paint sticks. Did I go over my quota?

    If it makes it any better, there have been multiple times when I’ve bought paint and not gotten the paint sticks….

    I’m really, really sorry.

    But you see, I just had to have those extra paint sticks to make these stellar evergreen wreaths.

    How to Make an Evergreen Wreath


    You understand, don’t you Home Depot?

    And all of you, my fabulous friends understand too, don’t you?

    I mean, really, how could I not make these spectacular paint stick evergreen wreaths? Especially when they cost me a total of $0.

    You want to make your own now too, don’t you?

    Let’s do it!

    This post contains affiliate links for your shopping convenience. Click here to read my full disclosure policy.

    DIY Evergreen Wreaths using Paint Sticks

    I made two square wreaths and one large star wreath. I’ll show you how to do both.

    For the Square Evergreen Wreaths

    Materials

    • 4 Paint Sticks per Wreath
    • Green Spray Paint
    • Evergreen Clippings
    • Hot Glue Gun
    • Wide Ribbon for Hanging

    Steps

    Step 1


    If you want to make the wreaths smaller than the size of the paint stick, cut the paint sticks down first. Next, spray paint the paint sticks.

    Step 2

    Using the hot glue gun, glue the paint sticks together to form a square.

    DIY Evergreen Wreath

    Step 3

    Gather your evergreen clippings. Cut them down to the size you’d like them to be on your wreath. Just hold a few up to the wreath frame and decide.

    Start hot gluing the clippings onto the paint sticks starting in a corner.

    Paint Stick Evergreen Wreaths

    Hang a ribbon from the top and enjoy!

    How to Make an Evergreen Wreath using Paint Sticks
    Wreaths made from Paint Sticks
    DIY Christmas Evergreen Wreaths

    For the Star Evergreen Wreath

    Materials

    Steps

    Step 1

    You will need ten paint sticks to make the size that I made. Now, mine is pretty big people. I didn’t cut any of the paint sticks down to size. It works for me because I will be sitting it on my front porch for decor and it would probably look great on a mantel if I had one, but if you want to hang it on a door, you will want to cut all your sticks down some. I would just play with the size until you have what you like.

    Gather your paint sticks.

    Using paint sticks for Christmas wreaths.

    Lay them out in the floor in the best star shape you can muster, if it looks like this at first, don’t worry:

    How to Make a Star Shaped Evergreen Wreath

    Yea, that big huge gap wouldn’t cut it. Just play with it until you have the correct shape. The best way I found was to take a square and put it into the angles and push the sticks together until they met up with the square.

    Paint Stick Star
    DIY Star Evergreen Wreath

    Step 2

    Once you have it laid out how you want it, hot glue all the sticks together. If its a little off, don’t worry because the greenery will cover up some of the unevenness.

    DIY Paint Stick Star

    Step 3

    Spray paint the frame green.

    Step 4

    Hot glue the greenery onto the star just like with the squares.

    How to Make an Evergreen Star Shaped Wreath

    Use a wide ribbon to hang the star wreath as well.

    DIY Star Shaped Evergreen Wreath

    Yes, it takes a little time to hot glue all the greenery on, but it is so worth it.

    Especially since its free.

    Thanks for the paint sticks, Home Depot. And no, Home Depot did not compensate me in any way for this post. In fact, they may be really pissed at me now.

    Uh-oh.

    Still in a wreath lovin’ mood?

    Then don’t miss the easy Santa Tinsel Wreath or these 10+ Holiday Wreath Ideas.

    There are also loads of simple and affordable Christmas decoration ideas here!

    Want to come back to this wreath tutorial later? Just pin the image below!

    How to Make Evergreen Wreaths from Paint Sticks

    Sign up to get my posts delivered to your inbox here. 

    You know you don’t wanna miss any of this crazy.

    Stalk Me Here:

    Pinterest / Facebook / Twitter / Instagram

  • Simple Fall Decorating Ideas

    If you remember my post from last Saturday, I told you about the modern and fresh fall tours I am participating in this month.

    When I think modern and fresh, I think simple.

    Fall Home Tour {rainonatinroof.com} #fall #tour

    And if there is one thing I am all about it is simple seasonal decorating.

    (more…)

  • My Fright-Tastic Halloween Home Tour

    My Fright-Tastic Halloween Home Tour

    If you’ve read my fall decor posts, you know I’m a Halloween girl.

    I love it.

    I live for it.

    Well, I live for it and cheap beer.

    Oh, yea, and Grunt Labor and the kid.

    This post contains affiliate links for your shopping convenience. Click here to read my full disclosure policy.

    I believe it started early on with my love for ghosts and scary movies. I’ve spent a ridiculous amount of time in my life reading about ghosts and witches and such. I’ll blame it on Mrs. Maxwell, my elementary school librarian who read us a story about the Bell Witch.

    I’ve been hooked ever since.

    It could also be due to staying up late as a nine year old entranced by Freddy Krueger on USA’s Up All Night show with that Gilbert Gottfried guy.

    I’m warped.

    And I fully embrace it.

    Let us begin now.

    One, two, Freddy’s coming for you…

    halloween home tour

    I didn’t realize how many Halloween decorations I had on my front porch until I started photographing it.

    Fright-Tastic Halloween Home Tour {rainonatinroof.com} #halloween #hometour #diy

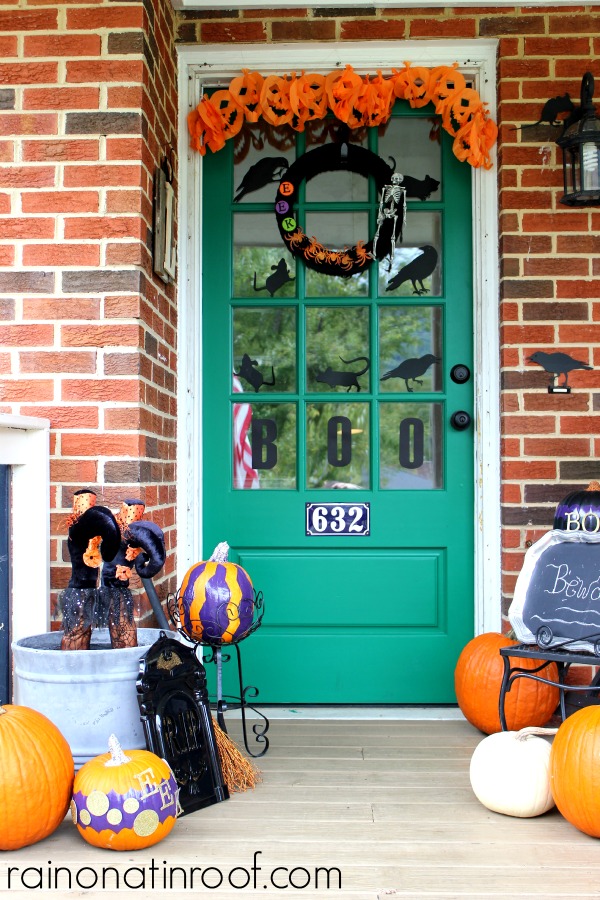
    I created a “witch’s grave” with an upcycled tombstone from the Dollar Tree and by sticking her feet upside down in the flower pot.

    Fright-Tastic Halloween Home Tour {rainonatinroof.com} #halloween #hometour #diy For the gravestone, I just spray painted it black and stuck gold glittery cardstock, left over from my DIY cheers banner, behind the letters to make them pop.

    Fright-Tastic Halloween Home Tour {rainonatinroof.com} #halloween #hometour #diyThe “feet” are actually two chair leg covers I purchased at Pier 1 Imports a few years back. They are designed to go around table legs or chair legs to look like a witch is sitting there, but I like them better sticking straight up on my porch.

    The “EEK” pumpkin’s scallop design was used with Shape Tape. See how I made it here.

    Beside the grave is the witch’s broom and my chevron pumpkin.

    Fright-Tastic Halloween Home Tour {rainonatinroof.com} #halloween #hometour #diy

    I found the broom at World Market a few years ago as well. I made the chevron pumpkin when I made the chevron witch’s hat. They were both so easy!

    On the other side of the door is my BOO scalloped pumpkin, as well as a skeleton entombed in a lantern. The glitter on the pumpkins stems came from Meyers-Imports. They are a glitter mecca!

    Fright-Tastic Halloween Home Tour {rainonatinroof.com} #halloween #hometour #diy

    Watch out, he may be waiting for you…

    Fright-Tastic Halloween Home Tour {rainonatinroof.com} #halloween #hometour #diyA little closer….

    Fright-Tastic Halloween Home Tour {rainonatinroof.com} #halloween #hometour #diyThe pumpkin was a find at Kirkland’s on clearance after Halloween. That’s when I make a lot of seasonal decorating purchases. You can save tons of money and if you’re like me, when you open up your Halloween stuff the next year, its a big surprise because you forgot about what you bought!

    The skeleton is from the Dollar Tree. He came in a wierd greenish glowy shade when I got him, so I gave him a coat of white spray paint to make him more skeleton-y.

    I don’t know that there is any room left to decorate on my front door.

    Fright-Tastic Halloween Home Tour {rainonatinroof.com} #halloween #hometour #diyI cut out the “BOO” on my Silhouette.

    The orange pumpkin garland came from a local store, Chrysalis, a couple years ago. It has a fun vintage feel.

    I made the wreath last year from yarn, a skeleton from an old wreath, and other Halloween decor I found at Hobby Lobby.

    Fright-Tastic Halloween Home Tour {rainonatinroof.com} #halloween #hometour #diy

    Fright-Tastic Halloween Home Tour {rainonatinroof.com} #halloween #hometour #diyHere’s hoping the front porch creeps some trick or treaters out this year…

    Shall we continue this fright-tastic Halloween tour inside, now?

    Proceed at your own risk >>>

    Like what you see?

    Follow along:

    Pinterest / Facebook / Twitter 

    SaveSave

  • Scalloped Pumpkins

    Scalloped Pumpkins

    I’ve ranted and raved over Frogtape®’s new chevron Shape Tape™. In fact, you may be sick of me going on and on about it and may be sick of seeing my ridiculously easy chevron tray and chevron witch hat.

    But, now, I’m going to blow your mind with Shape Tape™ again.

    Friends, let me introduce you to Frogtape® Scallop Shape Tape™.

    This is a sponsored post written by me on behalf of FrogTape. All opinions are 100% mine. This post contains affiliate links for your shopping convenience. Click here to read my full disclosure policy.

    Scalloped Pumpkins {rainonatinroof.com} #frogtape #shapetape #halloween #pumpkin

    I’ll give you a second to collect yourselves.

    Yep, not only is there chevron Shape Tape™, but there is also a scallop pattern, which is what I used to make these fabulous scalloped pumpkins.

    Making these was, just like my chevron tray and witch’s hat, ridiculously simple.

    I started out with the tape and two pumpkins.

    Scalloped Pumpkins {rainonatinroof.com} #pumpkin #halloween #frogtape #shapetape #scallop

    One pumpkin is real and one is a faux one I picked up at a local craft store. We’ll start with the faux black one.

    First, I put a band of Shape Tape™ around the middle of the pumpkin. Since this was a curved surface, you have to work in sections to keep it level, or from turning downward. After it was level, I pressed the tape down really well to remove any air bubbles.

    I repeated this with two more bands of tape along the top and bottom of the pumpkin. However, with these I left half of the tape (on the top, the half going toward the stem, and on the bottom the half going toward the bottom) open. I wanted to keep this part black, so I put plastic wrap over those portions, then pressed the tape down around the plastic wrap.

    Scalloped Pumpkins {rainonatinroof.com} #scallop #pumpkin #halloween #frogtape #shapetape

    With the real pumpkin, I put two bands of Shape Tape™ around the top and bottom, once more leaving half of it open where I could apply plastic wrap. I also turned this tape with the scallop points inward to change up the pattern a bit.

    Scalloped Pumpkins {rainonatinroof.com} #scallop #pumpkin #halloween #shapetape #frogtape

    After I put the plastic wrap around the top and bottom, I pressed the tape down well again to remove air bubbles and spray painted both pumpkins purple. Just like regular FrogTape®, ShapeTape™ has PaintBlock® Technology which means when it meets paint, it forms a gel barrier to prevent paint bleed.

    After spray painting the pumpkins, I removed the tape and plastic wrap. To snaz up the stems some, I added some glitter. I also added some gold embelishments to the pumpkins to “spook” them up a bit.

    Scalloped Pumpkins {rainonatinroof.com} #scallop #pumpkin #halloween #shapetape #frogtape

    Scalloped Pumpkins {rainonatinroof.com} #scallop #pumpkin #halloween #shapetape #frogtape

    These fabulous pumpkins were so easy to make and took less than an hour! An easy and stylish Halloween craft!

    Scalloped Pumpkins {rainonatinroof.com} #frogtape #shapetape #halloween #pumpkin

    Get more Halloween craft and DIY project ideas:

    Easy DIY Halloween Decorations – easy, but with big impact!

    Spooky Halloween Home Tour – we love Halloween and we do it up big around here!

    Glittery DIY Witch Brooms – using stuff from the Dollar Tree!

    DIY Skull Sconce – another one using items from The Dollar Tree!

  • Dollar Tree Skulls Upcycle

    Dollar Tree Skulls Upcycle

    Maybe last week, when I showed you the easy chevron witch’s hat, you noticed that fabulous skull it was sitting atop.

    Dollar Tree Skull Upcycle {rainonatinroof.com} #halloween #upcycle #skull

    This post contains affiliate links for your shopping convenience. Click here to read my full disclosure policy.

    That’s the skull.

    After my Dollar Tree pumpkins upcycle, I was hooked on some fall / Halloween upcycling.

    Enter this Dollar Tree skull upcycle.

    If you run out to your local Dollar Tree, you may find these skulls in this state:

    Dollar Tree Skull Upcycle {rainonatinroof.com} #halloween #upcycle #skullHe’s definitely not bad as is.

    He’s freaky looking.

    And freaky looking for Halloween is good.

    But, you guys know I love me some glitter and maybe even a little more freakishness than the average person.

    As Carrie Bradshaw would say, “Let your freak flag fly.”

    I’m beginning to think I should add “Sex and the City references” to my blog description. Hmmm…

    Anyway, to add more of those two things, glitter and freakishness, I gave him a good coat of this glossy black spray paint, and then used glue in his eye sockets to adhere some orange glitter.

    But that wasn’t good enough.

    I felt this skull needed to really be put on display. He wanted to be noticed.

    He didn’t just want his freak flag to fly, he wanted it to soar.

    I pulled out a couple of thrift store candlestick holders and spray painted them orange.

    Dollar Tree Skull Upcycle {rainonatinroof.com} #halloween #upcycle #skullJust like with the chevron witch’s hat, I threw some glitter on them while the paint was still wet.

    The candlestick holders took a full day to really dry. When they were dry, I added some hot glue around the top rims and stuck those skulls on there.

    Dollar Tree Skull Upcycle {rainonatinroof.com} #halloween #upcycle #skullThe disco ball skull, as I call him, is not a Dollar Tree upcycle. I bought him a few years back after Halloween when he was on clearance for a few bucks. I felt him and the other skulls could be great freakshows together.

    Dollar Tree Skull Upcycle {rainonatinroof.com} #halloween #upcycle #skull

    Dollar Tree Skull Upcycle {rainonatinroof.com} #halloween #upcycle #skull

    When Grunt Labor saw it, he said, “Whoa, those are freaky.”

    Mission accomplished.

    Looking for more Halloween goodness? See these:

    Glam and Spooky Halloween Home Tour – I love Halloween; this is how I do it!

    Double Double Toil and Trouble Printable Art – perfect for easy Halloween art!

    DIY Skull Candleholder – so easy and uses skulls from The Dollar Tree!

    Like what you see?

    Follow along:

    SaveSave

  • Simple Chevron Witch Hat and Pumpkin

    Simple Chevron Witch Hat and Pumpkin

    Remember that fabulous navy and white chevron tray I made?

    I knew you would.

    It was just so simple and fabulous that I couldn’t keep myself from putting some chevron love into my Halloween decor.

    Chevron Witch Hat & Pumpkin {rainonatinroof.com} #frogtape #chevron #witchYep, I made a chevron witch hat with my beloved FrogTape Chevron Shape Tape.

    Disclosure: This post is sponsored by FrogTape, but y’all know how I roll, all opinions are 100% mine. This post contains affiliate links for your shopping convenience. Click here to read my full disclosure policy.

    Just like my chevron tray, this was so simple! I started with this cardboard witch’s hat I picked up at a local craft store for a few bucks.

    Chevron Witch Hat & Pumpkin {rainonatinroof.com} #frogtape #chevron #witchIt was screaming for chevron and glitter, don’t you think?

    Before putting on any shape tape, I spray painted the entire hat glossy black, then pulled out my chevron shape tape and got to work.

    Chevron Witch Hat & Pumpkin {rainonatinroof.com} #frogtape #chevron #witch

    Chevron Witch Hat & Pumpkin {rainonatinroof.com} #frogtape #chevron #witchTo get the round, contoured cut on the tape where the cone meets the hat brim, I cut lightly with an X-Acto blade. And just like with my chevron tray, I used a small piece of the tape to measure the distance between where I applied the tape. After all the tape was where I wanted it, I made sure to press it down hard and remove any air bubbles, so there was a secure seal. Shape Tape is just like regular FrogTape, it has the PaintBlock® Technology that forms a barrier to keep the paint from bleeding!

    This is what I came up with:

    Chevron Witch Hat & Pumpkin {rainonatinroof.com} #frogtape #chevron #witchI apologize for the blurriness, but you get the idea.

    I took it out to the garage and gave it coat of orange spray paint. Right after I gave it a coat of spray paint, I threw some orange glitter (throw some glitter, make it rain!) on it, to accentuate that fabulous chevron effect.

    Chevron Witch Hat & Pumpkin {rainonatinroof.com} #frogtape #chevron #witchSo now my garage floor sports not only green, navy, white and orange colors, but glitter as well.

    I let it sit for 5 minutes or so and then pulled off the tape.

    The base looked fabulous, however, I didn’t like how I had positioned the shape tape on the cone, so I taped off the base and sprayed the entire cone orange and added glitter to it.

    And then, I had this fabulous end result:

    Chevron Witch Hat & Pumpkin {rainonatinroof.com} #frogtape #chevron #witchGrunt Labor came home and asked if I had really made that.

    Oh, ye, of little faith. He was pretty impressed. I don’t know if he has figured out about the shape tape yet and just how easy that makes projects. Maybe I won’t tell him just yet….It’s good to be queen.

    Chevron Witch Hat & Pumpkin {rainonatinroof.com} #frogtape #chevron #witchThe hat is the perfect topper to my upcycled skull, which I’ll be telling you about next week.

    And because I love me some chevron so much, I just had to do a chevron pumpkin:

    Chevron Witch Hat & Pumpkin {rainonatinroof.com} #frogtape #chevron #witchBeware, I still have some chevron shape tape left, there may be more chevron-ness in the future!

    Watch out, world.

    Need more Halloween decorating ideas?

    Easy DIY Halloween Decorations – a roundup of some of my favorite Halloween decor!

    Glittery DIY Witch Brooms – to make these, all you’ll need is something from your yard and a few things from The Dollar Tree!

    Free Printable Spell Book Cover and Potion Labels – Turn any book into a spell book!

    DIY Skull Drink Stirrers – these will take all of five minutes to make and are perfect for parties!

    You know you don’t wanna miss any of this crazy.

    Sign up to get my posts delivered to your inbox here. 

    Stalk Me Here:

    Pinterest / Facebook / Twitter / Instagram

    SaveSave

  • Fall Home Tour

    Fall Home Tour

    Every once in a while I surprise myself.

    If you read my DIY fall decor posts last month, you may recall that I’m not much of a fall decorator.

    But, I do love my Halloween decorating.

    So, when I was asked to be part of the Falliday Tour of Homes, I was a little intimidated. But, I said yes. And instead of stressing out over elaborate fall decor, I went for simple touches and shopped my home for decor.

    Fall Home Tour {rainonatinroof.com} #fall #tour (more…)

  • Dollar Tree Pumpkins Upcycle

    Dollar Tree Pumpkins Upcycle

    This could be it.

    This could be the last fall DIY decor project.

    Until next year.

    I’m just itchin’ to move along to Halloween.

    Dollar Tree Pumpkins Upcycle {rainonatinroof.com} #upcycle #dollartree #pumpkins (more…)

  • Glittery Fall Garland

    Glittery Fall Garland

    Want to add a touch of shimmer to your fall home decor? This glittery DIY fall garland should do just the trick! This fall craft is simple and to make and a great one to get the kids involved with too!

    This post is a total fail on my part.

    The project turned out fabulously.

    But, I took no pictures of how it came together.

    I thought I did.

    But, there was also a 15 month old running around with a can of spray paint in one hand and trying to pry the cap off with the other.

    She is most definitely my offspring.

    Maybe you understand why I have no pictures now?

    But, here it is anyway.

    A glittery fall garland for your fall decor.

    DIY Fall Garland (more…)

  • DIY Fall Door Decor: My Take on the Fall Wreath

    DIY Fall Door Decor: My Take on the Fall Wreath

    I heart wreaths.

    I have a whole Pinterest board dedicated solely to wreaths.

    I still like my fall wreath from the last couple years. Although there was an unfortunate accident with it when the kid got a hold of it.

    But, this fall, I was feeling that a little something different was in order.

    Enter the Fall Rectangle Wreath.

    Fall Door Decor {rainonatinroof.com} #falldecor #wreath #fall

    (more…)