Countertops are one of those things that can creep up on ya and take a big bite out of your project budget fast. These DIY countertop ideas for built in cabinets are creative and easy on your wallet.
When I installed the built in cabinetry in my recent office makeover, the one thing I didn’t worry too much about was what I would do for a countertop. I just assumed I’d be able to pop a 1″ x 12″ across the top of the cabinet run, paint it and call it a day.
Wrong.
Never ever ever expect anything to go smoothly when it comes to home projects.

As it turned out, the wall I was installing my built-ins on had a huge hump in it that I had to work around. This caused a major hiccup in the countertop department.
Here’s the thing though.
Not everyone is going to have a huge hump that some drywall guy thought looked decent enough forty years ago. So if you are planning to install built in cabinets somewhere in your home, first, I’m going to give you some ideas for the countertops that will work if you don’t have a huge hump in your wall, which you most likely won’t. 🙂 And then, I’m going to show you how I worked around my little problem and made an upholstered countertop for my built-ins, in case you have that problem too. And even if you don’t have a big hump in your wall (lucky you!), you can still do the upholstered countertop if you like it!
First off, if you have no clue as to what I’m talking about when referring to my office built-ins, then read this post first.
Affiliate links included in this post.
Countertop Ideas for Built In Cabinets
Idea #1: Use two 1″ x 8″s or a combination of other 1″ boards.
If the cabinets you purchased for your built-ins are like mine, stock wall cabinets, then the tops of them are right around 12″ deep. While one would think, you could just go buy a 1″ x 12″ at your local hardware store, cut down the length to fit and nail it in place, you would be wrong, because a 1″ x 12″ is actually not 12″ wide, but only 11 1/4″ wide, therefore, you would have a gap left to fill on top of your cabinets.
The solution to this would be to purchase two 1″ x 8″s, cut them down to the length of your cabinet span, place them side by side on top of your cabinets, secure them in place, then fill holes and gaps and paint. 1″ x 8″s are actually 7 1/4″ inches wide, so you would have a total 14 1/2″ to cover those cabinets, leaving you with a nice overhang.
You could also use a combination of other 1″ boards like 1″ x 3″, 1″ x 4″, 1″ x 6″ – just depends on what you want the countertop to look like and how many boards you want to cut.
If you have access to a local lumber mill that mills their own lumber, then you may be able to contact them and have them custom cut a piece, such as a 1″ x 14″ just for you.
Idea #2: Custom Laminate or Stone Countertop
You could go to your local home improvement store or stone store and have them come out, measure and cut a custom size countertop for your built-ins. They would be able to give you a single slab of countertop in the exact measurements you would need. This is going to be a pricier option though.
Idea #3: DIY-ish Laminate Countertop
You can purchase in-stock laminate countertops at your local home improvement store, then cut them down to the size you need for your built-ins. If you went with true base cabinets, this would just be a matter of cutting down the length of the countertop. If you went with wall cabinets like I did for your built-ins though, you would need to cut down the width and length of the countertop, which can be a little more tedious. This option isn’t as pricey as custom laminate or stone counters, but would probably run you around $75 – $100 depending on what size you needed. We installed some built-in cabinetry using base cabinets in the sitting area of our bedroom and this is what we opted to do there. You can see how it turned out here.
Idea #4: Faux Stone Countertop using an Old Laminate Countertop
If you’ve got a local Habitat for Humanity or another store that sells building and housing materials that have been removed from homes, then you could go there and find a piece of laminate countertop that would fit your built-in, then turn them into “soapstone” counters using this DIY method that I did in one of our previous homes.
Idea #5: Plywood Countertop
If your cabinet run isn’t longer than a piece of plywood (8 ft.), you could take your measurements to your local Home Depot or Lowe’s, get a piece of their high quality sanded 3/4″ plywood and have them cut it down to the size of your built-ins – remember to leave a little for overhang. Go home, install it on the cabinets using a finish nailer, fill holes, caulk and then paint or stain it. If you buy the good quality sanded plywood, this should give you a pretty good looking, smooth countertop for your built-ins.
Idea #6: Perpendicular 1″ x 3″s or Beadboard
This idea is courtesy of the one and only Wayne. Wayne is Nicky’s dad and he is my go-to guy for when I run into any snags when it comes to any home project. The man knows everything. I called Wayne over to come and help me troubleshoot the cabinets and counter of my built-ins when I realized that I had the huge hump in my wall. He had the idea to take multiple beadboard panels (the small ones that fit together tongue and groove style) or 1″ x 3″ pieces, cut them down to where there was a 1 1/4″ overhang and then put them perpendicular on the top of the cabinets. So instead of having just a couple of long pieces of boards as the counter, you would have lots of pieces going along the cabinet top that almost created a shiplap type look. You could paint or stain the pieces after you installed them all.
This idea would also work if you have a hump in the wall because you would be custom fitting each individual piece of wood. The only reason I opted to not go with this solution was because I thought it might give the built-ins more of a farmhouse look and my office definitely is not farmhouse. We all know how I feel about shiplap.
Alas, those ideas either wouldn’t work for my built-ins due to the large hump in the wall or they just weren’t my style. So, I created an upholstered countertop for my built-ins. If you’re interested in that option, here’s how I did mine.
How to Make an Upholstered Countertop for Built In Cabinets
Materials & Tools Needed
- 1″ x 6″ or a 1″ x 8″ that is cut down to the same span as your built-in cabinets.
- 3/4″ Plywood – will need 1/2 a sheet to a whole sheet depending on how large your built-ins are. Doesn’t have to be the premium plywood.
- Lattice Trim – enough to cover the span of your built-ins, plus the sides of your countertop ends
- Quarter Round (optional)
- Circular Saw
- Jigsaw (possibly)
- Carpenter’s Pencil
- Measuring Tape
- Upholstery for the Countertop – I went with a vinyl upholstery so that I could easily wipe it clean – I used this one.
- Finishing Nailer and Air Compressor or Hammer and Finish Nails
- Staple Gun
- Spackling or Wood Filler
- Caulk
- Paint for Trim
Please note, If you don’t have a big hump in the wall like I did, then you can skip some of these steps. 🙂 You could just cut a piece of plywood to size, attach it to your cabinet tops and skip to step #3.
Steps
Step 1: Install the 1″ x 6″ or 1″ x 8″
First, cut a 1″ x 6″ or 1″ x 8″ down to the length of your built-ins (wall to wall or however long your complete built-in is, filler pieces included.) Place that piece on the front edge of your cabinet tops, slightly overhanging it over the cabinet edges by 1 1/4″ or so. Make sure your overhang measurement is the same over the whole span of your built-in, then nail the 1″ x 6″ into place.

This is going to allow you to have a smooth countertop front that will have an even overhang all the way across.
Step 2: Install the Plywood Pieces Against the Wall
Next, take 3/4″ plywood and cut it into pieces that are the length, plus a little (measure to about the middle of the gap between the cabinets that are side by side), of each individual cabinet. For the width, cut the plywood at the biggest measurement between your wall and the 1″ x 6″.

Place the plywood piece along the back of the cabinet tops, then using a carpenter’s pencil, run it along the wall on the back of the plywood piece.
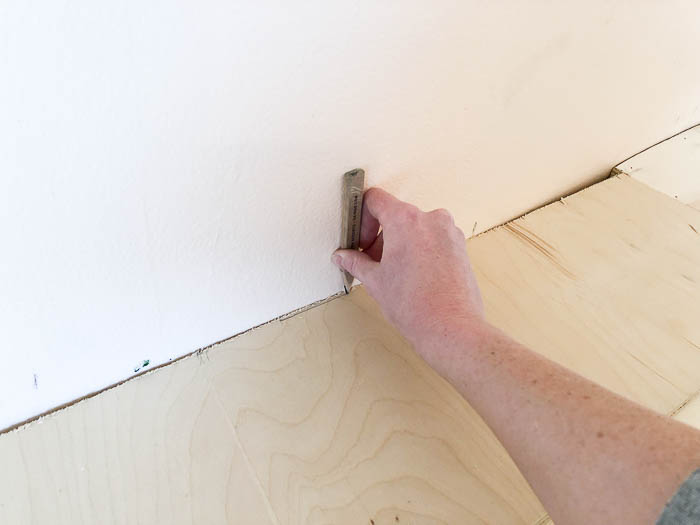
This is called scribing. It’s going to give you the shape of your wall so you can custom fit that piece of plywood to it. Once you’ve scribed, use a jigsaw or circular saw to cut along the line you drew. Repeat until the piece fits and attach it to the cabinet tops using a brad nailer or a hammer and finish nails.

Repeat this whole process with the plywood pieces until you’ve covered the entire span of your built-ins.
Step 3: Upholster the Countertop
Lay your upholstery material out along your countertop – this is the material I used. Pull a little bit of excess up around the back and the edges.

Cut a piece of lattice trim to the length of your countertop span. Place the trim along the back of the countertop, on top of the upholstery material.

Attach the lattice trim to the wall where studs are using a finish nailer or finish nails. As you attach the trim, push it down firmly both onto the upholstery material and against the wall.
Trim off the excess material along the front edge of the countertop, leaving enough overhang to staple under the countertop.

Pull tightly on the front of the upholstery and staple it under the overhang of the countertop. Trim any excess material as needed.
Cut two lattice strips to the length coming out from the end corners of each wall to the edge of the countertop. With these, repeat the same process you did with the lattice piece on the back.
Step 4: Install Quarter Round Trim (Optional)
If you still have any gaps around where the lattice trim and the upholstered countertop meet, you can cut quarter round trim and install it along those areas. I did have to do this because I still had some gaps to contend with. Quarter round is very flexible though, so it easily curved into all those gaps and closed them.
Step 5: Paint the Trim
Fill any holes in the lattice trim and quarter round with spackling or wood filler. If you have any gaps along the wall, caulk those. Paint the trim whatever color you wish. I opted to go with the color of my built-in cabinets.

The upholstery I used for my countertop is a faux leather crocodile pearl, so it wipes easily, but also has a little shine to it.

And so the saga of the built-ins ends.
Thank ya, Jesus.
Can you add any DIY countertop ideas to this list?
If you haven’t seen how I installed the built-in cabinetry, you can read how to do that right here.
You might also want to see…


Marianna says
Definitely had to pin this for later! such a helpful post.
Jenna says
Great, Marianna! Glad it was helpful!
Pam S says
I’m going to have to increase my vocabulary a LOT to continue leaving comments on your projects! Wow! Amazing! Genius! Who woulda thunk??!
That’s all I got 🙂 That counter top really is pretty!
So Circus nixed the chicken?? I’m so disappointed ~ I still love it, but I have a feeling if I got it, all I would think of is her comment on it! And the llama is cute. Those things are really “in” right now!
Jenna says
hahahahahahaha!! Oh Pam, you just popping over to say hi is more than enough!! Thank you!
And yep, nixed the chicken! I laughed out loud when she said that about the chicken butt!!
Stephanie says
Nice clean look. Love it.
Jenna says
Thank you, Stephanie!
WENDY MOSELEY says
So YOU!!!!! It was meant to be covered in fabric- especially that fabric.
Jenna says
hahaha!! Thanks, Wendy! It had to be meant to be covered in fabric, because that was my only option! haha!
Jessica says
That’s a nice clean look! Love the simplicity and elegance of that countertop. The blue is such a cool and calming color too.
Jessica
Jenna says
Thanks, Jessica!
angie says
love all the great storage room that would be created from this cabinet. Thanks for sharing
Jenna says
Thanks, Angie! It is great for storage!
Erlene says
I think I would have cried if I found a huge bump in the wall…lol. You have a great solution here and I’m sure you’re not the only one with wonky wall issues. Thanks for sharing this on Merry Monday.
Jenna says
Oh girl, there were a few tears!
Jann Olson says
Very creative! Thanks for sharing with SYC.
hugs,
Jann
Jenna says
Thanks, Jann!