Tag: side table

  • 9 Unique Ways to Makeover a Side Table

    9 Unique Ways to Makeover a Side Table

    Looking for a clever way to update a side table, end table or bedside table in your home? You want something more – something that pops! Here are nine unique DIY side table ideas that are totally doable – even for a beginning DIYer. You’ll be running for your paint by the end of this post!

    It’s been a while since I’ve been able to get my hands dirty with a good ol’ furniture makeover. I’m planning to end that hiatus soon since school has started back and we are finally getting back into a routine around here. There is literally one whole side of our garage that is filled with pieces just calling my name. Y’all know I can’t pass up a piece of thrift store or yard sale furniture with good lines.

    As I was going through the pieces and brainstorming ideas for what to do with each one, I also went through my gallery of past furniture makeovers looking for inspiration – perhaps a good spinoff of another makeover. 🙂 While doing so, I realized a few things:

    1. I like to turn things into bars.
    2. I especially like to give side tables new life or turn them into things they aren’t meant to be.
    3. My photo skills have vastly improved since the creation of this blog.

    I realize that most everyone only needs one bar in their home, but many people do need more than one side table. Or end table. Or bedside table. Or whatever the heck you want to call them. So, I’ve put together some of my favorite DIY end table ideas to get the inspiration flowing the next time you see a side table with fabulous lines, but needing a little love.

    Unique End Table Ideas

    This post contains affiliate links for your shopping convenience. Click here to read my full disclosure policy.

    Idea #1: Cover the Top with Wrapping Paper

    DIY Side Table Ideas

    Wrapping Paper Topped Table

    This little table makeover is definitely a blast from the past! It’s still one of my most favorite colorful pieces I’ve ever done though. I found this little table for a whopping $2 at a yard sale. The top was in really rough condition, but the rest of it was pretty good. I painted most of it a bright coral pink color and then remedied the top by apply wrapping paper. Get all the details on how I did it here. Wrapping paper tip: I find the best patterns and designs on wrapping paper at Home Goods!

    Idea #2: Give it a plaid treatment.

    Unique End Table Ideas

    Plaid Painted Side Table

    It’s been a few years since I did this plaid painted side table, but Grunt Labor will still tell you that he thinks it’s one of the best projects I’ve ever done. The crazy thing about it though is that it doesn’t require a single bit of measuring to get this pattern painted. I used Frogtape to “measure” everything – it was so easy! Tutorial for this guy is here. You can use any colors you want to create the plaid. I’ve always thought this would be really cute in pastel colors – especially for a little girl’s room.

    Idea #3: Get Beachy with It.

    Bedside Table Ideas

    Painted Beachy Colored Side Table

    The paint treatment on this side table is crazy easy to do – seriously, it’s hard to mess it up! I gave this piece a washed-out beachy vibe by painting the whole thing white first, then creating colored furniture glaze with paint and clear glaze from Velvet Finishes. If you get too much color on, then just wipe it off, if you want more, paint more on. Easy peasy. Again, you could do this with any color you wanted to. I think a small side table painted like this would be great in a mostly white bathroom to add a little color. You can read the full tutorial for painting pieces beachy style here.

    Idea #4: Confetti Style

    DIY End Table Ideas

    DIY Confetti Side Table

    This one is another super simple end table idea that just requires paint, tape and very little skill at all. Create “confetti” on the tabletop (or the whole table if you prefer!) by placing random strips of paint over the table before painting it. This creates a fun little table just begging for someone to put a drink, preferably with a little umbrella, on top of it. The full how-to on this one is here.

    Idea #5: Stenciled Top End Table

    Unique End Tables

    Leopard Print End Table

    If you want to add pattern to a tabletop, but don’t want to be confined to using tape to come up with something, then you could look for a stencil to paint onto a side table. I just happened to have this leopard print stencil lying around and went with it for this table that was on the back porch at our old house. The full makeover is here.

    Idea #6: Turn it into a bench.

    Side Table Ideas

    Side Table turned Bench

    And if you ask me what one of my favorite makeovers ever was, I’d say that one of them is definitely this little side table turned bench. I found this table at a thrift store for $7. The sides and legs of this table had perfect lines and there were gorgeous brass details on top of that. The top though had those weird slats and so I decided to cover those by adding a cushion on top. I love this piece because it can serve as a traditional side table or even a tall coffee table by just placing a tray on top of the cushion and putting drinks, remotes, whatever there. But, when you need extra seating or want to throw your feet up, just move the tray! See how I did this makeover here. Also, you can do this with any table that’s open underneath! P.S. If you’re looking for a gorgeous light blue color, that Tranquil that I painted this side table is hands-down one of my most favorite colors ever.

    Idea #7: Ditch the Tier.

    End Table Ideas

    How to Remove the Top Tier of Two-Tiered Tables

    So I found this two-tiered table at a local thrift store and I was immediately drawn to it’s mid-century lines. But then, I was like, “Damn, I hate that it’s tiered.” I’m not a huge fan of two-tiered tables. But then, I was like, “Wait I bet I can get rid of that tier.” And I did. And I have no idea why that had never occurred to me before. When I think about all the two-tiered tables I’ve passed up because of that tier and now knowing how easy it was to remove it, I get so mad at myself! Anywho, you can read about how I gave this table new life here.

    Idea #8: Layer on the Colors.

    Painted Side Table Ideas

    Caribbean Blue Layered Paint Side Table

    I just started experimenting more with layering paint colors earlier this year and this piece was one of the firsts I did. I created this look by using three different paint colors and creating different colored glazes with two of them. It actually isn’t as hard or complicated as it sounds and again, it’s a project that you can’t easily mess up! Find the tutorial here.

    Idea #9: Accentuate details with contrasting colors.

    Painted Bedside Table Ideas

    Gray and White Bedside Table Makeover

    And this one is really taking it back – one of the first furniture makeovers I posted about. See, my photography has definitely  improved. 🙂 Even though the photos here aren’t that great, I still love this simple idea for painting a bedside table that still commands attention. If you ever come across a piece that has good grooves on it, snatch it up. Then, choose two contrasting colors – I tend to go for an actual color and white together – and paint the majority of the piece the color and then pull out all those details with the white paint. The tutorial for how I did this one is here.

    Looking for more painting tips and inspiration?

    What kind of paint do I use on that? – a guide to all different types of paint and what kind to use on what material.

    How to Make Furniture Glaze in Any Color – the possibilities are endless!

    3 Easy Ways to Update Your Furniture Hardware – don’t toss it just yet!

    Want to come back to these side table ideas later? Just pin the image below!
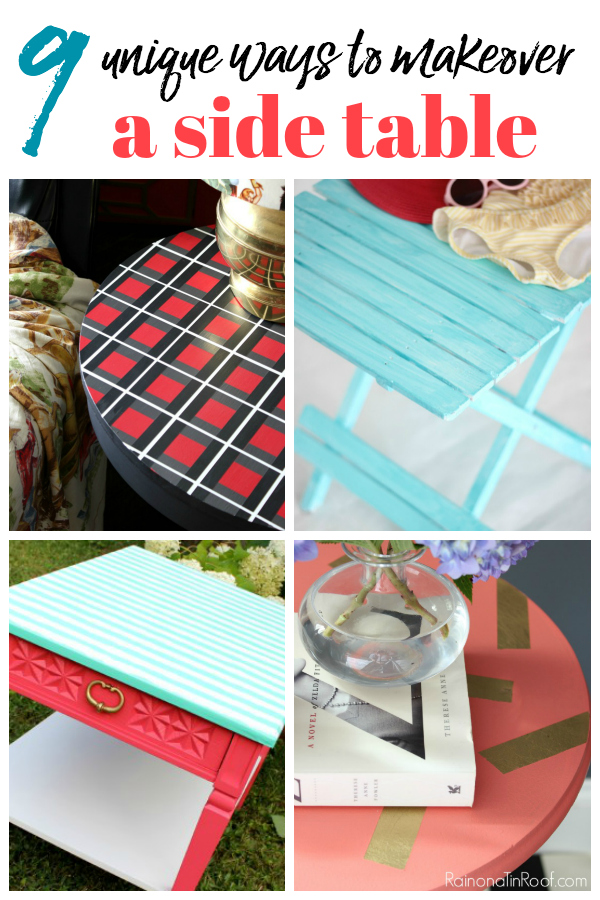
    Unique Side Table Makeover Ideas
    Gift Ideas Signature

  • Two-Tiered Table Makeover | How to Remove the Top Tier

    Two-Tiered Table Makeover | How to Remove the Top Tier

    This post is sponsored by Velvet Finishes, however all opinions are 100% mine.

    I see these little two-tiered end tables all the time at thrift stores and yard sales. For the most part, I tend to pass them by. Some are pretty nice, but I’ve just never been a big fan of the whole two-tiered aspect of these tables. I know it was hot back in the day, but just not up my alley.

    I don’t know why taking the top tier off though never occurred to me before now.

    I guess I needed to see one of these little guys that had really great lines.

    Two Tiered Table Makeover - How to remove the top tier! Such a great diy furniture makeover idea!

    Like this Mid-Century Modern style one that I happened upon at a local thrift store.

    At first glance, I was like, “Oh man, I wish it wasn’t two-tiered.”

    Then, I thought, “Wait! I bet I can cut that off!”

    So I snatched it up, brought it home and got to work.

    And it was so much easier than I ever thought it would be.

    Two-Tiered Table Makeover | How to Remove the Top Tier

    Tools & Supplies

    Steps

    Step 1

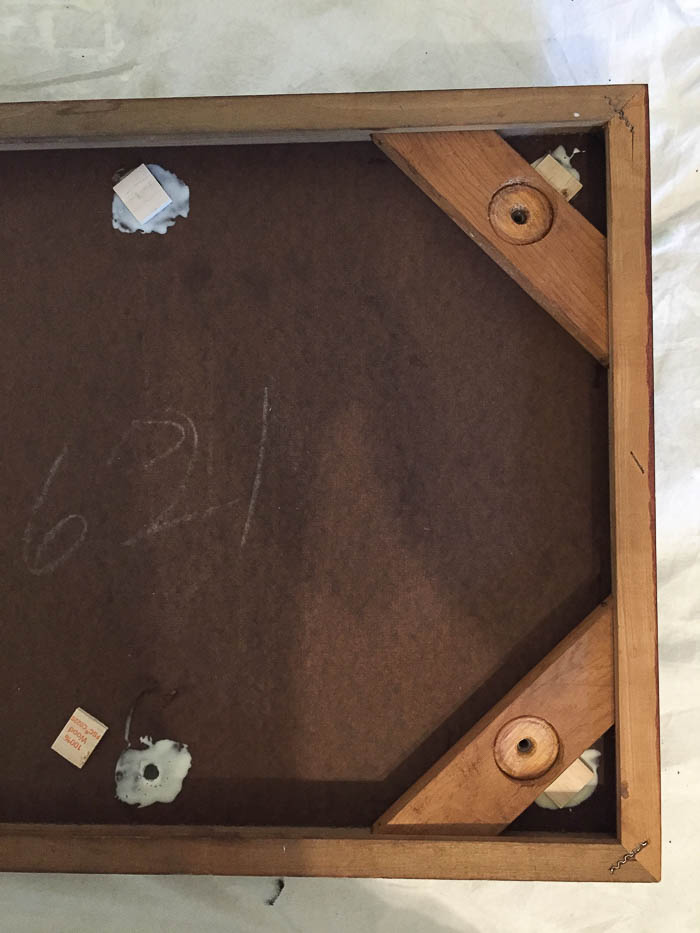
    Flip the table over and look for where the top tier is attached. Using a screwdriver, wrench or your hands, remove the screws or bolts holding the tier on.

    Two Tiered Table Makeover - covering the old holes.

    Mine had four nuts and bolts holding it in place. I was able to just unscrew them with my hands. I also unscrewed the legs of the table just to get those out of the way while I was working on it.

    Step 2

    Find four small pieces of wood that will cover the holes where the screws had been.

    Two Tiered Table Makeover - covering the old holes.

    I had a paint stick on hand so I just cut four small pieces from it.

    Step 3

    Place wood glue around the holes on the underside of the table, then place a small piece of wood over each hole pressing it firmly into place.

    Two Tiered Table Makeover - covering the old holes.

    Let these sit for at least a few hours.

    Step 4

    Flip the table over and fill the holes on top where the tier had once been with wood filler.

    Two Tiered Table Makeover - covering the old holes.

    Since these holes are pretty deep, you’re probably going to have to fill the holes a few times. I found it best to fill the hole, let dry, sand smooth, repeat. I did this about three times before the holes were even with the table.

    Step 5

    Once the wood filler is dry, smooth and even, you’re ready to start prepping and painting.

    Two Tiered Table Makeover - painting supplies.

    This table had a really shiny finish on it. In order for the paint to get the best adhesion, that finish needed to go before applying the paint. To do that, I used Ready.

    Two Tiered Table Makeover - prep it with Ready to remove old shiny finish.

    Ready is a spray primer / deglosser. You just spray it on, let it sit for a few minutes, then wipe it clean with a towel. Ready also cleans away dust at the same time. For this table, I had to do three rounds of Ready to get the shine gone.

    Step 6

    Let the table fully dry and then you’re ready to paint.

    Two Tiered Table Makeover - paint it

    I opted to go with Luxurious for the table top. It’s black, but not a super deep black. I was leaving the legs as they were so I knew black would go well with those stained legs. I did two coats of Luxurious on the table. This Velvet Finishes paint has great coverage – I know this is a small table, but I bet I didn’t use more than 1/2 –  3/4 of a cup of paint.

    Step 7

    After the Luxurious paint was dry, I gave the table a coat of Protect.

    Two Tiered Table Makeover - topcoat.

    Velvet Finishes paint already has a topcoat built-in, but since this little table might see a lot of action as a coffee table, end table, etc., I wanted to go on and give it some added protection. All you need is one coat of Protect and you just brush it right on.

    After the table was dry, I put the legs back on just as they were. They weren’t in too bad of condition and y’all know I love a good paint and stain combination anyway.

    Two Tiered Table Makeover - How to remove the top tier! Such a great diy furniture makeover idea!

    I think removing that top tier makes the table much more functional. It can be a great coffee table for a smaller room, it could still be an end table / side table, or it could even be a bench!

    Two Tiered Table Makeover - How to remove the top tier! Such a great diy furniture makeover idea!

    Sidenote: That Seventies Glamour book is one of my all-time faves. 😉 It has a totally corny cover, but the photos inside are awesome. 

    Two Tiered Table Makeover - How to remove the top tier! Such a great diy furniture makeover idea!

    Two Tiered Table Makeover - How to remove the top tier! Such a great diy furniture makeover idea!

    I won’t be so quick to pass up those little two-tiered tables anymore! What about you?

    You might also want to see…


    How to Turn a Side Table Into a Bench– one of my all time fave hacks!

    Mid-Century Modern Dressing Table Makeover in a Day – such a beauty that still gives a nod to it’s 60’s roots!


    Pin This Post

    Two Tiered Table Makeover - How to remove the top tier! Such a great diy furniture makeover idea!

    SaveSave

  • How to Turn a Side Table Into a Bench

    How to Turn a Side Table Into a Bench

    This post is sponsored by Velvet Finishes, however all opinions are 100% mine. Affiliate links may be contained in this post.

    Sometimes I forget how much I love painting furniture. Before this project, it had been too long since my last furniture makeover. With a few furniture painting projects prior to this one, there seemed to be hiccups every time I turned around and I think I finally just got burned out for a little while. Hiccups happen. A lot. That break and this project though, was exactly what I needed to remind me how much I love seeing a piece of furniture do a 180°.

    This is a great furniture makeover idea for an end table makeover - find out how to turn a side table into a bench. Easy side table redo in a day!

    This one turned out better than I imagined. I took an old, beat up side table and turned it into a classy bench. In the process, I also fell in love with this new blue color – more on that in a minute though.

    How to Turn a Side Table Into a Bench

    Tools & Supplies

    Steps

    Step 1

    This is what my table looked like to begin with:

    This is a great furniture makeover idea for an end table makeover - find out how to turn a side table into a bench. Easy side table redo in a day!

    Now, I came up with the idea for turning this into a stool because of the way the tabletop was with those slats. I fell in love with the lines of the legs and the brass hardware on the table, but that slatted top was weird. That being said, you can still turn any side table into a stool – it’s just a matter of making the upholstered top whatever size you want it to be.

    To start with, I sprayed the table down with Ready.

    This is a great furniture makeover idea for an end table makeover - find out how to turn a side table into a bench. Easy side table redo in a day!

    This helps to remove any shine left behind from the previous finish and also works as a cleaner. Ready is kind of like a de-glosser and cleaner in one. Most of the time, it’s going to eliminate the need for priming or sanding.

    All you do is spray it on there, let it sit for a few minutes and then just wipe it off.

    This is a great furniture makeover idea for an end table makeover - find out how to turn a side table into a bench. Easy side table redo in a day!

    You can see above some of what it took off my table there.

    Step 2

    Now, you’re ready for paint. Velvet Finishes has just introduced new colors to their line. When I saw them, I was so excited to get my hands on a few of them. Tranquil was one of those colors.

    It’s not a navy blue or a bright blue, but somewhere in the middle and I love, love, love it. I gave my piece two coats of Tranquil.

    This was also my first time using the Velvet Finishes brushes. I really liked how smoothly they applied the paint.

    This is a great furniture makeover idea for an end table makeover - find out how to turn a side table into a bench. Easy side table redo in a day!

    The Circus has become very adamant about assisting in painting lately, so I let her have at it and help me. Those slats didn’t really have to be painted since they were getting covered up, but ya know, it gave her something to do. 😉

    Step 3

    After the final coat of paint was dry, I followed up with Protect for a little added protection.

    This is a great furniture makeover idea for an end table makeover - find out how to turn a side table into a bench. Easy side table redo in a day!

    Since this piece was getting a new life as a bench, I wanted to give it a little more protection against legs and banging feet. I also used the Reviver paint brush to apply the Protect.

    Step 4

    The next step is to make the cushion for the top of the table. Since I had those weird slats on the top of my table, I made my cushion the same size as that area to cover it up. If you’re doing this on a solid tabletop, then just determine how big you want your cushion to be and cut a piece of 1/2″ plywood down to that size.

    This is a great furniture makeover idea for an end table makeover - find out how to turn a side table into a bench. Easy side table redo in a day!

    After you cut the plywood to size, lay it on top of a piece of foam and trace the shape of the plywood onto the foam, then cut the foam to size. You can do this with a utility knife, but I finally bought an electric knife to cut my foam with about a year ago and it has been one of the best purchases I’ve ever made. That sucker cuts through foam like butter instead of having to do all that sawing with a knife.

    Once the foam is cut, put a little glue on the plywood, then attach the foam to it.

    Step 5

    Lay batting over the foam and cut enough out to wrap around all the edges of your cushion. Do the same with your upholstery material.

    This is a great furniture makeover idea for an end table makeover - find out how to turn a side table into a bench. Easy side table redo in a day!

    Finally, wrap the wood and foam with the batting and material, stapling it securely to the other side. You can use a regular utility stapler to do this, but I do prefer a power stapler. Like with the electric knife, it just makes the job go so much faster and smoother. No hammering in staples that don’t go all the way in.

    Step 6

    After your table is fully dry, use your drill with a small drill bit attached and drill pilot holes a little inside the four corners where your cushion will go. I did this from the underside, but I think you could probably do it from the top too. Finally, place your cushion on top. Attach the cushion onto the tabletop by screwing it from the bottom up through the pilot holes.

    This is a great furniture makeover idea for an end table makeover - find out how to turn a side table into a bench. Easy side table redo in a day!

    Isn’t that color gorgeous???? I definitely see myself using this color on more furniture in the future. I am just crazy over it.

    This is a great furniture makeover idea for an end table makeover - find out how to turn a side table into a bench. Easy side table redo in a day!

    The material I used was actually left over from recovering my old dining room chairs. It is called Williamsburg Portobello Vase Ladybug. I love how it looks against the Tranquil. I also cleaned up the brass hardware with Bar Keepers Friend to make it look all shiny and new.

    What do you think of this new color?

    You might also want to see…

    How to get a layered Caribbean Blue Look When Painting Furniture - easy way to paint furniture by layering on colored furniture paint glazes.

    How to Get a Layered Caribbean Blue Look

    Happy Painting!

    Pin This Post

    This is a great furniture makeover idea for an end table makeover - find out how to turn a side table into a bench. Easy side table redo in a day!

    *This post is sponsored by Velvet Finishes, however all opinions are 100% mine.

    SaveSave

  • The Perfect Navy Paint

    The part-time child, Bill, and I have formed a sort of business partnership.

    I find furniture for him to paint. He paints it. I write about it. We sell it. I get my initial investment back and he keeps the profit for his labor.

    When I first presented this idea to him, he was ecstatic and couldn’t wait to jump on the two end tables that I had already picked up.

    I even let him pick out the color, which in my opinion is the perfect navy paint…

    Look no more! Not only is this the perfect shade of navy, its also the perfect paint - no priming or topcoat required! The Perfect Navy Paint

    This post contains affiliate links for your shopping convenience. Click here to read my full disclosure policy.

    But then something happened.

    I brought one of the finished tables upstairs to photograph.

    And it was like it was made for my living room. 

    Even Grunt Labor came home and said, “That table isn’t going anywhere but there.”

    So it appears that Bill’s first furniture sale is to me.

    Let’s hope our actual business model goes according to plan the next time around.

    This navy beauty started out like this:

    End Table Before

    I actually scored two of them for $15 each at Goodwill. I think what pulled me to them the most was the drawer hardware.

    We started by removing the glass top, taping and papering off the inlay of caning (I think that’s caning?). I thought it might be nice to have just a touch of contrast with the navy. After that we sprayed down both tables with Ready.

    Spray on Ready to prime the piece.

    Ready, by Velvet Finishes, is essentially a spray-on primer. You don’t always have to use it with Velvet Finishes paint, but if the surface you are painting over is shiny or dirty, you should definitely prime it. These tables were both. We sprayed the Ready on, let it sit for a few minutes, then wiped the tables down.

    Next, we gave the tables about three light coats of the navy paint, which is called Handsome.

    Paint on Velvet Finishes Handsome - the perfect navy paint.

    Or as I like to call it, The Perfect Navy.

    It never ceases to amaze me how much just one single color can totally transform a piece of furniture. The Perfect Navy Paint

    You can see why it needs to stay in my living room, right? Seriously, it just goes perfectly with the rug.

    I need you to back me up here and make me feel better about my furniture hoarding tendencies. Mkay? Thanks.

    Navy with brass accents, plus the pop of red in the rug is perfection. The Perfect Navy Paint

    I didn’t worry with adding on an extra topcoat, since Velvet Finishes already has a topcoat built in. I knew the glass part of the table would get the most action and all we can do with that is hope the circus doesn’t break it.  I did clean up the hardware with Bar Keeper’s Friend (you can see how I clean hardware here).

    Oh, and this is also the same color I used on my base kitchen cabinets that you saw in my home tour.

    See, it is the perfect navy.

    Am I right or am I right? 

    Do you have anything screaming for navy?

    Find more furniture makeover inspiration here and see how I used this gorgeous navy on my cabinets here.

    You know you don’t wanna miss any of this crazy.

    Sign up to get my posts delivered to your inbox here.

    Stalk Me Here:

    Pinterest / Facebook / Twitter / Instagram

    Disclosure: This post was a collaboration with Velvet Finishes paint. However, all opinions and love of the perfect navy are 100% mine.

    pin-this-post

    Look no more! Not only is this the perfect shade of navy, its also the perfect paint - no priming or topcoat required! The Perfect Navy Paint

    SaveSave

  • DIY Leopard Print Table A.K.A. The (Almost) Bee Table

    DIY Leopard Print Table A.K.A. The (Almost) Bee Table

    I’ve had this table in my basement for nearly a year. I loved its shape so much, but just couldn’t decide what to do with it. When I finally did decide what to do with it, it was an utter failure (I’ll get there in a minute). Luckily, it made a spectacular comeback with the help of a little leopard print goodness.

    Leopard Print Table via RainonaTinRoof.com #leopard #stencil #makeover #painting #diy #furnituremakeoverThis post contains affiliate links for your shopping convenience. Click here to read my full disclosure policy.

    This piece is the last one that my sweet neighbor gave me before she moved. Remember how she gave me the navy chests, the chevron tray, the coral and mint nightstand, and so much more? She’s such a sweetie and we miss her dearly. This table sat in my basement for a while because I couldn’t decide what to do with it.

    Leopard Print Table via RainonaTinRoof.com #leopard #stencil #makeover #painting #diy #furnituremakeover

    I was absolutely in love with its retro feel and would have been completely fine keeping it wood toned. But upon close inspection, the finish was peeling – and the top of it wasn’t real wood – it was laminate. No re-staining for this baby.

    And then one day, it hit me. The perfect combination of colors and I already them on hand – black and mustard.

    Bee Table

    Guys.

    Seriously.

    The next time I think that black and mustard (I swear the color was more mustard in the can and was called fresh mustard) work well together please remind me that they work well together on a bumble bee. And a caution sign.

    Not on a table.

    Mkay? Thanks.

    So we went back to square one. I primed the table all over again. It sat around for a while.

    One day I finally said to myself, “Black and Gold. Its never failed you. It looked great on that french desk. Put it on the table.”

    So I painted.

    Leopard Print Table via RainonaTinRoof.com #leopard #stencil #makeover #painting #diy #furnituremakeover

    I painted the whole piece black with my paint sprayer. Next, I topped it off with a gold leopard print using the stencil from the accent wall in my guest bedroom and office.

    Leopard Print Table via RainonaTinRoof.com #leopard #stencil #makeover #painting #diy #furnituremakeover

    I finished it all off with my usual coat of Polycrylic. If you look closely in those pictures, you can see a sneak peek of my porch floor I’m working on – reveal coming next week!

    Leopard Print Table via RainonaTinRoof.com #leopard #stencil #makeover #painting #diy #furnituremakeover

    I was thinking I would put this inside somewhere, but I’m loving the feel of it on the porch.

    Every room needs a little animal print, right?

    Need a little more furniture makeover inspiration? 

    Find out how to make gorgeous colored glazes in any color for furniture flips and colored stains here!

    Get all my tips, tricks and techniques and more for furniture painting here!

    And see my complete gallery of all my furniture makeovers right here.

    You know you don’t wanna miss any of this crazy.

    Sign up to get my posts delivered to your inbox here. 

    Stalk Me Here:

    Pinterest / Facebook / Twitter / Instagram

    SaveSave