When I wrote the post on How to Grow Your Blog with Pinterest, I touched on making your photos pin-worthy. You should have at least one photo in your post that is made specifically for Pinterest.

This post contains affiliate links for your shopping convenience. Click here to read my full disclosure policy.
As you guys already know, Pinterest is huge. Huge. Huge. Pinterest is all about photos (we knew that, Jenna!), and as bloggers, our photos can make or break us!
As bloggers, we want our photos to be pinned and re-pinned over and over again! So, how do we get readers to pin our photos? We must make them pin-worthy!
Let me give you an example of a non-pin-worthy photo:
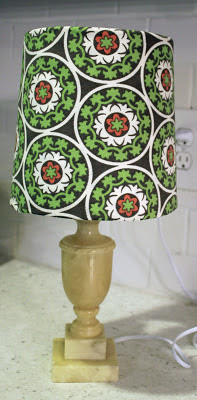
And a pin-worthy photo:

See the difference? The pin-worthy photo is bright, clear, and sharp. I added an overlay with the project name over it so that people would know what that pin would lead them to and I also added a watermark with my blog url in the bottom corner. This image is also vertical – vertical photos do better on Pinterest, rather than horizontal ones.
Having great photos will not only help grow your blog through Pinterest, but it will keep readers interested in your post, and other posts on your blog.
Here are the steps I take when getting my photos ready for a blog post, and eventually to go on Pinterest. I use PicMonkey features to do all the edits.
How to Make your Photos PinWorthy
Step One:
Open up your photo in Picmonkey. Under Basic Edits, go to Exposure and adjust the levels as needed. Just play with the levels of each item until your photo looks good. Each photo is different, so there is no exact recipe for this. I usually increase the brightness a bit (especially if the photo is dark to begin with), I will increase the highlights a tad, and the contrast a bit as well. Sometimes, I increase the shadows, but not a whole lot. It tends to make the photo too dark.
Step Two:
Under Basic Edits, go to Colors. Adjust the saturation and temperature as needed. Typically, if you started out with pretty good color, you may not need to adjust these levels at all.
Step Three:
This is when I add my overlays. First, I add the label overlay that usually states the post / project title. Go to the overlays button, the 5th button down on the left. Picmonkey has lots of different labels you can use for this. I typically use one of the banners under Scrapbooky or something under Geometric. If there is some empty space on the photo to start with, I skip the overlay and write the text directly on the photo. Select which one and click on it. Position it where you want it on the photo. Use the bubbles on the corners to size it. You can use the overlay box that pops up beside it to change the color.
Step Four:
Now, you need to add text to your overlay. Go to the text button on the left side, the fourth button down. Click add text. Type your text in the box. Change the color and size with the text box that pops up. Change your font with the menu on the left. When you have your text like you want, drag the text box on top of the overlay.
Step Five:
At this point, you can create another overlay with text that says your blog’s name using the same steps you did above.
Step Six:
Save your photo.
That’s it! Not too hard, especially once you get the hang of PicMonkey!
Do you have any tips for making your photos pin-worthy?
READ MORE OF THE GROW YOUR BLOG SERIES:
7 Things Your Blog Needs to Keep Readers Coming Back
How to Grow Your Blog with Pinterest
You know you don’t wanna miss any of this crazy.
Sign up to get my posts delivered to your inbox here.
Stalk Me Here:
Pinterest / Facebook / Twitter / Instagram

Ann Yaconis says
Great Post ! I love picmonkey I learned it from you a couple of months ago . Its ure does change photos for the better
Thank you for sharing again
Amber Koogler says
Great tips! I’m a PSE girl but agree learning to edit photos has changed my picture dramatically!! Fun giveaway too! Going to have one over at blog soon!
Shannon Hawk says
Your pictures always look so nice! I love Picmonkey too:) Thanks for sharing your tips!
Tara @ Suburble says
Great post, Jenna! It’s too true… the photos have to catch your eye before you’ll pin it!
Linda Kilsdonk says
EXCELLENT advice! I pinned your article. Thanks!
Sharon says
Thanks for the reminder. I’ve been sick and lacking energy lately. Hopefully I’m on the mend and will have the time it takes to give it that extra pop. I pinned you!
Visiting through Diana Rambles
Elizabeth says
This is so great! I’ve been wondering what programs people were using to make such awesome pin-able photos! Thank you!
Alexis AKA MOM says
Great tips! I always looking for ways to make them pop!
Stopping by from Pin Me :).
cooking with curls says
I have never used the overlay before…I just add my text straight on the photo. I will have to try it out next time. Thank you 🙂
Jamie Alanna says
Love picmonkey 😉 Great tips as usual girl!
Jamie
Christine Vandormolen says
Wonderful Helpful Post!!!
Christy Our Southern Home says
I so needed this post!!!!! Using these steps tomorrow for a new post. I am following you on Bloglovin now!
Megan B says
Very helpful post, thank you!
Megan @Bourne Southern
Dennis Andrew says
Thanks for the tips!
Is there an app for picmonkey?
Jenna LaFevor says
I don’t know if there is an app or not, Dennis. I have always used it online on a laptop!
Diana - FreeStyleMama says
Great tips!
Miss Kitty says
Great tips for us…it is crazy how many more views I have gotten on my blog since the advent of Pinterest! Your post may help me get even more (and more is better).
ngnrdgrl says
Great tutorial, Jenna! I love picmonkey! It really is great seeing how successful your blog has gotten. You really have grown your blog wonderfully! Your before and after picture is a pretty good example of how taking better photos and using picmonkey can really help to make your pictures pinworthy. Thanks for continuing to share your secrets with us!
Simply Domestic says
Great post! Thanks for sharing your wisdom!
Christine @ First Home...Love Life says
Great advice Jenna! Thanks for linking up to “House Party” Linky party! XO
Jennifer - The Deliberate Mom says
These are such great tips! I’ve been working on making my pictures more “pin-worthy”… this should help.
Thanks so much!
Jeanette says
Found you at Live Laugh Rowe! Great tips and I LOVE PicMonkey! Following you know via Bloglovin.
Paula Parrish says
PicMonkey seems like a awesome programs for photo editing. I am going to give it whirl on my next blog post photos. Thanks for sharing this information. ;o)
Natalie@SophisticatedYellow says
Thanks so much for the great post, Jenna. I was wondering how to do the overlays!
KC Coake says
Great tips…thanks!
Thanks so much for linking up at the Real Family Fun link party! Hope to see you next week.
KC
Deborah@Green Willow Pond says
Thank you for sharing how to do this. I didn’t realize you could do this in picmonkey! Thank you for sharing it at What We Accomplished Wednesdays. Have a great weekend!
Hugs,
Deborah
Brooke @ Putter Home says
Finally, an editor that has everything I need. Many thanks!
Jenna @ Rain on a Tin Roof says
It. Is. Amazing. Have fun!
Shailaja V says
Fantastic tips! I have linked back to this post in my tutorial on how to survive a blogging marathon. I have attributed the picture used there, to you as well. I hope it is fine 🙂
Lisa says
LOVE the tips and LOVE picmonkey!
Marla says
These are awesome tips! Thank you for posting the help! I am new to all of this and it is great that there are others out there that simply want to help this realm grow rather than keep it all to themselves. That alone inspires me! I have been using Picasa but it always crashes, I will try picmonkey. Could you maybe do a post on using a cell phone for photo taking if you do not already have one? I do not have time at the moment to search as I was just stopping by for a second.
Thanks again!
Marla
Lisa says
Hi Jenna, I just came across your blog while trying to figure out how to better use Pinterest to get my recipes out to more people. Thanks for all of your helpful posts. I’m looking forward to exploring your blog. I do a lot of entertaining and I’m about to do a kitchen renovation, so I’m sure I’ll find some good inspiration here! ~ Lisa
Jenna @ Rain on a Tin Roof says
Awesome, Lisa! I’m glad the posts were helpful!