How to Install Nucore Flooring

How to install NuCore Flooring - no nails or glue required, installs over most existing floors and it's completely waterproof.

Written by

in

Want to save money and install your own luxury vinyl flooring? That’s exactly what we did. This Nucore flooring installation guide will walk you through the process step-by-step.

YOU GUYS.

The 70’s Landing Pad is actually starting to not look like a construction zone.

Well, it’s starting to not look like a construction zone in the living room, dining room and hallway anyway.

After getting paint on the walls week before last, we’ve been putting down the new flooring in the  hallway, living and dining rooms. This flooring will also go in the kitchen, stair landing and in the downstairs foyer as well, we just haven’t gotten that far yet. I’m finally moving past the point of “Oh my word, what have we gotten ourselves into?” to “Oh my word, it actually looks like a house and it’s pretty!” We still have quite a ways to go in the overall renovation, but there is a light at the end of the tunnel, y’all.

This post is sponsored by Floor & Decor, however all opinions are 100% mine. Affiliate links may be contained in this post.

The flooring we are using for the kitchen, dining room, living room, hallway and all those other places where there’s going to be a lot of foot traffic is NuCore from Floor & Decor.

How to install NuCore Flooring - no nails or glue required, installs over most existing floors and it's completely waterproof.

NuCore is an engineered floor that has a tough top layer of luxury vinyl adhered to a stable, rigid, and waterproof core. I’ll be the first to say there isn’t a thing about this flooring that looks cheap or even like vinyl – I’ll also admit I had my doubts in the beginning. I partnered with Floor & Decor on the flooring and after a slew of emails full of questions about NuCore between myself and Sarah from Floor & Decor, we finally opted to go with the NuCore Cocoa Oak Handscraped Planks.

One of my doubts was how easy installation was supposed to be. Word on the street was that it snapped together (tongue and groove), no glue or nailing required and it could go over most any existing floor, with the exception of carpet.

Word on the street was accurate.

How to Install NuCore Flooring

You’ll need:

How to install NuCore Flooring - no nails or glue required, installs over most existing floors and it's completely waterproof.

Step 1

Unlike hardwood, NuCore does not have to acclimate to your home’s temperature before being installed. You can start as soon as you get it.

You can install NuCore over most existing flooring. Carpet is an exception. If you want to put it where carpet currently is, you will need to remove the carpet first, which is what we had to do. Pull up any staples that are left from the carpet pad and remove any carpet tack strips.

For your first row, you will simply snap the short edges of the flooring together, which easily lock into one another. After finishing the first row, place a few pieces of the flooring vertically along the baseboard of the room. Put your first row flush against these pieces. This will keep your first few rows of flooring from sliding in the beginning.

How to install NuCore Flooring - no nails or glue required, installs over most existing floors and it's completely waterproof.

Step 2

For the second row of flooring, you will snap the tongue and groove into each other.
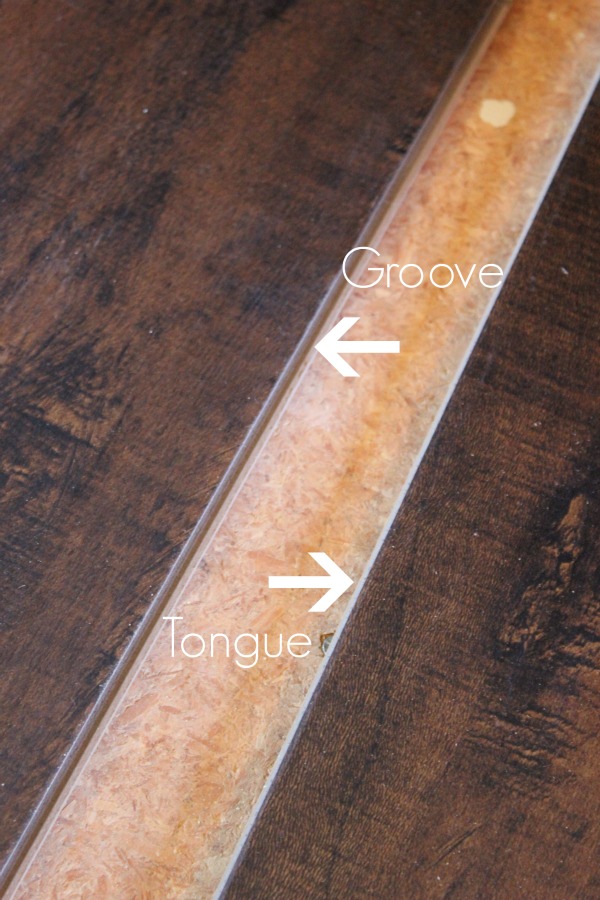
How to install NuCore Flooring - no nails or glue required, installs over most existing floors and it's completely waterproof.

Simply hold a piece of NuCore at a 45° angle and snap it into the piece in front of it.

How to install NuCore Flooring - no nails or glue required, installs over most existing floors and it's completely waterproof.

Step 3

Use a rubber mallet to secure the joints.

How to install NuCore Flooring - no nails or glue required, installs over most existing floors and it's completely waterproof.

You do want to make sure you stagger your joints as shown below.

How to install NuCore Flooring - no nails or glue required, installs over most existing floors and it's completely waterproof.

You will have to cut pieces in order to do this sometimes and obviously you will have to cut pieces as you get to the end of rows. To cut NuCore, measure to determine what length you need, mark it on the plank, score it with a utility knife and snap it at the cut.

How to install NuCore Flooring - no nails or glue required, installs over most existing floors and it's completely waterproof.

Super simple.

After installing all the flooring, you will want to trim out around the edges with quarter round molding to cover the small gap. If you have to go around door trim or jambs, you can cut the wood with a jigsaw. Mark where you need to cut, drill a small hole to get you started, then use the jigsaw to cut the flooring.

Grunt Labor and I made a quick video to show you how to install NuCore.

[adthrive-in-post-video-player video-id=”EmAIvJzB” upload-date=”Wed Jun 29 2016 14:23:39 GMT+0000 (Coordinated Universal Time)” name=”Rain on a Tin Roof – How to Install NuCore Flooring” description=”How to Install NuCore Flooring by Rain on a Tin Roof”]

It is really as simple as it looks. And when it’s installed, it looks just like hardwood. It’s gorgeous. I’m also pretty pumped about the fact that it’s waterproof, so that when the Circus doesn’t tell me she spilled her juice hours later, it won’t be that big of a deal. 🙂

UPDATE: I DID A REVIEW OF OUR NUCORE FLOORING ONE YEAR LATER. YOU CAN READ ABOUT IT HERE.

Want to easily come back to this flooring installation guide later? Just pin the image below!

How to Install NuCore Flooring | Luxury Vinyl Wood Flooring | Luxury Vinyl Flooring | Luxury Laminate Flooring | Luxury Vinyl Plank Flooring
blog-signature-summer-15

You know you don’t wanna miss any of this crazy.

Stalk Me Here:

Pinterest / Facebook / Twitter / Instagram

SaveSaveSaveSaveSaveSave

Comments

88 responses to “How to Install Nucore Flooring”

  1. This looks SO good Jenna! I absolutely love the flooring you picked out (And what? It’s waterproof??) I can’t wait to see everything once your renovations are done!

    1. Isn’t it so cool that it’s waterproof?! Blew my mind!!

      1. Jeff Corcoran

        How is the floor holding up long term? Scratches? Any separation? Problems?

  2. What a great product- thanks for the fab tutorial and video! My friend is looking to install this type of flooring in her whole main floor- I can’t wait to show her your post!

    1. Awesome, Krista! She will LOVE it!

    2. Gigi

      I had this same flooring put in my last house and it is wonderful. Everyone who came to house oohed and aahed. Kids and dogs impervious. And the only dark wood that doesn’t show dirt and dust because of the variation and dill finish love it! Wish I had it now, but I’m renting. Great partnership, Jenna.

      1. Gigi, that is awesome to hear!!! Someone had just asked me about the dogs scratching it and I will have to tell them! Thanks gal!

  3. Looking good. Love following the process and seeing it all come together!

    1. Thanks, Whitney!! It is so nice to actually feel like its coming together!!

  4. This looks awesome, Jenna! Love your choices! I can’t believe how quickly you guys are pulling everything together in the new place! Have a wonderful week!

    ~Abby =)

    1. Thanks, Abby!! I feel like it’s taking forever – good to hear you don’t think so!! haha!

  5. Helen Holley

    Thanks for sharing! Very Informative!!
    Awesome!
    Helen Holley

    1. You are welcome, Helen! Glad it was helpful – I love this stuff! 🙂

  6. Jennifer

    Waterproof! And you’re right it is gorgeous! Love this!

    1. I know, right?! I could not believe it was waterproof!!

  7. Pam S

    Well done!! Love your house 🙂

  8. Patty

    Jenna this floor is so dang gorgeous, it is exactly what I want. The installation looks easy enough, your tutorial is great. I just can’t get over the fact that this is just what I want, I love the wide planks and the color is perfect and it is waterproof, that is the one thing that has kept me from getting lament flooring, I have heard so many stories about them buckling or coming apart or the color fading. Wow I’m really pumped. I can’t wait to see more of your 70’s landing pad it is going to be so gorgeous.

    1. I love this flooring too, Patty!! I seriously thought it had to be too good to be true at first – so glad I was wrong.

  9. Marcia Banach

    Hi Jenna, I would love to try this flooring. I do wonder how floors with joints can be waterproof –a big issue for us with multiple dogs! Any thoughts?

    1. I am certainly not a scientist, Marcia to know the specifics of it, but I would assume since this flooring has tongue and groove joints, that keeps from water seeping through. Of course, you do have to make sure that your joints are tight when you install it.

    2. John

      It’s the material that the flooring is made of that makes it water proof. I put a sample of NuCore halfway in a bucket of water overnight along with other flooring samples and the NuCore was the only one that came out undamaged.

  10. Very pretty and you are so smart to get something that will withstand the dings and wet of a kiddo!! Ummm, tongue is not spelled tounge – your fingers were going too fast!! Grunt Labor did a great job with installation and it looks awesome! My daughter finds that with a cat and a dog, there is always fur on her hardwood floor – maybe it is time to develop a relationship with Roomba?? Wow, I just checked them out and found out that there were a whole lot more of them around than I thought! http://robot-vacuum-review.toptenreviews.com/

    1. Thanks for catching my typo, Susan!!! Fixing it now! Oh man, a Roomba would be a dream! Luckily, we have a dog that doesn’t shed much, but I’ll be the first to say that I definitely do not sweep like I should!

  11. Wow! This is going to look amazing when you guys finish!

  12. Wow, Jenna! I absolutely love those floors! Everything at the 70s landing pad is coming together so great! I can’t believe how easy it looks to install either! Great job!

    1. Thanks, Chelsea! It is coming together – I’m so excited!

  13. Jenna, The floor looks amazing! Thanks so much for the great tutorial. Maybe now I can convince my husband that I am capable of installing “hardwood” floors in my family. 😉

    1. Thank you, MJ!! We are just crazy over the floor – in a good way! haha! Yes, you can totally install these -anyone can!!

  14. So glad I found this on Pinterest! This looks like something even *I* could do! Thank you!

    1. You can totally do it, Lynn!! It really is easy – and looks great too! 😉

  15. nathan118

    Thanks for the info Jenna. It’s water proof because it’s vinyl…but any thoughts on if it “feels” like vinyl? I know it looks really nice…but walking on it in shoes, socks, barefoot….does it feel cheap or “plasticky”?

    1. Personally, I don’t think it feels cheap or plasticky, Nathan. It certainly doesn’t have that vinyl floor feel or look (slick and shiny) that I associate with vinyl.

      1. nathan118

        Thanks Jenna. Looking it as an option that we can run through our family room, AND into the kitchen and dining room. Sounds like a good possible option instead of trying to do tile in the kitchen and dining room, and then a laminate in the adjacent rooms.

        1. That’s actually exactly what we are doing, Nathan. It will be in our living room, dining room, kitchen and hallway which all three connect to one another.

  16. This looks awesome, I’m actually convinced that my wife can do it!

    1. Oh, she can, Mike! It’s so easy!

  17. Megan

    Jenna,

    I’ve pretty much convinced my husband that is is what we’ll be installing and I can’t wait to see how it turns out! Two questions:
    1: About how long did install take? (this is my husbands big concern but you make it seem to move pretty fast!)
    2: Did you lay down a barrier or just go straight on the floor? (We have hideous linoleum that I plan on leaving when we install but I’m wondering about a soundproofing barrier)

    Thank you!

    1. Awesome, Megan! Once you get the hang of installing it, it goes pretty fast. My husband worked on ours after work for about two hours a day. On average, he was probably able to complete one good sized room done in 2-3 days time, so that’s about 4-6 actual work hours. And no, we didn’t lay down a barrier underneath – just straight to the floor. The flooring has cork on it which also helps as a sound barrier. Hope all that helps!

      1. Megan

        600 square feet of NuCore is purchased and the install starts tonight!! I’ll be sure to share some before and after pics 🙂

        1. Whoot whoot! Hope it goes great!

  18. Laura Nasser

    Does it scratch easily?

    1. No. Obviously, you don’t want to drag a refrigerator across it, but other than that, it doesn’t scratch easily. We have a dog and that was another reason we went these because she did scratch up our hardwood at our old house.

  19. Terry

    How do you install it on stairs?

    1. They make stair noses that fit over the front edge of the steps. You do the regular installation on the rest of the step.

  20. Adam

    1) We have 700+ square feet of tile in the kitchen, laundry room, bathroom, etc that’s gonna cost $7000 to demo and re-tile, so I’m trying to see if there’s a cheaper DIY alternative. I assume you can install this on top of existing tile? But how think is it? The issue I see there is a dropoff when transitioning into other rooms.

    2) How does this stuff stay in place without gluing it down? My concern would be if there is a slightly uneven place in the floor then this could shift or not rest flush.

    1. Adam

      Make that “how THIN is it” 🙂

    2. Hi Adam! I actually just wrote a follow-up post on our flooring and I think it will answer your questions. You can find it here: https://rainonatinroof.com/2016/05/why-we-opted-for-nucore-flooring/

  21. Whitney

    How is the floor holding up 5 months later? Is it really waterproof and can you give in updated review? We’re considering using this flooring but I’m hesitant because it is so new and I can’t find many reviews on it.

    1. Hi Whitney! I actually just wrote a post about how it’s holding up here: https://rainonatinroof.com/2016/05/why-we-opted-for-nucore-flooring/ Hope that helps!

  22. Audrey

    Very nice job. We are in the deciding stage, so I appreciate your generosity. We have a great deal of tile that will butt against any flooring we choose. Did you use any transition pieces? We also have a fireplace with angles! YIKES! ???? As I write, I am thinking about removing the tile in front of the fireplace – the job would be much easier & the finished product would look much nicer. Thanks for the inspiration!

    1. Thanks, Audrey! Yes, we did have to use some transition pieces in a couple of places. There are matching ones you can buy and easily install. We had one spot where we ended up removing the tile as well instead of going over it. We could have went over it, but there would have been way too big of a transition and I was worried about people tripping there.

  23. Leslie

    Hi! Quick question…do your floors need to be even for the install to be this easy? I’m buying a place and floors seem even but not 100% sure.

    1. I don’t think they would have to be perfectly level, but you would want them pretty level. If the levelness varies by room, you could always use transitions and reducers in those areas.

  24. Paul Weader

    Tell you the problem I had. With the normal caveats that I could be wrong, my old tile on concrete pad is apparently more than just “Slightly Irregular Subfloor” in a couple places. so there were a couple places where the flooring flexes up and down and the long side joints flex lose. Those long side joints seem to be weaker than the engineering laminates I am used to. I have tried a fix: some caulk at the low points, some super duct tape down the bottom side edges, and some Cyanoacrylate based super glue in the edges. I will report back in a few months if the fix seems to be working. If so, I will say I am happy with the results.

    1. Thanks for the input, Paul. Keep us updated!

  25. Tiffany

    Hello!
    Do you mind sharing any tips on how you did the flooring on the stairs?

    Thank you!

    1. Hi Tiffany! For the actual stair part, we ended up using traditional stair treads and staining them. However where the main flooring dropped off to the stairs, we used stair noses to round it off, which you can purchase in the matching color of NuCore you get.

  26. Cyndee

    Can the Nucore be installed over a travertine tile floor?

    1. As long as the surface is level, it should be able to go over it.

  27. JEn

    I was wondering if you had to put this flooring at the top or bottom of a staircase or against an outer door. We are using this flooring soon and we will have one on what very top stair at the top of a basement staircase , and the very bottom of an upper staircase andni cant seem to find out what transitions to use. Thank you!!

    1. Hi Jen! Where the flooring met the stairs going down, we used stair noses. You can purchase them with the flooring in the same shade you get your flooring in – hope that helps!

  28. Dania

    Hi, congratulations the floors look amazing. What would you suggest in my case? I have some moisture that has seeped thru my bamboo floors 🙁 and I was thinking of installing this product on top of my existing floors but I was told it would be best to remove them since there is existing damage to them any suggestions.

    thank you,
    Dania

    1. Hi Dania, It probably would be a good idea to remove the old flooring since there is damage there.

  29. Nina

    What other colors do you have? and what is the price on it!

  30. I would be interested in knowing the time it took to install. Can you provide the room dimensions and a timeframe?

    1. We installed a living room, hallway, dining room and kitchen over the course of about two weeks, working a few hours each afternoon. I’d say the room sizes are a little more than average.

  31. Marissa

    Looks great! Question: I can’t tell from the images but does this flooring have decent physical texture? That’s something that we’re looking for to help hide scratches and dust a bit more than the usual smooth, full-sheen of regular vinyl.

    1. Hi Marissa! Yep, there is some texture to the flooring. Nothing too deep that would catch dirt and dust, but enough to give it a little more character. 🙂

  32. Jillian

    I am getting ready to install this in two rooms– very excited! You blog has been very helpful but I am curious on two things.
    1. Did any of your rooms have doorways that led to different flooring or sliding glass doors with a track? If so, how did you handle the transition? We have a bathroom off of the one room with a pocket door and then tile. I am not sure if we need to use a schulter or not. The same room has a sliding glass door. The flooring will land next to the track but I am thinking there will a raw edge?

    2. What direction did you lay your flooring in? Our one room is longer then wide and the other is wider then long. They are on other sides of the house and are separated by tile….

    1. Hi Jillian! We had one place where the flooring butted up to a sliding glass door and we just cut it so that it was snug in there – we didn’t need a transition. There was another place where it butted up to flooring a little higher than it and we used one of the NuCore transitions there. As for the direction of our flooring, if you look down our hallway, we layed it vertically.

  33. Pam K

    Can you tell me will this work on concrete flooring over the top of water heated floor

    1. I would think so, but I would ask the folks at Floor and Decor who sell this product to be certain.

  34. Tina

    Do you know if I put Nucore directly over tile, will it telegraph the grout lines?

    1. I would think it would be fine, but couldn’t say for certain.

  35. Joe

    Thanks for deleting my comment!

    1. Hi Joe. I haven’t deleted your comment. I just set all my comments to where they must be approved before showing on the post. I have been out of town for a couple of weeks, so I’m just now getting caught up. Thanks.

  36. Corinne

    I’m not sure if someone asked this already or not, but we are about to install this throughout the majority of our house and I was wondering how you measured with the staggering. Did you follow the rule of thirds where a new board starts 12 inches in from the one on top of it? Or did you just eyeball it? I want it to look natural in placement. Thanks!

    1. We just eyeballed it!

  37. Since this is ona Pinterest website relating to RV’scan I assume this will work with Rv’s that have slide-outs. Would it be thin enough?

  38. Ali

    I have a question, what did you do about when you tiled your kitchen? Did you tile below your fridge, oven and dishwasher?

    1. We didn’t tile the kitchen, we laid the Nucore planks. We did go under the fridge, oven and dishwasher.

  39. monica

    We’ve had this flooring a few months already and a certain board seems to be lifting . How would I be able to fix this issue ?

  40. Cynthia

    Hello, I have a question. If I were to put Nucore down in a hall that meets with the laundry room which I want tile in, how would the two different type flooring meet? You see, We have laminate currently and there must be a “T” type connector that meets the two flooring because laminate chips when the edges are exposed. WHEN the edges of Nucore are exposed would it chip like the laminate?

  41. Jen

    Hello! I am strongly considering the NuCore Cocoa Oak. After looking at all your pictures and noticing some appear to be a redder tint than others, I was wondering what your opinion is of the color of this. Do you see it as more brown or more red?

Leave a Reply

Your email address will not be published. Required fields are marked *