Tag: flooring

  • Mudroom Progress: Installing the Flooring

    Mudroom Progress: Installing the Flooring

    If you’re looking for a durable, but beautiful floor that’s also an easy DIY install, this Select Surfaces Flooring might be your answer! This waterproof, vinyl plank flooring is not only easy to install, but can also go over most existing floors!

    We’re doing things a little backwards here. Normally, I would like flooring to be one of the last things going in – like after all the painting is done and there isn’t a chance I’ll spill paint on it – we all know how those “best laid plans” go though, don’t we?

    So no, the painting isn’t even close to being done and I’m still waiting on quite a few things to arrive, but flooring is going down.

    This post contains affiliate links for your shopping convenience. Click here to read my full disclosure policy.

    Select Surfaces Flooring Being Installed

    Grunt had yesterday off and as we all know – it’s best to take advantage of free grunt labor anytime you can. 😉

    He isn’t completely done, but he’s put a dent in it and that’s mostly thanks to this Select Surfaces Flooring being a relatively easy DIY install. The best part is that this engineered vinyl plank flooring can go over many existing flooring surfaces. We were able to put it right over the old linoleum sheet flooring and the bare concrete that were both in this space.

    On top of that, this flooring is waterproof, so it’s perfect for this room in the house where we have had a water leak before. Fingers crossed that doesn’t happen again, but just in case, our flooring will be ready.

    I also love that this flooring has that natural look of hardwood, but with the low-maintenance that comes with vinyl plank flooring. As all busy mamas will agree, low-maintenance is our preferred way to go. 😉

    How to Install Select Surfaces Vinyl Plank Flooring

    Materials and Tools Needed:

    Step 1

    If you are removing any existing flooring currently in place, do so first. This vinyl plank flooring can go over most existing hard surface floor coverings as long as it is smooth or can be made smooth. As I said earlier, we went right over both concrete and old sheet flooring.

    Step 2

    Adjust door trim if needed. If you want to be able to easily slide the flooring right under door jambs and trim, place a plank of the flooring up against the door jamb and mark where the top of the plank hits. Use an oscillating multi tool to remove this part of the trim as shown below.

    Cutting out door jambs to install Sam's Club Flooring

    Step 3

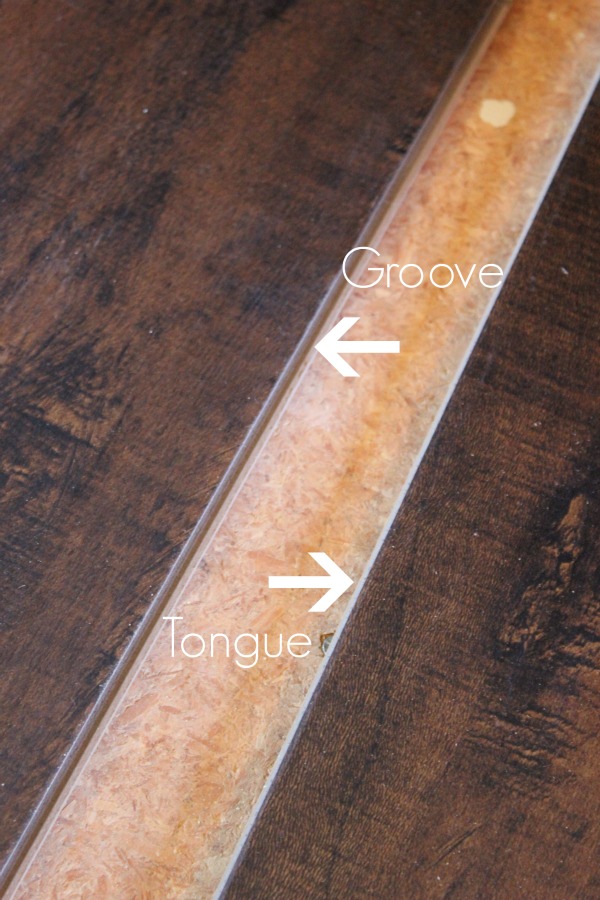
    Starting in the top left corner of the room, lay the first plank so that the head and side seam grooves are exposed.

    Installing click together vinyl plank flooring from Select Surfaces

    You always want those white parts you see to be on the outer edges so you can click more planks on.

    Remember, this is a floating floor – no glueing or nailing needed. Just lay that first piece down.

    Step 4

    Click another plank into place beside the first plank you laid.

    How to Install Vinyl Plank Flooring over Sheet Linoleum

    Place it at an angle over the exposed tongues and push down firmly.

    Tapping in vinyl plank flooring from Sam's Club.

    Use a rubber mallet and lightly tap all the seams tight.

    Tapping together vinyl plank flooring from Select Surfaces.

    Step 5

    Repeat until the floor is fully covered with your new vinyl planks. When you need to cut planks to fit, simply measure, mark with a pencil and then cut with a power saw. We used our miter saw for cuts.

    Step 6

    Once the flooring is fully installed, you can install baseboard and quarter round around the edges of the flooring.

    I’m super excited to have this incredibly beautiful and equally durable flooring in this space! This is one of the most high traffic areas in our house so it needs flooring to withstand it all!

    If you’re new to this challenge, you can view the entire design and ideas HERE!

    A big thank you to all our sponsors on this challenge:

    Be sure to see what the other challenge participants are up to:

    Casa Watkins Living // The Boho Abode // Delineate Your Dwelling // Haneen’s Haven // The Happy Housie // Homemade by Carmona // House by Hoff // Jeweled Interiors // Kaleidoscope Living // Our Fifth House // PMQ for Two // Rain on a Tin Roof // Southern State of Mind // Taryn Whiteaker // This is Our Bliss // Thou Swell // Up To Date Interiors

    Keep up with it all on social media too!

    Facebook | Instagram | Pinterest | Twitter

  • NuCore Flooring: How It’s Holding Up After A Year

    NuCore Flooring: How It’s Holding Up After A Year

    Multiple times a week, I get questions about the NuCore flooring we put down throughout the living room, dining room and kitchen in our house. Apparently, it’s become a very popular option in flooring. NuCore is an engineered floor, that looks like hardwood, but is actually a tough top layer of luxury vinyl adhered to a stable, rigid, and waterproof core.

    I don’t always get to answer those questions in a timely manner, so in an effort to be able to answer people’s questions more efficiently and to also give an update as to how well it has held up after a year, I decided writing a post about it was the best way to go.

    Just so we’re clear, this post is in no way sponsored by Floor and Decor, which sells NuCore Flooring. They did provide me with the flooring last year in exchange for two product review posts, but this post was not part of that deal.

    I figured the best way to go about this was in Q & A format, so I’ve gathered all the questions I get about NuCore and answered them below. Let’s get down to it, shall we?

    This post contains affiliate links for your shopping convenience. Click here to read my full disclosure policy.

    NuCore Waterproof Flooring: How It’s Holding Up After a Year

    Q: How do you install it? 

    A: I actually wrote a post about just that, which you can find it here. You can also watch the short video below as well, the post will go into more detail.
    [adthrive-in-post-video-player video-id=”EmAIvJzB” upload-date=”Wed Jun 29 2016 14:23:39 GMT+0000 (Coordinated Universal Time)” name=”Rain on a Tin Roof – How to Install NuCore Flooring” description=”How to Install NuCore Flooring by Rain on a Tin Roof”]

    In a nutshell, it’s pretty easy to install.

    Q: About how long did install take?

    A: Of course this is going to depend on the size of the room you are installing it in, but once you get the hang of installing it, it goes pretty fast. My husband worked on ours after work for about two hours a day. On average, he was probably able to complete one good sized room done in 2-3 days time, so that’s about 4-6 actual work hours.

    Q: How do you install it on stairs?

    A: You can install a few planks on the stairs and then fit the edges with the coordinating stair noses that are offered. What we opted to do though, was replace our old stair treads with actual hardwood treads. We used the stair noses on the edges of where the top floor dropped off to the stairs.

    NuCore Flooring Review: Here's how this waterproof, vinyl plank flooring performed, one year later.

    The photo above shows NuCore on our landing and then a stair nose at the edge.

    Q: Can you install this on top of existing tile?

    A: Yes. That being said, you would want to make sure the tile was level and in good condition.

    Q: How thin is it?

    A: 6.5mm

    Q: What do I do if the transition from NuCore to another flooring in my home is of varying heights?

    A: You should be able to use a coordinating reducer to make the transition smoother.

    Q: How does this stuff stay in place without gluing it down? 

    A: NuCore is a floating tongue and groove installation. The more you snap together, the heavier it becomes, which helps to keep it in place. We also put quarter round trim around the baseboard and edges of the NuCore once it was installed to give it a finished look. This of course also helps to keep it in place.

    Q: Do your floors need to be even for the install to be easy?

    A: I don’t think they would have to be perfectly level, but you would want them pretty level. If the levelness varies by room, you could always use transitions and reducers in those areas.

    Q: Did you lay down any kind of barrier or just install it directly on the floor?

    A: No, we didn’t lay down a barrier underneath, just installed it straight on top of the floor. The flooring has cork on it which also helps as a sound barrier.

    Q: Can you lay down a barrier underneath NuCore? 

    A: The flooring specifically says you don’t have to put any sort of underlayment or barrier under the flooring, however if you prefer to do so anyways, I would suggest asking the folks at Floor & Decor who sell NuCore.

    Q: Is the flooring renter-friendly or would it ruin the floor underneath? 

    A: It shouldn’t ruin the floor underneath, as you aren’t having to put down a barrier underneath it or nail it down.

    Q: My concern is that the cork backing might show imperfections in the sub floor over time. Do you have any places in your sub floor that is showing up after a year of being installed?

    A: I haven’t noticed any places like that. There is one place where there had been two different subfloors and they didn’t meet up quite right. I can tell where that spot is when I walk on it, but not when I look at it.

    Q: How can floors with joints be waterproof?

    A: I am by no means an expert on answering this question. I’m not the creator of this product, an engineer or a scientist who could tell you the specifics on how that works. In my personal opinion, I would assume since this flooring has tongue and groove joints, that keeps water from seeping through. Of course, you do have to make sure that your joints are tight when you install it. That being said, the core of the flooring is also waterproof as I noted above.

    Q: So is it really waterproof? 

    A: Yes, at least with the water issues we have had. Shortly after moving in, we had a major dishwasher leak. The drain was clogged up and the water came out all in our floor. The end edge of the NuCore flooring buts up to the dishwasher of course and we never had an issue with the floor buckling, deteriorating or anything else because of the water. Now of course, we didn’t let the water sit there for hours to just see what happened, but all in all, no issues. Our dog also had a few accidents on the NuCore and the flooring didn’t seem to absorb any of the urine at all.

    Just as a little extra information, this is what one reader left as a comment on one of my previous posts about NuCore: “It’s the material that the flooring is made of that makes it water proof. I put a sample of NuCore halfway in a bucket of water overnight along with other flooring samples and the NuCore was the only one that came out undamaged.”

    Q: Any thoughts on if it feels like vinyl? It looks really nice, but walking on it in shoes, socks, bare feet, does it feel cheap or “plasticky”?

    A: Personally, I don’t think it feels cheap or plasticky. I always associate a vinyl floor with a slick feel and a shiny look and I don’t think that NuCore has either one of these.

    Q: Does the flooring have any physical texture?

    A: Yes, there is some texture to the flooring. It’s not too deep that it would catch and hold dirt and dust, but it does give it a little more character.

    Q: Does it scratch easily?

    A: It doesn’t scratch easily, but our flooring has gotten some scratches. You have to hunt for them though. The scratches aren’t white, but brown in color, so they blend in with the floor.

    The scratches on our flooring was from our boxer dog. As she got older, she lost control of her back legs and they would often fall out from her under her, which caused some scratching on the floor and then caused her to try and get a better grip on the floor to get back up.

    NuCore Flooring Review: Here's how this waterproof, vinyl plank flooring performed, one year later.

    You can hardly see any of the scratches on the floor in our living room, dining room, or hallway. The only place you can really see them well are right in front of really well-lit places. The photo above was taken in front of our all glass sliding door. The scratches aren’t very noticeable or deep, you have to look for them. I noted some of the ones above with the arrows.

    Q: Has it dented easily? Have you noticed denting or divots where chairs or furniture have been sitting on it?

    A: No, we haven’t had any dents at all.

    Q: Have you had any problems with it splitting at the seams?

    A: We have one place where a seam popped. I think it is mainly due to the fact that we put a very large and heavy piece of furniture right beside that seam though. And when I say a large and heavy piece of furniture, I’m talking about a piece of furniture that my husband refers to as “the steel box.” It’s super heavy.

    Q: Does it muffle sound well? 

    A: This is something I haven’t really paid that much attention to, so I might not be the best person to answer it. That being said, if I haven’t noticed it, maybe it means it does muffle sound pretty well. I think that the cork backing helps to absorb some of the sound. We live in a split-level house and the NuCore is installed primarily on the upper level. With the exception of spending some time in our den on the lower level, I’m not down there very much to determine if it does or does not muffle the noise significantly.

    Q: Does it make a click-clack noise when the dogs walk across the floor?

    A: Yes, the dogs paws and toenails do make that sound as they walk across the floor.

    Q: Will it break under pressure of heavy furniture?

    A: We haven’t had any pieces break, but we did have that one seam pop up as noted above.

    Q: What do you clean NuCore with? 

    A: At first, I was using Mop n’ Glo, but then someone commented on one of my NuCore posts saying that Floor and Decor suggested not using that to clean it with as it could yellow it. So, I switched to just Swiffer Wet Pads. I usually go over it first with my Shark vacuum using the hardwood floor attachment (which is awesome), then the Swiffer Wet Pad.

    Q: Is it ok to get your house sprayed for bugs with the NuCore? Will the flooring be ok being exposed to the spray? 

    A: I’ve had our house sprayed once every three months for pests since we’ve moved in and there has never been an issue with the spray damaging the flooring.

    Q: Where do you buy NuCore and how much does it cost?

    A: You can purchase NuCore at Floor & Decor and it costs about $2.40 – $3.00 a square foot.

    Our overall thoughts:

    We are really pleased with our flooring. I’ll be the first to say that we give our floors a beating. There’s me, Grunt Labor, the Circus, and a dog. We live in our house, we don’t tiptoe around it and this stuff has held up. We have dropped tools on the floor, drug things across it, and with the exception of those scratches from the dog, it’s held up. We have two more places in our house that we still need to update the flooring in and we’re considering NuCore for those places as well. Grunt Labor is really pushing for it because of how easy it is to install. The only other type of flooring we might put in those places would be tile. Either way, both places see a lot of foot traffic and potential water – one is the laundry room, the other a long hallway between our garage and den and both are in the lower level of our house, which is partially underground, since our house is a split-level.

    Read more NuCore Flooring Reviews in the comments.

    If you’ve installed NuCore before, please add your thoughts on it in the comments as well.

    More posts about NuCore:

    How to Install NuCore Flooring – this was a DIY project for us and this is how we we did it.

    Why We Opted for NuCore Flooring – why we went for this flooring over others.

    Want to be able to quickly refer back to this post? Pin the image below. 

    NuCore Flooring Review: Here's how this waterproof, vinyl plank flooring performed, one year later.

    SaveSaveSaveSaveSaveSave

  • How to Install Nucore Flooring

    How to Install Nucore Flooring

    Want to save money and install your own luxury vinyl flooring? That’s exactly what we did. This Nucore flooring installation guide will walk you through the process step-by-step.

    YOU GUYS.

    The 70’s Landing Pad is actually starting to not look like a construction zone.

    Well, it’s starting to not look like a construction zone in the living room, dining room and hallway anyway.

    After getting paint on the walls week before last, we’ve been putting down the new flooring in the  hallway, living and dining rooms. This flooring will also go in the kitchen, stair landing and in the downstairs foyer as well, we just haven’t gotten that far yet. I’m finally moving past the point of “Oh my word, what have we gotten ourselves into?” to “Oh my word, it actually looks like a house and it’s pretty!” We still have quite a ways to go in the overall renovation, but there is a light at the end of the tunnel, y’all.

    This post is sponsored by Floor & Decor, however all opinions are 100% mine. Affiliate links may be contained in this post.

    The flooring we are using for the kitchen, dining room, living room, hallway and all those other places where there’s going to be a lot of foot traffic is NuCore from Floor & Decor.

    How to install NuCore Flooring - no nails or glue required, installs over most existing floors and it's completely waterproof.

    NuCore is an engineered floor that has a tough top layer of luxury vinyl adhered to a stable, rigid, and waterproof core. I’ll be the first to say there isn’t a thing about this flooring that looks cheap or even like vinyl – I’ll also admit I had my doubts in the beginning. I partnered with Floor & Decor on the flooring and after a slew of emails full of questions about NuCore between myself and Sarah from Floor & Decor, we finally opted to go with the NuCore Cocoa Oak Handscraped Planks.

    One of my doubts was how easy installation was supposed to be. Word on the street was that it snapped together (tongue and groove), no glue or nailing required and it could go over most any existing floor, with the exception of carpet.

    Word on the street was accurate.

    How to Install NuCore Flooring

    You’ll need:

    How to install NuCore Flooring - no nails or glue required, installs over most existing floors and it's completely waterproof.

    Step 1

    Unlike hardwood, NuCore does not have to acclimate to your home’s temperature before being installed. You can start as soon as you get it.

    You can install NuCore over most existing flooring. Carpet is an exception. If you want to put it where carpet currently is, you will need to remove the carpet first, which is what we had to do. Pull up any staples that are left from the carpet pad and remove any carpet tack strips.

    For your first row, you will simply snap the short edges of the flooring together, which easily lock into one another. After finishing the first row, place a few pieces of the flooring vertically along the baseboard of the room. Put your first row flush against these pieces. This will keep your first few rows of flooring from sliding in the beginning.

    How to install NuCore Flooring - no nails or glue required, installs over most existing floors and it's completely waterproof.

    Step 2

    For the second row of flooring, you will snap the tongue and groove into each other.

    How to install NuCore Flooring - no nails or glue required, installs over most existing floors and it's completely waterproof.

    Simply hold a piece of NuCore at a 45° angle and snap it into the piece in front of it.

    How to install NuCore Flooring - no nails or glue required, installs over most existing floors and it's completely waterproof.

    Step 3

    Use a rubber mallet to secure the joints.

    How to install NuCore Flooring - no nails or glue required, installs over most existing floors and it's completely waterproof.

    You do want to make sure you stagger your joints as shown below.

    How to install NuCore Flooring - no nails or glue required, installs over most existing floors and it's completely waterproof.

    You will have to cut pieces in order to do this sometimes and obviously you will have to cut pieces as you get to the end of rows. To cut NuCore, measure to determine what length you need, mark it on the plank, score it with a utility knife and snap it at the cut.

    How to install NuCore Flooring - no nails or glue required, installs over most existing floors and it's completely waterproof.

    Super simple.

    After installing all the flooring, you will want to trim out around the edges with quarter round molding to cover the small gap. If you have to go around door trim or jambs, you can cut the wood with a jigsaw. Mark where you need to cut, drill a small hole to get you started, then use the jigsaw to cut the flooring.

    Grunt Labor and I made a quick video to show you how to install NuCore.

    [adthrive-in-post-video-player video-id=”EmAIvJzB” upload-date=”Wed Jun 29 2016 14:23:39 GMT+0000 (Coordinated Universal Time)” name=”Rain on a Tin Roof – How to Install NuCore Flooring” description=”How to Install NuCore Flooring by Rain on a Tin Roof”]

    It is really as simple as it looks. And when it’s installed, it looks just like hardwood. It’s gorgeous. I’m also pretty pumped about the fact that it’s waterproof, so that when the Circus doesn’t tell me she spilled her juice hours later, it won’t be that big of a deal. 🙂

    UPDATE: I DID A REVIEW OF OUR NUCORE FLOORING ONE YEAR LATER. YOU CAN READ ABOUT IT HERE.

    Want to easily come back to this flooring installation guide later? Just pin the image below!

    How to Install NuCore Flooring | Luxury Vinyl Wood Flooring | Luxury Vinyl Flooring | Luxury Laminate Flooring | Luxury Vinyl Plank Flooring
    blog-signature-summer-15

    You know you don’t wanna miss any of this crazy.

    Stalk Me Here:

    Pinterest / Facebook / Twitter / Instagram

    SaveSaveSaveSaveSaveSave