It’s been a very busy two weeks, y’all! When I was trying to decide what space to do for the Choose Your Own Adventure Room Refresh hosted by Jeweled Interiors, one of the reasons I opted to go with my closet (besides the fact that it desperately needed a makeover) was because I thought it might be a little easier time-wise and project wise than taking on a larger room. This space still ended up being demanding on both fronts. Of course, part of that was due to me critiquing every little thing.

This post contains affiliate links for your shopping convenience. Click here to read my full disclosure policy.
Thanks to Hudson Valley Lighting, Minted and SEI for providing products for this makeover!
I’m so glad we gave this closet a makeover though, y’all. It has given us a load more of functional space and it’s a true testament to how readymade plain Jane store bought products and DIY projects can come together to create a beautiful, organized and super functional space.
The Master Closet Before


After: DIY Walk-In Master Closet Makeover
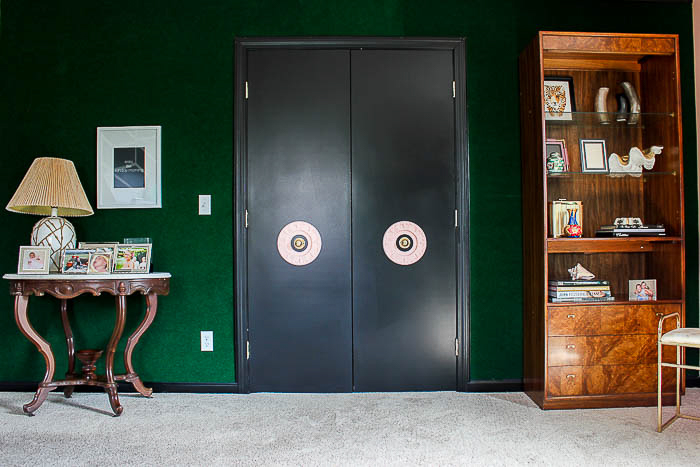
The Closet Exterior

DIY Green Carpet Wall / Closet Door Medallions
I was already pretty pleased with the closet exterior, so I didn’t do too much here. I did a bit of sprucing up though by editing, adding art and styling.

I’m still a big fan of the color and texture the carpet wall adds to the space and how this table and details like the closet door medallions, the lamp, rattan basket and other items give it a “traveled and collected” feel.

Toro Art / Rome or Bust Art / Fonte Mourisca Art
I wanted to add in more of that traveled feel and color with some art though. I went with Toro, Fonte Mourisca and Rome or Bust from Minted. Minted offers custom framing with all their art prints and you can choose from a wide variety of frame styles and sizes. I wanted the art to stand out and needed to keep the frames neutral since they were going on a very bold wall, so I opted for thin black metal frames. This way, they will also work with just about any other decor style if we ever change it up.

I got Toro in a larger size since he was a good neutral and he also adds some masculinity to the rest of our bedroom, which sports pink walls. He was also approved by Grunt, so brownie points there.

The bookshelf on the other side of the closet doors desperately needed some styling help. I had scored the bookshelf for $10 at a thrift store a while back, but had never really worked to make it “pretty”. I kept the travel vibe going here as well.

These shelves hold lots of mementos from our trips – a seashell Grunt found on the beach the day we got married, a nod to my favorite city, pictures from our trips, a vase we made during our Booze No Baby trip 😉 and more.

I found this guy at a thrift store and he fit perfectly in here too – guess we also have a bull theme going. ?

I added in another art piece from Minted here as well called Curaco. It pulls in a lot of colors from the space and of course continues the traveled feel.
The Closet Interior
Here’s where we really put in some work…

And yes, one closet door edge is black and one is white. Of course, it’s by design. 😉

Leopard Print Rug / Closet System / Black and White Bins / Black Bins / Velvet Coat Hangers
This is just your basic closet system we bought at Home Depot when we moved in about three years ago. It’s nothing fancy, but I feel like we were able to make it fancy (and functional at the same time!) by partnering it with pretty storage bins.
That leopard print rug helps out a little too, doesn’t it? Can you believe that bad boy was only $15?!

The top of our closet system wasn’t really all that functional before. You couldn’t tell, but the shelves didn’t go all the way to the back of the wall. There was a pretty good sized gap between the back wall and the shelf’s back edge. And they also bowed in the middle. We were just so tired of renovating when we finally moved in, we just used a lot of what we had and called it a day. Grunt switched all those out this time around though and they are much more functional now. The green bins hold handbags, seasonal items, work clothes, etc. – things that you don’t need on an everyday basis. That cute little step stool makes it easy for us folks with short girl problems to get to the top shelf. 😉

Isn’t it darling? It was a super fun and really easy little makeover I did with a stool I found on clearance at Home Goods – tutorial for it is here!

Black and White Bins / Tassel Trim on Bins / Black Bins / Black Velvet Coathangers
I did do the one thing I had said I wouldn’t do – switch out my coat hangers. I am so glad I did though, y’all. These take up less space and they truly do keep those slippy sliding tops on the hangers. Switching out the coat hangers also made me realize how many pieces of clothing I had! I did some serious editing!
Putting the bins in were a game changer for this space. Doing this allowed us to move all the things that were in the chest of drawers in the closet and move that big piece of furniture out that was taking up one corner of the closet.

I dressed up the black and white striped bins with this colorful tassel trim. I just used fabric tape to apply it – easy peasy. The black bins got a simple white tassel. Tassels for everything up in here!
The right side of the closet is my most favorite part about this whole space…

Sconces / Zebra Art / Mirror / Stool
This is one of the times when what I envisioned in my head actually turned out better in reality.

If you read my first post about the plans for this space, I told you that I actually do my makeup in here because surprisingly it has the best lighting in our house for that. Previously though, I would be sitting in the floor in front of the mirror on the back of the closet door putting my makeup on. Not anymore though! Now I’m sitting getting pretty at this dressing table.
This wall mounted table was a really easy build (tutorial for it is HERE!) and the front even drops down to reveal storage inside. The Circus had a ball organizing all my makeup into the containers, although she was upset I wasn’t ready to let go of more and give it to her.
Both the gorgeous stool and mirror are from Southern Enterprises. You can find the stool at Home Depot and the mirror at Overstock.

I was going for a bit of a Studio 54 vibe in this area of the closet. Y’all know I’m enthralled with all that. The stool, mirror and sconces all help to create that and when I’m getting gussied up now, I can easily channel my inner Jerry Hall or Divine – depending on what the day calls for of course.

When the sconces are lit up, I can really feel the disco vibe coming on. 🙂 They are from the Mitzi collection at Hudson Valley lighting and I love everything about them. They are plug-in, so no hard wiring required. I didn’t want the cords just flopping along the wall though so I customized some cord channels to keep them in place while adding a little color at the same time.

Zebra Art / Brass Brackets / Single Clip Hangers / Stool
My jewelry and hats had previously been on top of the chest of drawers. Since we moved that out, I had to come up with new storage solutions for both.
For the bracelet and necklace storage, I used acrylic rods anchored on brass posts that were leftovers from my curtain rods and stair rail.
For my hats, I took these brass brackets, installed them upside down, then hung the hats from these single clip hangers onto the brackets.
I love both the jewelry and hat storage solutions because now I can see everything that I have right in front of me – no digging for what I’m looking for! To top it off, I added in this Zebra art above it all. I’ve been eyeing that art for years and finally decided this was the space to put it.

Stackable Shoe Shelves / Brass Hooks
Opposite “my” side of the closet is our area for shoe storage and Grunt’s nook. He gets a nook, I get a side. Seems fair, right?
As I told you in the progress post, I had a grand idea for elaborate shoe shelves in this area and as it turns out, DIY wasn’t the way to go there. We ended up buying readymade shoe shelves and stacking them on top of one another. They actually ended up giving us more shoe storage than we would have had with my not so brilliant idea and it was much easier as well. Sometimes, it is just easier and more effective to not DIY!

Not Just a Number Art / Brass Wall Hooks
Halfway through this makeover Grunt asked for a bench or stool of his own to sit down and put on his shoes. I told him sure, but don’t count on it before this whole thing is done. Mama had a list a mile long to get through! On Sunday, he mentioned the stool again. I went and got this one I had bought at a thrift store a couple years back and handed it to him. I told him I thought I had some leftover cowhide print fabric in my closet. He took it upon himself to find the fabric and reupholster the seat himself. I don’t know if I’ve ever been more proud of him in my life. haha! He had already picked out the Not Just a Number art from Minted, so it fit perfectly over the stool. I bought quite a few of the brass wall hooks to add in throughout the closet as needed. These work perfectly in his space to hang his clothes for the next day and other odds and ends.
That’s it for me! What do you think of the new space?
A big thank you to Hudson Valley who supplied the lighting for the Choose Your Own Adventure Refresh and Minted who supplied the art.

A special thanks also to SEI who provided me with the mirror and stool for this space.

Be sure to see what everyone else did during the Choose Your Own Adventure Refresh…

Jeweled Interiors | Haneen’s Haven | Dimples and Tangles | PMQ for Two | House Homemade | Pencil Shavings | Our Fifth House | Kaleidoscope Living | The Pink Clutch | At Charlotte’s House | Effortless Style Blog
Join the Freak Show on Social Media:
Tasha says
I love it, Jenna! OMG, the makeup and jewelry area is perfection. And that tassel stool?! I can’t handle it. So good!
Jenna says
Thanks, Tasha! I couldn’t get enough tassels in here! haha!
Paula says
I love your use of ready made, DYI. And of course Jennafied! It’s perfect and functional. Thanks for sharing
Jenna says
Thank you, Paula! And Jennafied – haha! It’s funny because when I brought out those tassels and asked Grunt what he thought – his first comment was “That’s very Jenna!”
Marty says
Oh my word, I love it. Love that gorgeous primping station you added with the mirror and perfect little stool. Great job and Grunt did a fabulous job too.
Jenna says
Thanks, Marty! I love the primping station too – it makes me want to get primped up more! hahaha! And he did – I was so proud of him!
Lynn O’Brien says
WOW! Unbelievably gorgeous and functional! ????
Jenna says
Thanks so much, Lynn!! I’m so happy with it!
Dewena says
Stunning! I don’t think I’ve seen a closet where I would choose to leave the doors open all the time but I would with yours. It’s like a piece of art on the wall of your beautiful bedroom.
My daughter has tried to tell me for years that those velvet hangers would be the best investment I could make and now that we’ve downsized to a small house I’m ready to listen to her, and you.
Jenna says
Oh wow! Thanks so much for such a nice compliment, Dewena! I love looking at this space and seeing how far it’s come. It’s pretty, but it’s so much more functional for us now too! Those velvet hangers really are a game changer – I’m so glad I got them!
Laura says
I love your ideas and style!Any information on the green velvet storage totes?
Jenna says
Thanks! You can find those totes here: https://www.athome.com/grn-rnd-velv-bskt-w-gmt-hndl-m/124246752.html#q=green+bins&start=1
Laura says
I love your ideas and style!Any information on the green velvet storage totes?
Jenna says
Thanks, Laura! Those are from At Home: https://www.athome.com/grn-rnd-velv-bskt-w-gmt-hndl-m/124246752.html#q=green+bins&start=1
Laura says
Ps- I was looking forward to seeing how you added that groovy green fabric onto sides of shoe storage (as I have same desire). Will that be upcoming?
Jenna says
So the fabric didn’t make it here in time. 🙁 For now, I’m going to just leave it off and live with it. I think I really like how it all turned out sans the fabric, but we’ll see!
Leigh Anne says
Love it all!! You did a great job. Do you have a link for the green baskets up top? I may have missed it in the post.
Jenna says
Thanks, Leigh Anne! Sorry – forgot to add that one! They are from At Home: https://www.athome.com/grn-rnd-velv-bskt-w-gmt-hndl-m/124246752.html#q=green+bins&start=1
Regina says
It is so pretty! Love those tasseled bins and the green bins! And those sconces!!
Jenna says
Thank you, Regina! Those are a couple of my favorite things here too!
Susan the Farm Quilter says
Love how your closet turned out!! I actually think it qualifies as a dressing room now!! Go in with just your birthday suit on and come out ready for the red carpet!!!!
Jenna says
hahahaha!!! Now if only I had red carpet events to attend!!
Jewel says
That mirror, the art, and the sconces are AWESOME!!!! Did you know my friend designed your Zebra art? She also designed my terrazzo sofa fabric for the ORC.
Jenna says
Thanks, Jewel – my favorite pieces of this space too! And no, I didn’t know she designed that!! It’s one of my favorite prints – I’ve been eyeing forever and was so glad I finally found a space for it!
Rachel Shingleton says
Fun fact: I grew up in a house that had that green carpet all the way throughout. My parents’ entire house was emerald green and cobalt blue! Made me smile when I saw your wall. 🙂
Jenna says
hahaha!! That sounds like a pretty cool house!!
Tammy says
LOVE. Love love love love love. Hard to pick a favorite, but those acrylic rods are perfection, especially knowing they were leftovers! You made it adorable but kept is so incredibly functional, and that is not always easy.Well done!
Jenna says
Thank you, Tammy! Those rods are SO great for jewelry storage! Yep, I couldn’t let them go in the trash – I’ve been hanging onto them for a couple years now. I still have one or two on standby! haha!
Linda F. says
Wow. I’m blown away by this “refresh”. Looks like way more work than 3 weeks worth! Found your site through this challenge, and I love that you put a lot of your own elbow-grease into it. Your style is far from my love of neutrals and “safe” decor, but I’m interested, intrigued,and very entertained. I love it! Great job.
Jenna says
Thanks so very much, Linda! There was most definitely some elbow grease used in the making of this space! haha!!
Charlotte Smith says
So I know it was already there but the carpet wall is amazing and I love it! I’m also a big big fan of your hat hanging system… seems better than shoved in a drawer like my system. 😉 Awesome makeover!
Jenna says
hahaha! Yep, I love my carpet wall too! I am so glad I did that with my hats – makes finding what I want so much easier!
Shirley says
Wow Jenna – how fabulous! So organised- I love your dressing table & lights & the cowhide stool. Great job.
Jenna says
Thanks, Shirley! Those are some of my favorite things about the space too!!
Erin says
Love it and I can’t wait to see the tutorial on the little step stool.
Jenna says
Thanks, Erin! It’s coming – it was pretty easy, but with big impact! 🙂 The best kind of projects!
Stephanie S says
Fabulous..Another fun winner. So nice and big or feels that way. I have got to do something now in mine. My spouse has so many sweatshirts and tshirts. I want to hide them. Shoes would be nice to get off floor.
Great job.
Jenna says
Thanks, Stephanie! It does feel bigger! Getting those bins for some of our clothes was a game changer. I had quite a few too many sweats and t-shirts myself and it forced me to condense each “clothes category” so to speak down to one bin! Felt good to get rid of some of it!
Betty says
Looks great Jenna. Have a great weekend.
Jenna says
Thank you, Betty!
Carmel says
Love the dressing area with those sconces! And the cord covers are so awesome!
Jenna says
Thanks, Carmel! Me too – that’s my favorite part of the whole space!
Kaycee says
You guys created a great looking, and super functional closet! I love your “glamy” dressing/makeup area as well as the masculine side for your husband. He did a great job with the cow print stool too!!
Jenna says
Thanks, Kaycee! I love the two different areas too – nice to have a little something especially for each of us!
Ariel says
Giiiiirl this is fabulous! I love the his and hers corners, and how you solved your storage issues with fringed baskets. So clever!
Jenna says
Thanks, Ariel!! I love that we each have our own space as well!
Laura says
I’ve really enjoyed your ideas and style! My mom had that 3 eyes print in her room growing up…
Dying to know where the green and gold bins are from! Also, would love to see use of that groovy green, palm-like fabric
Sharon H says
Oh, Lordy Lordy! I’m loving every inch of that space! But I knew I would, because I knew you wouldn’t disappoint! I have a heifer on a hall wall adjoining my great room, so I think your bulls and cowhide are pretty cool. Love your jewelry and hat hangers….going to share this with my daughter and granddaughter as they could use a little help in that department. Good job, Jenna! Better watch out though, as Grunt might make a run for your DIY title.
Jenna says
Thanks, Sharon! We do love a good piece of cattle art around here! 😉 That hat and jewelry storage is one of the best things I’ve done – makes finding those pieces so much easier, gets them up off valuable surface area and it was easy!!
Jenny says
The closet space is great and so functional. Using bins a closet works so well. Thanks for sharing at Merry Monday.
Jenna says
Thanks, Jenny! Yep, those bins were life changing!
Jennibell says
This is amazing! Love it and what and what a good idea about using curtain rods for your jewelry 🙂
Jenna says
Thanks! Those rods for jewelry storage were a game changer!
Brigitte Baker says
OMGosh, Jenna….. I LOVE IT! It’s beautiful. I love the layout, the colors, the accessories, the vanity, just EVERYTHING! 🙂 What an awesome job!
I think you asked in your first post about the back of the cabinet next to the closet (and oh, the table restyle, SO CUTE. Sigh…Cafe du Mond, how do I love thee?!), what about the fiddle leaf wallpaper? Or there’s a piece of art in your bedroom with leaves on it…..palm tree or something? I can’t remember right now, but that would be cute, too! 🙂
Jenna says
Thanks, Brigitte! Yep, I was going to put some fiddle leaf wallpaper along one side of the shoe shelves and possibly on one wall. But, it wasn’t going to get here on time. Then, I was going to use fabric to do it, but it didn’t get here on time either! haha! Just my luck! I ended up ditching that plan and I’m good with that – I like how it turned out as is!