This one will be as short and sweet as possible, friends. The flu has struck our house and its first victim is me.
I love marble. Have I told you that before? I mean, I’m sure its apparent by looking at my bathroom.
I also love little side tables that can be moved around as needed to hold drinks and what not.
And I love a classic black – paired with gold.
The three loves combined in this DIY Marble Top Table.

Disclosure: This post was a collaboration with Velvet Finishes. All opinions and love of black, gold, and marble are 100% mine. This post contains affiliate links for your shopping convenience. Click here to read my full disclosure policy.
I came up with this idea, but I have to give Grunt Labor credit for building it. Preschool is out until after the first of the year, so while I chased the kid, he worked on the table. Thanks, Grunt.
How to Build a Marble Top Table
Supplies & Tools Needed:
- 1 marble tile (Mine was leftover from my bathroom reno, but they still have it at Home Depot)
- 2 square balusters
- 12 x 12 piece of MDF
- 1 x 3 wood – 8 ft piece
- Finish Nails
- Nail Gun (that’s what we used, but you may be able to just use a hammer and nails)
- Wood Glue
- Circular Saw and/or Miter Saw
- 4 – 2 1/2 inch L brackets
- Caning or something else for the bottom
- Velvet Finishes Luxurious Paint
Steps
Step 1:
Trace out the tile on the MDF.

Cut out the traced piece with a circular saw.

Ignore that other square. We were going to use it for the bottom, but it didn’t work out.
Step 2:
Cut the ends off the square balusters and then cut both in half – approximately 20 inches long and set aside.

Step 3:
Frame the tile with the 1 x 3s and cut as needed to fit the tile.
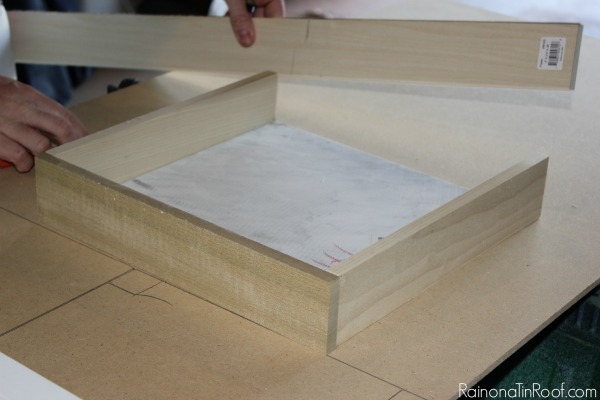
Put wood glue on the ends, then use your nail gun to nail the frame together on the edges. Be sure not to nail where the tile is.

Step 4:
Place the cut MDF piece on top of the tile, but still within the frame you just nailed together. Take the balusters and place one in each corner. Nail them to the frame of 1 x 3s.

Step 5:
At this point lift the spindles and frame (they should be nailed together) off the MDF and tile, and flip it over. Set the the MDF and tile aside.
Cut 4 more pieces of 1 x 3 to create a square around the base of your table. Nail these pieces to the balusters at the bottom.

Step 6:
Take your cut MDF square and place it in the top of the frame. Nail it down in the corners onto the spindles.

Sit your marble inside the top frame. You can glue it down with something like Elmer’s Advanced, but I opted to just sit mine in there in case I ever want to change it out.
Step 7:
Paint it, baby!
So, I really really really wanted to paint this piece with Velvet Finishes Glamorous, but when I got it on the table, it just didn’t work with the marble.
Instead, I opted to go with a classic never-fail black, Velvet Finishes Luxurious.

I just slapped it on with a regular paintbrush and it only took two coats – even on the raw 1 x 3s. That kind of shocked me, because raw wood usually just soaks up paint and it takes coat after coat after coat if you don’t prime it. No priming here though and still only two coats. Holla.
Step 8:
For the bottom, I cut some leftover caning to size, spray painted it gold, then secured it down with 4 L brackets.

I love the classic combination of black and gold – it never fails me and it can work with just about any decor.

Another thing I noticed with this paint is that even though I used a brush to put it on, there were no brush strokes.
Cheers to the new year, friends – and black & gold marble tables!
Looking for more easy DIY builds?
DIY Modern Rustic Bookshelf – customize in any color you like!
DIY Chippendale Desk – probably my most favorite build of all time, and an easy one too!
DIY Clothes Rack – an easy build and perfect for extra clothes storage or selling clothes at yard sales!
You know you don’t wanna miss any of this crazy.
Sign up to get my posts delivered to your inbox here.
Stalk Me Here:
Pinterest / Facebook / Twitter / Instagram

Kellie Smith says
Wow Jenna! What a great project! This table is da bomb!! Hope you feel better soon, this flu mess is taking everybody down! Ugh!! xx
Jenna @ Rain on a Tin Roof says
Thanks, Kellie!
Kelly says
Great way to get a bang for your buck! Happy New Year. xo
Jenna @ Rain on a Tin Roof says
Thank you, Kelly!
Emily @ Two Purple Couches says
This turned out gorgeous; I love the black, gold & marble look! Fantastic job, Jenna! Hope you’re feeling better soon 🙂
Jenna @ Rain on a Tin Roof says
Thanks so much, Emily!
Laura @ Inspiration for Moms says
That’s a very cool project you made there! Love the Velvet Finish!
Jenna @ Rain on a Tin Roof says
Thanks, Laura!
Krista @ the happy housie says
So adorable Jenna! You could do this so many different ways… but the marble gold and black looks beautiful. what a great idea… happy new year!
Jenna @ Rain on a Tin Roof says
Thanks, Krista!
Dad says
Honey, Get well soon! Happy New Year! Love You. Dad.
Claire @ A Little Claireification says
What an awesome project!! And I adore that caning on the bottom. Pinned! xo
Jenna @ Rain on a Tin Roof says
Thanks, Claire! I love that touch of caning too!
Tracey A. says
Jenna
You are quite the trooper, posting when you should be sleeping! SLEEP! You will be feeling much better with a little home cooked chicken soup and SLEEP! Hopefully someone can cook you some…not out of the can!
Tracey
Jenna @ Rain on a Tin Roof says
You are too sweet, Tracey! I know. I should have been sleeping!! Luckily, I’m back to normal for the most part! And I did eat some chicken soup….but it was from a can…. 🙁
chris aka monkey says
this table is awesome grunt did a nice job and i love the marble and caning looks fabulous… jenna this flu is a whopper maybe a trip to doc for tamiflu, stay hydrated and not with cheap beer wink wink and rest rest rest also watch your temp this flu is jacking it up feel better xx
Jenna @ Rain on a Tin Roof says
Chris, its was such a whopper!! Both the kid and Grunt got it as well. Luckily, I’m good now, the kid is too, but we are still nursing Grunt back to health! Thank you!
Liz says
Love the table. I sooo wanna try the Velvet Finishes paint as much as you rave about it. Unfortunately no one sells it around here. I may have to breakdown and pay shipping. Hope you feel better soon I got the flu for New Years too. Yuck.
Jenna @ Rain on a Tin Roof says
Yep, Liz, there aren’t many retailer locations! I’m sorry! It really is awesome paint though!! Happy New Year!!
Jamie says
Wow, that’s incredible, girl! You always have the best ideas!!
Hugs, Jamie
Jenna @ Rain on a Tin Roof says
Thank you, Jamie!
Chelsea says
wow, Jenna!! I love marble too -this is a beauty for sure!
Jenna @ Rain on a Tin Roof says
Thanks so much, Chelsea!
April Hoff says
Very pretty and practical! I love the three finishes combined too!
Jenna @ Rain on a Tin Roof says
Thank you so much, April! I love that combination too!
Marty@A Stroll Thru Life says
Love this little table. What a great project.
Jenna @ Rain on a Tin Roof says
Thank you, Marty!
Sarah @ Life On Virginia Street says
Very cool! And I love that you built the whole thing from scratch!!
Jenna @ Rain on a Tin Roof says
Thank you, Sarah!
Amanda @ Dwelling in Happiness says
So pretty! I love the combination of marble, black and gold. It all comes together just perfectly!!
Jenna @ Rain on a Tin Roof says
Thank you, Amanda! I love that combo too!
Anna says
Hey Jenna! I am totally digging this! Would you mind if I included it in a round up and used one of your photos? (unedited of course!) Let me know <3
Jenna says
That’s totally fine with me as long as it’s one photo and a link back! Thanks, Anna!