Tag: velvet finishes

  • DIY Ottoman Coffee Table

    DIY Ottoman Coffee Table

    This post is sponsored by Velvet Finishes and Boho Luxe Home provided the fabric for this project. All opinions are 100% mine. Affiliate links included in this post. 

    This project isn’t anything groundbreaking. If you’ve ventured on Pinterest anytime since it’s invention, then I’m sure you’ve seen a few versions of how to turn a coffee table into an ottoman – this one is just my take on it.

    I found this little table at a thrift store and in all honesty probably fell in love with the caster wheels more than anything. I had high hopes I could clean them up.

    Take an old coffee table and turn it into an ottoman type coffee table.

    The biggest problem with this piece was the top of it. Most of the top except just around the edges had one of those faux leather inlays and it was in rough condition. Fixing that problem was what led to my idea of putting an upholstered cushion on the top of the table to make it an ottoman coffee table – and it can also serve as extra seating.

    How to Make an Ottoman Out of An Old Coffee Table - easy DIY project for your living room.

    DIY Ottoman Coffee Table

    Supplies & Tools Needed:

    Steps

    Step 1

    If the coffee table you are using is dirty or has shiny finish, you’ll want to clean it up and degloss it first. I also removed those metal accent pieces from the table at this time as well. I just felt those dated it a bit too much and they would have been a huge pain to paint around. To remove those, I just cut them with pliers in a couple of places and then they just pulled right out.

    Take an old coffee table and turn it into an ottoman type coffee table.

    Mine was’t too terribly shiny, but it was very gross. I used Ready to both clean and degloss at the same time.

    Ready: A spray primer that both cleans and deglosses.

    Ready is by far one of my most favorite furniture painting products because it’s such an easy deglosser and cleaner to use. You just spray it on, let it sit a minute or two, then wipe it clean with a paper towel.

    Ready: A spray primer that both cleans and deglosses - just wipe off with a paper towel.

    Gross, right? And that paper towel was just from around the top edges of the coffee table.

    If you don’t have a shiny finish on your piece and you plan on using Velvet Finishes paint for your project, then you can skip the Ready as Velvet Finishes paint already has a primer built-in. You just have to use the Ready when your piece is glossy to begin with or when you want to clean it first.

    Wipe down your table with a tack cloth before moving on to make sure you remove any bits of dirt or dust left on it.

    Step 2

    After you’ve cleaned and deglossed your piece if needed, you can start painting.

    Velvet Finishes Tranquil - a deep teal blue hue.

    I opted to go with Velvet Finishes Tranquil for this piece. The blue hue worked well with all the different colors in the upholstery fabric. Since it’s not too bright of a blue, I think it also helped to anchor the piece with all the pattern that was going on in the material. Tranquil is one of my most favorite Velvet Finishes colors because there isn’t much it doesn’t pair great with.

    I just brushed it right on with a paintbrush and gave the whole piece two coats.

    Sidenote: This is the second project I’ve got out of that one container of Tranquil and there’s still a good bit left. This stuff covers really well.

    Step 3

    I wanted to add a little more dimension to the table base, rather than it just being a flat color. Since the upholstery was going to be busy, I felt that adding a bit something more to the base would also help to even things out.

    I saw this as my chance to try out a new Velvet Finishes product – their metallic gold Enhance glaze.

    Velvet Finishes Enhance Metallic Glaze

    For the most part, this works just like the regular Velvet Finishes dark glaze, it’s just thicker.

    You’ll want to work in small sections, as this does dry fast. I used a small paintbrush to apply the glaze just along the edges and crevices of the table.

    Velvet Finishes Enhance Metallic Glaze - applying.

    After applying a little glaze to a portion of the table, I came back with a t-shirt scrap and wiped off the excess glaze, while at the same time pushing the glaze into that crevice.

    Velvet Finishes Enhance Metallic Glaze - wiping away a part of it.

    This made it to where the gold really helped to accentuate those lines.

    Step 4

    Because this is a coffee table that can also be used to kick your feet up on or sit on, I wanted to add a little more extra protection to it besides the topcoat that already comes in Velvet Finishes paint.

    Velvet Finishes Protect - added protection for your painted pieces of furniture.

    To do that, I gave the whole piece a coat of Protect. One coat is all you need and you can simply brush it on or use a foam brush if you wish.

    Step 5

    Once you’ve cut your plywood piece down to the size you want your upholstery portion to be, cut a piece of upholstery foam to the size of the plywood. Cover that with batting and then with your upholstery material.

    DIY Ottoman Coffee Table - cut a piece of plywood to size, cover it with foam, batting and upholstery material.

    Flip it over, pull everything tight and staple all along the edges. My plywood piece is about two inches smaller all the way around than my table top. I needed to cover up that old vinyl / leather top so I used that as my guide.

    To attach the upholstered top to the coffee table, I used heavy duty velcro, putting a strip on each side of the cushion/table.

    If you’ve got a solid coffee table that doesn’t have the drawer or openings like mine does, then alternatively, you could get under the table, and use a drill to screw from the bottom of the coffee table up into the plywood cushion top.

    DIY Ottoman Coffee Table - How to add a cushion top to an old coffee table.

    I love how beautifully this piece turned out. It has the perfect punch of pattern and color.

    How to Make an Ottoman Out of An Old Coffee Table - easy DIY project for your living room.

    I was able to clean up the drawer knobs and caster feet with Bar Keeper’s Friend.

    DIY Ottoman Coffee Table - can also double as a bench for extra seating in your living room.

    And that upholstery – I think I fell in love with it even more once it was paired with the Tranquil paint! This is just one of the gorgeous colorful prints that Boho Luxe Home offers!

    Add an upholstered top to a coffee table to create an ottoman or extra seating for your living room.

    And the touch of gold detailing I did with the glaze adds the perfect amount of depth, I think.

    What do you think about this piece?

    You might also want to see…

    FAQ: Painting Furniture

    OMG. I'm in love. French Country Chair Modern Makeover

    French Country Chair Modern Makeover

    Oh my goodness! If you love the beachy washed out look in home decor, then you have to see this! It's so easy! How to Create a Beachy Colored Look with Paint | Beach Decorating | Nautical Decor | Ocean Living | Beach Living | Aqua | Furniture Makeover

    How to Create a Beachy Colored Look with Paint

    Pin This Post

    How to Make an Ottoman Out of An Old Coffee Table - easy DIY project for your living room.

    SaveSave

    SaveSaveSaveSaveSaveSave

    SaveSave

  • Two-Tiered Table Makeover | How to Remove the Top Tier

    Two-Tiered Table Makeover | How to Remove the Top Tier

    This post is sponsored by Velvet Finishes, however all opinions are 100% mine.

    I see these little two-tiered end tables all the time at thrift stores and yard sales. For the most part, I tend to pass them by. Some are pretty nice, but I’ve just never been a big fan of the whole two-tiered aspect of these tables. I know it was hot back in the day, but just not up my alley.

    I don’t know why taking the top tier off though never occurred to me before now.

    I guess I needed to see one of these little guys that had really great lines.

    Two Tiered Table Makeover - How to remove the top tier! Such a great diy furniture makeover idea!

    Like this Mid-Century Modern style one that I happened upon at a local thrift store.

    At first glance, I was like, “Oh man, I wish it wasn’t two-tiered.”

    Then, I thought, “Wait! I bet I can cut that off!”

    So I snatched it up, brought it home and got to work.

    And it was so much easier than I ever thought it would be.

    Two-Tiered Table Makeover | How to Remove the Top Tier

    Tools & Supplies

    Steps

    Step 1

    Flip the table over and look for where the top tier is attached. Using a screwdriver, wrench or your hands, remove the screws or bolts holding the tier on.

    Two Tiered Table Makeover - covering the old holes.

    Mine had four nuts and bolts holding it in place. I was able to just unscrew them with my hands. I also unscrewed the legs of the table just to get those out of the way while I was working on it.

    Step 2

    Find four small pieces of wood that will cover the holes where the screws had been.

    Two Tiered Table Makeover - covering the old holes.

    I had a paint stick on hand so I just cut four small pieces from it.

    Step 3

    Place wood glue around the holes on the underside of the table, then place a small piece of wood over each hole pressing it firmly into place.

    Two Tiered Table Makeover - covering the old holes.

    Let these sit for at least a few hours.

    Step 4

    Flip the table over and fill the holes on top where the tier had once been with wood filler.

    Two Tiered Table Makeover - covering the old holes.

    Since these holes are pretty deep, you’re probably going to have to fill the holes a few times. I found it best to fill the hole, let dry, sand smooth, repeat. I did this about three times before the holes were even with the table.

    Step 5

    Once the wood filler is dry, smooth and even, you’re ready to start prepping and painting.

    Two Tiered Table Makeover - painting supplies.

    This table had a really shiny finish on it. In order for the paint to get the best adhesion, that finish needed to go before applying the paint. To do that, I used Ready.

    Two Tiered Table Makeover - prep it with Ready to remove old shiny finish.

    Ready is a spray primer / deglosser. You just spray it on, let it sit for a few minutes, then wipe it clean with a towel. Ready also cleans away dust at the same time. For this table, I had to do three rounds of Ready to get the shine gone.

    Step 6

    Let the table fully dry and then you’re ready to paint.

    Two Tiered Table Makeover - paint it

    I opted to go with Luxurious for the table top. It’s black, but not a super deep black. I was leaving the legs as they were so I knew black would go well with those stained legs. I did two coats of Luxurious on the table. This Velvet Finishes paint has great coverage – I know this is a small table, but I bet I didn’t use more than 1/2 –  3/4 of a cup of paint.

    Step 7

    After the Luxurious paint was dry, I gave the table a coat of Protect.

    Two Tiered Table Makeover - topcoat.

    Velvet Finishes paint already has a topcoat built-in, but since this little table might see a lot of action as a coffee table, end table, etc., I wanted to go on and give it some added protection. All you need is one coat of Protect and you just brush it right on.

    After the table was dry, I put the legs back on just as they were. They weren’t in too bad of condition and y’all know I love a good paint and stain combination anyway.

    Two Tiered Table Makeover - How to remove the top tier! Such a great diy furniture makeover idea!

    I think removing that top tier makes the table much more functional. It can be a great coffee table for a smaller room, it could still be an end table / side table, or it could even be a bench!

    Two Tiered Table Makeover - How to remove the top tier! Such a great diy furniture makeover idea!

    Sidenote: That Seventies Glamour book is one of my all-time faves. 😉 It has a totally corny cover, but the photos inside are awesome. 

    Two Tiered Table Makeover - How to remove the top tier! Such a great diy furniture makeover idea!

    Two Tiered Table Makeover - How to remove the top tier! Such a great diy furniture makeover idea!

    I won’t be so quick to pass up those little two-tiered tables anymore! What about you?

    You might also want to see…


    How to Turn a Side Table Into a Bench– one of my all time fave hacks!

    Mid-Century Modern Dressing Table Makeover in a Day – such a beauty that still gives a nod to it’s 60’s roots!


    Pin This Post

    Two Tiered Table Makeover - How to remove the top tier! Such a great diy furniture makeover idea!

    SaveSave

  • Mid-Century Modern Dressing Table Makeover

    Mid-Century Modern Dressing Table Makeover

    This post is sponsored by Velvet Finishes, however all opinions are 100% mine. Affiliate links may be included in this post, which means if you purchase something through one of those links, I may earn a small commission, but you won’t pay a dime more.

    This project is the kind of project that keeps me going sometimes. It’s just another furniture makeover. Nothing groundbreaking. Nothing phenomenal. I won’t be able to fill up my retirement account with it.

    But this little mid-century modern dressing table makeover made me feel a little bit better about the past few weeks I’ve been having.

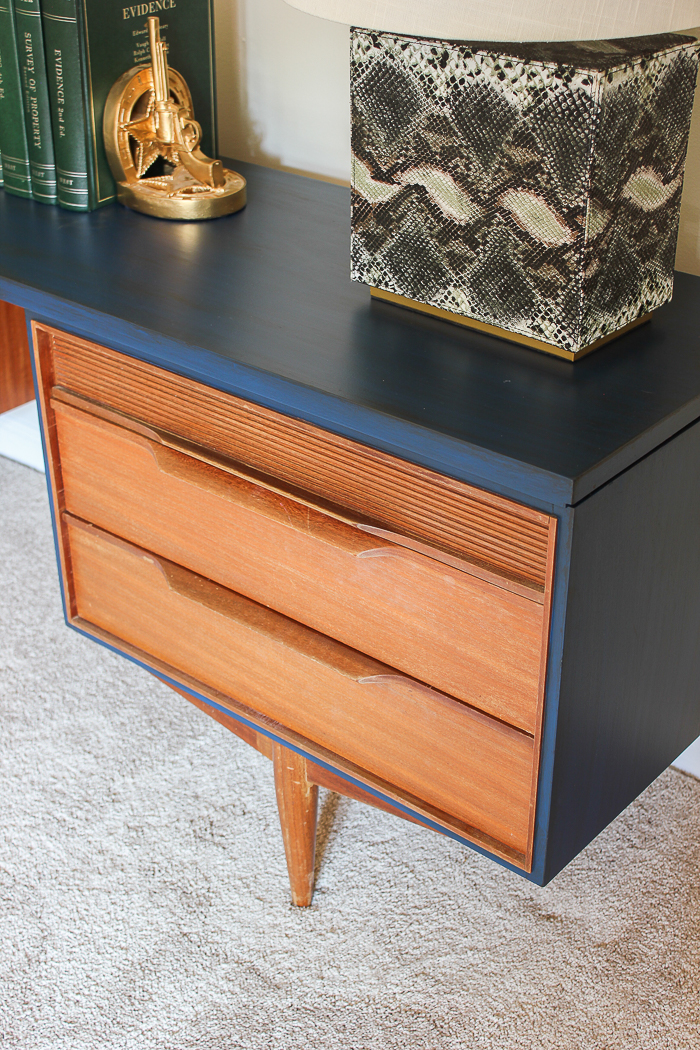
    Mid-Century Modern Dressing Table Makeover - a painted and stained furniture makeover combination with Velvet Finishes.

    About four out of five projects I’ve had on my to-do list either didn’t happen, didn’t go as planned at all or just flat out went up in smoke.

    And then this little piece came along and renewed my hope in my DIY self.

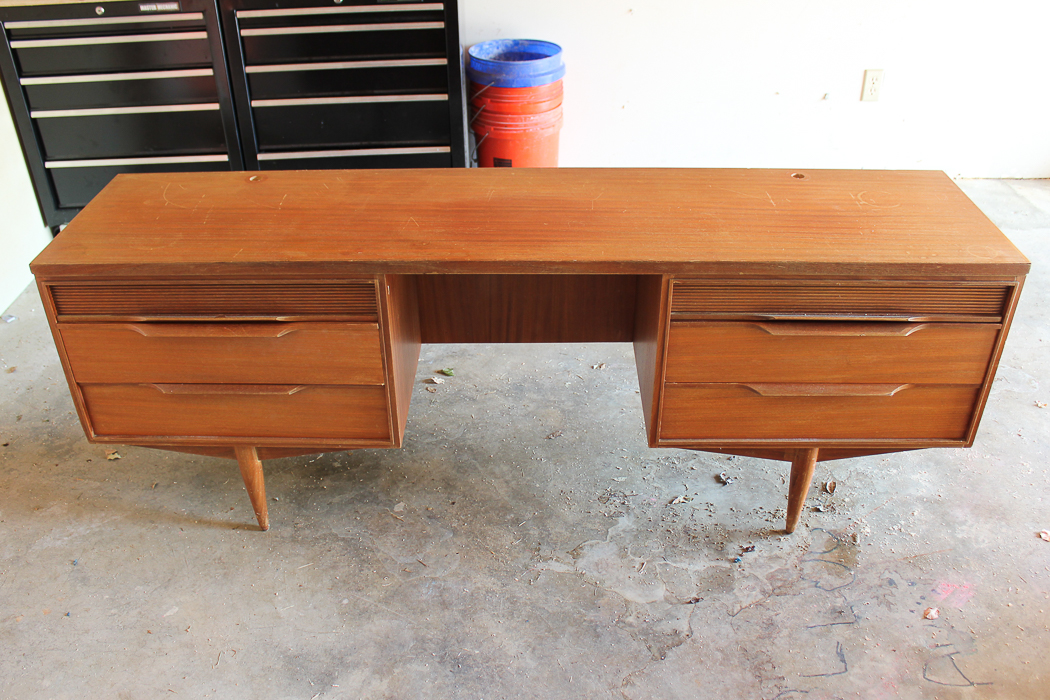
    I started with this…

    Before: Mid-Century Modern Dressing Table Makeover - a painted and stained furniture makeover combination with Velvet Finishes.

    I’ve had this piece for a while and found her at a rummage sale. Judging from the holes on top of her and space in the middle, I think she was once a beautiful mid-century modern dressing table with a mirror across her top.

    Now, I’m not usually one to paint wood that’s in good condition. The funny thing about this piece was that her top and sides were in really rough condition, lots of nicks, scratches and of course, those holes on top where a mirror once was, but the drawers were in excellent condition. Oh, the glorious drawers – aren’t the details on them just beautiful!

    So I thought about it for a while and knowing that I really didn’t want to cover up those drawers with paint that were in great condition, I instead opted to just paint the top and sides of this piece and leave the drawers untouched.

    And it turned out perfectly – went off without a hitch – in just a day.

    See how my faith was restored now?

    Mid-Century Modern Dressing Table Makeover

    Tools & Supplies

    Mid-Century Modern Dressing Table Makeover - a painted and stained furniture makeover combination with Velvet Finishes.

    I used:

    Steps

    Step 1

    First, I filled those holes on top of the table and fixed any deep scratches, dents and dings that were there as well. I used wood filler and sandpaper to smooth it out. There’s a tutorial here for how to fill holes.

    Step 2

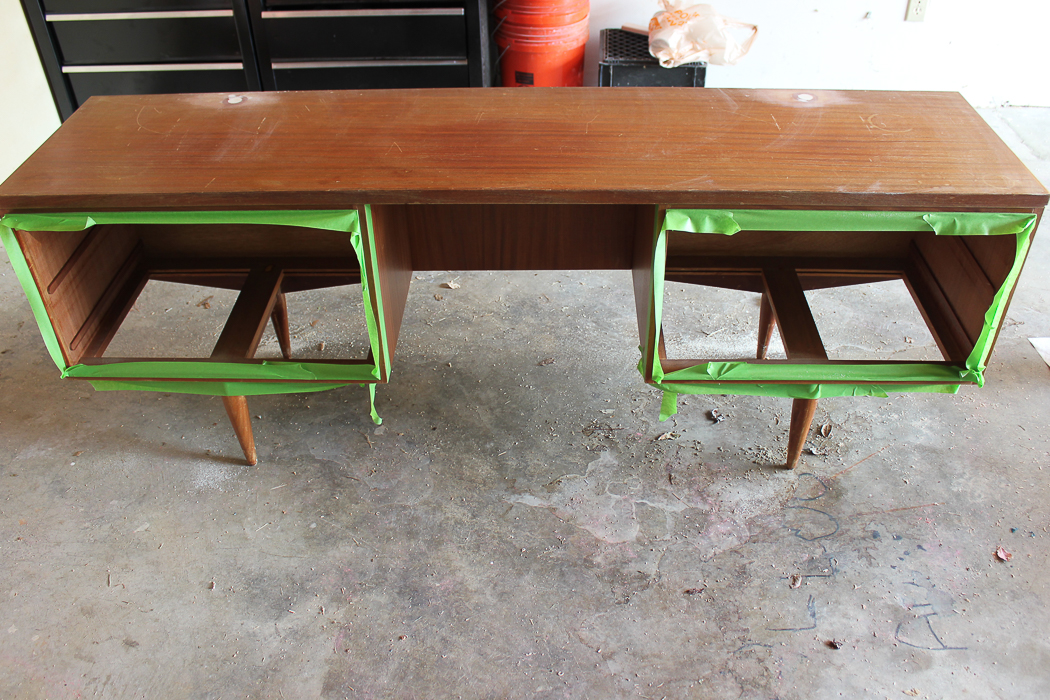
    Next, I removed the drawers and taped off around the edges of the trim that went around those – I wanted to keep that part stained as well.

    Mid-Century Modern Dressing Table Makeover - a painted and stained furniture makeover combination with Velvet Finishes.

    Basically, I just wanted to paint the exterior frame of the table. I also ran FrogTape along the upper part of the legs to make sure I didn’t accidentally get paint on them.

    Step 3

    This piece had a bit of shiny topcoat left on it where I was planning to paint, so I needed to remove that in order to get my paint to adhere well to the surface there. To do this, I used Ready.

    Mid-Century Modern Dressing Table Makeover - a painted and stained furniture makeover combination with Velvet Finishes.

    I just sprayed it on the top and sides of the table, let it sit for a few minutes, then wiped it down with a clean cloth. This removes the shine and cleans at the same time. I was careful not to get the Ready on any part that wasn’t getting painted though.

    Step 4

    After that, I gave the piece two coats of Velvet Finishes Handsome, which is a perfect navy color.

    Mid-Century Modern Dressing Table Makeover - a painted and stained furniture makeover combination with Velvet Finishes.

    I just brushed the color right onto the piece with one of the Reviver series paint brushes. Paint glides on really smoothly with these brushes.

    Step 5

    Since stained wood has so many different variations in its finish, I didn’t want a stark contrast between the navy painted top and sides and the stained drawers on this piece. So to add more dimension to the painted portions, I applied Enhance Dark Glaze to the painted portions after the paint had dried.

    Mid-Century Modern Dressing Table Makeover - a painted and stained furniture makeover combination with Velvet Finishes.

    The glaze is really simple to apply.

    Mid-Century Modern Dressing Table Makeover - a painted and stained furniture makeover combination with Velvet Finishes.

    You just brush it on, let it sit for a minute or two, then gently wipe the excess away.

    Mid-Century Modern Dressing Table Makeover - a painted and stained furniture makeover combination with Velvet Finishes.

    You want to wipe it away very lightly. I ended up doing two rounds of the Enhance glaze to get the look I wanted.

    Mid-Century Modern Dressing Table Makeover - a painted and stained furniture makeover combination with Velvet Finishes.

    Similar Gun Bookends

    Enhance Glaze also works as a topcoat, so even though Velvet Finishes paint already has a topcoat built-in, this piece will have even more added protection. Isn’t the depth the glaze added gorgeous? I love it with the Handsome paint.

    Mid-Century Modern Dressing Table Makeover - a painted and stained furniture makeover combination with Velvet Finishes.

    Similar Snakeskin Lamp

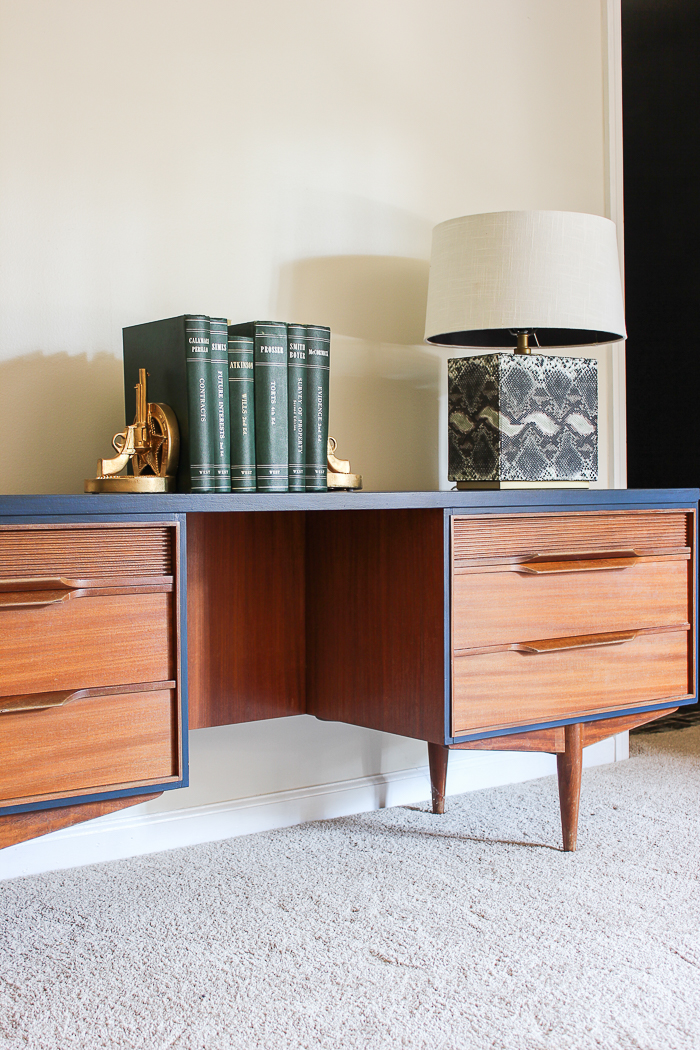
    I think this piece would make a great media console.

    Mid-Century Modern Dressing Table Makeover - a painted and stained furniture makeover combination with Velvet Finishes.

    Similar Snakeskin Lamp / Similar Gun Bookends

    Cheers to a project finally going off without a hitch, friends!

    You might also want to see…

    How to Turn a Side Table into a Bench

    How to Make Furniture Glaze in Any Color

    Pin This Post

    Mid-Century Modern Dressing Table Makeover - a painted and stained furniture makeover combination with Velvet Finishes.

    SaveSaveSaveSaveSaveSave

    SaveSaveSaveSave

    SaveSave

    SaveSaveSaveSave

    SaveSaveSaveSave

  • How to Create a Beachy Colored Look with Paint + Video

    How to Create a Beachy Colored Look with Paint + Video

    Disclosure: This post was a partnership with Velvet Finishes. However, all opinions and negligence of trying out the colored stain sooner are 100% mine.

    Last year, I figured out a way to make furniture glazes in any color. When I did that, I had just tried out different colors on spare pieces of trim I had lying around. I always intended to go back and makeover an actual piece of furniture using the method.

    But then life happened. #bestofintentions

    A few weeks back, as I was clearing stuff off the front porch at our-previous-house-soon-to-be-the-inlaws-house, (don’t judge me that we still haven’t gotten all of our stuff out of there, ok?) I picked up an old table and was about to toss it.

    How to Create a Beachy Colored Look with Paint: The Table Before

    But then I realized that this table would be the perfect candidate to try out my colored glaze on.

    Yes, this table had been sitting on my porch for the past year and never once did this idea pop into my head before. #smh

    So I finally tried out my colored glaze on that table.

    Oh my goodness! If you love the beachy washed out look in home decor, then you have to see this! It's so easy! How to Create a Beachy Colored Look with Paint | Beach Decorating | Nautical Decor | Ocean Living | Beach Living | Aqua | Furniture Makeover

    And I ended up with this really cool beachy colored look.

    How to Create a Beachy Colored Cook with Paint

    Affiliate links may be contained in this post.

    Tools & Supplies
    Oh my goodness! If you love the beachy washed out look in home decor, then you have to see this! It's so easy! How to Create a Beachy Colored Look with Paint | Beach Decorating | Nautical Decor | Ocean Living | Beach Living | Aqua | Furniture Makeover
    Steps

    **Psst – there’s a video toward the end of this post you can view that has these steps as well. Just don’t judge my very elementary video skills. 

    Step 1. 

    First, you’ll want to make sure the surface you are painting is clean. I did this with Velvet Finishes Ready. Ready will clean your furniture and de-gloss it at the same time, which means you don’t have to worry about using a primer or sanding before you paint. Simply spray it on the table, let it sit for a minute or two, then wipe it down with paper towels.

    Step 2. 

    To achieve the beachy colored look, you want a base color of white on your piece before you add on the colored glaze.

    Oh my goodness! If you love the beachy washed out look in home decor, then you have to see this! It's so easy! How to Create a Beachy Colored Look with Paint | Beach Decorating | Nautical Decor | Ocean Living | Beach Living | Aqua | Furniture Makeover

    I gave the table two coats of Minimalistic, a true white, before layering on the glaze.

    Step 3. 

    After the Minimalistic was good and dry, I made the colored glaze.

    Oh my goodness! If you love the beachy washed out look in home decor, then you have to see this! It's so easy! How to Create a Beachy Colored Look with Paint | Beach Decorating | Nautical Decor | Ocean Living | Beach Living | Aqua | Furniture Makeover

    To make the glaze, I used Velvet Finishes Boheme and Enhance Clear Glaze. All you do is mix a little bit of glaze with a little bit of paint.

    Oh my goodness! If you love the beachy washed out look in home decor, then you have to see this! It's so easy! How to Create a Beachy Colored Look with Paint | Beach Decorating | Nautical Decor | Ocean Living | Beach Living | Aqua | Furniture Makeover

    I do this in a plastic cup so I can just throw it away when I’m done rather than having to clean out a paint tray. #lazygirl You’ll want a little more of the clear glaze than the paint. The consistency should be watery. You can see how little is in that cup in the photo above – you won’t need to mix up much at all. This stuff goes a long way. Once more, you can watch the video below to see it in action. This is something where you may have to go back and add a little more glaze or a little more paint to the mixture. You really can’t mess it up though.

    Step 4. 

    With a paintbrush, apply the colored glaze to your surface.

    Oh my goodness! If you love the beachy washed out look in home decor, then you have to see this! It's so easy! How to Create a Beachy Colored Look with Paint | Beach Decorating | Nautical Decor | Ocean Living | Beach Living | Aqua | Furniture Makeover
    Just put a little on your brush – you don’t need much at all – and brush it back and forth just like you would with paint. If your glaze is too dark or too colored to your liking, use a lint free cloth to wipe away some of the glaze, but be sure to do so before it dries. With this table, I started by wiping up some of the glaze as I went, but decided I actually liked it better with the glaze as-is on the table, so I just brushed it on the entire table and let it dry.

    Here’s the video if you want to see it all in action:

    [adthrive-in-post-video-player video-id=”EyicUR72″ upload-date=”Fri Jul 22 2016 19:16:29 GMT+0000 (Coordinated Universal Time)” name=”Rain On A Tin Roof – How To Create A Beachy Look With Paint” description=”Learn how to create a beachy colored look with paint! Use any color you want!”]

    Stellar video skillz, no? #icrackmyselfup

    After the table dried, I was left with this cool beachy vibe on it.

    Oh my goodness! If you love the beachy washed out look in home decor, then you have to see this! It's so easy! How to Create a Beachy Colored Look with Paint | Beach Decorating | Nautical Decor | Ocean Living | Beach Living | Aqua | Furniture Makeover

    So of course, I threw the Circus’ swimsuit, sunglasses and beach hat on top of the table for photos. Because really, who can deny how cute a little girl’s swimsuit is? 

    Oh my goodness! If you love the beachy washed out look in home decor, then you have to see this! It's so easy! How to Create a Beachy Colored Look with Paint | Beach Decorating | Nautical Decor | Ocean Living | Beach Living | Aqua | Furniture Makeover

    What do you think of the beachy colored look? Any colors you think would work great for mixing up your own colored glazes?

    Liked that? Then see this…

    DIY Bright Colored Wood Stains – wood grain, beware!

    How to Make Furniture Glaze in Any Color – your makeovers will never be the same!

    Polka Dot Chair Makeover – everything is better with polka dots, right?

    blog-signature-summer-15
    pin-this-post-2
    How to Get a Beachy Look with Paint | DIY Beachy Decor | Furniture Glaze Recipe | Furniture Makeover Ideas | Furniture Glaze Technique

    Disclosure: This post was a partnership with Velvet Finishes. However, all opinions and negligence of trying out the colored stain sooner are 100% mine.

    SaveSaveSaveSave

  • How to Paint a Plaid Pattern for Lazy Gals

    How to Paint a Plaid Pattern for Lazy Gals

    This post is sponsored by Velvet Finishes, however all opinions are 100% mine. 

    You guys. You guys. You guys.

    No. Really. You guys.

    I did something.

    I did something I wasn’t sure I could do at all. I was sure it would be an utter failure. I held my breath with each brushstroke and removal of FrogTape.

    But it wasn’t a failure.

    It. Was. A. WIN.

    That table is PAINTED - she PAINTED on that plaid pattern and it actually looks really easy. She even tells you how to do it without having to measure anything! How To Paint a Plaid Pattern | Furniture Makeovers | Furniture Painting | DIY Projects | Painting Patterns

    You see that plaid beauty? I painted it. It’s not a stencil, it’s not contact paper, it’s paint!

    And I didn’t measure one iota of a thing to do it….because I’m lazy…and bad at math.

    How to Paint a Plaid Pattern Without Measuring

    Affiliate links may be contained in this post.

    Materials & Supplies:

    How To Paint a Plaid Pattern WITHOUT Measuring - you will not believe how easy it is! Furniture Makeover | Furniture Painting | DIY Projects | Plaid Pattern

    Step 1:

    Prep your painting surface. My little table had a leopard print I stenciled on it a couple years back. It had resided on the screened-in porch, but never really got used all that often. I didn’t want to part with the table as I really liked it’s bones, so I opted to re-do it with a plaid print. First, I used Ready to prime the table.

    How To Paint a Plaid Pattern WITHOUT Measuring - you will not believe how easy it is! Furniture Makeover | Furniture Painting | DIY Projects | Plaid Pattern

    Just spray it on, let it sit for a few minutes, then wipe down the surface. Ready will remove any shine the previous finish may have had and any dust or dirt as well.

    Step 2:

    Give the surface a few coats of Vivid.

    How To Paint a Plaid Pattern WITHOUT Measuring - you will not believe how easy it is! Furniture Makeover | Furniture Painting | DIY Projects | Plaid Pattern

    Reds are always hard to even out in color, so it might take a few more coats than with other colors. It took three for my table. Let the final coat dry overnight.

    Step 3:

    Place your yardstick in the middle of the table. It doesn’t have to be perfect – I eyeballed mine. On each side of the yardstick run a piece of 1.5″ Delicate Surface FrogTape along the length of the table. The yardstick I have from Home Depot is almost the exact same size as the 1.5″ FrogTape, thus why I suggested it – it makes the spaces between your tape and the tape almost identical in size, thus no measuring!

    How To Paint a Plaid Pattern WITHOUT Measuring - you will not believe how easy it is! Furniture Makeover | Furniture Painting | DIY Projects | Plaid Pattern

    You do want to make sure you use Delicate Surface tape as this paint is still relatively fresh. Delicate Surface tape is made for painted surfaces that are just a few days old.

    After running two pieces of FrogTape along each side of the yardstick, remove the yardstick and place it on one side of either piece of tape, then run another piece of tape along the side of the yardstick that doesn’t have tape.

    How To Paint a Plaid Pattern WITHOUT Measuring - you will not believe how easy it is! Furniture Makeover | Furniture Painting | DIY Projects | Plaid Pattern
    Continue moving your yardstick and running your tape until your table has strips of tape all across it as shown above.

    After all your tape has been ran, firmly run your finger or a credit card edge along the edges of the FrogTape to seal it. Do not skip this step! If you don’t do this, you risk having the paint bleed through the tape.

    Step 4:

    Paint two coats of Luxurious in between the tape pieces on your surface.

    How To Paint a Plaid Pattern WITHOUT Measuring - you will not believe how easy it is! Furniture Makeover | Furniture Painting | DIY Projects | Plaid Pattern

    Remove the FrogTape immediately after brushing on your final coat. Let dry overnight.

    Step 5: 

    Place your yardstick in the center of the surface perpendicular to the black stripes you painted. Once more, run two pieces of 1.5″ Delicate Surface FrogTape along both sides of the yardstick.

    How To Paint a Plaid Pattern WITHOUT Measuring - you will not believe how easy it is! Furniture Makeover | Furniture Painting | DIY Projects | Plaid Pattern

    Just like you did before, move the yardstick to one side of a tape strip and then place another tape strip along the other edge of the yardstick. Repeat this over the entire surface until your surface resembles the image shown below.

    How To Paint a Plaid Pattern WITHOUT Measuring - you will not believe how easy it is! Furniture Makeover | Furniture Painting | DIY Projects | Plaid Pattern

    Remember to firmly press down along the edges of the FrogTape after you have applied it to seal the edges.

    Step 6:

    Using the 1″ Delicate Surface FrogTape, cover the black stripes on your surface.

    How To Paint a Plaid Pattern WITHOUT Measuring - you will not believe how easy it is! Furniture Makeover | Furniture Painting | DIY Projects | Plaid Pattern

    The easiest way I found to do this was to take a piece of the 1″ FrogTape and run it along on edge of the black and then run another piece of tape along the other edge of the black. The tape will overlap in the middle. Repeat this until your Luxurious stripes are covered and you have lots of little squares. Once more, remember to firmly push down on the edges of the FrogTape to seal it.

    Step 7:

    Within the squares you created with the tape, paint a couple coats of Timeless.

    How To Paint a Plaid Pattern WITHOUT Measuring - you will not believe how easy it is! Furniture Makeover | Furniture Painting | DIY Projects | Plaid Pattern

    Remove the FrogTape immediately after applying your final coat. Your surface should look similar to the image below after you remove the tape.

    How To Paint a Plaid Pattern WITHOUT Measuring - you will not believe how easy it is! Furniture Makeover | Furniture Painting | DIY Projects | Plaid Pattern

    Let dry overnight.

    Step 8:

    Using the 1″ Delicate Surface FrogTape, run strips of tape just a little outside each black edge. This should create small lines of black within the tape as shown below. Once more, I didn’t measure this at all – I just eyeballed it.

    How To Paint a Plaid Pattern WITHOUT Measuring - you will not believe how easy it is! Furniture Makeover | Furniture Painting | DIY Projects | Plaid Pattern

    Firmly seal the edges of the tape with your finger or the edge of a credit card.

    Step 9:

    Brush on a couple coats of Minimalistic between the tape where the black is.

    How To Paint a Plaid Pattern WITHOUT Measuring - you will not believe how easy it is! Furniture Makeover | Furniture Painting | DIY Projects | Plaid Pattern

    Immediately remove the tape after your final coat. Let it dry overnight.

    Step 10: 

    Repeat the previous two steps above, except this time on the gray areas on your surface.

    How To Paint a Plaid Pattern WITHOUT Measuring - you will not believe how easy it is! Furniture Makeover | Furniture Painting | DIY Projects | Plaid Pattern

    Paint Minimalistic between the pieces of tape. Remove the tape after your final coat. Let dry overnight.

    Step 11:

    Velvet Finishes paint does not always require an additional topcoat as there is already a topcoat built into the paint. However, if you have painted something that is going to get a lot of action and use, then an additional topcoat is suggested. I plan on this going into either the den/man cave or Bill’s room as a side table or night stand at the 70’s Landing Pad, so I opted for the extra protection.

    how-to-paint-a-plaid-pattern-14

    I just brushed on one coat of Protect to give the surface more protection and even a bit of shine.

    That table is PAINTED - she PAINTED on that plaid pattern and it actually looks really easy. She even tells you how to do it without having to measure anything! How To Paint a Plaid Pattern | Furniture Makeovers | Furniture Painting | DIY Projects | Painting Patterns

    This table turned out more awesome than I ever dreamed. I fully realize that sounds corny and I fully don’t give a damn.

    That table is PAINTED - she PAINTED on that plaid pattern and it actually looks really easy. She even tells you how to do it without having to measure anything! How To Paint a Plaid Pattern | Furniture Makeovers | Furniture Painting | DIY Projects | Painting Patterns

    Ok, what are you going to plaid up?

    You might also want to see…

    How to Make Colored Furniture Glaze: 11 Colorful Furniture Makeovers

    How to Make Furniture Glaze in Any Color

    DIY Tuxedo Bar | Learn how to paint a bar front or any piece of furniture with a mostly flat front to look like a tuxedo jacket. Awesome idea for a furniture makeover!

    DIY Tuxedo Painted Bar

    pin-this-post-2

    How to Paint a Plaid Pattern | DIY Furniture Makeovers | DIY Painting Ideas | Painting Techniques | Painted Furniture Ideas

    blog-signature-summer-15

    Disclosure: This post was a collaboration with Velvet Finishes, however all opinions and over-excitement about painting a plaid pattern all by myself are 100% mine. 

    SaveSave

  • When in doubt…go polka dots.

    When in doubt…go polka dots.

    This post is sponsored by Velvet Finishes, however all opinions are 100% mine. 

    I’m ashamed to tell you how long I’ve had this chair sitting in the garage ready to be made over. I’ll say it’s been the better part of a year at the least. It was one of those purchases that went like this:

     It’s $10! I can’t pass it up for $10!

    But you don’t need it Jenna.

    I know that. But it’s $10!!!

    You don’t need it.

    $10.

    Make a smart decision, Jenna. 

    Ok. I’m buying it. 

    Said conversation was between myself and myself of course.

    So since I really had no clue what to do with it or where I would put it, it just sat for a while. And then one day, I got a wild hair and decided I would attempt to paint the upholstery on this piece rather than re-upholstering it since I’d never tried painting it before. I only had $10 to lose.  Here’s how it turned out…

    Simple Polka Dot Chair Makeover - She used Velvet Finishes to paint the chair and upholstery! So adorable and very Kate Spade inspired!

    Not half bad! I didn’t set out for it to turn out so preppy / Kate Spade-ish, but I think it works with the chair pretty well. Here’s what I did…

    Polka Dot Chair Makeover

    Affiliate links may be contained in this post.

    What I Used: 

    Step 1

    The upholstery of this piece was not in great condition. It looked like a cat had maybe clawed around the edges a bit, so I cleaned up that with some scissors first.

    Simple Polka Dot Chair Makeover - She used Velvet Finishes to paint the chair and upholstery! So adorable and very Kate Spade inspired!

    After that, I actually got out my shop vac and vacuumed really well in all the nooks and crannies of the upholstery since I knew I was going to paint it.

    Step 2 

    After vacuuming, I painted the wood portions of the chair with Velvet Finishes Handsome.

    Simple Polka Dot Chair Makeover - She used Velvet Finishes to paint the chair and upholstery! So adorable and very Kate Spade inspired!

    Handsome is the same color I used on my kitchen cabinets. It’s a classic navy shade. I just used my paintbrush and painted right onto the wood. If you have a really shiny finish to begin with, you can prime your piece with Ready, which is a simple to use spray primer, before painting it. If you don’t have a shiny finish, then you usually won’t need a primer with Velvet Finishes. I did two coats of Handsome.

    Step 3

    I let the Handsome dry overnight, then the next day, I tackled the upholstery. First, I taped off around the woodwork so I wouldn’t get any paint there, then I just slapped on some Glamorous with my paintbrush.

    Simple Polka Dot Chair Makeover - She used Velvet Finishes to paint the chair and upholstery! So adorable and very Kate Spade inspired!

    It took about four coats of paint on the upholstery, which I expected since I knew the upholstery would absorb so much of the paint.

    Step 4

    After the upholstery dried it was a little bit “tough” so to speak. Kellie had told me that sanding it with a fine grit sandpaper would loosen it up.

    Simple Polka Dot Chair Makeover - She used Velvet Finishes to paint the chair and upholstery! So adorable and very Kate Spade inspired!

    So that’s what I did. I lightly sanded over all the upholstery with about a 150 grit sandpaper. It made the upholstery feel less “tough” and more like a faux leather type upholstery.

    Step 5

    After sanding, I thought the chair was a little boring – it needed some pattern or something to make it pop, so I added in polka dots.

    Simple Polka Dot Chair Makeover - She used Velvet Finishes to paint the chair and upholstery! So adorable and very Kate Spade inspired!

    I just used a medium sized pouncer and Minimalistic and randomly placed polka dots all over the upholstery.

    Simple Polka Dot Chair Makeover - She used Velvet Finishes to paint the chair and upholstery! So adorable and very Kate Spade inspired!

    And all of a sudden, it became an incredibly cute chair.

    You can still see some of the upholstery’s pattern through the paint, but unless you are painting plain fabric, I think that’s gonna happen.

    Simple Polka Dot Chair Makeover - She used Velvet Finishes to paint the chair and upholstery! So adorable and very Kate Spade inspired!

    The pillow is from Target – it’s the first purchase for the Circus’ new room at the 70’s Landing Pad. It went with the chair perfectly, so I couldn’t resist not using it in the photos.

    What do you think of the preppy polka dotted chair?

    pin-this-post-2

    Painted Chair Makeover | How to Paint Upholstery | Furniture Makeover Ideas | Furniture Painting Ideas | Furniture Painting Techniques

    blog-signature-summer-15

    You know you don’t wanna miss any of this crazy.

    Sign up to get my posts delivered to your inbox here.

    Stalk Me Here:

    Pinterest / Facebook / Twitter / Instagram

    Disclosure: This post was a collaboration with Velvet Finishes, however all opinions and hoarding of chairs I don’t need are 100% mine.

    SaveSave

  • Business in the Front, Party on Top: 70’s Credenza Makeover

    Business in the Front, Party on Top: 70’s Credenza Makeover

    This post is sponsored by Velvet Finishes, however all opinions are 100% mine. Affiliate links may be contained in this post.

    I got my first and only Achy Breaky Heart t-shirt at the flea market in the middle of town.

    I was seven.

    It was heather gray, with a big multi-colored neon heart and multi-colored neon lettering on it.

    I was so damn proud of that t-shirt.

    Billy Ray Cyrus and his mullet essentially had overnight success with a song that had a terrible title.

    It was the age of the achy breaky heart craze.

    It wasn’t until I was in at least middle school, if not high school, that I realized the name for Billy Ray Cyrus’ infamous hairstyle was a mullet.

    And that people described it as business in the front, party in the back.

    Well that’s just what this credenza makeover is. Business in the front, but the party’s up top…

    Easy and pretty way to cover a surface that isn't in the best shape! 70's Credenza Makeover with Malachite Wrapping Paper / Velvet Finishes / Furniture Makeover / Furniture Painting

    Y’all I wish you could have seen me hauling this thing into the truck.

    I found it while I was riding solo thrifting one afternoon. A store employee helped me get it into the truck, but then he quickly realized the cluster that was about to happen and scooted off quickly.

    He was a smart man.

    This thing is heavy. And it ain’t small.

    First, I thought I would just let part of it hang out the back of the truck and use Grunt’s ratchet tie-downs to keep it in.

    Well, I knotted up that tie-down.

    So then I thought it could just go sideways and I could close the tailgate.

    It wouldn’t close by a hair. A hair.

    So I turned it back around and attempted to strap it in again with another tie-down.

    I didn’t get the tie down secured correctly, but I got it secured enough to get it home.

    There was only one close call on the way home. 

    When I got it home, I promptly had a beer and told Grunt Labor I would buy him new tie-downs because I was pretty sure we were going to have to cut his to get this piece out.

    But it was totally worth it.

    This piece was only $20.

    Easy and pretty way to cover a surface that isn't in the best shape! 70's Credenza Makeover with Malachite Wrapping Paper / Velvet Finishes / Furniture Makeover / Furniture Painting

    And if we are going to be really honest about it, I probably would have paid that for just the hardware. It’s so pretty.

    I originally intended to paint the entire piece. However, I decided that I really liked the stained drawers. The top though had to have something done to it…

    Easy and pretty way to cover a surface that isn't in the best shape! 70's Credenza Makeover with Malachite Wrapping Paper / Velvet Finishes / Furniture Makeover / Furniture Painting

    I think it must have had some other top on it at some point. Here’s what I did…

    Easy and pretty way to cover a surface that isn't in the best shape! 70's Credenza Makeover with Malachite Wrapping Paper / Velvet Finishes / Furniture Makeover / Furniture Painting

    I used:

    Step 1: 

    Since the top was so rough, I used my power sander to smooth it out as much as possible. It didn’t do a whole lot of smoothing but it did knock some big uneven chunks out of the way.

    Step 2: 

    I painted on a good, thick coat of Velvet Finishes Luxurious on the top and sides of the credenza.

    Easy and pretty way to cover a surface that isn't in the best shape! 70's Credenza Makeover with Malachite Wrapping Paper / Velvet Finishes / Furniture Makeover / Furniture Painting

    The paint helped to fill in a little more unevenness on the top and also worked as a primer of sorts for the deco-paste that would adhere the wrapping paper to the top of the credenza.

    Step 3: 

    Next, I cut the paper to the size of the top of the credenza. I did leave a little extra on the sides just in case.

    Easy and pretty way to cover a surface that isn't in the best shape! 70's Credenza Makeover with Malachite Wrapping Paper / Velvet Finishes / Furniture Makeover / Furniture Painting

    Step 4: 

    This is where a friend comes in handy. Luckily for me, one of main girls, Brittany had come over to work on some other projects. I painted on the Deco-Paste that would adhere the paper to the top, while Brittany held the paper up.

    Easy and pretty way to cover a surface that isn't in the best shape! 70's Credenza Makeover with Malachite Wrapping Paper / Velvet Finishes / Furniture Makeover / Furniture Painting

    The Deco-Paste dries really quickly, so you need to work in small sections. I would paint on a little bit, then firmly put the paper on top of it. After I had the whole top covered with the malachite paper, I went back over it and smoothed out any air bubbles firmly with my hands, then let the piece cure for the rest of they day.

    Step 5: 

    Once it was all dry, I came back with an X-Acto knife and cut off any excess overhang.

    Easy and pretty way to cover a surface that isn't in the best shape! 70's Credenza Makeover with Malachite Wrapping Paper / Velvet Finishes / Furniture Makeover / Furniture Painting

    Step 6: 

    Where there was any extra overhang that was too small to cut, I used fine grit sandpaper wrapped around a sanding block to smooth the edges.

    Easy and pretty way to cover a surface that isn't in the best shape! 70's Credenza Makeover with Malachite Wrapping Paper / Velvet Finishes / Furniture Makeover / Furniture Painting

    When you do this, you want to go straight down on the edge. Don’t go back and forth sideways or up and down vertically – go straight down and then again if needed. This helps to give the paper a clean, finished look.

    Step 7: 

    Finally, I topped the paper off with a coat of Protect.

    Business in the front.

    Easy and pretty way to cover a surface that isn't in the best shape! 70's Credenza Makeover with Malachite Wrapping Paper / Velvet Finishes / Furniture Makeover / Furniture Painting

    Party on top.

    Easy and pretty way to cover a surface that isn't in the best shape! 70's Credenza Makeover with Malachite Wrapping Paper / Velvet Finishes / Furniture Makeover / Furniture Painting

    This piece is destined for my office. I just gotta find someone to help me haul it there first. 😉

    Any takers?

    What do you think of the midas malachite touch?

    pin-this-post-2

    Credenza Makeover | Decoupaged Furniture | Wrapping Paper Furniture Makeover | How to Decoupage Furniture | How to Decoupage Wood | Furniture Makeover DIY

    blog-signature-summer-15

    You know you don’t wanna miss any of this crazy.

    Sign up to get my posts delivered to your inbox here. 

    Stalk Me Here:

    Bloglovin / Pinterest / Facebook / Twitter / Google+ / Instagram

    Disclosure: This post was a collaboration with Velvet Finishes. However, all opinions and references to Billy Ray Cyrus are 100% mine.

    SaveSave

  • Using Velvet Finishes Paint in a Paint Sprayer

    Using Velvet Finishes Paint in a Paint Sprayer

    This post is sponsored by Velvet Finishes, however all opinions are 100% mine. Affiliate links may be contained in this post.

    It’s no secret around here that I have a love for both Velvet Finishes paint and my HomeRight Paint Sprayer.

    In fact, last year, when Kellie from Velvet Finishes asked me about trying her paint, one of my first questions was “Can I use it in my paint sprayer?”

    Luckily, the answer was yes.

    Now if she would have said no, it wouldn’t have been a deal breaker. There are lots of times when the weather isn’t cooperating with me and I can’t use my sprayer or other times when the project is small and it just doesn’t make sense to use the sprayer.

    But on big projects and pieces with lots of little details and nooks and crannies, I like to use Velvet Finishes in my paint sprayer to cut down on my work time.

    Because I like having more time for cheap beer, ya know?

    Am I right or am I right?

    Many of you, my dear people, have asked me if you can use Velvet Finishes in a paint sprayer and I’ve said, “Yep, you sure can!” Just like with any other paints though, you do have to thin Velvet Finishes before spraying it.

    So here’s how it all works. Even though there’s a lot of writing, its really easy – I promise.

    How to Use a Paint Sprayer | Using a Paint Sprayer on Furniture | Paint Sprayer Tips | Paint Sprayer for Furniture Makeovers | Using Velvet Finishes in a Paint Sprayer

    Using Velvet Finishes Paint in a Paint Sprayer

    Step 1: 

    First, unscrew the paint container from the bottom of the sprayer. Fill the container with paint. I generally fill the container somewhere between 1/2 and 3/4 full. If its a really thick paint, then 1/2 full because more water will be required. If its a thin paint, then 3/4 full because less water will be required.

    Using Velvet Finishes Paint in a Paint Sprayer

    Step 2: 

    Add water. Generally, I try to have a cup of water nearby. Add a little water at a time. Start with about 1/4 of a cup of water for thinner paints and 1/2 cup for thicker paints – you can always add more.

    Using Velvet Finishes Paint in a Paint Sprayer

    Its really important to note that some of the Velvet Finishes colors are much thicker than others. The lighter colors such as Minimalistic, Cosmopolitan, Ethereal, and other light colors are thinner. Those won’t require as much water. Darker colors like Vivid and Glamorous are much thicker and will require more water. The color I’m using here, Boheme, is a paint that’s kind of in the middle – its not too thin, its not too thick.

    After you have added water, stir.

    Using Velvet Finishes Paint in a Paint Sprayer

    You want to fully incorporate the paint that is on the bottom with the water on top.

    Step 3:

    You’re probably wondering how you’ll know when you’ve have added enough water. That was one of my questions when I first started using a paint sprayer.

    Using Velvet Finishes Paint in a Paint Sprayer

    The paint sprayer I use, the HomeRight Finish Max, comes with a handy dandy little tool called a Viscosity Cup. Fancy name, but simple to use. Also, with my paint sprayer came an instruction manual that outlined how quickly the paint should run out from the fully filled viscosity cup when the paint is thinned correctly. For most paints, the paint should empty out of the viscosity cup within 25 – 40 seconds.

    So, after adding your water and mixing, dip the viscosity cup in the paint, hold it up and count how long it takes the cup to run out. If the time falls within 25 – 40 seconds, you’re ready to paint. If its more, add more water and mix until it falls within that timeframe. Chances are it won’t be less, but if it is, its usually ok to paint with. Test the sprayer on a scrap piece of wood first to make sure the paint comes out well.

    After you thin paint a few times, you’re going to get the hang of it and not need to use the viscosity cup as much. Honestly, I’ve done it so much now that I rarely ever need it.

    Step 4: 

    After you’ve thinned your paint correctly, you are ready to go. Reattach the paint cup to the sprayer, plug it in and pull the trigger.

    Using Velvet Finishes Paint in a Paint Sprayer

    You will want to keep the sprayer in constant motion by moving your arm – not the sprayer – as you cover your piece. Generally, I find that each piece I do with a paint sprayer and Velvet Finishes takes 2-3 light coats.

    If you have extra paint leftover that you have thinned, I usually just put it back in the container with the un-thinned paint and give it a good shake. If you don’t want to do that though, you could store it an airtight container of its own.

    Step 5: 

    Finish your project by sealing the paint with Protect – there’s no thinning required on that one.

    Using Velvet Finishes Paint in a Paint Sprayer

    DIY Dress-Up Station 

    If you’re wondering how easy clean up is with the paint sprayer – I promise its so easy. I’ll actually have another post about doing just that in a couple of weeks, so stay tuned.

    Also, Velvet Finishes will soon be carrying HomeRight paint sprayers on their site!

    Because they go together like Rama lama lama Ka dingity dinga dong.

    Name that song! 😉

    Have you used Velvet Finishes before? Do you prefer a paint sprayer or a brush and roller when using it?

    pin-this-post-2

    How to Use a Paint Sprayer | Using a Paint Sprayer on Furniture | Paint Sprayer Tips | Paint Sprayer for Furniture Makeovers | Using Velvet Finishes in a Paint Sprayer

    You know you don’t wanna miss any of this crazy.

    Sign up to get my posts delivered to your inbox here.

    Stalk Me Here:

    Bloglovin / Pinterest / Facebook / Twitter / Google+ / Instagram

    blog-signature-summer-15

    Disclosure: This post was a collaboration with Velvet Finishes. However, all opinions and love of both Velvet Finishes and my paint sprayer are 100% mine.

    SaveSave

  • Liquor Cabinet Makeover + Adding Fretwork to Furniture

    Liquor Cabinet Makeover + Adding Fretwork to Furniture

    Something happened after I stripped and re-stained the buffet in the living room.

    After a few weeks, I started missing the red.

    Not the red on the buffet itself, but just the color red in general.

    Apparently, not only are my beloved colors kelly green and navy, but also a bold red.

    This really isn’t surprising. Red was always my favorite color growing up. I’m quite sure it became my favorite color when Reba wore the red dress.

    If you know the dress I’m talking about, then we are kindred spirits. 

    So I started hunting for something to paint red.

    Que Lorrie Morgan’s Something in Red.

    Sorry, I’m not quite sure how this post has become about country music of the 90’s. 

    And I happened upon my great-grandmother’s china cabinet turned liquor cabinet.

    I know. I know. You can judge me. It won’t bother me at all.

    It was time for a change.

    And not just a change in color, but also a change in location.

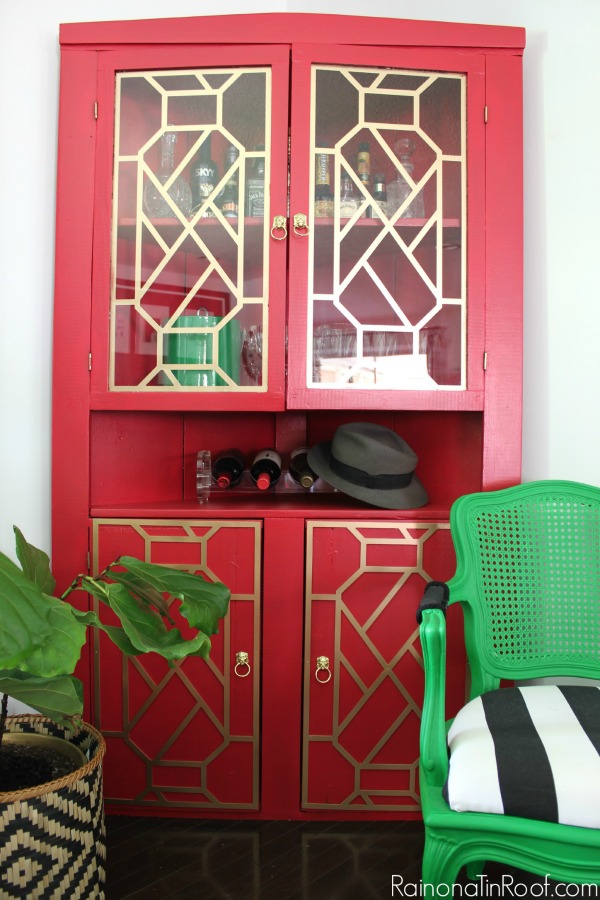
    Vivid Red Hutch Makeover / How to Add Fretwork to Furniture / Velvet Finishes Paint / O'verlays / Brass Lion Pulls / Chippendale Fretwork

    I know, right. It went from flat black to vivid red.

    Hutch Before

    Disclosure: This post was a collaboration with Velvet Finishes and O’verlays. However, all opinions and references to 90’s country music are 100% mine. This post contains affiliate links for your shopping convenience. Click here to read my full disclosure policy.

    It also moved from the dining room to the back corner in the living room.

    Here’s what we did…

    Liquor Cabinet Makeover + Adding Fretwork to Furniture

    Supplies & Materials Used:

    Step 1: 

    Before doing anything, I took off all the hardware, including the “campaign” corners that I had added to the piece a while back.

    fill-nail-holes

    I used wood filler to fill the holes and then sanded it smooth when dry (there’s a full tutorial here about filling holes). After that, I wiped the whole piece down with Ready to pick up any dirt and dust, then taped off the glass with FrogTape. This piece is so heavy that I painted it right there in the living room. Moving it from the dining room to the living room was a job, so once it was there – it stayed. For that reason, I also taped off the flooring around the cabinet.

    Step 2:

    After the prep work was done, which wasn’t much at all, I started painting the piece Vivid.

    Velvet Finishes Vivid: A true red. No priming or topcoat required.

    Vivid is a true red hue from Velvet Finishes. It took about four good coats to even out the red. If you have painted anything red before, you know it takes a while to even out the color. At my old house, I put eight, nope, not kidding, eight coats of red paint on the kitchen walls before the color evened out. Luckily, this paint didn’t require near as many coats.

    Step 3:

    After the paint was good and dry, I went back over the piece with Protect.

    Velvet Finishes Protect: A Polycrylic Topcoat for Furniture

    Protect is a satin poly topcoat. Velvet Finishes already has a topcoat built in, but this piece takes a good beating seeing as how we like our drinks around here, so I gave it some added protection.

    Step 4:

    While the Protect was drying, I painted the O’verlays.

    O'verlays Fretwork Panels for Furniture

    O’verlays are decorative fretwork panels that you can add to furniture to up your makeover game. 🙂

    That’s the Jenna definition anyway. 

    Really though, they are super cool. There are tons of designs to choose from and you can have them custom sized for your furniture. If you want to makeover an IKEA piece, they already have panels for those pieces sized and ready to go. How cool is that? 

    I went with the Cheryle panels. They came to me primed white. I had toyed with the idea of leaving them white against the red, but in the end, gold won out. I gave them a few coats of gold spray paint.

    Step 5:

    Once the panels and cabinet were fully dry, I used my nail gun to attach the panels to the lower cabinet doors. You could also use a glue as well. The top panels went behind the glass. I used these panel clips to keep them in place.

    Vivid Red Hutch Makeover / How to Add Fretwork to Furniture / Velvet Finishes Paint / O'verlays / Brass Lion Pulls / Chippendale Fretwork

    Its vivid, its bold, and I love it.

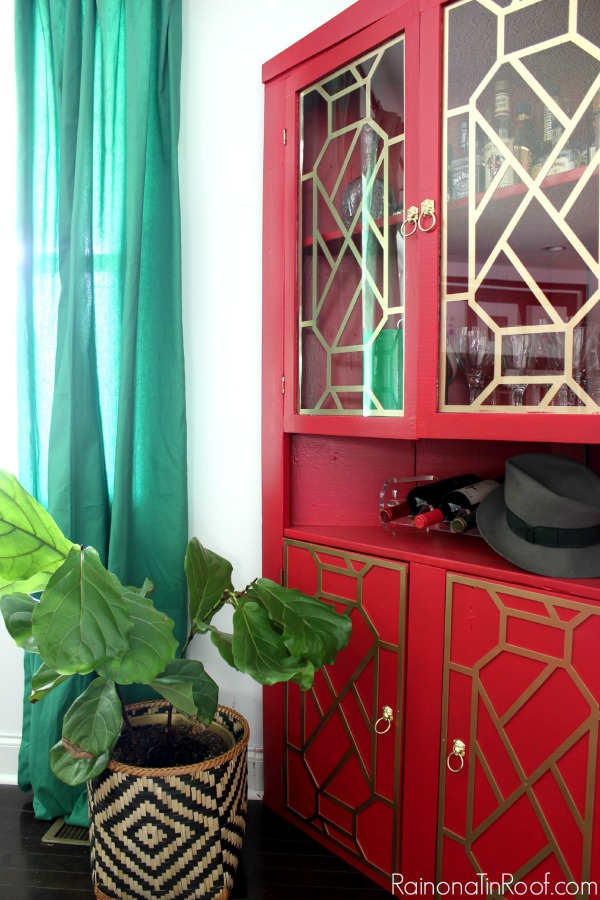
    Vivid Red Hutch Makeover / How to Add Fretwork to Furniture / Velvet Finishes Paint / O'verlays / Brass Lion Pulls / Chippendale Fretwork

    I kept the lion hardware, but I have to say, I think it pops so much more with the red and gold fretwork than it did before.

    Vivid Red Hutch Makeover / How to Add Fretwork to Furniture / Velvet Finishes Paint / O'verlays / Brass Lion Pulls / Chippendale Fretwork

    And the fretwork? Ahhh, the fretwork – well that was just the icing on the cake, darlin’.

    So tell me, are you seeing red now? The good kind?

    Looking for more bold and daring furniture makeovers?

    DIY Tuxedo Bar – yes, it looks like a tuxedo. I’m serious.

    Malachite Credenza Makeover – I like to call this one party on top, business in the front.

    Bold and Beautiful Furniture Makeovers – very bold, very very beautiful.

    pin-this-post

    Vivid Red Hutch Makeover / How to Add Fretwork to Furniture / Velvet Finishes Paint / O'verlays / Brass Lion Pulls / Chippendale Fretwork

    SaveSave

  • When it doubt, use all the colors.

    About a month ago, I drug the kid and Bill out of bed early one Saturday morning to go yard saleing.

    They hate love it when I do that. 😉

    I decided to be nice for once and give Grunt Labor the Saturday morning off.

    He usually gives me Saturday mornings off, so it was long overdue. 

    Before leaving the neighborhood, we had lucked up on a bamboo patio table for a whopping $2 and a 5×7 leopard print rug for only $5.

    Luck was on my side that day. 

    It quickly ended when there was a meltdown with the kid when I refused to buy a creepy $7 FurrRealz Cat.

    $7 for a toy cat at a yard sale? And it looked possessed? Move along child, move along.

    At the next stop though, we lucked upon a play phone, a beanie baby skunk and a Care Bears nightgown that the kid just had to have.

    I’ve never been so happy to see a Ty Beanie Baby in my life.

    The meltdown ceased.

    As we were about to leave, I spotted something that had potential out of the corner of my eye…

    A vintage paper sorter.

    I looked at Bill.

    His eyes lit up and he said, “We can do something really cool with that.”

    He’s starting to think like me.

    I asked the man how much for it.

    $12.

    Oh honey. You must be crazy. I don’t pay $12 for anything at a yard sale unless its furniture. Let me show you the rug I just snagged for $5.

    Yep, I’m that girl, y’all.

    Sorry not sorry. 

    We started negotiating.

    I walked away with the paper sorter for $6.

    It was still more than I wanted to pay for a paper sorter, but it was half of what he started at.

    I’ll take it. 

    Once we got it home, we realized we weren’t really sure what that something really cool we would do to it would be.

    But when in doubt…use all the colors.

    Look at all those colors! Crazy how they all work perfectly together!

    Disclosure: This post was a collaboration with Velvet Finishes. However, all opinions and love of all the colors are 100% mine. This post contains affiliate links for your shopping convenience. Click here to read my full disclosure policy.

    I know, right?! 

    Aren’t they all just great together?

    Here’s how she started:

    Paper Sorter Before

    Vintage Paper Sorter Makeover

    To achieve this uber-colorful look, we used:

      • Paper Towels

    Steps

    Step 1: 

    I started by pulling the trim off the outside of the sorter to be able to get all the shelves out and easily paint them.

    Pull off the trim.

    I did this very carefully because I didn’t want to damage the wood.

     Step 2: 

    After the trim was off, I pulled out every shelf and primed each of them as well as the sorter itself with Ready.

    Use Velvet Finishes Ready to prime the piece.

    This thing had a glossy finish on it and was dirty as well. Ready primed and cleaned it at the same time. I just sprayed it on each shelf and the sorter, let it sit for a couple of minutes, then wiped it down with paper towels. Bill and I tag teamed it, so that it didn’t take as long.

    Step 3: 

    To make all the soon-to-be colorful shelves pop, I painted the outside and inside of the sorter with Minimalistic – a true white.

    Velvet Finishes Minimalistic

    It took about three light coats with a good quality paintbrush to do the job.

    Step 4: 

    I gave each shelf a couple coats of color.

    Velvet Finishes Boheme

    I also did this with just a paintbrush – but a good one. 😉

    I didn’t worry with a topcoat, because Velvet Finishes paint already has a topcoat built-in and this won’t be getting a lot of hardcore use.

    Step 5: 

    After everything was painted, I had to sand the edges of the shelves a bit to make them fit back in the sorter, then I put the trim back on.

    Oh my! Those colors! Can't believe how well they all work together! Vintage Paper Sorter Makeover

    There was a mishap with one shelf and it was tragically lost.

    I broke it. 🙁

    Vintage Paper Sorter Makeover - Those colors!

    But really, I don’t think this paper sorter makeover could get any cuter.

    Those colors are just perfection.

    I’m going to save it for the circus’ upcoming room makeover.

    Looking for more colorful and easy home projects and crafts? 

    Here are 9 unique and colorful ways to makeover a side table.

    Here is a super fun, easy and colorful step stool makeover.

    And here are bold and colorful furniture makeovers you’ll love!

    You know you don’t wanna miss any of this crazy.

    Sign up to get my posts delivered to your inbox here.

    Stalk Me Here:

    Pinterest / Facebook / Twitter / Instagram

    pin-this-post

    Those colors!!! I love how they all work together! Vintage Paper Sorter Makeover

    SaveSave

  • The Perfect Navy Paint

    The part-time child, Bill, and I have formed a sort of business partnership.

    I find furniture for him to paint. He paints it. I write about it. We sell it. I get my initial investment back and he keeps the profit for his labor.

    When I first presented this idea to him, he was ecstatic and couldn’t wait to jump on the two end tables that I had already picked up.

    I even let him pick out the color, which in my opinion is the perfect navy paint…

    Look no more! Not only is this the perfect shade of navy, its also the perfect paint - no priming or topcoat required! The Perfect Navy Paint

    This post contains affiliate links for your shopping convenience. Click here to read my full disclosure policy.

    But then something happened.

    I brought one of the finished tables upstairs to photograph.

    And it was like it was made for my living room. 

    Even Grunt Labor came home and said, “That table isn’t going anywhere but there.”

    So it appears that Bill’s first furniture sale is to me.

    Let’s hope our actual business model goes according to plan the next time around.

    This navy beauty started out like this:

    End Table Before

    I actually scored two of them for $15 each at Goodwill. I think what pulled me to them the most was the drawer hardware.

    We started by removing the glass top, taping and papering off the inlay of caning (I think that’s caning?). I thought it might be nice to have just a touch of contrast with the navy. After that we sprayed down both tables with Ready.

    Spray on Ready to prime the piece.

    Ready, by Velvet Finishes, is essentially a spray-on primer. You don’t always have to use it with Velvet Finishes paint, but if the surface you are painting over is shiny or dirty, you should definitely prime it. These tables were both. We sprayed the Ready on, let it sit for a few minutes, then wiped the tables down.

    Next, we gave the tables about three light coats of the navy paint, which is called Handsome.

    Paint on Velvet Finishes Handsome - the perfect navy paint.

    Or as I like to call it, The Perfect Navy.

    It never ceases to amaze me how much just one single color can totally transform a piece of furniture. The Perfect Navy Paint

    You can see why it needs to stay in my living room, right? Seriously, it just goes perfectly with the rug.

    I need you to back me up here and make me feel better about my furniture hoarding tendencies. Mkay? Thanks.

    Navy with brass accents, plus the pop of red in the rug is perfection. The Perfect Navy Paint

    I didn’t worry with adding on an extra topcoat, since Velvet Finishes already has a topcoat built in. I knew the glass part of the table would get the most action and all we can do with that is hope the circus doesn’t break it.  I did clean up the hardware with Bar Keeper’s Friend (you can see how I clean hardware here).

    Oh, and this is also the same color I used on my base kitchen cabinets that you saw in my home tour.

    See, it is the perfect navy.

    Am I right or am I right? 

    Do you have anything screaming for navy?

    Find more furniture makeover inspiration here and see how I used this gorgeous navy on my cabinets here.

    You know you don’t wanna miss any of this crazy.

    Sign up to get my posts delivered to your inbox here.

    Stalk Me Here:

    Pinterest / Facebook / Twitter / Instagram

    Disclosure: This post was a collaboration with Velvet Finishes paint. However, all opinions and love of the perfect navy are 100% mine.

    pin-this-post

    Look no more! Not only is this the perfect shade of navy, its also the perfect paint - no priming or topcoat required! The Perfect Navy Paint

    SaveSave

  • Mid-Century Modern Lamp Makeover (A.K.A. I Dream of Jeannie Lamp)

    Mid-Century Modern Lamp Makeover (A.K.A. I Dream of Jeannie Lamp)

    I watched reruns of I Dream of Jeannie when I was a kid. It wasn’t one of my favorites, but I thought Barbara Eden was so pretty. And while Larry Hagman will always always always be J.R. Ewing in my mind, he was still pretty great in I Dream of Jeannie.

    Well over a year ago, I found a lamp that screamed “I Dream of Jeannie” at a yard sale.

    It was $2.

    It came home with me.

    And as most things do around here, it sat for a while until I had a great idea for it.

    And finally I did.

    If you follow me on Instagram, you may have seen this image where I asked YOU to tell me what to do with the lamp…

    Mid-Century Modern Lamp Makeover with Velvet Finishes

    Disclosure: This post was a collaboration with Velvet Finishes. However, all opinions and love of bright and cheery color schemes are 100% my own. This post contains affiliate links for your shopping convenience. Click here to read my full disclosure policy.

    You guys were just full of ideas.

    So many ideas that I was even more confused as to what to do to the lamp.

    Some of you even said to leave it as is, but that wasn’t an option – there were lots of chips in the finish and you know me – I needed some color.

    As I was pouring over my paint swatches stressing over what to do, the part-time child, Will, who insists on being called Bill on the blog (I know – I have no idea why either) walked over, played with the paint swatch for a while and said let’s do these colors…

    Velvet Finishes Exotic, Bold, and Minimalistic

    I looked at the colors and wondered how in the hell a 17 year old boy could come up with that great color combination in under five minutes.

    So we started painting. 

    Velvet Finishes Paint Lamp Makeover

    To do this lamp makeover, we used:

    • Paintbrushes of various sizes

    After sitting in my craft room for a year, this lamp was pretty dirty. So, to start with, we cleaned it up really well with Ready, which also primes pieces at the same time.

    Use Ready by Velvet Finishes to clean and prime before painting.

    I just sprayed the Ready onto a paper towel and wiped the lamp down. You can also spray it directly onto a piece, let it sit, then wipe it down.

    I gave the lamp a little while to dry and then started painting.

    Paint Velvet Finishes onto the piece.

    With all the nooks, crannies, and designs going on with this lamp, we used a variety of paint brush sizes. And I won’t lie, since we were using three different colors, it took a while to finish this lamp. I worked on it on and off for 30 minutes or so each day over the course of about five days. First, I painted all spots I wanted Bold, then I went back and painted the spots I wanted Exotic, and finally finished it off by painting some of the small details Minimalistic.

    Wow! That color combination is so pretty! Mid-Century Modern Lamp Makeover with Velvet Finishes Paint

    It wasn’t as hard as it looks to paint all the trim and details. When you use a small paintbrush, its actually pretty easy. I did have baby wipes on hand to quickly wipe up any paint if it got where it wasn’t supposed to be.

    I haven’t decided where I will put it just yet, but I’m thinking its the perfect color scheme for an outdoor living space – maybe the porch?

    Wow! That color combination is so pretty! Mid-Century Modern Lamp Makeover with Velvet Finishes Paint

    It also seems very Lilly Pulitizer-ish to me, which I won’t even get started on that whole Target fiasco.

    What do you think about this bold color scheme? 

    Need more lamp makeover ideas? 

    Don’t miss these 16 lamp ideas and makeovers  – they are so good.

    Find out how to make a lamp out of a bottle here.

    And see how easy it is to make your own gorgeous agate slice lamp finials here.

    You know you don’t wanna miss any of this crazy.

    Sign up to get my posts delivered to your inbox here.

    Stalk Me Here:

    Pinterest / Facebook / Twitter / Instagram

    pin-this-post

    Lamp Makeover Ideas | Painted Lamp Makeover Ideas | DIY Lamp Makeover | How to Paint a Lamp | Lamp Makeover DIY

  • Glamorous Dresser Makeover

    Glamorous Dresser Makeover

    Have I told you that my dad claims the title of “Rain on a Tin Roof Middle Tennessee Marketing Manager?”

    I’m not kidding. 

    He even signs his emails to me that way.

    And he hangs my business cards at the post office.

    And tells all his friends about me.

    And the people he works with.

    I’m sure they loathe me by now.

    One of his co-workers, Shannon, (who is forced to work right beside him – poor girl), offered me a dresser she had in her garage. Thanks, Shannon!

    Seeing as I never turn down free furniture, I went and picked it up.

    In my not-so-big SUV.

    With my dad, the kid, and Will.

    That was a tight squeeze fun ride home.

    It was well worth it though for this glamorous dresser makeover.

    Gorgeous rich color! And no priming required with this paint! Glamorous Dresser Makeover

    Disclosure: This post was a collaboration with Velvet Finishes. All opinions and overuse of the word Glamorous are 100% mine. This post contains affiliate links for your shopping convenience. Click here to read my full disclosure policy.

    Isn’t that color glamorous?

    Literally – that’s the name of the paint. 

    Before I started on the dresser, it looked like this:

    Dresser - Before

    I ended up stripping the top of it with my heat gun because of where the paint was already coming off on top. See that white spot? I didn’t want the paint to be uneven there, so I just stripped off the top and gave the rest of the piece a good cleaning before painting it – no priming needed!

    As I said earlier, I used Glamorous by Velvet Finishes – a rich pink hue, one of my favorites in their paint line.

    Velvet Finishes Glamorous Paint - No priming or topcoat needed with this paint!

     And yes, the whole time I was painting it, I was singing the G-L-A-M-O-R-O-U-S song by Fergie.

    You’re quite welcome for having that song stuck in your head now. 

    I just brushed the paint right on.

    No priming required! Velvet Finishes Glamorous Paint

    I did about four light coats of paint.

    After the paint was dry, I wanted a little more depth to this piece, so I layered on Velvet Finishes Enhance Glaze.

    Velvet Finishes Enhance Dark Glaze - also works as a topcoat protectant!

    Y’all, typically, I suck at glazes. This is one I can actually do.

    How to Use Enhance Glaze

    You just slap it on with a paintbrush and wipe it down with a lint free cloth. If you wipe off more than you want, go back and add more, then wipe again. Just work in small sections because this stuff dries pretty quickly.

    The glaze actually works as a topcoat for added protection as well.

    Score. 

    And the after…

    Gorgeous rich color! And no priming required with this paint! Glamorous Dresser Makeover

    Hello Gorgeous Glamorous.

    Gorgeous rich color! And no priming required with this paint! Glamorous Dresser Makeover

    I kept the drawer hardware that came with the dresser and just spray painted it gold. There weren’t knobs for the doors, so I spray painted some extra ones I had laying around and put them on.

    I am cra-cra about the gold with the glamorous. Its a very glamorous combination.

    Have I said glamorous too much in this post?

    Never. 

    Need more colorful furniture makeovers?

    Here are 11 of them.

    Also, find out how to make colored furniture glaze in any color and how to make colored stain here.

    You know you don’t wanna miss any of this crazy.

    Sign up to get my posts delivered to your inbox here.

    Stalk Me Here:

    Pinterest / Facebook / Twitter / Instagram

    pin-this-post

    Gorgeous rich color! And no priming required with this paint! Glamorous Dresser Makeover

    SaveSave

  • Color Coded Organization

    Color Coded Organization

    Let’s get one thing clear.

    I am not an organization guru.

    Heck, I’m not really a guru of any sorts. I just fly my freak flag and do what works.

    I have my own weird methods for organizing and storing stuff.

    For example, the kid has three different boxes in her room for small toys.

    One holds things that could potentially be living: plastic dinosaurs, My Little Ponies, Smurf figurines, Little People, California Raisin figurines, etc.

    I don’t know where I come up with this stuff either.

    Or why I consider Smurfs and California Raisins to be potentially living things.

    Another box holds non-potential living things: wooden blocks and plastic easter eggs.

    I know, it makes no sense.

    And the last box holds paper items: stickers and things to write on.

    Shocking. One box actually makes sense.

    See what I mean when I say that I do what works for me?

    I knew you would get me – you’re my people.

    This is my latest “what works for me” organizing method:

    Color Coded Organization 

    And shockingly, this may actually make sense to more people than myself.

    This is such an easy organizing idea and it holds family members accountable for their mess! Color Coded Organization

    Disclosure: This post was a collaboration with Velvet Finishes. All opinions and ridiculous organization methods are 100% mine. This post contains affiliate links for your shopping convenience. Click here to read my full disclosure policy.

    Here’s the deal.

    I hate clutter.

    (Thus why I shared the 15 days to a Clutter Free Home Checklist last week.)

    That doesn’t mean clutter never happens around here.

    It happens all the time. 

    And then life happens.

    And I don’t have time to pick up all the clutter everyday because I was chasing the kid trying to make her keep her clothes on while its 30 degrees outside.

    In an effort to combat the clutter and at least corral it, I picked up cheap plastic bins and then assigned a color combination to myself, the kid, and Grunt Labor. The bins stay in the living room and each of our bins contain our own items. At the end of the week, we each go through our bins and put whatever has accumulated there over the week back into its proper place.

    Make sense?

    Good. Here’s how I made them.

    Color Coded Organization Bins

    Materials & Supplies Needed: 

    This is such an easy organizing idea and it holds family members accountable for their mess! Color Coded Organization

    • Plastic Bins (Mine were $3 each at Target in the Dollar Spot.
    • Paint Colors of your choice. (I opted to give these a bit of a cohesive feel by painting everyone’s bottom stripe, Modern by Velvet Finishes, a bold blue. The kid chose Bold, a bright yellow, for her other color, Grunt chose Vivid, which is a fabulous red hue, and I went girly and opted for Glamorous, a pink color.
    • FrogTape 
    • Paint Brush

    Steps

    Step 1: 

    Tape off where you want your stripes to be.

    This is such an easy organizing idea and it holds family members accountable for their mess! Color Coded Organization

    You could actually get much more creative and decorative than I did with this and opt for a different pattern or design. However, I am in a “simple” mode right now (probably also referred to as a lazy mode), so easy stripes were just the ticket.

    Step 2: 

    Paint your color on.

    This paint works on just about any surface! No priming needed on plastic - just brush it on!

    As I said above, I used all Velvet Finishes colors on these bins. To be honest, I wasn’t 100% sure if this paint would work on plastic – but it did. No priming it at all! That’s totally why my heart has been captured by this paint – its the lazy girl’s paint. 

    I did three light coats of each color and was impressed by the fact that I still got super saturated, pretty colors.

    Step 3: 

    As soon as you’ve painted on your final coat, remove the FrogTape. If you let the paint dry before removing the tape, you risk the tape pulling some of the paint off.

    Put the bins where everyone can easily access them and lay down the law.

    If you have crap in this room, it goes in your bin. 

    This is such an easy organizing idea and it holds family members accountable for their mess! Color Coded Organization

    Yea, I’m still working on getting the two year old to understand that.

    This is such an easy organizing idea and it holds family members accountable for their mess! Color Coded Organization

    I have to say, I was a little worried about these sticking out like a sore thumb with the decor, but I am digging their colorfulness.

    Have you done any color coded organization before?

    Or maybe you just have an organizing tip you want to share that doesn’t involve classifying Smurfs as potential living things??

    More Organization and Storage Ideas:

    5 Simple but Life-Changing Storage and Organization Ideas – super affordable too!

    10+ Kitchen Ideas for Decorating, Organizing and Storage – and they’re pretty!

    You know you don’t wanna miss any of this crazy.

    Sign up to get my posts delivered to your inbox here.

    Stalk Me Here:

    Pinterest / Facebook / Twitter / Instagram

    pin-this-post

    This is such an easy organizing idea and it holds family members accountable for their mess! Color Coded Organization

    SaveSave

  • The No Priming, No Topcoat, Way to Paint (Seriously, I’m not even kidding.)

    The No Priming, No Topcoat, Way to Paint (Seriously, I’m not even kidding.)

    Let’s be honest about a couple things:

    1. I’m lazy on occasion.

    2. I’m impatient.

    How does this effect my furniture makeovers?

    I hate having to prime a piece before I can put some glorious color on it.

    Hate it. 

    I need instant gratification.

    Anyone else?

    And when the color is finally on, I can barely wait to get the piece back in its place.

    Oh, but wait….it needs a topcoat.

    That means I have to wait more.

    Did I mention I was impatient?

    Did I also mention I found a solution for this problem?

    Well, not a solution for being lazy and impatient, but a solution for the priming and top coating.

    There is a way to paint that requires no priming and no top coating.

    Boom.

    World altered. 

    Painting Furniture Without Sanding, Stripping or Priming, Painting Furniture DIY | Painting Furniture for Beginners | DIY Furniture Painting

    Disclosure: This post is sponsored by Velvet Finishes. However, all opinions and hatred of priming are 100% mine. This post contains affiliate links for your shopping convenience. Click here to read my full disclosure policy.

    So how can you paint without having to prime or give your piece a top coat?

    There aren’t any special tools involved. Just one thing.

    Paint.

    Velvet Finishes Paint. 

    Must try this paint! It looks amazing and has beautiful results! The No Priming, No Topcoat, Way to Paint (Seriously, I'm not even kidding.) via RainonaTinRoof.com

    Velvet Finishes paint was created by Kellie Smith who just so happens to live about 45 minutes from me. How we didn’t find each sooner I don’t know, but I’m so glad it finally happened. Anyway, she couldn’t find the finish and color palette she wanted while working on a client’s project so she just decided to invent her own paint.

    How cool is that?

    And can we just talk about the colors for just a minute?

    Must try this paint! It looks amazing and has beautiful results! The No Priming, No Topcoat, Way to Paint (Seriously, I'm not even kidding.) via RainonaTinRoof.com

    They are all gorgeous. There are 21 colors and not a one of them that I don’t like.

    I went to her studio a few weeks back and got to see a lot of the colors on real life pieces and y’all the colors were even more jaw-dropping then.

    The darker colors are a little thicker than the lighter colors, so you can thin them if you want to. I actually did that on the IKEA Tarva Hack turned Drink Bar that I just posted about. I used Baroque and the Dark Glaze on that piece. I just thinned the Baroque and sprayed it right through my paint sprayer.

    Let’s talk about how this works.

    Like I said, I got to visit Kellie’s studio and actually painted a piece with her, but I really wanted to put this stuff to the test.

    I decided to paint over a side table I used in our master bedroom beside our little reading nook chair.

    The No Priming, No Topcoat, Way to Paint (Seriously, I'm not even kidding.) via RainonaTinRoof.com

    I had spray painted this side table metallic gold when I first got it.

    Have you tried to paint over something with regular paint that has been spray painted?

    Kind of bubbles up on ya and takes coat after coat after coat after coat, right?

    The No Priming, No Topcoat, Way to Paint (Seriously, I'm not even kidding.) via RainonaTinRoof.com

    This didn’t.

    Velvet Finishes laughed in the face of spray paint.

    HAHAHAHAHAHAHAHHA.

    Ok, I’m also a little over dramatic.

    I didn’t prime the table, I didn’t sand it, I didn’t do anything to it.

    Well, I did wipe it down with a dust rag because well, ummm…..its been a week or eight since I’ve dusted our bedroom.

    The paint went on perfectly.

    If you do have a piece with a very shiny surface, you can use another Velvet Finishes product called Ready before painting the piece. It comes in a spray bottle and all you do is spray it on the piece, let it sit for 10 minutes or so, then wipe it down with a soft cloth.

    After three light coats of Velvet Finishes in the Exotic color, I had this beauty.

    The No Priming, No Topcoat, Way to Paint (Seriously, I'm not even kidding.) via RainonaTinRoof.com

    I kept little touches of the gold for some contrast by cutting pieces of FrogTape down in width a bit, placing them on the table and then just painting right over the tape.

    The No Priming, No Topcoat, Way to Paint (Seriously, I'm not even kidding.) via RainonaTinRoof.com

    I didn’t do any type of topcoat! This paint already has a topcoat built in!

    How freakin’ cool is that?

    Its finish is like a low matte sheen.

    The No Priming, No Topcoat, Way to Paint (Seriously, I'm not even kidding.) via RainonaTinRoof.com

    If you were painting something that is going to get a lot of use, like a kitchen table or coffee table, it is recommended that you use Protect on the piece. Its just a non-yellowing polyurethane.

    You can find more information on the Velvet Finishes website.

    Need more great furniture makeovers? 

    Love color? Then see these 11 Colorful Furniture Makeovers.

    Find out how easy it is to make your own colored furniture glaze.

    Learn how to get a beachy washed out color look on furniture here.

    You know you don’t wanna miss any of this crazy.

    Sign up to get my posts delivered to your inbox here.

    Stalk Me Here:

    Pinterest / Facebook / Twitter / Instagram

    pin-this-post

     Painting Furniture Without Sanding, Stripping or Priming, Painting Furniture DIY | Painting Furniture for Beginners | DIY Furniture Painting