Ready to add some serious wow factor to your mudroom cabinets? This cabinet makeover will leave their jaws hanging!
You know those chances you take sometimes where halfway through you realize there’s no going back?
It’s not that you didn’t realize there would be no going back when you started but it just didn’t occur to you what you might do if it failed.
Man, this is turning into some deep thoughts about plain old cabinets. 😆
Anyway, that’s how I felt about my mudroom cabinets. I had hated the look of them since we moved into the 70’s Landing Pad four years ago. However, getting the mudroom space into shape was at the very bottom of the list; it’s pretty closed off from the rest of the house and for the most part, we’re the only ones who walk through it.
While halfway through this project, the “oh shit, I’m in it now” feeling hit me, I’m happy to report that this project was a success…
Here’s what the mudroom storage looked like before…
Someone actually commented on this space saying it resembled what they think some prisons may look like. I was not offended at all. 😆
I most definitely did not want to lose this great storage space in here. Here’s how I pulled the epic cabinet makeover off.
Mudroom Storage Cabinets Makeover
This post contains affiliate links for your shopping convenience. Click here to read my full disclosure policy.
Upholstery Fabric in color/pattern of your choice – I used this one.
Scissors
Measuring Tape
Staple Gun – I prefer using a power stapler for this; it makes the job go so much faster and smoother. This is the one I have.
Step 1
As you can tell from the before picture, my mudroom cabinet doors had holes drilled in them. While these may have been purely for decoration, I think they had more to do with ventilation since this space is in a partially below ground basement in the south. And while previous owners may have liked the “decorative holes,” this current owner did not.
The first thing I did was have the centers of the cabinet doors cut out to get rid of those holes.
While this was something I could have DIYed myself, I opted to hand it over to my cabinet guy. I knew he would do a better job of getting nice straight cuts and the same edge measurements for each door. I also knew he’d be able to knock it out in half the time of what it’d take me. I was right on all accounts and it was probably some of the best spent money on this space.
Step 2
Paint the cabinet doors and frames.
After the centers of the doors were removed, I painted all the doors and cabinet frames with Bit of Sugar by Behr. I did two coats total.
Step 3
Once everything was good and dry, I put the doors back on the cabinet bases.
I know it might seem weird to put them back up with them not being fully completed, but I felt it might make attaching the fabric easier if the doors were in place.
I installed the doors using new hinges as the old ones were gross and had been painted over multiple times. I also went on and put the new knobs on at this time too.
Step 4
Finally, I attached the upholstery fabric to the backs of the cabinet doors.
Roll out the upholstery fabric. Measure the openings in the doors and add about an inch or two to each side, then cut that measurement out from the fabric.
Using a stapler, attach the fabric to the backside of the door with the pattern showing through the opening.
I used my power stapler for attaching the fabric. It shoots all the way into the wood the first time, so no hammering staples down. It also goes much faster than using a regular stapler and it’s easier on your hands!
The biggest thing to remember when attaching the fabric is to pay attention to the pattern on the front. Make sure you’re keeping the pattern straight. Of course if you have a more abstract patten or a solid color, you won’t have to worry about this.
I had enough fabric left over to create a window seat on top of a couple of the cabinets. The Circus loves to climb up here and chill.
The cool thing about this cabinet makeover idea is that if you ever want to change up the look of your space, you could switch out the fabric for a new print and create a whole new feel – and you’d never have to paint a thing!
Share any creative mudroom cabinet ideas you have in the comments!
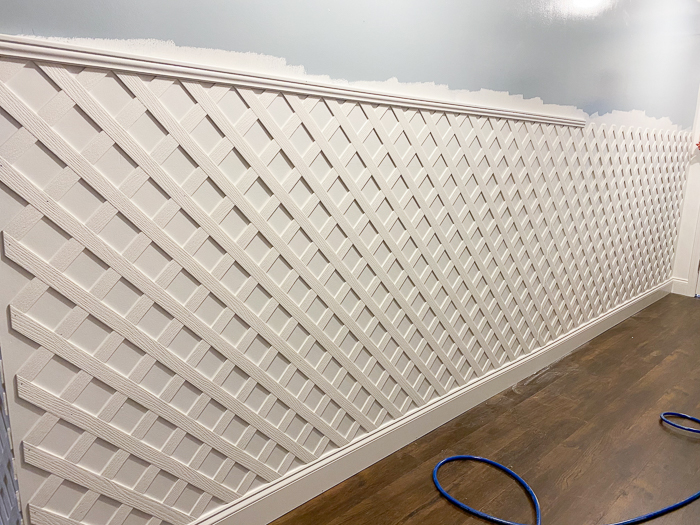
If you want to make a statement with your next accent wall, then look no further than this DIY indoor lattice wall. Your friends may think you’re crazy at first, but in the end their jaws are gonna drop.
Many of you thought I was crazy. Hell, I kind of thought I was crazy.
Many folks are seriously worried about how I’m going to clean them. To be honest, I don’t do a lot of cleaning, so there’s that. 😆 Really though, since everyone was so concerned, I put my thoughts on cleaning these at the bottom of this post.
For me though, I’d been thinking about doing a lattice wall somewhere for quite a while and when the mudroom’s design led that way, I knew it was now or never. Well, probably not really never, we all know I’m a determined soul when it comes to an out-of-the-box decorating idea.I did put green astroturf carpet on a wall after all.
While lattice walls will never be for everyone, they are most definitely a winner in my heart…
Thinking about working them into your own home? It’s actually a relatively easy feature wall to create….
This post contains affiliate links for your shopping convenience. Click here to read my full disclosure policy.
Before installing any lattice, you’ll need to determine what paint color you’ll be doing behind the lattice and paint the wall that color.
I had a lot of other colors and prints going on in this space, so I stayed with white-on-white for the walls and lattice. I have seen lattice accent walls that have one color on the wall and another on the lattice and it’s gorgeous. It just wasn’t the right move for this space.
For reference, I painted my walls Bit of Sugar by Behr and left the white vinyl lattice as-is and both whites worked well together.
If you’re planning to go with a color other than white for your lattice or if you’re using traditional wood lattice, you’ll also want to paint it first as well.
Paint any other trim you’ll be installing on the lattice walls now as well – i.e. the single lattice trim pieces, the cap molding, etc.
Baseboard also needs to be installed along your wall before installing the lattice.
Finally, go ahead and mark your studs along the wall using a stud finder.
Step 2
Now it’s time to put the lattice on the walls! This is actually really easy.
The lattice panels come in 4′ x 8′ sheets. So, if you’re looking at the sheets horizontally, they are 4′ tall and 8′ long. I did not cut any of the height off my panels. I only cut down the length if need be.
If you have a wall you are installing the lattice on that is longer than 8′, you should first determine where you want the seam to be where your panels will meet. I had one wall that was longer than 8′. I decided I would make the seam in the middle. I marked the middle and then used my level to draw a line.
Note: If you will have to use two or more panels on a wall, I highly suggest placing the seams along where a stud is.
Cut the lattice to length as needed. We used a circular saw for this.
After drawing your level line, line up one end of the lattice on the line, then attach the lattice to the wall using a nail gun or finish nails and a hammer where you’ve marked your studs.
This is the seam on my long wall where two panels had to meet up. As you can see, there is a gap. Both the walls and floors here are not level, so that was working against me. No big deal though – that gap is easily going to be covered with a single lattice wood strip.
The lattice should sit right on top of your baseboard, or be pretty close to it as shown below.
Continue installing the lattice panels around the rest of the room.
Step 3
Once all the lattice panels are installed, it’s time to make it look finished with your moldings.
You’ll want to install the molding cap above the lattice before installing the single lattice pieces to cover seams and corners.
Keeping it white-on-white also complemented the other colors, patterns and designs in this space without having the walls take away from the overall feel of the room.
And I adore how it’s the perfect backdrop for decorative accents like these and that red mirror.
And for those of you super worried about cleaning: since it was such a concern on this Facebook post, I tested out my Swiffer duster on them and that thing easily gets in all the nooks and crannies. The fact that I used the vinyl lattice panels which are thinner than traditional wood panels was key there too, I think.
So….would you do it? Could you handle lattice on your walls? 😬
A bright and colorful DIY mudroom makeover that brings the outside in!Featuring gorgeous lattice walls, bird wallpaper, pink and green hues and more!
While J. Lo worked her scantily clad 50 year old rockin’ body during the Super Bowl halftime, my 34 year old body, clothed in dirty sweats and embellished with numerous traces of paint, was sprawled out on the sofa engorging myself on chocolate ice cream.
Nope, not even J. Lo’s miraculous self-preservation could inspire me to put the ice cream down. It probably should have inspired me to not give myself such large scoops at least, but there was cause to celebrate.
And it wasn’t the game on television.
It was the completed mudroom…
This post contains affiliate links for your shopping convenience. Click here to read my full disclosure policy.
Y’all, it has been a crazy last couple of weeks. With all the delays I had on items getting here, Grunt and I worked nearly round the clock over the last week to get everything done in here on time. There is NO way this space would have ever been completed without him helping me out. He stepped in and installed the flooring, then took it upon himself to take on the moldings after that, went round and round with a light fixture and more. Thanks boo. ❤️
If you don’t remember what this space looked like before, here’s a little reminder.
One of the first things we did was install flooring in this space. We used Select Surfaces engineered vinyl plank flooring throughout the room. Getting rid of that old linoleum and putting this in laid the groundwork (literally!) for a fresh new space that can hold up to all our family’s shenanigans as well. Read more on the flooring and how we installed it here.
The cabinets got a huge makeover. You may have noticed in the before image that these cabinet doors had funky little holes in them. Well, that “design” has made me frown ever since we moved in here. I had the centers of the cabinet doors cut out, gave them all a fresh coat of Bit of Sugar, then installed fabric to the backs of the doors to cover the openings. I used this bamboo trellis fabric from Spoonflower to do the job. It coordinates nicely with the wallpaper and packs https://olxslot22.com/ a fun punch of pattern and color.
All the cabinets got new knobs and hinges as well. I wanted to go with a clean, polished finish for this space so I opted for polished nickel finishes. I used these acrylic cabinet knobs to compliment the bamboo fabric on the doors. To keep everything on this side from being too green, I hung one of SmithHonig’s gorgeous silk tassels on one knob.
This side also got a fun little addition in the form of a window reading seat for the Circus! This little area has always been here, but before we would just use it as storage for our grocery bags and things like that. When I had some of the bamboo fabric leftover, it hit me that this would make the perfect little window seat for my best girl. She thinks it’s super cool to climb up there away from the rest of the house. We also installed this bamboo roman shade here as well. It’s a simple pull down-push up shade, so the Circus can easily operate it herself.
As you may remember from last week, we installed a new, solid door in this space, which was much needed. I opted to give the door a pop of color, Bubble Shell by Behr to be exact. I found the Chinese symbol at a thrift store a while back. It means “long life.” I thought it was a nice little compliment to the door.
New lighting! These sure beat the bare bulb fixtures we were working with, eh? I wanted lights in here that were shiny and pretty, but that also wouldn’t take away from the gorgeous wallpaper and other patterns I was putting in this space. These semi-flush mounts were the perfect answer and they give us loads more light in here than the old ones did! Now I can actually see in my cabinets when I’m rummaging through them looking for something!
Speaking of wallpaper, what do you think of it? Sometimes I think I can actually hear the birds just singing off the walls. haha! This wallpaper from Milton & King was the jumping off point for the entire space. I fell for it first and then worked everything else around it. Its beautiful bird pattern brings the outside in and always makes for a sunny day inside even if it’s raining out. While the install for wallpaper does take time, it’s well worth it for the outcome you get!
Ahhh, the controversial lattice walls. Did you see my Facebook post about this? You either love it, hate it, or you’re really worried about cleaning it. 😂 While this was not the original plan, I LOVE that we did it! We used vinyl lattice panels for this project and I have to say, it’s one of the more easier wall treatments I’ve ever done. The full tutorial for the lattice walls is here. P.S. I’m not that worried about cleaning it. Since it’s vinyl rather than wood, it’s a lot thinner than traditional lattice. My Swiffer dust easily gets in those nooks and crannies.
Along this wall, we also added in a few of these polished nickel wall hooks for easy hanging storage. No mudroom is complete without a few hooks for hanging coats and bags, right?
I’ve got my felt tote bag from SmithHonig hanging on one now. This tote is great for just about everything. It has great little compartments inside to keep everything organized as well – no more digging around!
On the opposite end of the door is this little area. This space was originally the garage before previous owners added on. Thus, part of our heating unit and water heater are located in this room. I used this room divider to hide those, but still make them easily accessible if need be.
I took an old credenza I had and made it into a bench. It offers more storage and a place to sit down and put on / take off shoes. I wanted to keep some of the stained wood look on this piece to coordinate with the roman shades in the space, so instead of painting the entire thing I just painted parts of it in this light green hue from Velvet Finishes – so easy to do, only took a couple coats and I was done! I upholstered a piece of plywood with this pink trellis fabric from Spoonflower to create the bench top.
Turning the corner from the long lattice wall is this little nook. I wanted to have a drop zone for mail, keys, etc., so this little wall was prime real estate for a small console table to do just that. Seeing as how there’s lots of pattern and color going on in the space, this simple white one with clean lines worked perfectly. I did add the knobs to give it a glam little touch.
Do you recognize that mirror? It used to hang in the Circus’ bathroom before she got an upgrade. I always liked the look of it, so I hung onto it. I gave it a glossy coat of red spray paint and I love how it works in here. Hubba hubba!
I found this brass bowl at a yard sale for $3 and it’s going to be perfect for mail!
On the opposite end of the table, I mixed in a little blue and white decor along with a touch of brass and another SmithHonig tassel in Courtyard – these kick anything up a notch!
And last but not least, to give this space even more of an outside feel, I added in a faux fiddle leaf fig in a pretty blue and white fishbowl planter. My last two fiddle leaf figs haven’t fared too well so I decided to invest in a good lookin’ faux one.
And that’s a wrap for this space! Tell me what you think about it in the comments below!
Don’t miss the rest of the gorgeous room reveals today!
Looking for mudroom design ideas rooted in classic design, but still functional? And maybe there’s a pop of color here and there? You’re in the right place!
Happy New Year, freaks!
I hope each of you has had a wonderful holiday season! Our crew certainly did – in fact, I think it was one of my favorites to date. I felt like we all really slowed down and took time to enjoy every second we could of the season. We were also able to work in a couple of little trips – one including a tour of Goodwills around the state with my best girl. I completely lucked out on the whole kid thing. When she’s cool going thrift store shopping for an entire day, there isn’t much else you can ask for! haha!
To kick off the new year, the incredibly talented Stephanie of Casa Watkins Living has asked me to join in on the New Year New Room Refresh Challenge….
Myself and all those other talented folks you see above will be refresh one room in our homes throughout the month of January. You’ll be able to check in on our progress at each of our blog’s each Tuesday during the month. We’ll also be sharing lots on Instagram stories, so be sure to follow there!
What room am I making over? THE ONE ROOM IN MY HOUSE YOU’VE NEVER SEEN BEFORE….
This funky little space right here, folks:
So what kind of room is that? It’s a little space you walk into from our garage and through to get to our den. It also buts up to the guest bedroom. At one point, before the previous owners added an addition to the house, this space would have been part of the garage.
I’ve never really known what to do with this little L-shaped room. Yes, those built-in cabinets have been wonderful for storage, but did you notice the ugly little holes drilled into them for ventilation?
Those could be prettier, right?
I’m sure the blue all over the walls, trim and cabinetry didn’t sneak by you either. And there’s also that big eyesore of a heating unit in this space.
Over the past year, it has quickly became apparent to me how best to utilize this space: we need a true mudroom.
We have our laundry room-mudroom that I got into shape a couple summers ago and it’s perfect for the summer when we’re going to the backyard all the time, but we need a space now for throughout the year where we can come in and drop backpacks, riding gear, dance bags, hang coats, etc. And that’s just what this space is going to become…
DIY Mudroom Makeover
Overall, the mudroom design has a colorful classic feel. There are only two small windows in this space so I’m bringing in lots of white with a few pops of color.
Mudroom Plans
Have centers of cabinet doors cut out to remove ugly holes. Paint all the cabinetry white. Cover the now open door centers with this gorgeous Osaka Bamboo Trellis fabric. Replace cabinet hardware – currently thinking these beauties. I’m really excited to kick this storage area up a notch.
A couple of tassels go a long way when it comes to adding color and personality to a space. I’ll be tossing a couple of SmithHonig’s silk tassels around in the space.
The wall opposite the cabinetry and wrapping around the corner will be get a board and batten wall treatment and on top of that, this gorgeous Hawthorn wallpaper from Milton + King. I love the classic decor feel this paper has, but also the character added by the colorful birds. Also topping off the board and batten wall, will be a handful of these wall hooks, which will be great for not only hats and coats, but also a great tote.
In terms of flooring, we’ll be pulling up the old sheet vinyl flooring and installing Select Surfaces Engineered Vinyl Plank Flooring in Chocolate Oak. This flooring is waterproof, which was a must for this space since it’s partially below ground and it’s also an easy DIY install. To lighten up the flooring a bit and add some texture, I’ll top it off with a classic navy and beige rug from Mohawk Home. There will also be a pretty blue and white umbrella holder hanging around somewhere, which was my first purchase for this space months ago and the jumping off point for the design.
Finally, I’ll be bringing in a DIY mudroom bench by way of an old credenza. You may remember this credenza makeover from a few years back. I used it in my office for a while and always loved it. Even after I redid my office and there was no longer a need for it in there, I held onto it just in case. Well, “just in case” is here! Parts of this credenza will get a lightening up makeover with a coat of Velvet Finishes Cosmopolitan. I’ll be adding an upholstered top that sports this beautiful trellis pattern in coral. The top will also have a couple more decorative touches by way of two pillows – one in this pattern and another in this one. The bench will also add additional storage space to the mudroom since it has nice deep drawers on the base.
A huge thank you to all our sponsors for this challenge!
This girl has a lot of stuff to get done this month! Be sure to see what everyone else is up to with their room refresh:
Do you have a laundry mudroom space in your home? Whether the two are combined in one space or separate, this makeover will give you mudroom laundry room ideas that are pretty, but most importantly, functional.
This is one of those projects in which I eat my words.
Full on crow.
So here’s the thing.
A few years back, when everyone and their mama was giving their laundry rooms these beautiful makeovers, I was like, “Nope. Totally not spending money to make my laundry room look better when no one ever sees it.”
Also, I hate bandwagons. And that seemed like a kind of bandwagon thing. So I totally ran running in the opposite direction.
Back then though, we lived in the Beloved Foreclosure. And the laundry room was in the garage, hence there really wasn’t a laundry room at all, more like a spot for the washer and dryer. So duh, totally not putting in pretty tile or an elaborate wallpaper there.
And in the 70’s Landing Pad, we have a laundry room that opens to the den. And also to our backyard. So it also functions like a mudroom for us. We use this space a good bit. And when people are over, they see this space. And there was no door to close it all up.
And it was looking like this…
Disclosure: Aiden Lane provided me with the bench and ironing center. All opinions are 100% mine. This post contains affiliate links for your shopping convenience. Click here to read my full disclosure policy.
It’s been two years since we moved into the house and y’all, we hadn’t done a thing to this space. Well, I had ripped down the curtains in a fit of anger one day, but besides that, the walls and trim were still adorned with cornflower blue.
On top of it all, the room was just gross. The walls and tile floor all needed a good scrubbing like five years ago.
Obviously, it was also ugly.
I knew this space needed to look better. I couldn’t just close a door and it be hidden. And, I wanted it to look better.
But I didn’t really know where to start or what I wanted to do with it besides that it needed to be a functional laundry room and it would be good to also use it as a mudroom to drop and store things that we take outside to play with and things for the pool.
Mudroom Laundry Room
Finally, inspiration struck and the whole design plan came together for this space in under 24 hours when I happened upon this wallpaper one afternoon.
This light bulb moment is when it also became obvious to me that I was about to eat crow.
So I did what I said I wouldn’t do. I spent money on my laundry room. I also made it function as a mudroom to justify the costs more in my head. 😉
The space is now light, bright, airy, colorful and I love every damn inch of it. As it turns out, that crow didn’t taste half bad.
This is looking into the laundry / mudroom from the den. Obviously, I painted all the walls and trim. The trim and back door got a fresh coat of white paint and the walls got a coat of Vanilla Paste – bye bye cornflower blue. Now, I refused to replace the tile in here. Instead, I spent a few days scrubbing it clean with my SteamMachine and it’s brass brush attachment.
Y’all, this tile was disgusting – I wore out four of those brass brushes. I hadn’t realized just how bad it was. For the most part, it cleaned up really well. There are some spots on the grout that didn’t clean up, but I think they are permanent stains and that’s alright – it’s just a mudroom and laundry room.
I tried to take advantage of just about every inch of wall space I had and maximize it for storage and function. On this wall, I hung three hooks to hold wet towels as people come in from the pool. I also splurged on a new beach towel because it coordinated perfectly with that flamingo art print. Also, we use the heck out of beach towels around here with our pool so it won’t just be hanging there looking pretty.
Since most of the walls in here are neutral, I wanted to bring in lots of playfulness and color with art. This flamingo print called Bird Bath fit the bill. I think it has a slight Palm Beach vintage type feel to it and y’all know, I’m a sucker for that. Plus, anytime I see a flamingo or a flamingo art print, I always think of the Circus at age two carrying around plastic flamingos from the screened in porch at our old house kissing and loving on them.
This wallpaper was what spurred the whole makeover. I fell in love with its somewhat vintage, but colorful and playful feel. The fact that it was so colorful made it basically effortless to coordinate other things in the room with the wallpaper – I had a slew of colors to choose from that would work well with it.
Also on this wall, I added one single piece of “art” – one of the Circus’ swimsuits from when she was a baby. From the time I found the Swimmers wallpaper, I knew putting one of her swimsuits on the wall was only fitting. I bought this shadow box from Michael’s, ironed the swimsuit really well then used pins and double sided tape to mount it inside the frame.
Since this is the room where everyone usually heads to the pool and/or backyard from, a place to sit down and put some sunscreen on or take some muddy shoes off was needed. However, as I said earlier, I also wanted to create as much storage as I could for this space. This Hart Storage Bench from Target met both those criteria.
First off, it’s gorgeous. To me, this bench has a classic feel that won’t easily date and I feel like it might also have a touch of Hampton/Nantucket style in there too. I’ve never been to either place, but ya know, that’s what this bench tells me. 😉 Second, it seems extremely well made. You do have to put it together, but this thing is solid. Third, it has hidden storage! And last but not least, all that for under $150!
The seat of the bench is divided into two sections that each lift up for hidden storage. I stashed away all our extra beach towels in here and still have room left to grow.
Incorporate a Workspace for Laundry or Small Outdoor Projects
Turning to the right of the bench, is a backdoor that leads outside as well as the kitchen island from our previous house.
When my in-laws remodeled the kitchen at our old house (remember – they moved into the Beloved Foreclosure after we bought the 70’s Landing Pad), they wanted a kitchen island with more hidden storage. Since Grunt and I built the kitchen island that was there ourselves (while I was pregnant and with barn wood from my great grandfather’s barn), I wanted to hold on to the island. We brought it to our house and put it against this wall in the laundry room as a folding center of sorts.
I found the red and aqua buckets at Target in their seasonal/summer section and was so excited to find them since they matched perfectly with the Swimmers wallpaper. They were just $6 a piece too! They hold work shoes and larger outdoor play items like basketballs, etc. – great storage space!
When I found this Play the Day Away art print, it was obvious it would work perfectly in the mudroom laundry room, but I also loved it because it’s a little reminder to literally play the day away and have a good time right before you walk out the backdoor.
Also, if you’ve seen any of my Instagram Stories lately, you know I’ve been working on my cut flower garden this summer. Those sunflowers were cut straight from that garden!
Don’t try to hide the washer and dryer away.
Turning the corner again, is where our washer and dryer are housed.
If you remember from the before photo, this space had doors on it. We actually opted to take those doors off and get them out of the way to make it a little easier to do laundry. I should also state here that Grunt Labor does all our laundry and if taking doors off to make it easier makes him happier while doing the laundry, then I’ll do that and whatever else it takes so that I don’t have to do the laundry. Praise Jesus for men who do the laundry, because otherwise our family would be running around either naked or in smelly clothes.
I did give this entire closet/now alcove a coat of paint to brighten it up. I also replaced the shelf that was above the washer and dryer as the old one was gross and one side was being held up with a vertical 1″ x 4″ coming up from the ground.
Maximize Wall Space
To the right of the washer /dryer area, we installed a wall mount ironing center.
Previously, the ironing board was stashed to the side of the dryer and the iron was in the upstairs closet. I realize this made no sense at all. Needless to say, when something needed ironed, I really evaluated how badly it needed ironed before I lugged everything out. And more often than not, I ended up wearing something that was a little wrinkled. This ironing center makes it so much easier to get things ironed.
All you do is open the door, flip down the ironing board and pull out your iron, starch, whatever you need. It can all be stored right there in the cabinet. There’s even a couple of hooks for you to hang stuff on if needed.
There was also another open closet area in this space when we first got the house. We opted to remove some of the trim around the opening in order to fit the refrigerator in here that had once been in the kitchen. This frig holds lots of cold drinks that people can easily run in and get when they are outside.
Get Creative with Storage
There was a little wall space here left for claiming and I did just that by adding more storage here. I hung vintage metal locker baskets with cup hooks (be sure to hit studs or use anchors if you do this!) to hold more outdoor related items. The top one has all our sunscreens and the bottom one holds smaller pool toys like water guns, etc. I went with the cup hooks so that the whole basket could easily be taken off the wall to take outside and then just brought back in and popped up on the wall again.
That’s it for this mudroom laundry room makeover, but probably not the first time I’ll have to eat my words. 😉
Share any modern mudroom laundry ideas you have in the comments!
Looking for more great ways to organize and maximize storage?