Tag: kid’s room

  • Seeing Red. The Circus’ Farmhouse Bedroom Plans

    Seeing Red. The Circus’ Farmhouse Bedroom Plans

    I didn’t want to be that mom.

    That mom who never let her kid have the kind of room they wanted.

    That mom who didn’t give her kid any creative freedom when it came to decorating their room.

    I really really didn’t want to be that mom.

    This is where not being that mom got me…

    The Bedroom Now

    A bright red room I’m not quite sure what in the hell to do with.

    The Circus insisted on having a red room at the farm. Absolutely could not be swayed any other way, folks.

    So I will say that the 1st photo above was taken in very bad lighting, so that picture might be making it seem a little worse than it actually is. And nothing is really on the walls yet. And everything else is just thrown into the room haphazardly.

    But still.

    It’s a whole lot of red. And I love red. It’s one of my favorite colors. But this red, y’all. I just don’t know.

    I’m trying though. I’m putting forth an effort to make this red work because this little girl loves this red. So here’s what I’ve come up with…

    Disclosure: Affiliate links may be included in this post. Minted provided me with the art for this room. All opinions are 100% mine.

    Colorful Boho Cowgirl Girls Bedroom Design

    Chandelier / Horse Art / Lucky Girl Art / Bedding / Curtains / Blue Paint / Purple Paint / Coral Paint

    I’m calling it a Colorful Boho Cowgirl Bedroom. I need something that sounds halfway legit to keep me going here, folks. 

    My general thought is that I need to make that red paint the backdrop, instead of the focal point, much like I do with the black walls in the living room and dining room at The 70’s Landing Pad. In this case, I figure the way to do that is to add in other colors that work with the red, some white and eye catching patterns.

    Colorful Boho Cowgirl Girls Bedroom Design: Colors and Textiles

    Light Blue Color / Purple Color / Coral Color / Bedding

    I found this colorful floral bedding from Target and the red that’s on the walls seems to go well with the red in the bedding. Since the bedding also has so many other colors, I figure I can pull multiple other colors from it as accents throughout the room that will also work well with the red. I matched up Velvet Finishes colors to some of the colors in the bedding, so I think I’m going for using the Boheme (light blue), Stately (purple) and Exotic (coral) as those accent colors. I’ve got to paint her toy chest and bookshelf in this space, plus a few other odds and ends, so hopefully those colors will work with some of those things. I’m actually thinking that what I might do is create a plaid sort of pattern with those three colors plus white on her toy chest. We’ll see….

    Colorful Boho Cowgirl Girls Bedroom Design: Textiles

    Bedding / Tassel Trim Curtains

    I had already let her pick out curtains for her windows and she chose these tassel trimmed ones from Target and they go perfectly with the bedding so there’s one win at least.

    Colorful Boho Cowgirl Girls Bedroom Design: Art

    Lucky Girl / Desolate

    We’ve already got our art for the space too – she chose Desolate and I chose Lucky Girl for her room. Both came from Minted, so we were able to customize the size and frames. We got both frames in the rustic-y indigo color you see around the horse print above. The horse print is large, so it will definitely help with taking some of the attention away from the red too.

    Colorful Boho Cowgirl Girls Bedroom Design: DIY Tassel Fringe Lighting

    Tasseled Chandelier

    This isn’t the actual light fixture I’m going with, but….wait for it….I’m going to attempt to DIY a similar version of this one. Yes, I’m crazy, and no, don’t hold your breath on this one. It may not work at all, but I’ve got a plan, so I’m going to give it a whirl. This one is beautiful, but out of our budget, and I’d prefer it be a little more playful for the Circus’ room anyway.

    So what do you think? Have you ever pulled off a red room before? Any ideas or tips you want to share? I am all ears!

  • How to Create an Object and Text Feature Wall

    How to Create an Object and Text Feature Wall

    Man, this wall has been nearly a year in the making. When I found out we were moving and started plotting out the Circus’ room, I knew this wall was a must. I really wanted a way to convey the Circus’ unique personality and I think this object and text feature wall was the perfect way to do it.

    How to Create an Object and Text Feature Wall | Perfect for a kid's room and totally customizable! Great way to add a kid's unique personality to their room!

    You may have seen a wall similar to this in a Kate Spade store. I’m not sure if every store has them, but I know the one that I have been in does have one and it’s what inspired this wall. Of course, the Kate Spade version doesn’t mention yard sales or tutus, but that’s their loss. 😉

    How to Create an Object and Text Feature Wall

    Tools & Supplies

    • Custom Wall Decal (I got mine from Wall Quotes – I’m going to show you how I made it. Disclosure: They gave me my decal to use in this post, but I had planned on buying one anyway.)
    • Objects (to add into the wall and take the place of some words)
    • Paint and FrogTape (if you want to change the color of your wall where the decal will go)
    • Command Strips and Command Hooks to hang the objects

    Steps

    Step 1. 

    The first thing you’ll want to do is come up with your text. If you’re doing it for a person, make a list of things they really love or that describe them and then work those into sentences. After you’ve done this, go back through and make note of words that you could actually replace with objects. We did this with the words horse, tutu, cowboy boots, money, yard sale and umbrella.

    Step 2. 

    Now you’re ready to make your decal. I made my decal through the Design Your Own feature at Wall Quotes. The design center walks you through all the steps, but I also made a video to show you specifically how I made mine.
    [adthrive-in-post-video-player video-id=”rejB6yTP” upload-date=”Fri Sep 16 2016 18:40:58 GMT+0000 (Coordinated Universal Time)” name=”Rain on a Tin Roof – How to Create a Text Feature Wall” description=”Create a text feature wall that perfectly describes your child with a touch of whimsy!”]

    When you make your decal in the design center, I think the biggest thing is making sure you have the dimensions of the wall area set correctly. The spaces in the sentences didn’t really matter that much while making the decal because I had to cut some sentences into two pieces to make room for the objects anyway. Also, make sure to take into account your wall color. I knew I was painting this section of the wall white, thus why I set it to white when making the decal.

    Next, try to wait patiently for your decal to arrive! 😉

    Step 3. 

    If you’re planning to paint the area of the wall where the decal is going, go ahead and do so. I didn’t realize that the wall needed to be painted at least three weeks prior to the decal going on until I got my decal, so that slowed my project up a bit. I just rolled some bright white paint (Bit of Sugar), onto the wall.

    Step 4. 

    When your decal arrives, pull it out of the box and unroll it.

    How to Create an Object and Text Feature Wall | Get a custom made wall decal.

    When I unrolled mine, I realized I was definitely going to have to cut the sentences into strips for it to feel the space I wanted it to on the wall.

    How to Create an Object and Text Feature Wall | Get a custom made wall decal.

    That wasn’t a big deal at all – it didn’t affect the text in any way.

    Tape your strips onto the wall and move them around until you get them where you want them.

    How to Create an Object and Text Feature Wall | Place decals on wall.

    Once I got the strips where I wanted them, I tested out the objects in their spaces and ended up cutting most of the sentences where the objects would go so I would have room for the actual object.

    Step 5. 

    Once you have all the strips in place where you want them, it’s time to start actually applying the decal to the wall. Instructions and an application tool are included with Wall Quotes decals. It’s really simple though.

    How to Create an Object and Text Feature Wall | Place decals on wall.

    Just apply tape to the top portion of the strips (as shown in that top sentence of mine), carefully pull the backing from the strip, then smooth the top portion onto the wall. Use the application tool to fully smooth and apply the decal onto the wall, then pull  back the top portion.

    How to Create an Object and Text Feature Wall | Place decals on wall and add in objects as you go.

    Add in your objects as you go so that you can move strips if you need to.

    Step 6. 

    If you painted the area where you put the decal and objects, then use FrogTape to straighten up the edges and go back over the outside with your wall color.

    How to Create an Object and Text Feature Wall | Perfect for a kid's room and totally customizable! Great way to add a kid's unique personality to their room!

    I used Command Strips to keep the horse and boots on the wall. The tutu is held up by clothespins that are hot-glued to the wall. The dollar bills are just taped and the coins are hot-glued. The yard sale sign is taped and the umbrella is hung on Command Hooks.

    How to Create an Object and Text Feature Wall | Perfect for a kid's room and totally customizable! Great way to add a kid's unique personality to their room!

    I really love this little sneak preview you get of the wall when looking into her room.

    How to Create an Object and Text Feature Wall | Perfect for a kid's room and totally customizable! Great way to add a kid's unique personality to their room!

    The Circus can still easily get the umbrella and tutu down to play with. The cowboy boots are actually too small for her, so she’s ok with them being on the wall. She was a little upset when I went to put one of her horses on the wall, but when I pulled out the 50 other ones she had, she forgot about that one real quick.

    Only a couple more projects to go in her room!

    What do you think about the new wall?!

    You can make your own custom decal at Wall Quotes.

    You might also want to see these…

    IKEA Bookcase turned Dress-Up Closet

    Easy DIY Lemonade Stand - use this tutorial to make a simple lemonade stand for kids!

    Easy DIY Lemonade Stand

    This is such an easy build! Any beginning DIYer could complete these! Great for kid's rooms and home offices! How to Build Wall to Wall Shelves in an hour for $50

    How to Build Wall to Wall Shelving Easily

    blog-signature-summer-15

    pin-this-post-2

    Learn how to create an object and text feature wall - perfect for a kid's room and totally customizable! Great way to add unique personality to a space!

    SaveSave

  • Summer Home Tours: The 70’s Landing Pad Home Tour, Part 2

    Summer Home Tours: The 70’s Landing Pad Home Tour, Part 2

    It’s official.

    I’m not Superwoman.

    Sometime last week though, I thought I was.

    You see, I thought that after showing you the first part of my home tour last week, I would be able to show you the rest of the house today. This would have entailed me finishing out all the trim painting in the master bathroom as well as staining the vanity, cleaning and decorating the den, same with the Circus’ room and then photographing it all.

    I have no idea what I was thinking, but around noon on Saturday as I was staining the vanity two hours before my daughter’s dance recital, it occurred to me that the doors wouldn’t be able to go back on for at least five days so the topcoat could fully cure. At that point, I decided that you would understand and that giving you a tour of our master bedroom and the Circus’ bedroom would be good enough because that’s the best I could do given that I didn’t wake up with those superpowers I’d been praying for.

    So if you are one of my regular freaks around here, I realize you’ve already seen our master and the only thing new will be the Circus’ room. But I know you understand. If you’re new here and hopping over from Marty at A Stroll Thru Life (our hostess with the mostest) or Alicia at Thrifty and Chic, then I hope you’ll enjoy the tour and come back for the rest of the room reveals later. You can also see the first part of my home tour – the living room, dining room, hall bathroom and my office – here. Also, be sure to visit the rest of the stops on the tour today at the bottom of this post!

    Affiliate links may be contained in this post.

    Master Bedroom

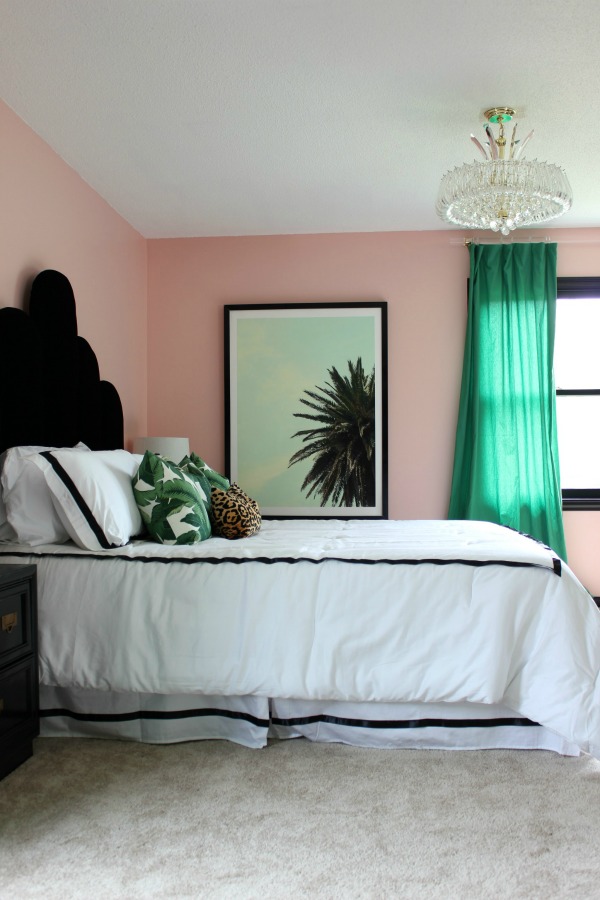
    This master bedroom makeover is a MUST-SEE! Who knew pink could look so good?! It's an eclectic vibe of old Hollywood glamour meets Palm Beach decorating styles! The 70's Landing Pad Home Tour, Part 2: The Master Bedroom | Palm Tree Art | DIY Scalloped Headboard

    Master Bedroom Details / Pink Wall Color / Black Trim Color

    I have to say, I fall a little more in love with our master bedroom everyday.

    This master bedroom makeover is a MUST-SEE! Who knew pink could look so good?! It's an eclectic vibe of old Hollywood glamour meets Palm Beach decorating styles! The 70's Landing Pad Home Tour, Part 2: The Master Bedroom | Palm Tree Art | DIY Scalloped Headboard

    Green Curtains / Bedding / Palm Print Pillow / Leopard Print Pillow

    It has quickly become our escape, which I know is extremely cliche to say, but we never had that before at our previous home.

    This master bedroom makeover is a MUST-SEE! Who knew pink could look so good?! It's an eclectic vibe of old Hollywood glamour meets Palm Beach decorating styles! The 70's Landing Pad Home Tour, Part 2: The Master Bedroom | Palm Tree Art | DIY Scalloped Headboard

    Chandelier / Green Curtains

    This room was actually the very first room to get completely redone at the 70’s Landing Pad. I call it the Well Traveled Master Bedroom.

    This master bedroom makeover is a MUST-SEE! Who knew pink could look so good?! It's an eclectic vibe of old Hollywood glamour meets Palm Beach decorating styles! The 70's Landing Pad Home Tour, Part 2: The Master Bedroom | Palm Tree Art

    Palm Print Art

    It’s a mix of Palm Beach meets Hollywood Glamour.

    This master bedroom makeover is a MUST-SEE! Who knew pink could look so good?! It's an eclectic vibe of old Hollywood glamour meets Palm Beach decorating styles! The 70's Landing Pad Home Tour, Part 2: The Master Bedroom | DIY Black and White Accent Wall | Mix of Modern and Vintage Design Styles

    And a dose of bold black and white.

    This master bedroom makeover is a MUST-SEE! Who knew pink could look so good?! It's an eclectic vibe of old Hollywood glamour meets Palm Beach decorating styles! The 70's Landing Pad Home Tour, Part 2: The Master Bedroom | DIY Black and White Accent Wall | Mix of Modern and Vintage Design Styles

    Mirror (I painted mine.) / Pink Lamp (similar) / Banana Leaves Art / Design Sponge Book 

    And where modern meets vintage.

    This master bedroom makeover is a MUST-SEE! Who knew pink could look so good?! It's an eclectic vibe of old Hollywood glamour meets Palm Beach decorating styles! The 70's Landing Pad Home Tour, Part 2: The Master Bedroom | DIY Carpet Covered Wall

    Also, a green carpet covered wall fits in just right as well.

    This master bedroom makeover is a MUST-SEE! Who knew pink could look so good?! It's an eclectic vibe of old Hollywood glamour meets Palm Beach decorating styles! The 70's Landing Pad Home Tour, Part 2: The Master Bedroom | DIY Carpet Covered Wall

    Bamboo Lamp (similar) / Closet Medallions 

    You can also see more of the master bedroom makeover including before and after shots here.

    The Circus’ Room

    Such a perfect kid's room - not too babyish, but not too grown up. Will grow well with the child! LOVE all the color! A must-see! The 70's Landing Pad Home Tour, Part 2: The Circus' Room | Kid's Bedroom Ideas | Love the mix of colors and patterns in this child's room.

    Wall Color / Bedding / Horse Sheets (similar) / Tassel Pillow

    If you’re new here, the Circus is my four-year-old daughter.

    Such a perfect kid's room - not too babyish, but not too grown up. Will grow well with the child! LOVE all the color! A must-see! The 70's Landing Pad Home Tour, Part 2: The Circus' Room | Kid's Bedroom Ideas | Vintage Brass Bed | Pops of Color in the Decor

    Rug

    We call her that because she could truly be a three-ring circus all by her little thirty-pound self.

    Such a perfect kid's room - not too babyish, but not too grown up. Will grow well with the child! LOVE all the color! A must-see! The 70's Landing Pad Home Tour, Part 2: The Circus' Room | Kid's Bedroom Ideas | Silhouette Art

    Custom Silhouette Art / Tassel Pillow

    When it was time to plan out her new room, I got her input on just about everything.

    Such a perfect kid's room - not too babyish, but not too grown up. Will grow well with the child! LOVE all the color! A must-see! The 70's Landing Pad Home Tour, Part 2: The Circus' Room | Kid's Bedroom Ideas

    Yellow Table Color / Cowgirl Lampshade

    It was clear that blue, horses and other animals were a must.

    Such a perfect kid's room - not too babyish, but not too grown up. Will grow well with the child! LOVE all the color! A must-see! The 70's Landing Pad Home Tour, Part 2: The Circus' Room | Kid's Bedroom Ideas | Vintage Cowboy Blanket paired with Modern Rug

    She also decided yellow was a pretty good idea as well and a touch of purple.

    Such a perfect kid's room - not too babyish, but not too grown up. Will grow well with the child! LOVE all the color! A must-see! The 70's Landing Pad Home Tour, Part 2: The Circus' Room | Kid's Bedroom Ideas

    White trim and accents helped to balance it all.

    Such a perfect kid's room - not too babyish, but not too grown up. Will grow well with the child! LOVE all the color! A must-see! The 70's Landing Pad Home Tour, Part 2: The Circus' Room | Kid's Bedroom Ideas

     Mirror (similar)

    Such a perfect kid's room - not too babyish, but not too grown up. Will grow well with the child! LOVE all the color! A must-see! The 70's Landing Pad Home Tour, Part 2: The Circus' Room | Kid's Bedroom Ideas | DIY Headband Holder | DIY Sunglasses Holder

    DIY Sunglasses Holder / DIY Headband Holder

    Such a perfect kid's room - not too babyish, but not too grown up. Will grow well with the child! LOVE all the color! A must-see! The 70's Landing Pad Home Tour, Part 2: The Circus' Room | Kid's Bedroom Ideas

    Rhino (similar) / Horse (similar) / Dog

    Such a perfect kid's room - not too babyish, but not too grown up. Will grow well with the child! LOVE all the color! A must-see! The 70's Landing Pad Home Tour, Part 2: The Circus' Room | Kid's Bedroom Ideas | Yellow Bookshelf

    Yellow Bookshelf Makeover

    And there’s a touch of brass and chrome here and there because as she said, “I like the shiny things, mama.”

    Such a perfect kid's room - not too babyish, but not too grown up. Will grow well with the child! LOVE all the color! A must-see! The 70's Landing Pad Home Tour, Part 2: The Circus' Room | Kid's Bedroom Ideas | Yellow Bookshelf

    It just further proved she was mine.

    Such a perfect kid's room - not too babyish, but not too grown up. Will grow well with the child! LOVE all the color! A must-see! The 70's Landing Pad Home Tour, Part 2: The Circus' Room | Kid's Bedroom Ideas | Donkey Art | Faux Cowhide Bench

    Donkey Art

    Such a perfect kid's room - not too babyish, but not too grown up. Will grow well with the child! LOVE all the color! A must-see! The 70's Landing Pad Home Tour, Part 2: The Circus' Room | Kid's Bedroom Ideas | Faux Cowhide Bench | Horse Pillow

    Horse Pillow

    She’s one cool cat.

    Such a perfect kid's room - not too babyish, but not too grown up. Will grow well with the child! LOVE all the color! A must-see! The 70's Landing Pad Home Tour, Part 2: The Circus' Room | Kid's Bedroom Ideas

    …and really loves her new room.

    You can tour the living room, dining room, hall bath and office here.

    Shop the home tour…

    [show_shopthepost_widget id=”1866967″]

    The 70's Landing Pad Home Tour, Part 1

    The 70’s Landing Pad Home Tour, Part 1

    The next stop on the summer home tours is Laura from Duke Manor Farm – it might be one of my favorite tours just because there’s a chicken on top of a donkey! I’m not kidding!

    SaveSave