Tag: furniture

  • How to Decorate with Inherited Furniture without Making Your Grandparents Roll Over in Their Graves

    How to Decorate with Inherited Furniture without Making Your Grandparents Roll Over in Their Graves

    My family is not a family who easily gets rid of things. When cars of those gone before us stop running, we park them on family land to serve as a sort of monument, a reminder of the soul before us who drove that truck and caused millions of tiny burn holes in the seat from his cigarettes.

    We don’t sell their houses. Grunt Labor often jokes that our family owns more houses than it has families to live in them. He’s right. We don’t hold estate sales when loved ones pass. Whatever items of theirs are not taken when things are divided up, get put into a basement or attic or garage for storage until a member of the family decides they really want that old chaise lounge from the 40’s.

    My people find it hard to let go. Some might call us hoarders, but that wouldn’t be true because it is in fact possible to navigate easily through each of our houses. Perhaps pack rats is a better term and I won’t deny that one. However, my preference is to think of us as collectors and keepers of the family history.

    The person who has the most issues with letting go is me. Everyone knows that if no one else wants it, but they just don’t have the heart to give it to Goodwill because it was a gift from so & so to so & so on their wedding day yada yada yada, then by God, give it to Jenna because she’ll hold onto it till the end of time whether or not she actually has a place or need for it. She’ll also be able to give the next generation a mostly accurate work-up of it’s history in the family.

    Here’s the thing though. Not all of those inherited pieces always fit in perfectly with my decorating style. You’ve ran into that problem too, huh? When I first realized this, I just kind of lived with it. I thought it would be a sin to paint something or repurpose it to make it more “me.” Well, that was just damn stupid, y’all. I’m here to tell you that your grandparents will in fact not disown you from the grave if you paint their kitchen table you spent countless hours with them at and turn it into your desk. In fact, I think they might be damn proud of your ability to repurpose items and love the fact that it’s like you still have coffee with a little piece of them every morning.

    So here’s where I give you all the “It’s ok to….” lines. Just imagine it’s your grandmother saying it. I do this all the time. The only time I got in trouble for it was when I turned my great-grandmother’s china cabinet into a liquor cabinet and I’m pretty sure I heard her sigh, throw her hands in the air from beyond the grave and say, “Whatever,” somewhere in the distance. She still loves me though and I did name my kid after her so I figure that got me back in her good graces.

    1. It’s ok to paint it.

    You see that buffet? It was my great Aunt Treva’s. I never met her, but my uncle, her brother, used to tell me I was a lot like her. He said she was a lot of fun, so I’ll take that. When I got the buffet it wore its original stain. Eventually it went to a periwinkle hue. Then red. And now, it’s stained once more, but not the same shade as before. The same is true of the matching dining room table that goes with the buffet. It was stained to begin with, now white, but will soon be stripped and stained again. Now, you can’t tell me my Aunt Treva doesn’t think her buffet looks killer in front of my black and and white gallery wall.

    My great Aunt Lee gave me this chest of hers about 10 years ago now. On the inside lid, it has the emblem of her college. I used it as as storage chest for quite a while, but when the Circus started amassing a huge collection of toys, I decided to paint the chest, add little birdies and make it her toy chest.
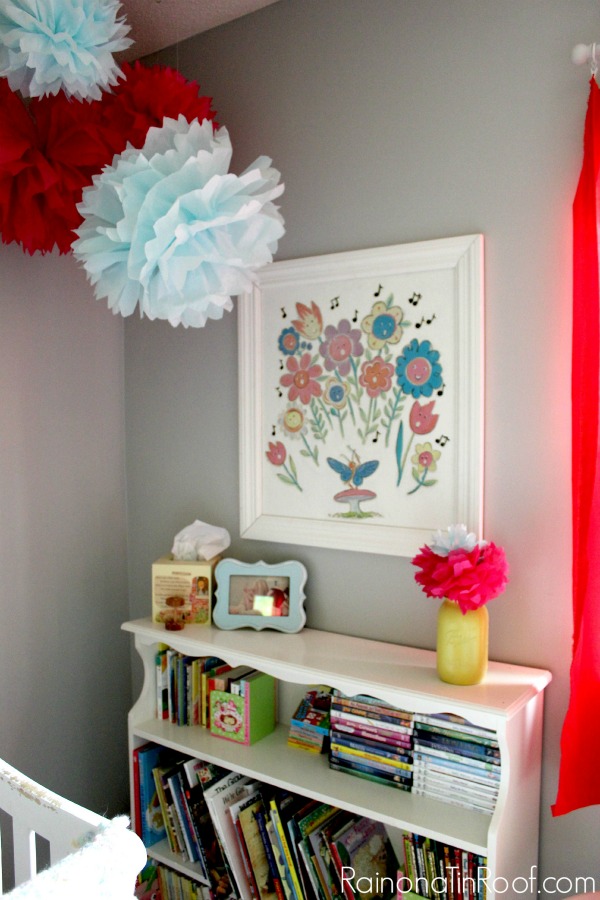
    When I was a little girl, that bookshelf was filled with 30+ years of yearbooks from my grandmother’s days as a teacher. I could probably still look through one and tell you the names of people just by looking at their faces – I looked at those yearbooks that much. Sitting criss-cross in the floor in front of that bookshelf with a yearbook in my lap is one of my most vivid memories. The bookshelf was stained then, but that wouldn’t work in my daughter’s nursery, so I painted it for her. She has a new bookshelf for her room at the 70’s Landing Pad, so this one will be getting another makeover for my office.

    2. It’s ok to repurpose it too.

    This one makes my heart smile every time. That desk is the one I’m sitting at now typing this post. It’s also the kitchen table I sat at over 15 years ago while my Pap and I stared at far too many grapes my father sent over and told us to do something with and we finally figured out how to make grape jelly. It’s the kitchen table where I sat on top of on my first birthday and drank from a mustard bottle my grannie filled with milk while my uncle put icing from my cake on my nose. It’s where my Pap waited for me to arrive every morning during the summer of 2001. That table has a history. I took the side leaves off it (but kept them in case I want to put them back on again) and added a hutch on top to make it my workstation. It’s served me well my whole life.

    And this is the one where my great-grandmother would have probably liked to come up from the grave and give me a swift kick in my rear end. This was her china cabinet. I had never really considered using it as anything else, but when Grunt Labor saw it for the first time, he stood in front of it in silent thought for about five minutes, then proclaimed it was meant to be a liquor cabinet. And I agreed with him. He and Nick knocked out a couple of shelves to make it work and Nicky nearly peed his pants when I told him mid-hammer swing that it was my great-grandmother’s china cabinet. But in the end, it does work better for us this way. I still remember it painted black in the corner of my great-grandparent’s house, but now it has lots of new memories as well.

    Apparently, I have a thing with bars. This vintage radio was my great-grandfather’s and while I didn’t necessarily want to paint it, it’s stained finish was simply too far gone. The radio didn’t work either, so I turned it into a bar cabinet for Grunt Labor’s man cave.

    3. It’s ok to mix and match.

    When my great uncle died, my uncle who inherited his things gave us a bedroom set from his house. We really needed the dresser and chest of drawers for our master bedroom, but the bed was too small for us. We split the set up and put the bed in the guest bedroom and the chest and dresser in our bedroom.

    4. It’s ok to embrace them just the way they are.

    There are some things you won’t be able to change – things that have too much of a stronghold on your heart that you can’t bear to see them any other way than the way you saw them growing up. This lamp was one of those things. My pap made it. Many might consider it out of style. I don’t give a damn. I love it. It works perfectly in our living room. For me – painting this was unthinkable. However, it’s finish was in bad condition, but I found a way to fix it.

    The same is true of this marble topped table. The finish is no longer shiny on it’s base, but I love this table just the way it is.

    5. It’s ok to pull out the little things.

    I carried my grandmother’s guitar around in its case from three different houses before it finally dawned on me to get the thing out and decorate with it for all to see. It was actually Bill who saw it out one day after the Circus had been “playing” it and said, “I like how that looks over there.” And he was right – it fit in perfectly. Don’t leave the small heirlooms tucked away. Get them out – let them breathe. I guarantee you they will make you smile when you pass by them.

    This one right here – it’s one of my favorites. My dad and uncle’s old cowboy blanket paired with my pap’s cowboy hat, my boots and a random confetti wall. I once told someone that if you threw me up on the wall, this is what it would look like. That’s about right.


    Now, repeat after me.
    It’s ok to make my grandparent’s pieces my own.
    They’ll still hold the memories, but now they’re ready to make even more.
    How do you decorate with your inherited pieces?

  • Painting 101: Topcoats and when to use them

    Painting 101: Topcoats and when to use them

    Wondering what top coat to put over paint? Specifically what kind of top coat for painted furniture? Consider this guide the holy grail for just that. It will walk you through all the different types of top coats and when to use each.

    The first few pieces of painted furniture I did, I had no idea what a topcoat was or that I was supposed to use them to seal and protect furniture.

    I quickly learned that if you paint a piece with a flat sheen of paint, you will eventually wind up with a bruised and scratched up piece of furniture – that ain’t pretty.

    You live. You learn.

    And then get Luvs.

    Not really, those diapers were never great for us.

    It took a few more tries, but I finally realized the benefit of a topcoat and when to use one.

    This post contains affiliate links for your shopping convenience. Click here to read my full disclosure policy.

    Lists different topcoats for furniture makeovers, what to use each one on and how to do it. | Furniture Top Coat | Furniture Makeover Ideas

    Topcoats and When to Use Them

    Painting Topcoats and When to Use Them

    Polyurethane

    Polyurethane - use on wood. Painting 101: Topcoats and when to use them

    Polyurethane is most typically used on stained wood and gives a very durable finish. I don’t recommend polyurethane for painted furniture, because it tends to yellow the paint over time. Its also oil based, which works best on top of stained wood and other oil based paints. I do use Minwax Polyurethane to protect stained pieces like the inside of my front door. I typically brush on a light coat with a high quality paintbrush, followed by a light sanding, another light coat, light sanding, then a final light coat. I haven’t tried the wipe-on poly, but I have heard good things about it. I usually go with a satin polyurethane because the gloss is pretty glossy. If you don’t use the fast drying version, it usually takes a few days for your piece to fully cure.

    Velvet Finishes Protect

    Velvet Finishes Protect - use on painted furniture. Non-yellowing. Painting 101: Topcoats and when to use them

    Its no secret that my new favorite furniture paint is Velvet Finishes. Velvet Finishes paint already has a topcoat built into the paint. However, if you are painting something that will get a lot of use, like a tabletop, dresser, end table, etc., you should still use a topcoat on it. Velvet Finishes topcoat is called Protect. Its a polyurethane, but unlike Minwax, it is non-yellowing and water based, which is why I love it. Its gives great protection, without the yellowing. With this one, I brush on one light coat and let it dry- that’s it.

    Vintage Radio turned Drink Bar

    The vintage radio turned drink bar got a coat of Velvet Finishes Protect after it was painted.

    Furniture Wax

    Wax - use on furniture pieces. Painting 101: Topcoats and when to use them

    There are many people that are crazy about furniture wax. I am not one of those people. In fact, this is my least favorite way to protect furniture, but I still do it on occasion when necessary. Wax gives furniture more of a flat finish, but still protects the piece. Most people will rub it on with a cloth, let it sit and then buff it. However, I have a much easier method to waxing furniture when I have to. Anytime I have waxed a piece, I have used Minwax Paste Finishing Wax.

    NO WAY! So easy and you may even have the supplies laying around your house! How to make Laminate Countertops look like Faux Stone for only $15

    When I made our laminate counters look like stone, I used wax to finish them because it gave the flat stone like finish I was looking for.

    Polycrylic

    Polycrylic - gives a more protective finish than wax. Use on furniture. Painting 101: Topcoats and when to use them

    Where many polyurethanes (except Protect) are oil based and go on stained wood and oil painted furniture, polycrylic is water based and can go on wood or paint. It can be applied the same as polyurethane – brush on, light sanding, brush on, light sanding, brush on. However, polycrylic can also be sprayed on with a paint sprayer. This is what I typically do, because it takes a lot less time and I usually only need one coat with my sprayer. I use my HomeRight Finish Max to do this.

    diy-coffee-table-industrial

    I used polycrylic on this DIY Industrial coffee table over the stained wood.

    Clear Topcoat Spray

    Spray Topcoat - use on spray painted pieces. Painting 101: Topcoats and when to use them

    I only recommend using spray topcoats over spray painted pieces. Most of the time, spray painted pieces don’t need any extra protection. If you are spraying something that is decorative and not going to get a lot of hands-on action, then I wouldn’t worry with top coating it. That being said, if you spray paint something and want to make it really glossy, you can spray a clear gloss topcoat on it to achieve the look. Spray a gloss topcoat or any other spray topcoat on in light coats. Fair warning – it can be tough to get semi-gloss and gloss spray topcoats even on large pieces. This is why you do multiple light coats, otherwise you could end up with streaks. I have always used Rust-Oleum spray topcoats when I needed a spray topcoat.

    Kitchen Tour {rainonatinroof.com} #kitchen

    After I spray painted my barstools, I knew they would be getting a lot of use, so I gave them a couple coats of clear spray topcoat.

    Some Glazes

    These glazes also function as a topcoat. Painting 101: Topcoats and when to use them

    This is a new one to me. When I found Velvet Finishes, I learned that their glazes also function as topcoats for added protection to your furniture – which is pretty sweet. They have two glazes, a dark and clear. The dark is great for aging furniture and you can make any color of glaze you want with the clear glaze. I actually have a post on that coming up soon. To apply the glaze, you brush on a small amount and then wipe off any excess. You can see how-to photos of this from this recent dresser makeover.

    The glaze on this piece also functions as a topcoat. Painting 101: Topcoats and when to use them

    I used a dark glaze on this IKEA Tarva Dresser turned Drink Bar.

    There are some cases in which you may not need a topcoat, like: 

    •Pieces painted with high-gloss or semi-gloss paint. These sheens are pretty durable and are easily wiped clean.

    •Spray painted pieces such as lamps, photo frames, wall decor (things that don’t see a lot of hands-on use)

    •Accent chairs / tables that don’t get a whole lot of use.

    Do you have any tips or tricks about topcoats and when to use them? 

    Looking for more painting help?

    What kind of paint do I use on that?  – A guide to different types of paint and what kinds of surfaces each can be used on.

    Why is my paint peeling? – Tips & Tricks to Keep Your Paint from Peeling & Scratching Off Your Furniture.

    Prepping Furniture to Paint – when to sand, when to prime, when to degloss and when you can skip it.

    How to Paint Walls – how to do it in less time with less mess.

    And here’s everything you’ve ever wanted to know about painting just about anything.

    Want to keep this list of best top coats for painted furniture handy for later? Just pin the image below!

    Lists different topcoats for furniture makeovers, what to use each one on and how to do it. | Furniture Top Coat | Furniture Makeover Ideas

    You know you don’t wanna miss any of this crazy.

    Stalk Me Here:

    Pinterest / Facebook / Twitter / Instagram

    SaveSave

  • Painting 101: Why is my paint peeling? Tips and tricks to keep paint from peeling and scratching off your furniture.

    Painting 101: Why is my paint peeling? Tips and tricks to keep paint from peeling and scratching off your furniture.

    If you read the longest blog post in history (a.k.a. the reader survey results), you know that there were some questions about furniture painting – what finish to use, why is the paint peeling, etc.

    Since I am a woman for the people and cannot let my people down, I decided to start a little Painting 101 series with basic tips and tricks for painting furniture.

    The first thing we are going to chat about is:

    Why is my paint peeling?

    Tips and tricks to keep paint from peeling and scratching off your furniture. 

    This post contains affiliate links for your shopping convenience. Click here to read my full disclosure policy.

    Tips and tricks to keep your painted furniture from peeling and scratching. Paint Peeling Fix | Peeling Paint Repair | Peeling Paint Fix

    Usually the reason paint ends up peeling off a surface, is because it didn’t fully adhere to the surface as it was supposed to do.

    There are a couple reasons why it may not have adhered correctly:

    Reason 1. The surface wasn’t clean.

    Anytime you paint something, it is so important to clean it first. You don’t have to do soap and water (unless its really nasty), usually just a wet cloth will do the trick. With any piece of furniture I paint, I always wipe it down first with a wet cloth to remove any dust and dirt. If the piece is really gross, like has been sitting in my garage for months, I will pull out the shop vac and run that over it first, then come back with the wet cloth.

    After you have wiped down the surface with a wet cloth, you need to go back over it with a tack cloth. A tack cloth is literally just that, a tacky cloth that feels a little sticky. You just wipe it over your piece and it will pick up any remaining dirt and dust.

    The basics and tips and tricks to keep your painted furniture from peeling and scratching. Why is my paint peeling?

    Mint + Coral Nightstand Makeover

    Reason 2. The surface had a topcoat or finish that kept the paint from adhering as it should have.

    There are some paints out there that you can paint directly onto just about any surface. One of those is Velvet Finishes, which if you’ve been around here for the last few months, you know that’s my new favorite furniture paint. Depending on what type of surface you are painting though, you may still need a primer with that paint and you will most likely need it if you are painting with regular latex paint. If the furniture you are painting has one of these types of finishes, you will need to sand and/or prime it before painting:

    • A thick waxy finish
    • A shiny, glossy finish
    • Laminate
    • A polyurethaned finish

    I recommend doing a quick sanding if the piece has any uneven spots or if its just really super shiny. Does that make sense? You won’t need to sand it down to the bare wood, just rough it up a bit. After you have sanded, run the tack cloth over the piece and apply a primer.

    If you are painting a piece of unfinished furniture, there is no need for sanding. However, depending on the paint you are using, you may need to prime it. If you are using a regular latex paint, you will definitely want to prime it with something like Zinnser or Kilz primer. All you will need is one coat. It will just keep the furniture from soaking up your paint and taking coat after coat after coat of paint. If you are using a paint that requires no priming first, you can skip that part.

    The basics and tips and tricks to keep your painted furniture from peeling and scratching. Why is my paint peeling?

    Vintage Radio turned Bar Cabinet

    After you’ve prepped your piece as needed, its important to remember a couple of other things when you get ready to paint:

    3. Apply Thin Coats of Paint.

    I’m guilty of it too – trying to put on thick coats to minimize my work time and because I’m just plain lazy. You will get the best protection and finish on your furniture if you apply thin coats of paint. To speed up the process, I will often use my HomeRight Finish Max Paint Sprayer when the weather permits. If I can’t spray a piece, I use a high quality paintbrush and/or roller.

    The basics and tips and tricks to keep your painted furniture from peeling and scratching. Why is my paint peeling?

    IKEA Tarva Dresser turned Drink Bar

    4. Protect It. 

    Some paints already have a topcoat built in, such as the Velvet Finishes paint that I mentioned before. High gloss paints are usually pretty tough too, but not everyone likes that super shiny look. If your piece is going to be seeing a lot of use, you need to put a good topcoat on it. I like to use Protect or a Polycrylic. With this step you can also use a paint sprayer or a high quality paint brush. A good topcoat will make your paint job stronger and hold up against little circuses that may be roaming around.

    The basics and tips and tricks to keep your painted furniture from peeling and scratching. Why is my paint peeling?

    5. Let It Cure.

    Just because the paint or the topcoat is dry to the touch doesn’t mean that its fully cured.  It can take paint and/or a topcoat up to three weeks to fully cure sometimes – this is especially true when its really hot and humid. Typically, once a piece is dry to the touch I will move it to its “spot,” however I try not to put anything on it until 2-3 weeks later – especially no magazines and papers, they will easily stick to paint that isn’t fully cured and leave some of their ink on the piece.

    Do you have any tips and tricks to keep paint from peeling or on protecting painted furniture pieces? 

    Need more painting tips and tricks? 

    Painting 101: Topcoats and when to use them– a guide to topcoats and when they should be used.

    FAQ: Painting Furniture – questions I’ve been asked over and over again about furniture painting and then some.

    A Guide on What Types of Paints to Use on Various Surfaces – all the different types of paints and what surfaces they work best on.

    How to Paint Walls in less time with less mess – a great little tip for getting your walls painted in less time.

    And you can see all of my furniture makeovers here. 

    If you want to come back to these painting tips easily later, just pin the image below!

    Tips and tricks to keep your painted furniture from peeling and scratching. Paint Peeling Fix | Peeling Paint Repair | Peeling Paint Fix

    You know you don’t wanna miss any of this crazy.

    Stalk Me Here:

    Pinterest / Facebook / Twitter / Instagram

    SaveSave
