As you guys well know, I will stretch a dollar as far as I possibly can.
And then some.
The same is true with fabric.
When I started the colorful porch makeover, Grunt Labor had one request:
Curtains.
Well he had other requests too, like a fireplace and a television, but at the current moment, those aren’t attainable.
He was adamant on the curtains though. He thought it would make the space feel more homey.
Yes, that coming from a male who even refers to himself as Grunt Labor is a little odd, but he was right. And really, the man rarely asks for anything around here – there was no way I could say no.
My problem was that I only had three yards of fabric for the curtains. Typically, I would be lucky to get two curtain panels out of three yards – and they would be skinnier panels at that.
My other problem here was that even though the porch is screened-in, the curtains were still going to get dirty at the bottom pretty quickly.
Luckily at Home Depot one day, the lightbulb went off.
Does anyone else have moments of genius at Home Depot? I swear sometimes that’s the only place I get them. I will have ran in for one can of spray paint and by the time I get to the checkout line, I’m struggling to hold onto everything that I’ve picked up and apologizing for knocking over a display with the 10 foot piece of pipe I’m barely holding under my arm.
Yep, I’m that girl.
But it was that stroke of genius that solved both problems – I would make Floating Curtain Panels.
 This post contains affiliate links for your shopping convenience. Click here to read my full disclosure policy.
DIY Floating Curtain Panels
If you can sew a straight semi-straight line (my lines are never totally straight) and make a couple of simple cuts with a hand saw or electrical saw, you can totally do these. Seriously, they aren’t hard at all.
Materials Needed:
-3 yards of fabric of your choice (I used this outdoor fabric and it made three panels for me that were 19 in wide x 89 in long before being hemmed. I did have a little leftover. If these are going outdoors and you don’t find an outdoor fabric you like, you can always waterproof, color protect, and stain repel the fabric yourself by using this tutorial.
-10′ piece of 1/2″ PVC pipe
-Regular Hand Saw or Circular Saw or Miter Saw (I used our Miter Saw)
-12 Screw Eyes
–Neon Pink Cord (or other color of your choice – you guys know I love my bright flashy colors)
-Scissors
-Sewing Machine & Thread or Stitch Witchery
-Straight pins
-Measuring Tape
Steps
Step 1
Cut your pipe down to whatever your desired length is. I was fitting my pipe between the 2×4 supports on my porch. Of course, no measurement between the 2x4s were the same. That’s just what you get with older houses and foreclosures, people. I thought it would look funny to have different size panels, so I opted to make all my pipes the same size, which was 19 inches. I marked my pipe and cut it with a miter saw.
 Most of the pipe will be covered by the panels, however, the ends do still show. I didn’t want them to be white, so I spray painted the ends gold.
Step 2
Lay out your fabric and cut it into panels. Each of my panels were 19 inches wide x 89 inches long.

After you have cut your panels, pin down the long side edges only (not the top or bottom edges) and hem them. If you want to go the no-sew route, use the stitch witchery here.
And by the way, if I can sew a decently straight line on this….

Anyone can sew a decently straight line. That sewing machine was my great grandmother’s, my grandmother’s, and now mine. I’ve cursed it, hit it (that hurt), ran my finger through it on more than one occasion (that hurt more), but I wouldn’t think of sewing with anything else.
We have a history.
Step 3
Now you need to hem your top edges, but leave an opening for the pipe to fit through.
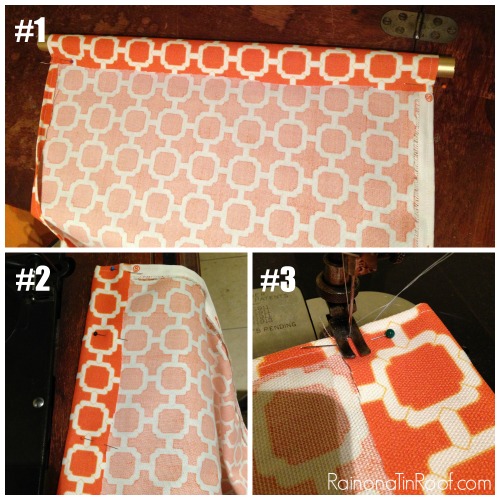
Do this by placing the pipe long the top edge, then pulling the fabric over the pipe and pinning the edges in place (#1 in the photo above). Remove the pipe and pin down the rest of the edge (#2 above). Finally, sew the edge down (#3). Repeat this with the top and bottom edges for all the panels.
Step 4
Take your screw eyes and screw one into each corner where your panels will hang from (top and bottom). Since my pipes were 19 inches long, I put my screw eyes about 19 inches apart.

Next, thread the nylon cord through your pipe and tie each end onto the screw eyes.
Stand back and observe your amazingness.

Go grab a cheap beer or a cocktail.

And relax in the shade of your new floating curtain panels that you made all by yourself.
Because you are a superstar.
Do you have any DIY curtain hacks?
See the full porch makeover here and this little DIY flamingo wreath that embellishes these curtain panels now!
Love a good curtain hack? Be sure to see these duck tape trimmed curtains too!
You know you don’t wanna miss any of this crazy.
Sign up to get my posts delivered to your inbox here.
Stalk Me Here:
Pinterest / Facebook / Twitter / Instagram
Leave a Reply