Looking for a simple valentine door wreath to make? This valentines wreath DIY will take you only 30 minutes to less to make – and it’s beautiful!
I never knew Grunt Labor’s grandfather, but after the many stories I’ve heard about him, I feel that we would have gotten along quite fabulously.
Although, he would have never used the term fabulously.
Among other things, we both liked to hang onto things. Some might call it hoarding. I, and maybe Grandpa, though would perhaps call it collecting. You never know when you might need something for a rainy day.
Also before I came along, a dumpster was rented and Mama and one of Grunt’s uncles, Vic, cleared out one of the rooms in the house from the “junk” Grandpa had accrued.
Apparently, Grandpa was sitting in his chair in the den while all this was going on talking about all the great stuff they were throwing away.
If I had been there, I’m sure I would have agreed with him.
And then probably sneaked out around to the back of the dumpster and climbed in to rescue some of the treasures.
So, this past fall when it was time to clean out Grunt’s grandparents’ entire house, there was another dumpster rented.
This time I was there though, so as you can imagine not quite everything handed to me to go to the dumpster actually made it to the dumpster. 😉
One of those things being a handful of little Valentine cards Grandpa had received in the 1930s.
I just wouldn’t have been able to live with myself had I tossed them into that dumpster. You’d be the same way, right?
And so, I brought them home and last week, the Circus and I made this simple little diy valentine wreath using a couple of the valentines.
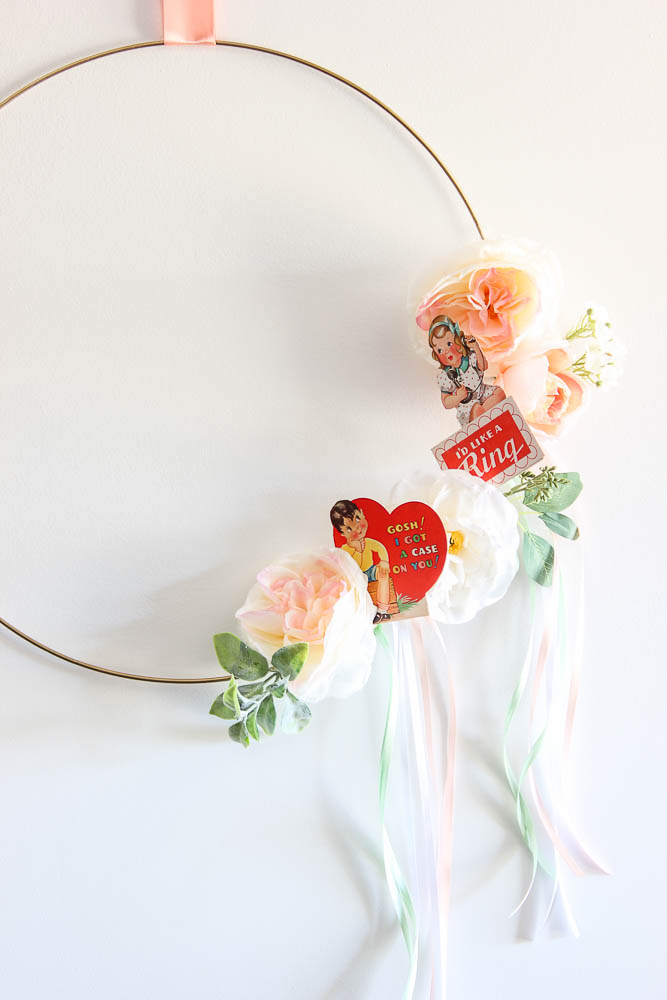
This wreath took all of about 10 minutes – not including paint drying time of the ring, but that is totally optional.
Don’t have your own vintage valentines to use? No problem! I’ve got you covered with a link below where you can print off vintage valentines to use!
This post contains affiliate links for your shopping convenience. Click here to read my full disclosure policy.
How to Make a Valentine Wreath
Tools and Supplies Needed:

- 19″ Metal Hoop (You could use any size you want to.)
- Metallic Gold Spray Paint (optional)
- Vintage Valentines – find a ton of options you can print for free here from The Graphics Fairy.
- Spring Flowers or Bouquet – We opted to buy one of the small spring bouquets from Michael’s that was already put together. There was no trying to coordinate flowers or greenery, everything was right there that we needed.
- Assorted “Skinny” Ribbons to coordinate with your valentines and flowers – obviously pink and red ribbon would work with valentines decor!
- Clothespins (optional, but I found that mini size works best.)
- Hot Glue Gun
- Scissors
- Little Blonde Hair Girl to Assist (optional, but highly recommended.) 😉
Steps
Step 1
I opted to spray paint my metal hoop gold. This is totally optional, but if you’re doing this, do it first.
Note: You could also tweak this wreath and use a heart wreath form to give it more Valentine zing!
Step 2
Disassemble the bouquet. Start wrapping the greenery and florals on the ring.

If you go with the kind of bouquet or a similar one like we got, then the flowers already have wire in them, so they just wrap right around that ring, no extra wire needed.

They stay where you put them, but then you can also move them around the ring if needed as well. So much nicer than having to mess with that bare wire and poking yourself.

Leave some space between the flowers for where you think you want your valentines to go. Put as many or as few flowers on your ring. We covered about 1/4 of the ring or so.

Step 3
Now you can attach your vintage valentines. Now, being as how the valentines I was using were special to us, I didn’t want to permanently put them on this wreath or damage them by putting hot glue directly on them and then onto the wreath. So, I opted to use mini-clothespins to attach my valentines.

I just stuck a clothespin on the valentine, then hot-glued the clothespin onto the metal ring or flower stem wherever I wanted it to go. Of course, if you aren’t attached to your valentines, you can just hot glue them right onto the wreath.

You can add in as many or as few valentines as you like. We opted for two of our favorites – a boy and girl and angled them to where they were kind of looking at one another.
Step 4
Take some of the skinny ribbons and wrap them around the metal ring and between the flowers and valentines, filling in as much or as little as you like. If you want to add a little more somethin-somethin to the wreath, then you could also embellish with a pom pom or two.
Step 5
Hang it up! We just used a wide peach colored ribbon to do this. You can drape the wreath over your front door and secure it on the other side or simply hang it from a nail or command hook on the wall somewhere.

I do love how the clothespins makes the valentines pop out from the flowers a little more than they might otherwise do.

I just adore the sweetness of vintage valentine decorations, don’t you? They truly don’t make ’em like that anymore.

Here’s to one handful of “junk” that didn’t get away, Grandpa!. 😉
What kind of valentine day wreaths have you made before?
Looking for more valentine decorating ideas?
Here’s some fun valentine decor and cards the Circus and I made one year.
And here are some great valentine ideas from a few blogging friends:
Valentine Heart Printables (printed on clear address labels) via So Much Better with Age
Valentine’s Day Dining Room via House by Hoff
Love Print via Two Twenty One
Adorable o”fish”ally Free Valentine Printables via The Happy Housie
Want to come back to this valentine wreath tutorial later? Just pin the image below!

Follow on social media for more simple holiday crafts!
Facebook | Instagram | Pinterest | Twitter

Leave a Reply