Tag: kitchen

  • This Kitchen is for Dancing Free Printable

    This Kitchen is for Dancing Free Printable

    Kitchens aren’t just for cooking – more importantly, they’re for dancing! Grab this Kitchen is for Dancing free printable to jazz up your kitchen with something besides food!

    I’m sure many of you were thinking I must have really meant my whole spill about embracing the Caftans and Cocktails way of life seeing as how I haven’t posted for over two weeks since writing that post. Well, I definitely did mean it, but I also intended to have a couple of posts go up between then and now.

    But then there came a pesky little migraine that I just couldn’t kick and lingered around for the better part of two weeks. After multiple doctor visits, two trips to the ER, and a couple scans, I am better.

    I also now believe in the power of a Thorazine shot, despite how bad it hurts, and know that Valium is not everything it’s cracked up to be. That’s another story though. And yes, I do realize Thorazine is an antipsychotic medication, but when you haven’t slept for days, are nauseous and nothing else will crack the pain, apparently Thorazine will do the job – for a little while anyway.

    When you have a migraine that lasts for two weeks and this is the first one you’ve ever had, your mind lingers to the worst possible outcome. I mean why else, wouldn’t all the meds you’ve been prescribed knock this thing out. Needless to say, while laying in my bed and on the worst day of it all, in our closet (because it was the absolute darkest place in the house), I thought for sure I wouldn’t make it through the day. A million thoughts ran through my head from thinking that at least I’d die laying under my beloved fur coats to I should have done more of this and less of that.

    So, in celebration of finally being back to normal (or as normal as I’m ever going to be), I’m sharing this new printable I made for our kitchen.

    This Kitchen Is For Dancing Free Printable

    When something like this hits you out of the blue, you realize just how much more the little things in life mean – like family dance parties in the kitchen.

    How to Get the Kitchen is For Dancing Print

    You can get the This Kitchen is for Dancing sign in two different sizes by subscribing to the Rain on a Tin Roof email subscription (it’s free and no more than 2-3 emails a week, usually just when I publish new posts). Sign up below to get access to download the printable art. Once you’ve subscribed and confirmed your subscription, you’ll be directed to a page where you can download the art. When you sign up, you’ll also be able to access and download all the other free printables in my printable library.

    If you’re already an email subscriber here, then you can put your email address in the form above as well and it should automatically take you to the download page. Don’t worry – it won’t sign you up twice for my emails though! If that doesn’t work for some reason, then you can find a link to download the Kitchen is for Dancing art in my Printable Library. You can look at the bottom of the last email you received from me for the password.

    Tips for Printing the This Kitchen is for Dancing Print

    First off, these are for personal use only. Print as many as you wish to for yourself, but you may not print and resell or sell the files themselves.

    • Print on card stock or photo paper. Some photo paper has a more glossy sheen though, so keep that in mind as to whether you want that look or not.
    • If you’ve got a good color printer at home, then of course you can print them at home. I don’t, so I usually have my printable art printed at Staples.
    • If you’re going the photo paper printing route, then I suggest Mpix for printing. Their color quality is really good. You can also opt for a matte finish there as well.
    • You can print the art in two different sizes:
      • 8″ x 10″
      • 8.5″ x 11″ (typical printer paper and card stock size)
    • Before you print, be sure to check if the image is being cropped and adjust it to your liking if needed.

    Cheers to dancing any chance you get!

    Need more great printable art?

    Here’s Your One Chance Fancy – yep, just like the song, but in wall art form. 🙂

    Find Her Jesus, Keep Her Well (Miranda Lambert) art – perfect for the girls you love!

    Frankly My Dear, I Don’t Give a Damn Printable – a classic line, from a classic movie.

    Pin This Post
    This Kitchen is for Dancing Sign

    Join the Freak Show on:

    Facebook | Instagram | Pinterest | Twitter

  • Decorating Ideas for Knotty Pine Paneling

    Decorating Ideas for Knotty Pine Paneling

    Have knotty pine paneling in your home and not sure what to do with it? Before you paint over it or tear it out, try these knotty pine walls decorating ideas – it just might make you love that paneling after all.

    As you know from my Ramblings post a few weeks ago, I had three makeover projects underway at the 70’s Landing Pad – the mudroom/laundry room, the guest room and the guest bathroom. The mudroom is finished, but the other two are still in progress and I have until Thursday night to finish them. That’s when the Man of Questionable Honor and his wife show up. As you might imagine, it is madness here.

    At the same time, I’ve also been working on a few projects at the farm including the design plan / color scheme for the den and adding more color to the kitchen. So basically, I’m just asking for a mental breakdown. 

    For the most part though, with the exception of some damaged drywall on the ceiling which did cause a full-on “Screw it. I’m done for the day,” attack on Friday, the den is coming together pretty well. I’ve just been adding to the kitchen as I find different things, so it hasn’t really been all that stressful.

    As you might remember, both the farmhouse den and kitchen are clad with knotty pine tongue and groove walls. Gasp!

    While most people would be reaching for a can of paint or a sledgehammer, I absolutely refuse to do either. You see, I love that damn pine paneling. I can’t imagine that house without it. In fact, when we got the farmhouse house back from the previous tenants, my number one fear was that they had painted the paneling. When my uncle called me as he was walking through the house for the first time after the tenants had moved out, his words were, “It’s bad. Really bad. But the paneling is ok.” Everything else can be fixed, but that paneling, by God, you couldn’t just replace it with drywall. It’s got over 50 years of grease from fried chicken, cigarette smoke and memories in it. There are just some things that can’t be replaced.

    Obviously, I could write a sonnet about this damn paneling.

    So, in a nutshell, the paneling and I work together. Perhaps, I should have just said that in the beginning and spared you all my ode to the paneling.

    So far, I’ve come up with three great ways, in my opinion, to make knotty pine paneling shine in a space.

    Disclosure: Minted provided me with some of the art for these spaces. Bellacor provided me with the lighting for the den. All opinions are 100% mine. This post contains affiliate links for your shopping convenience. Click here to read my full disclosure policy.

    Knotty Pine Paneling: How to Decorate With It

    Colors that Go with Knotty Pine

    Obviously, knotty pine rooms are going to be very brown. Typically, you’re going to have a neutral flooring as well, whether it’s carpet or hardwood. In order to keep the space from just being a brown pit, add some color, but you want to balance it all out with a neutral.

    Knotty Pine Walls Decorating Ideas - Den with Knotty Pine - Rain on a Tin Roof

    Chair Upholstery

    I’ve found that blues and greens work really well with paneling. The den isn’t quite finished yet (I still have to get pillows and draperies made as well as a few other things), but so far I have added in these two green chairs and this rug and it’s made a huge difference.

    I couldn’t afford new chairs, so I stalked Facebook marketplace for a while and found a set of chairs that I liked for only $50, then had them recovered in this material. Chattanooga folks, I used Don’s Trim Shop and they did an excellent job as well as having the best price! The only thing I would have done differently is used some thicker material for the upholstery. This one works, but it is thin. I didn’t realize that when I ordered it.

    I layered in my beloved cowboy blanket on one of the chairs to add more pattern and color. I’m also going to have pillows made for these chairs in a floral print to soften them a bit.

    I got super lucky and found the 8′ x 10′ area rug at Ross one day. I wasn’t even looking at rugs that day, but literally stumbled upon it while in the store. It was $50!

    Now, I don’t plan on filling the entire space with navy and dark greens. That would make it too dark. Opposite these chairs, I’m going to put in a neutral loveseat in either beige or cream. I just haven’t found one that I like yet that also fits in my budget. The lighter upholstery on the loveseat will help to lighten up the space more too.

    In the kitchen, I’ve been working on this wall and have pulled in lots of different colors here.

    Knotty Pine Walls in the Kitchen - Rain on a Tin Roof

    I’ve still got that green and navy going on with the barstools that help to anchor all the color, but I also added in bright pops of color with the art. I also balanced all of that color out by going with lots of white backgrounds and frames on the art.

    So, pull in color, but balance it out with lighter neutrals. 

    Make the Knotty Pine Walls Sing

    It is no secret around here that I love a great piece of art. I am picky about my art though. It always has to meet at least one of two conditions though: it has a special meaning to me or my family or it’s love at first sight.

    With the pine walls, I knew that adding gorgeous art would really make the walls sing. Minted is one of my go-to places for great art. I love that you can choose to buy just the art prints or you can choose to have it framed – and the selection of frames is great.

    In the den, the star of the show is, as you’ve already seen, the cow.

    Knotty Pine Paneling in the Den - Rain on a Tin Roof

    Faze Wall Art Vertical / Faze Wall Art Horizontal

    This piece of art was both one of those instant loves and also meaningful. Originally, I thought I would fill the den with lots of different floral prints to soften the walls, but then I saw this little guy and the deal was sealed. I come from a long line of cattle farmers, so this one also has special meaning. This one is called Faze. The vertical version is sold out, but you can still get this print in a horizontal version here.

    Colors that go with Knotty Pine - Greens - Rain on a Tin Roof

    I went with the French Farmhouse frame for this one. It has pretty corner details and a whitewashed finish, which looks good against the paneling.

    Along one wall in the den, we have a closet and two doors open against this wall on either side. There’s no place for furniture along this wall, so we opted to put in more art and meaningful objects here.

    Pine Paneling - Meaningful Art - Rain on a Tin Roof

    The wooden yoke above the closet was my great-grandfather’s that my Pap had put in the shed years and years ago. We brought it in, cleaned it up and mounted it on the wall. On either side of the closet doors, I mixed art and little mementos from both my Pap and Grunt’s grandfather.

    Pine Walls with Americana Art - Rain on a Tin Roof

    America Print

    When we cleaned out Grunt’s grandparent’s house back in the fall, we brought home two of his grandfather’s military hats and a mounted bayonet that had been given to him while he was stationed in Okinawa in the 60’s. When I saw this America print, I knew it would be the perfect compliment to these pieces.

    On the other side, there’s a nod to my Pap.

    Decorating a Room with Knotty Pine Tongue and Groove Walls - Rain on a Tin Roof

    Open Gate Art Print

    Grunt actually picked out this piece of art, Open Gate, it just happened to fit perfectly beneath my Pap’s belt and a couple of pieces from his old truck.

    DIY Art on Knotty Pine Walls - Rain on a Tin Roof

    Folks, if you ever want to hang a belt on the wall, just know it will take lots of zip ties and patience.

    I had pulled a few pieces off my Pap’s old truck a couple of years ago and finally found the perfect place for them. I mounted one of the Cheyenne tags and the center of the steering wheel in a shadow box and hung them above the belt.

    Paint Colors that Go with Knotty Pine - Navy and Greens in the Kitchen - Rain on a Tin Roof

    The kitchen wall has a variety of different pieces of art and objects. This is the one full wall in that space where I can really add color in. The rest of the kitchen is cabinetry, counters and appliances.

    Knotty Pine Walls in the Kitchen - Decorating with Colorful Art - Rain on a Tin Roof

    Orange Print

    The orange print was one of the first pieces I got for this space. I knew the bright colors would be the perfect punch of color for the kitchen. I’ve also mixed in a couple of family photos on this wall.

    Knotty Pine Wall Decorating Ideas in the Kitchen - Rain on a Tin Roof

    Chair Art Print

    The strawberry plaque was my Grannie’s that she used to have hanging in here, as was the Board of Education. The back of it is actually signed by many of her former students. The chair print, called Family Reunion (Uncle James), is a new addition. I knew it was coming to my house as soon as I saw it. My grandparents had a couple of those kinds of chairs at one point and I remember them sitting on the hill in them.

    Pine Paneling in a Kitchen - using colorful art to decorate it - Rain on a Tin Roof

    Hummingbird Art Print

    On the other side, I have a picture of me and Grannie and two more of her things that she had hanging in the kitchen – the Peggy’s Kitchen and the Some Visitors Bring Happiness sign – that sign has always cracked me up. The little hummingbird is a new addition. Grunt’s grandmother liked hummingbirds, so I got it and put it in here as a nod to her.

    Add a Touch of Shine to Knotty Pine Paneling

    And finally, my last tip for decorating with knotty pine walls – give it some shine.

    Shiny Light Fixtures with Knotty Pine Paneling in the Den - Rain on a Tin Roof

    I think that every room looks better with a touch of sparkle. In the den, I added a bit of this with a new lighting fixture from Bellacor.

    Pendant Lighting against Knotty Pine Walls - Rain on a Tin Roof

    Jaxon Polished Nickel Four Light Chandelier

    This is called a chandelier light, but I feel like it’s more of a pendant light. Either way, the sparkle of the polished nickel was exactly what this room needed. It lightens up the space and gives it a polished feel. Who says knotty pine can’t be a little fancy?

    Polished Nickel Pendant Light in Knotty Pine Den - Rain on a Tin Roof

    The lines of this fixture are pretty traditional though, so I feel like it will stand the test of time in terms of decorating trends – just like I’m making the knotty pine paneling stand the test of time.

    What side are you on when it comes to knotty pine paneling – yay or nay?

    Need more decorating tips?

    Got faux wood paneling from the 70’s? Read these 5 Ways to Decorate a Room with 70’s Wood Paneling.

    Need help plotting out your room design? Use this post to learn how to make a moodboard for your space.

    Low budget? Here are five ways to decorate your home on a small budget.

    Want to come back to this post later? Just pin the image below! 

    Knotty Pine Walls Decorating Ideas - Colorful Kitchen - Rain on a Tin Roof
    Gift Ideas Signature
  • Making the Knotty Pine Look Good: The Farmhouse Kitchen Plans

    Making the Knotty Pine Look Good: The Farmhouse Kitchen Plans

    Disclosure: Bellacor provided me with the lighting for this room and Minted provided me with the art. All opinions are mine. Affiliate links may be included in this post.

    We are in the home stretch of the farmhouse remodel, y’all! Well, the home stretch of the interior of the farmhouse anyway. We still have a lot of cleaning up and painting to do to the exterior of the house and the outbuildings, but it’s too hot for that right now, so for the most part we’ve been working inside.

    We’ve finished up the living room (see how it turned out here), are thisclose to finishing the bathroom and now I’m setting my sights on the kitchen. This is what the kitchen looked like when we got the house:

    Farmhouse Kitchen Before

    The Kitchen Before

    The Kitchen Before

    Since then, we have had to have the kitchen sink completely replumbed, I’ve been able to find and repair some of the missing drawer fronts, the walls, cabinets and flooring have been scrubbed, we tossed the stove and dishwasher and have replaced the light fixture, outlets, switches, faucet and probably done other things I can’t remember right now…

    As I told you when I first wrote about this project, the knotty pine walls and cabinets are staying. That being said, the lower cabinets are in pretty poor condition. While the upper cabinets and most of the paneling on the walls cleaned up pretty well, the lower cabinets are actually losing much of their finish as you can probably see by the photos. Still, I don’t plan on painting them. I’m hoping to be able to lightly sand them and then give them a fresh coat of poly. The cabinet hardware also needs a good cleaning for sure or to be replaced.

    The countertops will be staying for now as well. After giving them a good cleaning, they are still in pretty good condition. We’ll use them as long as we can – because budget!

    Here’s where the kitchen is headed:

    Farmhouse Kitchen Plans

    Light Fixture / Navy & White Striped Fabric / Faucet / Barstools / Art

    We’ve already replaced the old ceiling fan with a new semi-flush mount fixture.

    Drava 6 Light Semi-Flush Mount Ceiling Fixture

    In the kitchen, I wanted a fixture that would make somewhat of a statement, but it couldn’t be too fancy. This is definitely not a crystal chandelier kind of kitchen. I found this semi-flush mount that fit the bill perfectly. It works well with the paneling without standing out too much, provided plenty of light and has a modern farmhouse vibe that fits well with our style. It’s also less than $200, so it’s budget friendly.

    In my Pap’s old workshop by the house, we found this cool table that is going to function as an island in the kitchen.

    Pulling this table out only cost me one yellow jacket sting, which really is a good deal given the multiple nests that were in the workshop and the huge snakeskin we saw there. It obviously needs a good deep cleaning. After that, I’m going to see how much of the rust I can get off and then go from there as to whether or not to paint that metal part or not. I have actually hung onto the Ralph Lauren Inspired green, navy and white barstools from the Beloved Foreclosure and I think they will go perfectly with this island.

    Ralph Lauren Inspired Barstools Tutorial

    I also think they’ll add a much needed shot of color to the room. And as it just so happens, I also have the navy and white curtain panels from our last house as well, that I’ll be shortening for the windows in the kitchen.

    Navy and White Upholstery Fabric

    They will of course tie in with the upholstery on the barstools, add color and a little more lightening to the space with the navy and white stripes.

    We have also went ahead and replaced the faucet as the old one was leaking pretty badly.

    Delta Trinsic Pull Down Faucet

    Grunt and I both love the Delta Trinsic faucet we have in the kitchen at The 70’s Landing Pad, so we opted for the same faucet for the farmhouse, but in a matte black finish. Like the light fixture, it seems to give off that modern farmhouse kind of vibe to me and also works well with the paneling.

    And then there’s the other side of the kitchen…

    Eventully, the kitchen flooring will get replaced. We had hoped to replace it sooner rather than later, however the budget isn’t allowing for that right now. Instead I got on my hands and knees and scrubbed it with bleach and then cleaned it again with a basic floor cleaner. It actually cleaned up pretty well given what it looked like before.

    Growing up, the kitchen table was always against this wall. It was rectangular and came out from the wall longways and I can still see my Pap sitting there drinking his coffee every morning in the same spot. If you look closely at the paneling there, you can even see where the table was up against the wall there for all those years. That kitchen table is actually now where I sit and write this very post as well as most all the other posts I’ve ever written on this blog. I made it into my desk a few years ago and I really like working here each day on the same table where so many meals were eaten, countless conversations were had and hours were spent digging for one single recipe for Chicken Spaghetti out of a box of a thousand.

    For us, having a kitchen table in here really just wouldn’t make sense. The island will work better for our needs and we’ll eat family meals in the dining room. Instead of a kitchen table on this wall, I’m planning to do a gallery wall.

    Tropical Still Life Print

    This is the first piece of art I have for the wall. I have probably been looking at this Tropical Still Life print for two years now, but have never had the perfect place for it. It’s bright colors just always sucked me in and when I came across it again while gathering ideas for the farmhouse, I knew this would be perfect for the kitchen. It brings in some much needed bright colors against the dark walls and the green ties in perfectly with the barstools. The wall isn’t going to be just filled with art prints though! My grannie used to have lots of little knick-knacks hanging on that wall and above the cabinets and I actually still have quite a few of those pieces. (Yes, I am a packrat and damn proud of it!) I’m planning to work them all into the wall somehow.

    That’s all I have for now, but what do you think? Can I balance out all the knotty pine and make it work? 

    [show_shopthepost_widget id=”2783498″]

    SaveSaveSaveSave

    SaveSave

  • DIY Kitchen Banquette

    DIY Kitchen Banquette

    Disclosure: This project was in partnership with Behr Paint, however all opinions are 100% my own. Affiliate links may be included in this post. 

    I really like building things. I’m not an expert in it by any means, but I’m pretty good at basic builds. I’ve most definitely mastered the art of those built-in shelves I make, as I’ve done three sets of them now. 🙂

    As I’ve said before, my Pap did a lot of woodworking. Now he was the expert. Unfortunately, by the time I wanted to learn about that stuff, he had already hung up his hat in that department, but I think that feeling I get when I feel a little sawdust against my palms comes from him.

    In our kitchen remodel, we ripped out cabinetry in one corner and knew we were going to eventually build banquette seating there for a breakfast nook. This is what it looked like when we first got the house:

    The Kitchen Before

    Well when it finally came time to build that banquette seating, I was all about doing it myself. I drew up the plans, I did the measurements, bought the supplies, started putting it together – everything. I think in the back of my head I thought that if I could just do this one project all by myself and it turn out ok, that somewhere my Pap would give me a nod, a big grin and say “Good job.”

    I really picked the wrong project for that validation I thought I needed.

    This banquette is not a difficult build for two people. It is a difficult build for one person, as Grunt Labor so lovingly pointed out to me when he came home one day and found me with glassy eyes, drinking a beer, staring at the halfway completed banquette that wasn’t anywhere near square. I felt like such a failure, but he was right, it wasn’t a one person job.

    Learn how to build a basic kitchen banquette or corner bench with this DIY Kitchen Banquette tutorial - makes great built-in seating.

    Palm Print Pillow / Tiger Stripe Pillow / Malachite Pillow

    In order to get this thing square and level and all that other good stuff, you need one person holding the lumber steady and level while the other is screwing it together.

    So, after dropping all of my crazy notions into the bottle of beer I was drinking, Grunt Labor, Nicky and I all ended up putting the banquette together. Grunt and I built the bases, then Nicky came over to help with the cutting of the panels to go on the front and sides of the banquette because I was wrapped up in getting the rest of the house ready for an upcoming party. It truly takes a three man effort around here often and I am so damn lucky that God saw fit to give me two husbands for the heavy lifting and mopping up of my emotional breakdowns.

    Learn how to build a basic kitchen banquette or corner bench with this DIY Kitchen Banquette tutorial - makes great built-in seating.

    Pendant Light

    I may not have gotten that nod from my Pap that I was hoping for, but I’m damn sure certain I got a big ole’ belly laugh from him.

    You can find the full tutorial for how to build the banquette on Behr’s Designer Stories. Just remember, this one calls for reinforcements. 🙂

    And if you want to see our full kitchen remodel, it’s here.

    Black, White and Brass Kitchen Remodel | High End Kitchen on a Budget | Black and White Kitchen Ideas | Black and White Kitchen Design

    Pin This Post

    Learn how to build a basic kitchen banquette or corner bench with this DIY Kitchen Banquette tutorial - makes great built-in seating.

    Disclosure: This project was in partnership with Behr Paint, however all opinions are 100% my own. 

    SaveSaveSaveSave

  • Black, White and Brass Kitchen Remodel

    Black, White and Brass Kitchen Remodel

    Affiliate links included in this post. 

    I need to be clear on something.

    This remodel of The 70’s Landing Pad has not been a one man band. It has not been a two or a three or a four man band either. It’s more like a fix or six man band, made up of random friends and family pitching in to help out as needed, fueled by cheap beer and 80’s country music.

    This kitchen remodel showcases the specialities of each band member.

    Does any of that even make sense?  #FlyYourFreakFlag

    Maybe it will help to just start showing you pictures. When we first got this house, this is how the kitchen looked:

    The Kitchen Before

    The Kitchen Before

    Opposite that wall of cabinets was this:

    The Kitchen Before

    And opposite the pantry door was this:

    The Kitchen Before

    The kitchen was a really good size to start with, so we didn’t need more room, however the awful wallpaper, awkward vanity lights above the cabinets (WTF?), stained vinyl flooring, grimy cabinet hardware and much more needed to get the boot.

    Love a high-end kitchen, but have a low budget? Look at this black, white and brass kitchen remodel for ideas on how to get that kitchen of your dreams.

    We kept the original cabinets, with the exception of taking out the ones above the stove and sink, and I painted them black. These cabinets really aren’t in the best condition, but it just wasn’t in the budget for new cabinets. I’m hoping in a few years, we can maybe have new doors for the cabinets made.

    Love a high-end kitchen, but have a low budget? Look at this black, white and brass kitchen remodel for ideas on how to get that kitchen of your dreams.

    I switched out the knobs and hinges on all the doors and drawers. I tried quite a few different styles of knobs and pulls, but in the end I was surprised that these simple round concave brass knobs which are less than $1 per knob were perfect.

    Love a high-end kitchen, but have a low budget? Look at this black, white and brass kitchen remodel for ideas on how to get that kitchen of your dreams.

    Cabinet Knobs / Footed Brass Bucket (similar ones) / Leather Ice Bucket (similar ones)

    With all the brass and black, the kitchen had a more glam feel, which our previous kitchen did not. Our old canisters and counter decor just didn’t mesh with this kitchen as well as they did our last. I decided to think outside the box for counter storage (and also within our small budget) and raided my vintage ice bucket collection to find one to act as a canister for sweets and another to act as a cooking utensil holder. I pulled out a $1 office decor find from an antique store to be a recipe holder and the brass lion bucket was only $3 at an estate sale. It holds two smaller cookbooks that I use a good bit.

    Love a high-end kitchen, but have a low budget? Look at this black, white and brass kitchen remodel for ideas on how to get that kitchen of your dreams.

    Lemon Hand Towel (similar one) / Pantry Doorknob

    There wasn’t any guesswork when it came to the flooring, we knew we would carry the same flooring we used in the adjoining living and dining room into the kitchen as well. However, the white walls were a different story and probably caused me the most stress in this space. When I first started on the design plan for the kitchen, I decided on black cabinets and white walls. However, that combination became very stark against one another when it was all in place. And on one side of the kitchen, I had a lot more black with the cabinets than I did on the other side of the kitchen, which had no cabinets. I tested out no less than 15 paint colors to go on the wall from greens to grays to creams and more and none of them worked. Both Grunt and my friend Brittany were adamant that white was the color it should stay and I should have just listened to them from the beginning and saved myself the stress. Grunt was also the one who made the suggestion of putting up black crown molding to balance out all the black and was he ever right on that. When he told Mom and Dad about his idea, they offered to pay for the crown moulding (Thank you!), so we got that sooner than expected and it was a total game changer. It pulled everything together perfectly.

    Love a high-end kitchen, but have a low budget? Look at this black, white and brass kitchen remodel for ideas on how to get that kitchen of your dreams.

    Cane Runner / Lemon Hand Towel (similar one)

    The island was an addition as well and also one that I doubted in the beginning. I wanted an island in here, but I was very much overthinking it. The island is actually a cabinet that was in the school that Grunt Labor and I first met and worked together at. They tore down the building and we snagged that piece before they did so. He said from the beginning that it would make a great island, but I wasn’t sure. Then, Nicky’s dad, Wayne, came over and we were discussing building an island and he looked at that cabinet and said it would be the perfect island. At that point, I knew I was wrong and they were both right. Wayne took the cabinet home with him and modified it into an island for me.

    Love a high-end kitchen, but have a low budget? Look at this black, white and brass kitchen remodel for ideas on how to get that kitchen of your dreams.

    Barstools (similar ones) 

    The barstools were a vintage find at a resale store. There are similar ones here.

    Love a high-end kitchen, but have a low budget? Look at this black, white and brass kitchen remodel for ideas on how to get that kitchen of your dreams.

    The one thing I never swayed on in this space was the black subway tile backsplash in a herringbone pattern. It might actually be my most favorite part of this space. Grunt and Nicky usually do all our tile work, but they both refused to do this backsplash because I wanted the herringbone pattern. It is much more tedious and time consuming. I ended up going through Home Depot, using their in-home installation services for the backsplash. While it was more expensive than doing the tile ourselves, I knew the herringbone pattern would be a showstopper and well worth it. They did an impeccable job.

    Love a high-end kitchen, but have a low budget? Look at this black, white and brass kitchen remodel for ideas on how to get that kitchen of your dreams.

    Black Subway Tile / Brass Faucet

    The faucet is the same one we had in our old kitchen. My in-laws wanted something in brushed nickel at our old house, so I happily switched out the faucet for them and brought this one to the new kitchen for us.

    Love a high-end kitchen, but have a low budget? Look at this black, white and brass kitchen remodel for ideas on how to get that kitchen of your dreams.

    Cane Runner / Lemon Hand Towel (similar one)

    You might have noticed in the before photos, there was a stovetop on end of the kitchen and a wall oven on the other end of the kitchen. The old stovetop didn’t work correctly, so rather than replacing it with just another stovetop only, we opted to replace it with a double oven.

    Love a high-end kitchen, but have a low budget? Look at this black, white and brass kitchen remodel for ideas on how to get that kitchen of your dreams.

    Range Hood / Stirring The Pot Towel / Magnetic Knife Holder / Brass Ice Bucket (similar)

    We do a good bit of entertaining and hosting family holiday dinners at our place, so having three ovens makes those things so much easier. We also took out the cabinet above the stove and put in a more effective and prettier range hood as well.

    As I said earlier, I used a vintage ice bucket for a cooking utensils holder. We went with this magnetic knife holder to clear up more counter space and attached it with velcro to keep from having to drill into the tile. I have two of those runners, one on each side of the island, to add more color and pattern to the space. The hand towels also add a much needed dose of color.

    The open shelving to the left of the stove was also something that Wayne and Ron, another family friend, built for us – we are so lucky to have them!

    Love a high-end kitchen, but have a low budget? Look at this black, white and brass kitchen remodel for ideas on how to get that kitchen of your dreams.

    Brass Fruit Bowl (similar) / Barefoot Contessa Cookbooks / Acrylic Wine Rack

    That space used to be where a tiny cabinet and trash compactor were, both practically useless. We took those out and they built me this wonderful open shelving. It’s another favorite thing of mine in this space. This is also where I keep favorite cookbooks, our fruit bowl, wine rack and a few other knick-knacks.

    Love a high-end kitchen, but have a low budget? Look at this black, white and brass kitchen remodel for ideas on how to get that kitchen of your dreams.

    Lemon Hand Towel (similar one) / Brass Fruit Bowl (similar) / Acrylic Wine Rack

    The countertops are Quartz in Brown Fantasy. My friend Kellie gets a huge thank you for dealing with me when it comes to the countertops. I had no clue what to go with or what I even wanted and she held my hand the whole way with it. I never would have looked twice at that stone if it hadn’t been for her and I absolutely love it in here, as does Grunt.

    Love a high-end kitchen, but have a low budget? Look at this black, white and brass kitchen remodel for ideas on how to get that kitchen of your dreams.

    I removed the tall, skinny cabinets that were opposite the range and replaced them with the buffet that was in the living room at our old house.

    Love a high-end kitchen, but have a low budget? Look at this black, white and brass kitchen remodel for ideas on how to get that kitchen of your dreams.

    We also added a black chair rail and decorative wall molding here to bring more of the black over to this wall.

    Love a high-end kitchen, but have a low budget? Look at this black, white and brass kitchen remodel for ideas on how to get that kitchen of your dreams.

    Marble Slab / Brass Bamboo Tray (similar ones) / Profanties Coffee Mug

    I put my coffee station here as well as a couple of plants and other knick-knacks.

    Love a high-end kitchen, but have a low budget? Look at this black, white and brass kitchen remodel for ideas on how to get that kitchen of your dreams.

    DIY Lucite Frame + Free Gone With the Wind Printable

    And my daily answer to anything before the hour of 7am. 😉

    Finally, where the built-in corner cabinetry and desk once was is now our breakfast nook.

    Love a high-end kitchen, but have a low budget? Look at this black, white and brass kitchen remodel for ideas on how to get that kitchen of your dreams.

    Pendant Light

    Complete with Loretta, Conway, Johnny and June.

    Of course. 

    This banquette is all thanks to Grunt and Nicky.

    Love a high-end kitchen, but have a low budget? Look at this black, white and brass kitchen remodel for ideas on how to get that kitchen of your dreams.

    Palm Print Pillow / Tiger Stripe Pillow / Malachite Pillow

    You see, I had this wild idea that I could actually build it all by myself.

    I was full of shit. 

    They both swooped in, calmed me down and helped me finish it. That’s a whole other story which you can read about here. I also added more color to the kitchen here with the pillows, which was a whole other stressful ballgame that I can’t even think about right now.

    So in conclusion, thank you to all the band members who made this kitchen possible: Grunt, Nicky, Brittany, Wayne, Ron, Kellie, Mom and Dad.

    There will never be enough cheap beer in the world to pay you back. We are blessed to have you.

    Lord, I hope I didn’t leave anyone out. It takes a lot of people to deal with this crazy train.

    Shop the Kitchen:

    [show_shopthepost_widget id=”2489923″]

    You might also want to see…

    DIY Kitchen Banquette

    Types of Paint To Use on Cabinets - list of paints that are good for painting kitchen or bathroom cabinets.

    Types of Paint to Use on Cabinets 

    The 70's Landing Pad Living Room

    The 70’s Landing Pad Home Tour

    Love a high-end kitchen, but have a low budget? Look at this black, white and brass kitchen remodel for ideas on how to get that kitchen of your dreams.

    Disclosure: D. Lawless Hardware provided the cabinetry hardware for this remodel and Rug Studio provided the runners, however all opinions are 100% my own. 

    *Affiliate links may be contained in this post. That just means that if you click on one of those links and buy something, I may receive a small commission, but you won’t pay a dime more.


  • How to Raise Cabinets

    How to Raise Cabinets

    So sometimes during a big project or after I finish a project, I start looking at all the little projects that made up that big project and I decide that some of those little projects probably wouldn’t be that interesting to you.

    So I don’t bother too much with pictures and I don’t post about it.

    But then months later, someone will ask me something specific about that small project that helped to make the bigger project possible and I will realize that I probably should have posted about that.

    Does any of this make sense? Its late and I’ve been drinking. And apparently that makes me use the word projects too much.

    So there’s that. 

    Anyway, if you remember way back in January, Grunt Labor and I finally finished his man cave.

    How to Raise Cabinets - Learn how we raised our base cabinets to accommodate for a refrigerator that was taller than the base cabinets.

    In order to deem the man cave livable, he had to have a beverage center (a.k.a. a fancy name for a mini refrigerator). But when the beverage center arrived, it was a bit taller than the opening we had for it, thus we needed to raise the cabinets or get a new refrigerator.

    Raising the cabinets was cheaper and faster than getting a new beverage center.

    So you can guess which option won.

    How to Raise Cabinets

    Affiliate links may be contained in this post.

    First, let me say that these cabinets were not in our kitchen or around any sort of plumbing. I definitely think that you can do this with your kitchen cabinets, however you would have to remove the countertops and possibly create a few new holes in the back of the cabinets for plumbing. It would be a bigger job than what we had to do.

    You will need: 

    • 4 x 4 Post
    • Saw (We used our miter saw and a table saw, you could also easily substitute the miter saw for a circular saw.)
    • Drill and Screws or Hammer and Nails or Nail Gun (We used our nail gun.)
    • Trim for the bottom of the cabinets (most likely a 1 x 6 piece)

    Step 1: 

    Determine how much you need to raise your cabinets before moving them.

    Step 2:

    Remove your cabinets from the wall and flip them upside down. Before cutting the 4 x4 post to the height you need to raise your cabinets, look at the bottom of your cabinets.

    How to Raise Cabinets - Learn how we raised our base cabinets to accommodate for a refrigerator that was taller than the base cabinets.

    Most all cabinets have that “base” or “frame around the bottom. Your 4 x 4 pieces are going to need to fit in that frame, but extend out of it the height you need to raise your cabinets. Does that make sense? So, you should cut your 4 x 4 pieces the height you need to raise the cabinets plus the height of that frame. Cut the 4 x 4 post to the appropriate length you need – we did 5 of these for each cabinet – one in each corner and one in the middle.

    How to Raise Cabinets - Learn how we raised our base cabinets to accommodate for a refrigerator that was taller than the base cabinets.

    Step 3:

    Secure the 4 x 4 pieces to the cabinet with nails or screws. For each of the corner pieces, just go through the frame. On the middle piece, just use wood glue to secure it, otherwise a screw or nail would probably go through the bottom.

    Step 4:

    Put your cabinets back into place.

    How to Raise Cabinets - Learn how we raised our base cabinets to accommodate for a refrigerator that was taller than the base cabinets.It will now look like you have “feet” on your cabinets – although not pretty ones. To fix this, you need to trim it out. Measure the space that you have to cover and cut trim to fit, then secure. We had about 5 inches to cover (height wise), so we bought a 1 x 6 x 12, cut it down to the appropriate length, then ran it through a table saw to get the six inches down to five inches. We secured it with finish nails. Paint it whatever color matches your cabinets.

    How to Raise Cabinets - Learn how we raised our base cabinets to accommodate for a refrigerator that was taller than the base cabinets.

    Beverage center catastrophe averted.

    You can see more of the man cave here.

    Have you raised cabinets before? Did you use a different method? 

    How to Raise Cabinets - Learn how we raised our base cabinets to accommodate for a refrigerator that was taller than the base cabinets.

    You know you don’t wanna miss any of this crazy.

    Sign up to get my posts delivered to your inbox here.

    Stalk Me Here:

    Bloglovin / Pinterest / Facebook / Twitter / Google+ / Instagram

    blog-signature-summer-15

    SaveSave

  • Fall Home Tour: Cowboys and Elvis

    Fall Home Tour: Cowboys and Elvis

    This fall tour is not at all about pumpkins.

    Sorry if you were ready for pumpkins.

    Instead its about some of my favorite fall-ish things…cowboy hats and boots…red plaid blankets…and Elvis.

    Ok, Elvis isn’t really fall-ish, but its my house and I’ll do what I want to.

    If you want pumpkins and leaves and all that jazz, check back in a few weeks when I’ve actually had time to remember where I stored all that decor from last year.

    #storyofmylife

    A huge thanks to Marty at A Stroll Thru Life for organizing this Fall Tour of Homes. She is so on top of her game – don’t miss her tour. If you are new here from A Thoughtful Place or another blog on the tour, welcome! Fair warning that I’m not near as talented as all those other ladies and also don’t speak as eloquently as they do. I’m also just weird. And random. You’ve been warned.

    So, let me tell you something.

    I love country music. 

    You may have already figured that out.

    But in the fall, I love it a little bit more. 

    Which I didn’t even know was possible.

    I don’t even know why I love it a little more in the fall besides the fact that I drink a bit more Jack in the fall and what pairs better with Jack than country music?

    Nothing I tell you. Nothing.

    Fall Home Tour / The Entryway / Kelly Green, Black and White accents / Cowboy Accents

    So in the fall, instead of leaving my grandfather’s cowboy hat tucked safely away with the vintage cowboy blanket, I pull them both out.

    And decorate with them.

    Because what’s better than a kelly green pillow paired with a modern black and white one and cowboy paraphernalia all against a confetti wall?

    Random? Yes. But it makes me smile.  

    Fall Home Tour / The Living Room / Cowgirl DIY Lampshade

    And I might play a little bit of musical lamps.

    And put the cowgirl lampshade in the living room.

    Just because.

    Fall Home Tour / The Living Room / Kelly Green Accents

    And mix in a little red and gray plaid with another green velvet pillow.

    Because you can’t have enough comfy green velvet pillows.

    And to top it all off…

    Fall Home Tour / The Stairwell / Easy Abstract Circles Accent Wall / Elvis Bust / Lips Watercolor Art

    We’ll put Elvis against a random abstract circle wall beside red watercolor lips.

    Because every home needs a little Elvis in their lives – whether its fall-ish or not.

    Am I right or am I right?

    P.S. That abstract circle wall is the stairwell! I finally figured out what to do with it – it only took me five months – more on it soon!

    What are your favorite fall-ish decorating pieces? Besides pumpkins!

    The next tour stop is Style Your Senses – I promise Mallory won’t let you down!

  • Kitchen Makeover: Take Two

    Kitchen Makeover: Take Two

    Hi. My name is Jenna.

    I’m a recovering neutral decorator. 

    Yes friends, there was a time when I turned solely to whites and beiges for decorating.

    I knew no better. I thought I liked it. I thought it was my style.

    I was so damn wrong.

    As soon as I spray painted my first piece kelly green, there was no going back.

    And then I discovered the no-fail combo of kelly green and navy and it was as if the design gods smiled down upon me and showered me with their wisdom.

    Ok, maybe that was a little much, but you get the idea.

    I am a color girl.

    And when we renovated the beloved foreclosure I opted for beiges, whites, and light blues.

    And they were pretty. I’m not bashing on beige.

    But they weren’t me. 

    So slowly but surely, every room in this house has gotten re-made over.

    The kitchen was especially in need of color. This is what it looked like before we added in some glorious color (besides the barstools.)

    Kitchen Before

    Now, if you really want to see how far its come, as in how many walls we knocked down and the re-arranging we did, you can see the initial kitchen renovation here.

    It was a pretty kitchen. I liked it. It got me in Better Homes and Gardens and for that, I will always love that kitchen….but it wasn’t this kitchen.

    Modern Kitchen • Navy and White Painted Cabinets • DIY Island • Kelly Green & Brass Accents

    And this kitchen, I love.

    I would also like to take this moment to say how appreciative I am of the italics and bold features for fonts. It makes writing so much fun. Obviously, I’m a big fan.

    All that being said, I’m sure you are wondering why you are seeing my kitchen. Again. You already saw the finished results in the spring and summer home tours.

    Well the thing is, I’ve been meaning to do a post on how we got this beloved new kitchen for about oh, five months or so now. But my friend Kellie, who helped me paint my cabinets, just had to do a video about it and then I just had to wait until she had the video in just perfect viewing condition before she would let me post.

    Ok, I might have just thrown her under the bus a little there. She can handle it though. 

    So finally, here are more pretty kitchen pictures including details about the makeover and a video at the end.

    Modern Kitchen • Navy & White Painted Cabinets • Brass Hardware

    All of the kitchen cabinets got painted. We used Velvet Finishes Minimalistic on the top and Velvet Finishes Handsome on the bottom.

    Modern Kitchen • Navy & White Painted Cabinets • Brass Hardware

    The weather was horrendous the week that we opted to do this – so much so that Grunt Labor was even off work due to it one day – so we painted everything inside.

    Modern Kitchen • White Painted Cabinets • Brass Hardware

    The old black hardware just didn’t jive with the navy, so I got all new knobs, pulls, and hinges from D. Lawless Hardware. I think it works perfectly with both the white and navy.

    Modern Kitchen • Navy & White Painted Cabinets • Brass Hardware

    The old faucet was oil-rubbed bronze which definitely wasn’t jiving either. After a long search, we settled on the Delta Trinsic in Champagne Bronze.

    Modern Kitchen • Open Shelving • Navy Painted Cabinets

    Mohawk Lollipop Holder / Scales of Justice (similar) / Vintage Letters (similar) / Antlers (similar) / Red Glasses (similar)

    The open shelving also got a coat of Minimalistic. The rustic wood color that it was before clashed. I also did some editing on the shelves and rearranging. Personally, my favorite thing about the shelving is the contrast between the mohawk lollipop holder, my grandmother’s red glasses and the deer antlers I had to skin myself.

    If that’s not character, I don’t know what is.

    Modern Kitchen • DIY Island • Kelly Green Barstools

    Brass Bowl (similar) / Bar Stools

    The barstools remained the same – I am still mad over the kelly green – but the DIY kitchen island did get a nice fresh coat of white paint and some re-decorating as well.

    Kellie has more images of us actually painting the cabinets – go let her have it because she harassed me the whole time about how I never vacuumed my rug. I swear, I wasn’t mean to her at all to cause her to do such a thing.

    Of course, I’m not lying.

    And here’s the video of the whole shebang…I look very odd in the beginning because I was trying my damnedest not to laugh. There’s no doubt in my mind that the camera man was never happier when he was finally done with us.

    You might also want to see…

    Types of Paint To Use on Cabinets - list of paints that are good for painting kitchen or bathroom cabinets.

    Types of Paint to Use on Cabinets

    pin-this-post-2

    Modern Kitchen • Navy & White Painted Cabinets • DIY Island • Kelly Green and Brass Accents

    You know you don’t wanna miss any of this crazy.

    Sign up to get my posts delivered to your inbox here.

    Stalk Me Here:

    Bloglovin / Pinterest / Facebook / Twitter / Google+ / Instagram

    blog-signature-summer-15

  • Summer Home Tour: The Details Make The Space

    Summer Home Tour: The Details Make The Space

    It doesn’t matter how many times I paint a piece of furniture or upholster a chair – if the accessories around it don’t look good, the furniture or chair won’t shine and the space will fall short.

    The details make the space. 

    It took me a really long time to realize that.

    And a lot of backaches and wasted paint. 

    I get it now though – and even if we are just talking about decorating – the pain was worth the reward.

    As dramatic as that sounds. 

    So this summer home tour is about the details.

    The quirky little objects that I love.

    That some may find ugly.

    Or even tacky.

    But for me, they make my space a reflection of my family.

    And that’s all that matters.

    So if you love it or hate it, either way, I don’t care.

    Because we love it.

    And its how we fly our freak flag.

    Welcome to our freak show.

    This post contains affiliate links for your shopping convenience. Click here to read my full disclosure policy.

    A fun and easy to do confetti wall treatment. Summer Home Tour: The details make the space.

    Entryway / Confetti Accent Wall

    The entryway hasn’t changed since the last home tour.

    That’s good considering I just made it over in February. 

    Its still full of fun with the confetti accent wall. Guests feel like they are walking right into a party and turn around to go buy booze.

    Or at least that’s the effect I wish it had on them. 

    Eclectic but Modern Living Room. Summer Home Tour: The details make the space.

    Living Room

    You just saw the completed living room on Tuesday, so it definitley hasn’t changed since then.

    Ain’t nobody got time fo’ that.

    Here are my favorite details from the space though…

    A fun book atop a navy end table. Summer Home Tour: The details make the space.

    The Perfect Navy End Table

    The perfect navy end table paired with Kate Spade’s Places to Go, People to See Book and a faux snakeskin lamp I scored at Bargain Hunt for $5.

    P.S. I’d be lying if I said that book always sat open, perfectly placed like that. You and I both know the  circus would have it turned into a sticky apple juice mess in 2.0 seconds flat. 

    Coral paired with Kelly Green. Summer Home Tour: The details make the space.

    Kelly Green Curtains

    The coral lamp against the kelly green curtains and the pop of glam the pillow adds to the gray chair – I just can’t quit you. Oh and the tray, can’t forget the giraffe print tray.

    In my opinion, every room should have a little animal print.

    Roar.  

    A vintage bull planter. Summer Home Tour: The details make the space.

    My new favorite thing in the giraffe tray is the vintage bull planter.

    Right beside the metallic angel wing.

    Whoever told you that a bull, giraffe, and angel made a bad combination was lying.

    Add a simple pop of color to a boring console table. Summer Home Tour: The details make the space.

    I’m also quite smitten with the new pop of coral on the console table.

    And the $2 brass duck that was supposed to have went out of style in 1989.

    A dramatic, but easy to make black and white gallery wall. Summer Home Tour: The details make the space.

    Black & White Gallery Wall / Stripped & Re-Stained Buffet

    And then there’s the gallery wall. The gallery wall that is almost a sin because its so damn pretty.

    Almost. 

    Sconces on a gallery wall. Summer Home Tour: The details make the space.

    Let’s be honest though.

    Without the art and the sconces, its just a black wall with a white border.

    And that’s just boring. 

    Let’s not dismiss the bowl of cotton and lilies either.

    And then there’s the kitchen.

    Navy and White Kitchen. Stunning. Summer Home Tour: The details make the space.

    Kitchen Makeover / Barstools / Island

    The navy and white kitchen in all its glory.

    Its the stuff dreams are made of.

    Navy and White Kitchen. Summer Home Tour: The details make the space.

    Hardware

    But the hardware is so good, I refer to it as hardware porn.

    I’m nothing if not blunt.

    Navy and White Kitchen. Summer Home Tour: The details make the space.

    Faucet

    The faucet is right behind the hardware porn show.

    Navy and White Kitchen with Quirky Elements. Summer Home Tour: The details make the space.

    Mohawk Lollipop Holder

    And to top the kitchen off, we have open shelving that consists of a mohawk lollipop holder, antlers, the scales of justice and my grandmother’s red glasses among other things.

    I’m also nothing if not random.

    A bold accent wall in the dining room. Summer Home Tour: The details make the space.

    Criss-Cross Accent Wall / Blue and White Buffet / Entire Dining Room

    The dining room hasn’t changed one bit.

    Oh wait – I’m lying. 

    I did move the corner cabinet into the living room and painted it red, but didn’t have time for photos so you’ll have to stick around for that one. 😉

    Nothing else has changed. Seriously, I’m not lying this time.

    What do you think? Are you a details person?

    Either way, keep flying your freak flag.

    pin-this-post

    A gorgeous home tour, but also a breath of fresh air! Decorate with what you love! Summer Home Tour: The details make the space.

    SaveSave

  • 9+ Must Read Cleaning Tips

    9+ Must Read Cleaning Tips

    If we’re being honest, and since I’m always honest with you, my house is not clean right now.

    Its not clean at all. 

    May is a whirlwind of events for us and cleaning is not one of those events that tends to take place during the month.

    Until there is a mad dash next Friday to clean right before the kid’s birthday party so that our guests don’t turn and run screaming out the door…

    I can hear the circus talking to her therapist in ten years, “Everyone showed up for my birthday party that year, but then made a beeline for the door when they saw dust an inch thick and dried crusty milk on the floor. They took all their presents with them. I’ve never been the same since.”

     Therapy is going to cost me a fortune. 

    So next week, to hopefully cut down on therapy costs, these are my best cleaning tips that I will actually do…well at least everywhere that guests will be… 😉

    Must Read Cleaning Tips and Cleaning Ideas for the Home | Cleaning Hacks | DIY Cleaning Hacks | Bathroom Cleaning Tips | Cleaning Tricks

    Disclosure: This post was a collaboration with HomeRight. However, all opinions and dirty, dirty houses are 100% mine. This post contains affiliate links for your shopping convenience. Click here to read my full disclosure policy.

    Indoor and Outdoor Cleaning Tips

    First off, let’s de-clutter.

    This is an awesome printable - perfect for decluttering your home! 9 MUST READ Cleaning Tips!

    Shockingly, I did this last night when I found out the in-laws were coming down for the night. Lord knows, I can’t let them sleep on a bed where they may or may not end up being poked by plastic horses and measuring tapes – both of which were all over the guest bed last night. This de-cluttering printable covers every room, closet, nook and cranny.

    I should probably work on the bathrooms next…

    What??? I have to try this method for cleaning my shower! 9 MUST READ Cleaning Tips!

    I finally did take out the overflowing trash can in my bathroom last night. Once more, because my in-laws are coming down. Thanks for helping me get my butt in gear, Mama and Dad. I will be doing some deep cleaning in the showers though with my HomeRight Steam Machine. Honestly, never in a million years did I think I would love something that cleans so much. I guess age does that to you. Or maybe its the fact that it cuts down on so much time that I can have that cheap beer sooner? 😉

    Of course, the kitchen is gross too…and has a variety of craft items all over the counters that are supposed to be making some party decorations for the kid’s party. Still working on that one.

    I HAVE to get one of these - its the easiest way to clean your kitchen by far! 9 MUST READ Cleaning Tips!

    I also use my steam machine to clean my entire kitchen. Yep. The whole room. Counters, backsplash, sink, stove, refrigerator, all the stainless steel. You name it. I clean it with my steamer. See why I like it so much?

    My favorite thing to do, ok wait its not my favorite because it involves dog accidents, but maybe the best thing about my steam machine plus, is that it can easily clean up pet stains and odors.

    Wish I would have known this a long time ago!! How to clean pet stains and get the odor out of your carpet! 9 MUST READ Cleaning Tips!

    I am not a dog person. Go ahead. Throw the tomatoes at me. Sorry, y’all, they just aren’t my cup of tea. The thought of cuddling up with a furry creature is just gross to me. Alas, Grunt Labor and the circus adore the dogs, therefore I tolerate them. Ok, they are just a tad bit cute. Just a tad though. Their accidents are not cute. At all. Here’s how I clean up their stains and odors easily – yep, even on carpets.

    I steam clean just about every floor in my house actually.

    Use a steam mop to clean just about ANYTHING! 9 MUST READ Cleaning Tips!

    And trust me, never in a million years did I think I would be cleaning chemical-free. I grew up in the country where old ladies load their Cadillacs down with ammonia every spring for cleaning. I had fully intended on being one of those old ladies. The Cadillac will definitely happen – the ammonia, not so much.

    That being said, I do still use store-bought cleaners for some things.

    5 Ways to Use a Mr. Clean Magic Eraser you didn't know about | Cleaning Tips

    I am also a fan of using my magic eraser on a lot of things around the house.

    Instead of spray painting your hardware, here's a way to clean it! Isn't that crazy?! 9 MUST READ Cleaning Tips!

    One of those things being to clean my hardware. Its much cheaper than replacing it.

    How to waterproof fabric and protect upholstery against stains! Great to know! 9 MUST READ Cleaning Tips!

    I also use a spray to protect my upholstery from stains and to waterproof it.

    See, I’m not 100% hippie.

    I literally just laughed out loud at the thought of even being considered a hippie. 

    And since the birthday entourage will obviously see the outside of my house, I’d better make that look a little more presentable too..

    Easy way to clean up your concrete landscape blocks. 9 MUST READ Cleaning Tips!

    There will be some cleaning of concrete landscaping blocks.

    And the sidewalk could use a quick little cleaning refresh…

    Isn't that difference crazy?! How to Clean A Sidewalk. 9 MUST READ Cleaning Tips!

    Yea, I just cringed too at that before picture. I still have no idea what was growing on the sidewalk before I cleaned it.

    How to remove rust. You WILL NOT believe this!

    If you’ve got rust on anything, I’ve got a killer way to remove it.

    How to Clean Copper and Restore It using water, one product, and a little elbow grease will make your copper look new in no time. A MUST TRY! Great cleaning tip!

    I thought this little cookie jar was way past it’s prime, until I figured out how to clean copper!

    I love vintage brass, but I despise cleaning it up! Here’s the easiest way I’ve found to clean it.

    What are your best cleaning tips? 

    Do any of you have a magic genie in a bottle that can just do all the cleaning, the party decorations and make all the food for me before next Saturday?

    Anyone? Anyone?

    Looking for more useful cleaning and organization tips?

    Be sure to see these five simple storage and organization ideas that are truly life-changing!

    You know you don’t wanna miss any of this crazy.

    Sign up to get my posts delivered to your inbox here.

    Stalk Me Here:

    Pinterest / Facebook / Twitter / Instagram

    pin-this-post

    Must Read Cleaning Tips and Cleaning Ideas for the Home | Cleaning Hacks | DIY Cleaning Hacks | Bathroom Cleaning Tips | Cleaning Tricks

    SaveSave

  • Decorate My Space: Hope’s Kitchen

    A couple weeks back I asked for y’all’s help on decorating my stairwell.

    You were amazing with your responses.

    My stairwell isn’t decorated yet, but I’m still mulling over all your ideas.

    I thought it might be fun to ask for reader submissions and let everyone help out on decorating another space!

    The first one up is Hope’s Kitchen.

    Let’s start with her color scheme ideas and inspiration.

    She knows she wants these colors:

    Decorate My Space: Hope's Kitchen

    source

    However, instead of that darkest brown, she would like a soft buttery yellow, kind of like this one…

    Decorate My Space: Hope's Kitchen

    source

    Hope says: “I’m in love with French country.  A touch of industrial. And a touch of blue.”

    Decorate My Space: Hope's Kitchen

    source

    Decorate My Space: Hope's Kitchen

    source

    Her exact words for this space above were “Love, love, love.”

    Decorate My Space: Hope's Kitchen

    source

    She is also a fan of the red and yellow combination in this kitchen above.

    Decorate My Space: Hope's Kitchen

    source

    And the red and yellow in this kitchen.

    Alright, so there’s her inspiration. This is her current kitchen. Keep in mind, she is in the process of a renovation!

    Decorate My Space: Hope's Kitchen

    Decorate My Space: Hope's Kitchen

    She is going to make this dresser her kitchen island:

    Decorate My Space: Hope's Kitchen

    Isn’t that such a cool idea? She doesn’t know what color to paint it though!

    She also knows that her kitchen countertops will look like the island countertop in this photo:

    Decorate My Space: Hope's Kitchen

    source

    That wood will be on both her island and other countertops. She also knows she will have a beadboard backsplash.

    Her biggest dilemma is figuring out what paint colors to use where.

    So, what do you guys think?

    She wants a red, buttery yellow, and neutral toned space – what colors should go where?

    My first thoughts are to paint the cabinetry white, the island red, the beadboard backsplash yellow and the walls one of the neutral colors.

    Leave your opinions in the comments!

    Need more kitchen ideas?

    How to Make Laminate Counters Look Like Soapstone – I did it and it’s easy!

    DIY Kitchen Island Ideas – ideas for creating your own kitchen island that you probably haven’t thought of!

    DIY Kitchen Banquette – build your own banquette!

    10 DIY Countertop Makeovers – makeover those countertops on a budget!

    You know you don’t wanna miss any of this crazy.

    Sign up to get my posts delivered to your inbox here.

    Stalk Me Here:

    Pinterest / Facebook / Twitter / Instagram

  • DIY Countertops: 10 Countertop Makeover Ideas on a Budget

    DIY Countertops: 10 Countertop Makeover Ideas on a Budget

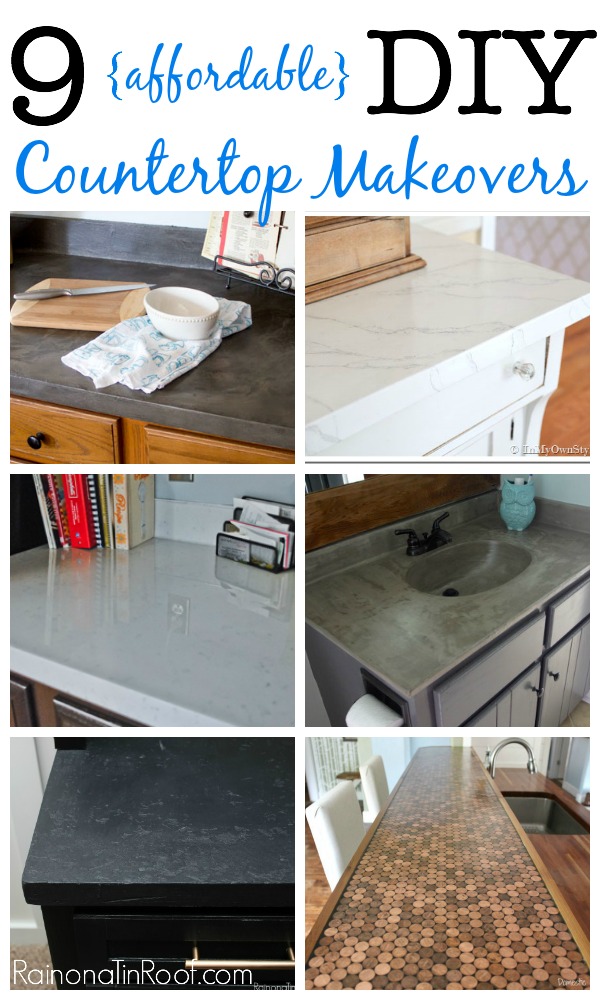
    Looking to update your countertops without breaking the bank? Give one of these DIY countertops a whirl then! These totally doable and cheap countertop makeover ideas will give your kitchen a whole new look in a weekend!

    I dream of marble countertops.

    I dream of having them in my kitchen and bathrooms.

    The dream is cut short when I realize two things:

    1. The high maintenance that is required to keep marble counters pristine.

    and

    2. The cost of marble countertops.

    New countertops, particularly stone counters, are expensive.

    The words “large” and “budget” are never put together when it comes to projects around our household.

    Since doing my faux soapstone countertops (link just below), I have found that the internets are filled with awesome DIY Countertop Makeovers. With these ideas, you can redo kitchen countertops without breaking the bank, but while still getting a whole new look in your space.

    DIY Countertops

    This post contains affiliate links for your shopping convenience. Click here to read my full disclosure policy.

    DIY Countertop Ideas

    These kitchen home improvement projects only look expensive…

    How to Make Your Laminate Counters Look Like Stone

    Countertop Makeover

    When Grunt Labor and I made over his man cave, we couldn’t afford a new countertop for his built-ins. Instead, I figured out a way (for only $15!) to turn them into “stone.” All you’ll need is a little elbow grease and some countertop paint!

    DIY Upholstered Countertop

    DIY Countertop Ideas

    Give your countertops an unexpected twist with upholstered countertops. Of course, this option is going to work best for built-in cabinetry countertops, not kitchen counters.

    DIY Faux Carrara Marble Countertops

    How to Redo Countertops

    There is nothing Diane from In My Own Style can’t do. Seriously – she is just amazing. Case in point, this faux carrara marble counter. Is that not stunning? And she painted it! If painting faux marble seems too daunting, you could always opt for marble contact paper like this.

    How to Redo Countertops Out of Wood Doors

    Redo Countertops

    Yep, those are actual doors. This kitchen counter makeover is sheer genius. The Mustard Ceiling made those counters out of wood doors. Nope, not even kidding. And aren’t they beautiful? I love a good piece of stained wood! Salvage yards often have doors for cheap!

    A Kitchen Countertop Makeover that Will Cost You Pennies

    Kitchen Counter Makeover

    Ashley from Domestic Imperfection is the queen of repurposing items. Not only did she use paper bags for flooring one time (for real!), but she also made a countertop from pennies. Pennies, people!

    DIY Painted Countertops

    Kitchen Countertop Makeover

    One of the more popular budget kitchen countertop options is to just paint them. Jacque and Matt, the husband and wife duo from The DIY Village, used an easy kit to take their counters from blah to bold. If you don’t have any DIY experience at all, then often a countertop kit is the way to go. I’ve used this countertop kit before and it’s really simple to use!

    Glossy Countertop Makeover

    DIY Countertop Makeover

    Designing Dawn got super creative with her cheap countertop makeover. She used a mixture of different paints and products to get a glossy countertop. It’s gorgeous! Glossy finishes always grab my heart and runs with it every single time!

    Granite Look Countertop Makeover

    Cheap Countertop Makeover

    Gail from My Repurposed Life gave her countertops a chic black stone makeover. The end result looks so much like the granite we had in one of our previous homes. This countertop paint kit will give you a similar look.

    Cheap Countertop Ideas in the Bathroom

    White Painted Countertop Makeover

    Redo Kitchen Countertops

    I’m Flying South painted both her vanity countertop and sink. I love the clean, crisp white. It gives the entire space a fresh, clean feel. So fresh and so clean clean. 😉 I’ve used this countertop paint before to give counters a uniform color.

    DIY Concrete Countertops

    Kitchen Countertop Options

    Tasha over at Designer Trapped in a Lawyer’s Body updated her vanity counter with concrete for a whopping $20. I’m generally not a huge fan of concrete in home decor, but I have to say – these look good!

    Do you have any cheap countertop ideas? Share them in the comments below!

    More budget kitchen and bathroom projects you might want to see…

    7 Kitchen Island Ideas You Haven’t Thought Of Yet.. – genius ideas for kitchen islands!

    10+ Kitchen Ideas for Decorating, Organizing and Storage – functional, but still pretty kitchen ideas!

    Bathroom Remodel Ideas on a Budget – nine different ways to save loads of money without compromising on style for your next bathroom remodel.

    High Style Low Budget Home Decor Projects – for when you’ve got champagne taste, but the beer budget.

    Want to remember these counter ideas for later? Just pin the image below!

    DIY Countertops on a Budget

    You know you don’t wanna miss any of this crazy.

    Sign up to get my posts delivered to your inbox here.

    Stalk Me Here:

    Pinterest / Facebook / Twitter / Instagram

    Affordable DIY Countertop Makeovers
  • Spring Home Tour: Design Ideas for Small Budgets

    Spring Home Tour: Design Ideas for Small Budgets

    You guys.

    You guys.

    No really, you guys.

    So much has changed since the last time I did a full home tour.

    Especially my living room. And my kitchen.

    I’m almost pee-my-pants excited to show you.

    And now that I think about the things that have changed in the past two months, I realize I have no clue how it all got done and that I must be insane.

    Oh wait, we already knew that.

    Even though, I know you’ve already seen the entryway, let’s start there since its still new-ish.

    Disclosure: Kirkland’s provided me with a gift card to do a little shopping for my home tour. However, all opinions are 100% mine.

    Confetti Style Entryway: Spring Home Tour

    Entryway Makeover / DIY Confetti Wall

    I still love the entryway so much. Its light, bright, and most importantly – fun.

    The living room….

    Wait for it…

    Wait for it…

    Vintage Modern Rustic Living Room: Spring Home Tour

    Boom.

    Such a big difference from last time, right?

    There’s a new rug, the red buffet has been stripped, and my most favorite new feature of the living room – the black and white framed gallery wall.

    Black and White Framed Accent Wall: Spring Home Tour

    Stripped & Restained Buffet / Black & White Gallery Wall

    Living Room: Spring Home Tour

    There is still a lot of gold, green, navy, and red in this space. Those are my favorites. 

    Vintage Modern Living Room: Spring Home Tour

    IKEA Tarva turned Drink Bar / DIY Cowhide Rug

    I love all the black and white that anchors it as well.

    Black and White Gallery Wall: Spring Home Tour

    The gallery wall turned out far better than I ever could have dreamed.

    Fo Realz. I never thought I could make anything that pretty. 

    The gray chair is sporting a new shimmery gold pillow, that’s a new white bust as well, and yes, those sconces are new on the wall. The pouf ottoman is new-to-the-space. I may or may not have stolen it from the man cave…..shhhhhh…..

    Black and White Gallery Wall: Spring Home Tour

    Same thing with the pink ottoman – except I stole it from my office. Moving pieces around is my favorite way to decorate. I was tickled pink to find the gold sphere for a whopping $13.

    Let’s move on to the kitchen…

    Navy and White Kitchen with a DIY Island: Spring Home Tour

    Kitchen Makeover / DIY Kitchen Island / Green & Navy Barstool Makeover

    Spot anything different??

    NAVY CABINETS!

    I die. 

    Navy and White Kitchen: Spring Home Tour

    And pretty new brass hardware…

    I die again.

    Me, overdramatic? Whatever…

    I loved my kitchen before.

    Now, I love my kitchen. Painting the base cabinets navy and adding that brass hardware made it 100% Jenna…and Grunt Labor too..he really likes it..

    Navy, White, and Brass Kitchen: Spring Home Tour

    Coffee Station & 10+ Kitchen Ideas

    The entire kitchen got a makeover in three days. It was a total whirlwind and there’s no way I could have done it alone. Kellie, who makes Velvet Finishes, actually came with her crew to pitch in and filmed it all! All that will be posted soon too.

    After the cabinets were done, I did some editing and redecorating on the open shelving.

    Open Shelving in the Kitchen: Spring Home Tour

    Knock-Off Jonathan Adler Mohawk Lollipop Holder

    The Knock-Off Jonathan Adler Mohawk Lollipop Holder graces the top of the shelving. I added a few more touches of brass with the eagle thing (no clue what its called, but it was $1 at a thrift store) and the brass bowl on the bottom. I also switched up the clear glasses for my Grannie’s red ones. I can’t believe I didn’t have those babies showcased before. I love ’em. The antlers didn’t make it into the new gallery wall in the living room, so I hung them in the kitchen. The touch of rustic they add is perfect for the space.

    And the dining room…

    Black and White Dining Room: Spring Home Tour

    Not much is different here. I am plotting to strip the table and stain it to connect the space with the living room more.

    Dining Room: Spring Home Tour

    That would be an ice bucket holding those roses, ’cause I’m a genius like that. You may have seen that tray when I instagrammed it. Its Jonathan Adler and was $4 at Burlington. Score.

    Dining Room: Spring Home Tour

    Navy, White, & Gold Buffet

    I’m still quite smitten with the buffet makeover. Its perfect for tying in the navy cabinets in the kitchen, since that whole space is open.

    Black and White Accent Wall / Buffet Makeover: Spring Home Tour

    Criss-Cross Accent Wall

    Everyone who has entered my house for the first time since the Criss-Cross Accent Wall was completed can’t get over the fact that it isn’t wall paper – its paint. And then they totally can’t believe it when I tell them it actually wasn’t that hard.

    More on the Dining Room…

    Last but not least, the master bedroom…

    Pop of Color with the bedding. Spring Home Tour

    Very little has changed in here since the master bedroom mini-makeover. I did switch out the white lamps for mid-century modern style lamps like you see above. The shape of those lamps pulled me in and had me buying them in five minutes flat.

    Stacks of books for decorating: Spring Home Tour

    I added another of the gold pillows to the reading nook and to make the books look less like clutter and more like decor, I topped them off with faux peonies. I’m usually not a faux flower person, but these were really cute and I adore the black and white striped pot.

    More on the Master Bedroom…

    I didn’t include the kid’s room, guest bedroom + office, and bathroom in the tour since nothing has really changed there at all. You can tour them here though if you haven’t seen them before.

    You know you don’t wanna miss any of this crazy.

    Sign up to get my posts delivered to your inbox here.

    Stalk Me Here:

    Pinterest / Facebook / Twitter / Instagram

    pin-this-post

    Great and Realistic Design Ideas for Small Budgets: Home Tour

  • How I Clean My Entire Kitchen With One Single Thing

    How I Clean My Entire Kitchen With One Single Thing

    Let me be the first to say that I am not a great house cleaner.

    If you’ve been around here long enough, I’m sure you could have easily guessed that one.

    Its not that I’m a bad house house cleaner, its just that I don’t do it often enough.

    We don’t have week old food laying out on the kitchen counter or anything, but most days its questionable as to what the sticky substance on the countertop might be.

    I’m just keeping it real, y’all. 

    However, when I do get around to cleaning – like I did yesterday so that I could take photos for an upcoming house tour that didn’t include gross sticky unknown substances – I clean my kitchen with one single thing. I call it my little mouse.

    Fo’ Realz. 

    How to Clean a Kitchen with One Thing | Kitchen Cleaning Hacks | Kitchen Cleaning Tips | Steam Cleaning Tips | Chemical Free Cleaning

    Disclosure: This post was a collaboration with HomeRight. All opinions and comparisons of mice and steam machines are 100% mine. This post contains affiliate links for your shopping convenience. Click here to read my full disclosure policy.

    I realize the irony in me calling my cleaning tool a little mouse.

    But its a good little mouse…

    HomeRight Steam Machine

    Its also known as the HomeRight Steam Machine.

    Doesn’t it slightly resemble a mouse?

    Ok, its just me and my weird imagination. 

    Anyway, I use this bad boy to clean my entire kitchen.

    This time around, I started with some grout cleaning…and removing blue paint apparently…

    Steam Cleaned Grout

    I just attach the nylon brush to the steam gun and fire away while scrubbing.

    I also had some dried white paint lurking on the countertops from a recent kitchen makeover…

    Get dried paint off with a steamer.

    I shot it with the steam and then used a scraper to peel it right off.

    I steam cleaned my sink as well.

    Steam Cleaned Sink

    With the sink, as I steam, I come behind with a sponge, wiping away the dirt and grime.

    It comes off like buttah’.

    I use it on all my appliances…

    Steam your appliances to get a streak free clean.

    Give the appliance a shot of steam, quickly followed by a wipe down with a towel. I do the same thing on my kitchen faucet.

    And shockingly – the steam machine can also tackle my stove…which is a whole other ballgame.

    Steam Clean Your Stove!

    I clean it the same as the stainless steel on the other appliances – steam, wipe, repeat as needed. If needed, I use a scraper to remove stuck on stuff.

    Do you use a steam machine for cleaning?

    Want more cleaning tips?

    How to Steam Clean Your Shower – you won’t believe how dirty this shower was before!

    How to Get Pet Stains and Odors Out Of Your Carpet – easy!

    9+ Must Read Cleaning Tips – super useful tips for all around the house!

    You know you don’t wanna miss any of this crazy.

    Sign up to get my posts delivered to your inbox here.

    Stalk Me Here:

    Pinterest / Facebook / Twitter / Instagram

  • 10+ Kitchen Ideas for Decorating, Organizing, and Storage

    10+ Kitchen Ideas for Decorating, Organizing, and Storage

    I am all about a pretty space.

    I’m also all about a real life space.

    The problem is that pretty + real life don’t always work together.

    And real life tends to trump pretty everyday of the week.

    I always struggle with finding that happy balance between pretty and real life in the kitchen.

    Prime example: the chips will always live on top of the fridge. No, its not pretty, but that’s where we expect them to be, so that’s where they will always be come hell or high water unless we magically get more pantry or cabinet space…which I won’t hold my breath for.

    That being said, these are my best kitchen ideas for merging real life and pretty. 

    Doritos bag on the refrigerator not included. 

    Full of easy to do ideas that are pretty, but also functional. 10+ Kitchen Ideas: Decorating, Organizing, Storage

    10+ Kitchen Ideas: Decorating, Organizing, Storage

    #1. Create a coffee station. 

    Create a coffee station. 10+ Kitchen Ideas: Decorating, Organizing, Storage

    This coffee station has only been around for the last few months and let me tell you it has made my morning coffee ritual so much smoother. You see, I tend to want my morning coffee faster than the Keurig can make it. I know – that’s like the purest definition of impatientness (which probably isn’t even a word) ever. It is what it is. I corralled my K-Cups, sugar, and spoons all on a cheap little IKEA tray to get my coffee in my mug as soon as possible. The only thing that isn’t there is the creamer in the fridge. Obviously, its not realistic to leave the creamer sitting out overnight uncovered, so I used that pitcher for my spoons. The little Cafe du Monde sign is a nice reminder of my favorite city in the world.

    #2. Use a locker basket to hold fruit.

    Use a locker basket to hold fruit. 10+ Kitchen Ideas: Decorating, Organizing, Storage

    I hate those banana hanger/holder things. I have no idea why, but they drive me crazy. Instead, I use a vintage locker basket to hold all our fruit.

    #3. Use a shiny pitcher to hold cooking utensils. 

    Use a silver pitcher to hold cooking utensils. 10+ Kitchen Ideas: Decorating, Organizing, Storage

    When I found that silver pitcher at Goodwill, I nearly peed my pants. It does the job of holding all the ugly cooking utensils, while adding a touch of chic.

    #4. Use a tray to corral salt, pepper, olive oil, etc. 

    Use a tray to corral olive oil, salt, pepper, etc. 10+ Kitchen Ideas: Decorating, Organizing, Storage

    Right beside the silver pitcher is a small rustic-y tray that holds salt, pepper and olive oil. The tray keeps everything corralled in one spot and makes them feel unified.

    #5. Bring in color with barstools. 

    Bring color into a kitchen with barstools. 10+ Kitchen Ideas: Decorating, Organizing, Storage

    Lots of kitchens lack color. In fact, just about everything in my kitchen is black and white except for the barstools and curtains. In terms of furniture, barstools are pretty cheap, which makes them a perfect candidate for color. Buy a cheap pair at Target and spray paint them or scour thrift stores for some to makeover. I gave my barstools a kelly green and navy blue makeover a couple years back and I’ve been in love ever since.

    #6. Switch out your hardware. 

    Switch out old hardware and cover the previous holes. 10+ Kitchen Ideas: Decorating, Organizing, Storage

    Granted, I painted my cabinets and switched out their hardware, but never underestimate the power of just switching out hardware. Grunt and I did this at our little cottage and it totally changed the look of the entire kitchen. We probably spent less than $50 on new hardware and it had a big impact. You can even change the location of your hardware and cover the holes easily.

    #7. Don’t want to trade out your hardware? Try restoring it. 

    Instead of switching out old hardware, restore it. 10+ Kitchen Ideas: Decorating, Organizing, Storage

    If your hardware is pretty old, chances are, it could use a good cleaning. Clean it up and you might realize you have a little gem under all the grime. Here’s how to restore your hardware.

    #8. Build your own island or peninsula. 

    AWESOME IDEAS - dressers turned island, build your own island, and more! 7 Kitchen Island Ideas You Haven't Thought Of... via RainonaTinRoof.com

    Yes you can. I know some of you were just like, “No way can I make my own island.” Y’all, if Grunt and I can, anyone can. Our kitchen island (in the photo with the barstools earlier) was made from porch posts and salvaged barn wood – and it only costs about $100 to make, excluding the counter. And if you don’t want to build one, look at these seven different kitchen island ideas – you can even use a dresser for an island.

    #9. Have fun with sweets. 

    Display treats in a unique way. 10+ Kitchen Ideas: Decorating, Organizing, Storage

    This mohawk lollipop holder is definitely not all that kitchen-y. Its not really even needed. Buts its fun and quirky. And I like that. The kid especially loves getting her lollipops out of the mohawk.

    #10. Use locker baskets for cookbook storage.

    Store your cookbooks in an unconventional way. 10+ Kitchen Ideas: Decorating, Organizing, Storage

    A kitchen ideas post wouldn’t be complete without my vintage locker basket cookbook storage. Almost three years and they haven’t budged.

    #11. Ditch some upper cabinets for open shelving. 

    Instead of having all upper cabinets, opt for some open shelving. 10+ Kitchen Ideas: Decorating, Organizing, Storage

    When Grunt Labor and I started the kitchen reno, I knew I wanted open shelving somewhere. Originally, I wanted it on both sides of the window (and would still like that), but there wasn’t enough space for the shelving we bought from IKEA on the left side of the window. The shelving is pretty and functional. In the photo above, its holding my whiteware, but now it actually holds dishes and glasses. You can see our entire kitchen renovation here.

    What are your best kitchen ideas for decorating, organizing, and storage? 

    Want more real life decorating ideas? 

    14 Real Life Bedroom Ideas Anyone Can Do – totally doable, totally real life.

    20+ Living Room Ideas – for every kind of design style.

    You know you don’t wanna miss any of this crazy.

    Sign up to get my posts delivered to your inbox here.

    Stalk Me Here:

    Pinterest / Facebook / Twitter / Instagram

    pin-this-post

    Full of easy to do ideas that are pretty, but also functional. 10+ Kitchen Ideas: Decorating, Organizing, Storage

  • 7 Unique Kitchen Island Ideas on a Budget

    7 Unique Kitchen Island Ideas on a Budget

    Increase the counter space and storage space in your kitchen with a new kitchen island – DIY style! Here are seven different kitchen island ideas on a budget that are functional and creative! 

    On the last three “house hunts” for a new home, a kitchen island was always at the top of the list in the kitchen space. The kitchen didn’t have to have an island right then, but there had to be a space where we could DIY one – and we’re pretty creative about fitting things like that in spaces. 🙂

    Kitchen islands can have a serious impact on your kitchen’s functionality – they can offer much needed food preparation space and also extra storage space. Who couldn’t use more of that in their kitchen?!

    These kitchen island designs are not only unique and creative, but they can easily be tweaked to work in any kitchen – big or small!

    Kitchen Island Ideas DIY

    DIY Reclaimed Materials Kitchen Island

    As you know, I am very partial to my kitchen island. I love it. Like love it so much, I threaten to be laid out on it when I die.

    kitchen island ideas on a budget - island made from reclaimed wood

    Grunt Labor & I built our kitchen island from barn wood out of my great grandfather’s barn and old porch posts.

    Turn a Sofa Table into a Kitchen Island

    kitchen island ideas diy - kitchen island made from a sofa table

    I had never thought of this before – find a sofa table you like and turn it into a kitchen island! That’s just what Designing Domesticity did! The open shelves below are perfect for larger kitchen items.

    Turn a Dresser into a Kitchen Island

    diy kitchen island ideas - island made from a dresser

    How about just taking an old dresser, painting it a bright color and turning it into an island? I love this one from You’re So Martha.

    diy kitchen islands on a budget - islands made from dressers with area for barstools.

    Here’s another dresser turned island, but this one from traerloves has an added overhang where you could push bar stools under. This would make the perfect spot for breakfast! Love how they added that overhang – such a unique diy.

    No room for a floating island? What about a kitchen peninsula?

    Turn a Dresser into a Kitchen Peninsula

    DIY Kitchen Peninsula made from a Dresser

    If you can’t get your hands on an old dresser, you could always pick up an IKEA dresser on the cheap and make it into an island. Ruffles and Such made her IKEA dresser into a peninsula and a breakfast bar.

    Small Kitchen Island Ideas

    Small diy kitchen island build

    This kitchen island looks pretty easy to make and very budget friendly from Kruse’s Workshop. It’s also narrow, so it would be perfect for a smaller rustic farmhouse kitchen.

    diy budget kitchen islands - rustic farmhouse kitchen island

    This kitchen island from Shanty 2 Chic is a bit more complicated to build, but only costs $85! It’s another one that is smaller scale so great for a small kitchen. It also has great shelves for storage and that butcher block countertop is gorgeous!

    Any DIY kitchen island ideas you’re brewing up?

    Need more DIY projects for the kitchen?

    See how I made laminate counters look like stone.

    And here are nine more DIY countertop makeover ideas.

    10+ Kitchen Ideas for Decorating, Organizing, and Storage – super good ones too.

    Want to come back to these kitchen island ideas later? Pin the image below!

    unique kitchen island ideas on a budget

    You know you don’t wanna miss any of this crazy.

    Stalk Me Here:

    Pinterest / Facebook / Twitter / Instagram

  • 7 {To Die For} White Kitchens

    7 {To Die For} White Kitchens

    Ok, maybe not To Die For, but you know what I mean. They are good.

    Way good.

    Let’s talk about white kitchens for a moment, shall we?

    First off, let’s define them. To me, a white kitchen is one that is mostly white of course. It doesn’t mean that all the cabinets have to be white, the backsplash white, or the countertops all white. To me, it just means that when you look at the overall space, it feels light and airy.

    Personally, I love white kitchens. To me, they have the most clean lines and seem the most inviting.

    7 {To Die For} White Kitchens via RainonaTinRoof.com

    White Kitchens

    Modern Rustic White Kitchen

    When Grunt Labor and I bought our foreclosure, I knew I wanted to make the cabinets white and have subway tile in our kitchen. We went for a white on white on white scheme with the cabinets, countertops, and backsplash, then brought in color with the barstools, and character with the island. I do have to say though, I am starting to crave just a bit more color in here – I’m thinking I can bring some in with a couple rugs.

    And on a side note – everyone always asks me how hard it is to keep white cabinets clean. Well honestly, I’m not the best at keeping them spic ‘n span everyday. I don’t have time to wipe them down daily. However, when I do get around to wiping them down, any grease, dirt, or smudges come off super easily with a Mr. Clean Magic Eraser.

    White Kitchens

    via

    I love the simple white cabinets in this kitchen and the classic subway tile. What I really really love about this kitchen though are the pops of black and white. Those countertops are perfection and the black and white rugs tie it all in.

    Navy and White Kitchen

    via

    Sara Richardson is one of my all time favorite designers. This kitchen she designed is to me, breathtaking. On one side, you’ve got the clean white cabinets and then bam that navy and brass island just make it all pop.

    Dark Blue and White Kitchen

    via

    Yep, more navy. I am totally digging the white cabinets on top, navy on the bottom. Even though this space has some definite color, it still has that overall white feel to me with the countertops and backsplash.

    White Kitchen

    Four Generations One Roof  has a beautiful white kitchen. She brought in some color with her backsplash and tied it together with her rug. I love the cozy cottage feel.

    Black and White Kitchen

    via

    This kitchen is definitely on the modern side. I’m not 100% crazy about the style of it, but I love how it shows that you can have lots of black in a kitchen and still have it feeling light and airy by painting the walls white and doing a white backsplash.

    Teal and White Kitchen

    Mom 4 Real has another beautiful white kitchen, but had the genius idea of removing some of her upper cabinet doors and painting the backs with a fun teal color. Such a great way to add color, while still keeping that white kitchen feel.

    What are your thoughts on white kitchens?

    Love ’em? Hate ’em? Somewhere in between?

    Looking for more kitchen inspiration? 

    See how I made my boring and basic laminate counters look like STONE! It was easy! And don’t miss these other 9 DIY countertop ideas either!

    Check out these 7 Kitchen Island Ideas you would have never thought of!

    Here are 10+ ideas for organizing, decorating and storage in your kitchen.

     You know you don’t wanna miss any of this crazy.

    Sign up to get my posts delivered to your inbox here. 

    Stalk Me Here:

    Pinterest / Facebook / Twitter / Instagram

  • Vintage Modern Rustic Kitchen Tour

    Vintage Modern Rustic Kitchen Tour

    Are you tired of my kitchen yet?

    If I were you, I may be tired of my kitchen.

    But, here’s hoping you aren’t tired of my kitchen.

    Because, its the second round of the What’s Your Style series, which means we are talking kitchens.

    So today, I’m sharing a little bit more about my Vintage Modern Rustic Kitchen.

    There are a few changes since the last time you saw it.

    Rustic Kitchen | White Kitchen | Kitchen Remodel | Kitchen Ideas | DIY Kitchen Ideas | Painted Kitchen Cabinets | DIY Kitchen IslandVintage Modern Rustic Kitchen

    This post contains affiliate links for your shopping convenience. Click here to read my full disclosure policy.

    During the first round of What’s Your Style, we determined that my style was Vintage-Modern-Rustic.

    And that shockingly, it all works together.

    I showed you my living room (something I never thought would happen) and we chatted about all the different elements.

    Today, let’s chat about the kitchen.

    Obviously, the most rustic piece in my kitchen is the island.

    Vintage Modern Rustic Kitchen via RainonaTinRoof.com #vintage #modern #rustic #kitchen #whatsyourstyle

    As you know, Grunt Labor and I built the island ourselves (sans the countertop). I painted it a crisp white, but left the bottom shelf of barn wood untouched. I love that look of barn wood mixed with clean white paint.

    Vintage Modern Rustic Kitchen via RainonaTinRoof.com #vintage #modern #rustic #kitchen #whatsyourstyleThe barstool makeover‘s brought them a bit more in the modern realm.

    And did you notice the new addition over the island?

    Vintage Modern Rustic Kitchen via RainonaTinRoof.com #vintage #modern #rustic #kitchen #whatsyourstyleI finally found some pendant lights I loved. They are much more modern than the light fixture over the sink, which may get switched out soon.

    Vintage Modern Rustic Kitchen via RainonaTinRoof.com #vintage #modern #rustic #kitchen #whatsyourstyleOf course, my kitchen would not be complete without a touch of cotton somewhere.

    Vintage Modern Rustic Kitchen via RainonaTinRoof.com #vintage #modern #rustic #kitchen #whatsyourstyleAnd intricate hand iced cookies. Why, yes, I did make those. And no, I’d  never lie to you about something like perfectly iced cookies. *evil laugh*

    Isn’t the little vintage plate the cookies are on adorable? I have a small set of those that were my aunt’s. The cream and sugar set go well with the vintage coffee jar.

    Vintage Modern Rustic Kitchen via RainonaTinRoof.com #vintage #modern #rustic #kitchen #whatsyourstyle

    The open shelving has a bit of a rustic touch with the stained wood, but not as much as the island.

    Vintage Modern Rustic Kitchen via RainonaTinRoof.com #vintage #modern #rustic #kitchen #whatsyourstyleI will say that I love all the “white-ware,” but I’m not quite sure its still working for me. It may get changed soon.

    Vintage Modern Rustic Kitchen via RainonaTinRoof.com #vintage #modern #rustic #kitchen #whatsyourstyleThe metal basket cookbook storage is another vintage touch.

    Vintage Modern Rustic Kitchen via RainonaTinRoof.com #vintage #modern #rustic #kitchen #whatsyourstyleMy mother-in-law bought me this fabulous caddy from Pottery Barn. Its probably supposed to be used outside, but it is perfect to corral all the clutter on the countertops.

    Vintage Modern Rustic Kitchen via RainonaTinRoof.com #vintage #modern #rustic #kitchen #whatsyourstyleIn the last kitchen tour, many people asked about my faucet. We bought it at Lowe’s and it was only $100 – a great price for a faucet. It has held up perfectly.  To me, it has an old farmhouse feel which works well with the island, but it contrasts nicely against the classic subway tile backsplash.

    Vintage Modern Rustic Kitchen via RainonaTinRoof.com #vintage #modern #rustic #kitchen #whatsyourstyleI use a modern wood container to hold my salt, pepper, olive oil, etc. by the stove. Its easy access and makes the necessities a bit prettier. The same goes for the silver pitcher – a Goodwill find. I’m not quite sure what the round piece of wood is from that is behind it all. I picked it up at one of my favorite local shops because I thought it would be a nice contrast with the backsplash.

    That’s it. My Vintage Modern Rustic Kitchen in a nutshell.

    Do you have any vintage, modern, or rustic elements in your kitchen?

    Need more kitchen ideas and inspiration? Be sure to see these then…

    Love white kitchens? Then get more white kitchen inspiration here!

    Need kitchen island ideas? Here are 7 Kitchen Island Ideas you haven’t thought of…

    Ready to paint your kitchen cabinets? Then be sure to read this post about all the different types of paint for cabinets and details on each.

    Want more general kitchen ideas? Then see these 10+ Kitchen Ideas for Decorating, Organizing, and Storage

     You know you don’t wanna miss any of this crazy.

    Sign up to get my posts delivered to your inbox here. 

    Stalk Me Here:

    Pinterest / Facebook / Twitter / Instagram

    SaveSave

  • DIY Kitchen Island with salvaged wood

    DIY Kitchen Island with salvaged wood

    Don’t miss another post like this one! Sign up to get my posts delivered to your inbox here. 

    Every time I post about my kitchen, it seems that you guys love the DIY kitchen island the most.

    And I love that you love it the most.

    That piece is pretty special to me.

    So special that I regularly threaten to be laid out on it when I die.

    {Insert Grunt Labor rolling his eyes here.}

    If you have read about the full kitchen makeover renovation, you know it has come a really long way. We knocked down walls, moved appliances, painted cabinets, took out cabinets, dealt with rude plumbers and much more.

    And it was all worth it.

    So, here is how we built our DIY kitchen island.

    This post contains affiliate links for your shopping convenience. Click here to read my full disclosure policy.

    Kitchen Tour {rainonatinroof.com} #kitchen

    DIY Kitchen Island

    First off, I apologize for the lack of photos of us actually building it. I was pregnant during the process (which was an adventure) and honestly, after it taking a couple hours to figure out how to build it, I wasn’t sure if it would even turn out well. 

    Luckily, I was wrong.

    The good news for you is that since it did take us a few hours and a few curse words and few cross looks to figure it out, we figured out it was actually pretty easy in the end. So, really if you have basic DIY skills, you can build this island. 

    First off, let me give you the dimensions:

    NO WAY! They built this and it cost less than $100! DIY Kitchen Island via RainonaTinRoof.com

    It’s five feet long, two feet (and a smidge over) wide and right at about three feet in height. For us, its the perfect size. It functions as a great workspace, we can eat breakfast at it, but it doesn’t take over the entire kitchen. 

    Here’s the materials we used:

    NO WAY! They built this and it cost less than $100! DIY Kitchen Island via RainonaTinRoof.com

    The legs are old porch columns we purchased from a local architectural salvage store. If you can’t find salvaged porch columns, you can always find them at Home Depot or another local hardware store. We made a frame of 2x4s to go around the columns at the top and at the base. We used wood screws to attach all the 2 x 4s to the columns.

    The bottom shelf is barn wood that came from my great grandfather’s farm. After the frame was completed, we just used a finish nailer to nail the barn wood into both sides of the 2 x 4s.

    NO WAY! They built this and it cost less than $100! DIY Kitchen Island via RainonaTinRoof.com

    The top is the same countertop material that is in the rest of the kitchen. We did add some 1 x 4s between the 2×4 frame on top (underneath the counter) to give the countertops a little more support.

    The screws weren’t too noticeable at the bottom, but were at the top. So, after the countertop was installed, we added decorative trim around the top to hide the screws. Its the same trim we used on our built-in bathroom shelving.

    NO WAY! They built this and it cost less than $100! DIY Kitchen Island via RainonaTinRoof.com

    DIY Kitchen Island via RainonaTinRoof.com #kitchenisland #diy

    A coat of white paint and my barstools make it complete.

    After we finally got our dimensions figured out, it took about an hour (without the countertop – we had pros put that in) to construct.

    NO WAY! They built this and it cost less than $100! DIY Kitchen Island via RainonaTinRoof.com

    All in all, excluding the countertop, we have less than $100 in it. If you didn’t want a regular countertop, like ours, you could always just opt for wood.

    Vintage Modern Rustic Kitchen via RainonaTinRoof.com #vintage #modern #rustic #kitchen #whatsyourstyle

    You can see more of the kitchen details here or tour our entire renovated rancher here.

    What do you think of our DIY Kitchen Island?

    You’ll also love these ideas for your kitchen…

    See how I made my laminate countertops look like stone here – you won’t believe how easy it was! 

    You can also get more DIY countertop makeover ideas here!

    7 Kitchen Island Ideas you haven’t thought Of– out-of-the-box ideas for your own DIY kitchen island!

    10+ Kitchen Ideas for Decorating, Organizing, and Storage– functional, but still pretty ideas!

    7 (To-Die-For) White Kitchens – love white kitchens? Don’t miss these then!

    Sign up to get my posts delivered to your inbox here. 

    You know you don’t wanna miss any of this crazy.

    Stalk Me Here:

    Pinterest / Facebook / Twitter / Instagram

    pin-this-post-2

    DIY Kitchen Island Idea | How to Build a Kitchen Island | Rustic Kitchen Island | Farmhouse Kitchen Island | Affordable Kitchen Island

  • Repose Gray Walls + The Easiest Way to Paint a Room

    Repose Gray Walls + The Easiest Way to Paint a Room

    Gray is the hot new choice for wall color these days and after just giving my kitchen, living room and dining room walls a fresh coat of Repose Gray, I can see why! This color is a true gray color and was the perfect choice for us! And the icing on the cake? I used a cool, new tool for painting my walls and it made the job so much easier! 

    That’s right.

    I went gray.

    Not with my hair yet, though.

    Thank the Lord.

    Because when the kid tries my patience, its like I can just feel the color fading from my hair, as well as my sanity quickly disappearing.

    But right now, just my walls are gray, repose gray to be exact.

    Things do change quickly around here though, so here’s hoping there are no gray hairs in my near future.

    Repose Gray Walls
    Repose Gray Walls + The Easiest Way to Paint a Room

    Disclosure: This post is sponsored by HomeRight. Y’all know how I roll though, all opinions are 100% mine. This post contains affiliate links for your shopping convenience. Click here to read my full disclosure policy.

    Tools & Supplies Used:

    • Sherwin Williams Repose Gray Paint – while this is a Sherwin Williams color, we actually had it mixed in Behr paint at Home Depot. They can mix colors of just about any paint brand, just tell ’em the name and brand!
    • HomeRight PaintStick EZ-Twist – makes painting a breeze!
    • QuickPainter for edging around trim and the ceiling.

    Ever since we moved into our rancher and made a mad rush to finish the renovation in two months, I was never really 100% happy with our previous wall color. No doubt, it was my fault – the mad rush took over and I lost all sight of actually taking my time on selecting colors. The same happened in my bathroom, the nursery, the guest room, and our bedroom.

    And that’s pretty much every room in our house.

    And that’s a lot of re-painting.

    Its no big surprise that it took me two years to even begin thinking about re-painting our main living space.

    Enter the HomeRight PaintStick EZ-Twist.

    Repose Gray Walls + The Easiest Way to Paint a Room via RainonaTinRoof.com #homeright #paintstickeztwist #reposegrayY’all I painted our entire main living area (that includes the kitchen, living room, dining room, entryway, and hallway) in about four hours with this bad boy.

    How to Use the EZ-Twist for Painting Walls

    It comes with a big paint stick (as if its name didn’t already allude to that), a roller, a roller cover, and a suction tube and cover for your paint can.

    Step 1

    Attach the roller to the stick.

    Repose Gray Walls + The Easiest Way to Paint a Room via RainonaTinRoof.com #homeright #paintstickeztwist #reposegray

    Step 2

    Attach the roller cover to the roller.

    Repose Gray Walls + The Easiest Way to Paint a Room via RainonaTinRoof.com #homeright #paintstickeztwist #reposegray

    Step 3

    Place the suction tube and cover over your gallon of paint.

    Repose Gray Walls + The Easiest Way to Paint a Room via RainonaTinRoof.com #homeright #paintstickeztwist #reposegray

    Step 4

    Put your PaintStick EZ-Twist onto the suction tube and pull the paint into the handle of the tube by pulling back on the inner tube.

    Repose Gray Walls + The Easiest Way to Paint a Room via RainonaTinRoof.com #homeright #paintstickeztwist #reposegray

    Step 5

    Take the EZ Twist to your walls, twist on the end of it to make the paint come up into the roller cover and start rolling your paint on the walls!

    There is no running back and forth to your paint tray hundreds of times.

    There is no messy tray to trip over and track paint all over your floors.

    Yes. That has happened to me before.

    When your roller needs more paint, you simply twist the handle and keep rolling.

    Repose Gray Walls + The Easiest Way to Paint a Room via RainonaTinRoof.com #homeright #paintstickeztwist #reposegrayWhen you have finally ran out of paint in the handle, just go fill it back up.

    To edge around all the trim in the areas we painted, I used the HomeRight Quick Painter.

    Repose Gray Walls + The Easiest Way to Paint a Room via RainonaTinRoof.com #homeright #paintstickeztwist #reposegray

    How to Use the Quick Painter

    Step 1

    Suction the paint right into the handle of the Quick Painter.

    Repose Gray Walls + The Easiest Way to Paint a Room via RainonaTinRoof.com #homeright #paintstickeztwist #reposegray

    Step 2

    Place the paint pad on the handle, squeeze the trigger and paint the town, I mean edges.Repose Gray Walls + The Easiest Way to Paint a Room via RainonaTinRoof.com #homeright #paintstickeztwist #reposegray

    Want to see the final product?

    The Repose Gray in all its glory?

    The Entryway

    Sherwin Williams Repose Gray Paint

    Repose Gray Walls + The Easiest Way to Paint a Room via RainonaTinRoof.com #homeright #paintstickeztwist #reposegray

    Repose Gray Walls + The Easiest Way to Paint a Room via RainonaTinRoof.com #homeright #paintstickeztwist #reposegray

    Repose Gray Walls + The Easiest Way to Paint a Room via RainonaTinRoof.com #homeright #paintstickeztwist #reposegray

    The Kitchen

    Repose Gray Walls + The Easiest Way to Paint a Room via RainonaTinRoof.com #homeright #paintstickeztwist #reposegray

    I especially love how the gray made the subway tile pop a bit more in the kitchen.

    Repose Gray Walls + The Easiest Way to Paint a Room via RainonaTinRoof.com #homeright #paintstickeztwist #reposegray

    Gray Walls in The Dining Room

    Gray Walls in the Dining Room

    Repose Gray Walls + The Easiest Way to Paint a Room via RainonaTinRoof.com #homeright #paintstickeztwist #reposegray

    Repose Gray Walls + The Easiest Way to Paint a Room via RainonaTinRoof.com #homeright #paintstickeztwist #reposegray

    Gray Living Room

    Repose Gray Walls + The Easiest Way to Paint a Room via RainonaTinRoof.com #homeright #paintstickeztwist #reposegray

    Gray Living Room

    Repose Gray Walls + The Easiest Way to Paint a Room via RainonaTinRoof.com #homeright #paintstickeztwist #reposegray

    Repose Gray Walls + The Easiest Way to Paint a Room via RainonaTinRoof.com #homeright #paintstickeztwist #reposegray

    Repose Grey WallsYou can see the boring beige walls of yesterday here. They weren’t terrible, they just weren’t that pretty.

    And we all know I like pretty things.

    And functional things.

    That make my life so much easier.

    Sign up to get my posts delivered to your inbox here. 

    You know you don’t wanna miss any of this crazy.

    Sherwin Williams Repose Gray Walls + The Easiest Way to Paint a Room

    SaveSave

  • Emerald Green Decorating Ideas

    Emerald Green Decorating Ideas

    According to Pantone, the color of 2013 was emerald.

    And that was just fine by me. I did not call to complain.

    I’m sure they breathed a sigh of relief that I approved.

    Not.

    Really, I’m not one who changes everything in my home just because a new trend is out or something is hot at the moment.

    But, emerald and I – we got along fabulously this year.

    And will continue to do so throughout 2014 and probably the better part of my life.

    Emerald and I are just destined for each other.

    I mean, it is my birthstone.

    Here is a 2013 emerald re-cap including some of my own projects and some fabulous emerald green decorating ideas.

    Love green - it can go with so many other colors! Emerald Green Decorating IdeasEmerald Green Decorating Ideas

    ANYONE can do this - its hard to mess up! And its cheap! DIY Faux Malachite Tray (For Less than $10) via RainonaTinRoof.com

    DIY Faux Malachite Tray – this was so easy to make! You can’t mess it up!

    IKEA Tarva Hack: Turn It Into a Drink Bar via RainonaTinRoof.com

    IKEA Tarva turned Drink Bar

    2013 Emerald Re-Cap via RainonaTinRoof.com

    And then there was the Kate Spade lamp. This project was the one that started it all.

    2013 Emerald Re-Cap via RainonaTinRoof.com

    And then, there are my barstools. Oh, the barstools. I do still adore them so.

    2013 Emerald Re-Cap via RainonaTinRoof.com

    I also discovered that sometimes the simple combination of white and emerald is just perfect. Such was the case with this French country chair makeover.

    2013 Emerald Re-Cap via RainonaTinRoof.comI want these chairs.

    No, I really really really want these chairs from Jen Langston Interiors. Seriously, if I just had one of these in my entire house and no other seating, I would be good.

    2013 Emerald Re-Cap via RainonaTinRoof.com

    Jennifer from Dimples and Tangles is a genius. If you don’t know about her or her fabulous hall of green mirrors, you are missing out.

    2013 Emerald Re-Cap via RainonaTinRoof.com

    Grunt Labor chose the paint color for the front door this summer. Why did he choose this color? Because of its name.

    Precious Emerald. He said he wanted to be able to tell people his front door was a precious emerald.

    2013 Emerald Re-Cap via RainonaTinRoof.com

    This dresser is not only emerald, but it also combines one my other favorite things: gold.

    A simple, yet fabulous combination from Something is Done.

    2013 Emerald Re-Cap via RainonaTinRoof.com

    This entryway is simply amazing.

    2013 Emerald Re-Cap via RainonaTinRoof.com

    I am usually not a fan of yellow. However, this combination of yellow and kelly green is beautiful from Honey.

    2013 Emerald Re-Cap via RainonaTinRoof.com

    I love all campaign furniture. But, put a coat of green on it and combine with gold. BAM. Gorgeous from Centsational Girl.
    2013 Emerald Re-Cap via RainonaTinRoof.com

    And since there was extra precious emerald paint left over, I used it on this restored rocking chair.

    2013 Emerald Re-Cap via RainonaTinRoof.com

    I die. Those stairs. Oh. My. Word.

    It would be the perfect place for me to give my rendition of Scarlett.

    Don’t you think so?
    green-tray-2-e1377599480228

    And while showing you how I transformed this Goodwill tray into an emerald gem, I told you about the rules of 1/2 off Goodwill shopping days.

    Wasn’t that a fun read?

    Or did it make you want to call the asylum on me?

    2013 Emerald Re-Cap via RainonaTinRoof.com

    I honestly don’t know that I would get any work done at all sitting at this gorgeous desk from Design in Bloom.

    2013 Emerald Re-Cap via RainonaTinRoof.comTypically, I loathe ceiling fans. However, this one is awesome. Why is it awesome? Because it has emerald painted blades. See the full tutorial from How Joyful here.

    And what is Pantone’s 2014 color of the year?

    Radiant Orchid.

    I may have to make a call about this one.

    Love green (me too!) and want more green decorating ideas? 

    Here are my favorite green decorating moves and here are the best green color combinations when it comes to decorating!

    You know you don’t wanna miss any of this crazy.

    Sign up to get my posts delivered to your inbox here.

    Stalk Me Here:

    Pinterest / Facebook / Twitter / Instagram

  • How to Paint a Refrigerator (It’s actually easy!)

    How to Paint a Refrigerator (It’s actually easy!)

    So, can you paint a refrigerator? The answer is a big YES! When you don’t have the budget to upgrade that dated fridge, just give a good ol’ DIY paint job. Find out how to paint a refrigerator below – it’s actually not that hard at all!
     
    Hi! My name is Madalyn and I nest over at Home Hearted where I share my latest crafting, homemaking and diy projects. My husband and I just bought our first house and since it took most of our resources to get it I have been trying to do what I can to restore and utilize what we already have. First on my list was to take our rusty old refrigerator that we inherited from our rental house and make it into something a little more pretty.
     
    I had grand ideas, but my dad who is a painter talked me out of them and into restoring my fridge to its former glory, a simple white. And to compromise on the chalkboard he suggested I paint a large magnet in chalkboard paint and put it on the fridge.
     
    How to Paint a Refrigerator Easily

    DIY Refrigerator Paint Job

    This post contains affiliate links for your shopping convenience. Click here to read my full disclosure policy.
     
    Let’s start out with a good before and after shot, shall we?
     
    Can You Paint a Refrigerator
     
    As you can see, we also switched the door handle to function better in our new kitchen. The above picture doesn’t do the before any justice. It was so rusted and gross as you can clearly see in these pictures below.
     
    Refrigerator Paint DIY
     
    This refrigerator was obviously in need of some major loving!
     
    Materials and Supplies Needed:
    Steps
     
    Step 1
     
    If you have rusted areas on your refrigerator, you’ll want to take care of those first.
     
    Start by lightly sanding the rusted areas, wiping them clean with a tack cloth and then applying two coats of Loctite Extend Rust Neutralizer. See image below for step-by-step shots.
     
    Step 2
     
    After the rust neutralizer is completely dry, apply Rust-Oleum’s Protective Enamel in Gloss White or another appliance paint color of your choice.
     
    Because the rust was so bad on the front of my fridge and thus where I applied the rust treatment, I had to apply two coats of the paint here. The rest of the fridge was fine with a light sanding and one coat of paint. Remember to always wipe the entire surface clean with a tack cloth after sanding to get a smooth finish in the end.
     
    I used a small roller for most all of the painting. I used a small artists paint brush for one tiny area that I couldn’t get to with the roller. 
     
    How to Paint a Fridge
     
    Step 3
     
    To top off this little home improvement project, I also spray painted the bottom vent on the refrigerator a nice black. That really cleaned things up and adds to the “brand new” look.
     
    Can You Paint a Fridge
     
    While I was at it I also took the time to clean up the inside of the refrigerator as the etched glass had received a stain at some point. I love the liner, it keeps things very simple as you can just pull it out and wash it, keeps things cleaner and easier!
    DIY Painting a Refrigerator
    DIY Refrigerator Painting
     
    When all was said and done I spent a total of $36.83 which includes the magnet, fabric rollers, paint and spray paint.
     
    I hope you enjoyed this post and if you have any questions about painting a refrigerator, please leave a comment!
     
    Need more DIY kitchen project ideas?
     
    See how I made my laminate countertops look like stone here!
     
    Need DIY kitchen island ideas? See these!
     
    Want more countertop makeover ideas? There are nine here!
     
    And finally, get 10+ ideas for decorating, organizing and storage in your kitchen here!
     
    Want to come back to this post later? Just pin the picture below! 
    DIY Refrigerator Paint Job

    Sign up to get my posts delivered to your inbox here. 

    Stalk Me Here:

    Pinterest / Facebook / Twitter / Instagram

     
  • Kitchen Tour {All About the Details}

    To get more decorating ideas and posts like this delivered to your inbox click here.

    Kitchen Tour {rainonatinroof.com} #kitchen

    This post contains affiliate links for your shopping convenience. Click here to read my full disclosure policy.

    **Update: There have been a couple questions about my faucet. It is Pegasus Lyndhurst Series by Glacier Bay. We’ve had it from the beginning of our re-model and love it! No problems with it at all!

    Ready for eye candy?

    I hope so.

    Today and tomorrow, myself, along with many other bloggers are showing you our kitchens.

    But not just our kitchens.

    The details of our kitchens.

    1095068_10152393916750288_1207316620_n

    Because we all know: its all about the details.

    Details pull a space together.

    Welcome to my kitchen tour!

    Kitchen Tour {rainonatinroof.com} #kitchen

    The thing that catches your eye first could possibly be those barstools.

    Kitchen Tour {rainonatinroof.com} #kitchen

    Yep, they are pretty fab.

    I Rub ‘N Buffed the lower ring.

    Kitchen Tour {rainonatinroof.com} #kitchen

    And painted on the blue stripes.

    The barstools are my favorite thing in the space.

    Wait, maybe I have more than one favorite thing.

    Because I really love my island as well.

    Kitchen Tour {rainonatinroof.com} #kitchen

    Kitchen Tour {rainonatinroof.com} #kitchen

    You can read more about how we built the island here.

    I refuse to ever move because I won’t be able to take the island with me.

    They may lay me out on it when I die.

    Maybe not, that would be weird.

    Kitchen Tour {rainonatinroof.com} #kitchen

    I am a firm believer in the power of fresh flowers.

    They can instantly add drama and welcome any guest into your home.

    I have a full-time gardner who works tirelessly to make sure I have beautiful, fresh flowers like these.

    His name is Grunt Labor.

    One time, he even planted a huge row of hydrangeas because while reading a magazine one day and drooling over hydrangeas, I said I don’t think I would ever leave my yard if I had hydrangeas like that.

    I came home one afternoon to see him planting 10+ hydrangea bushes.

    He said he figured if the hydrangeas were there and that meant I wouldn’t leave , it also meant I wouldn’t ever leave him.

    Oh, Grunt Labor, you are too valuable to leave.

    Who else would put up with my never-ending decor changes?

    Back to the kitchen tour, you know, I digress too much.

    Kitchen Tour {rainonatinroof.com} #kitchen

    I just whipped up this navy and white chevron tray this week.

    A super easy and fun project.

    There will be a tutorial soon. Hopefully.

    When Grunt Labor and I did the kitchen renovation, we kept the original cabinets and just updated them with paint and hardware from Ikea.

    We did however, remove one wall of cabinets to allow for some open shelving from once more, Ikea.

    Kitchen Tour {rainonatinroof.com} #kitchen

    Kitchen Tour {rainonatinroof.com} #kitchen

    I love the combination of the wood stained shelving against the subway tile.

    I display my “whiteware” on it.

    I refuse to pay over $5 for a piece of “whiteware” unless I absolutely love it.

    Speaking of subway tile, it is just the best – timeless and classic, it goes great with anything.

    Grunt Labor installed it as well – see, I told you he was valuable.

    Below the open shelving, sits the fruit basket.

    Kitchen Tour {rainonatinroof.com} #kitchen

    Which is really an old metal locker basket.

    I love these bad boys and anytime I see one for $10 or less, I buy it.

    One time, I walked into an old gym locker room and these were all along one wall.

    It took every ounce of self restraint I had not to run like a mad woman out of the building with as many as I could carry.

    I can see the headlines now:

    “Deranged Blogger jailed for Stealing Vintage Locker Baskets”

    How much time do you think I would get?

    It could be worth it.

    Just sayin.

    My sweet next door neighbor is moving.

    She has given me so many wonderful little treasures like this little vintage coffee holder.

    Kitchen Tour {rainonatinroof.com} #kitchen

    I’m not really a fan of the K-Cup spinner coffee holders and shelves.

    They aren’t very pretty at all.

    And I’m snobby when it comes to things like that.

    So, when she offered me this coffee holder, I jumped on it like stink on you-know-what.

    She also gave me some beautiful vintage mason jars – blue and clear.

    Lucky, lucky me.

    To store my cookbooks, I use metal locker baskets as well.

    Kitchen Tour {rainonatinroof.com} #kitchen

    Kitchen Tour {rainonatinroof.com} #kitchen

    They have been up for well over a year now and have never fallen.

    Go us.

    You can see the tutorial on how we hung these here.

    To store my cooking utensils, I use an old silver pitcher.

    Kitchen Tour {rainonatinroof.com} #kitchen

    I found this little gem at Goodwill for $3 one day.

    My heart soared, I tell ya.

    It adds a little bling to the counters.

    Thanks for coming along on the tour with me today.

    Kitchen Tour {rainonatinroof.com} #kitchen

    I hope you enjoyed it!

    If you really want to see how far my kitchen has come (it was a 1960s rancher style), see the full reveal here.

    Looking for kitchen island ideas? I’ve got ones you’ve never even thought of here!

    Desperately need a new kitchen countertop, but can’t afford one right now? What about one of these DIY countertop makeovers?

    Love white kitchens? Get more white kitchen inspiration here!

    Need more real life kitchen ideas? Find those here.

    Sign up to get my posts delivered to your inbox here. 

    You know you don’t wanna miss any of this crazy.

    Stalk Me Here:

    Pinterest / Facebook / Twitter / Instagram

    SaveSave

  • Ralph Lauren Inspired Barstools

    Ralph Lauren Inspired Barstools

    I have been waiting to show you these for a month. It has been so hard to keep them a secret…

    Barstool Makeover {rainonatinroof.com} #barstool #makeover

    Ralph Lauren Inspired Barstools {rainonatinroof.com} #ralphlauren #barstool #makeover

    This post contains affiliate links for your shopping convenience. Click here to read my full disclosure policy.

    What do you think? Ok, yes, they do have some Kate in them with that kelly green. But, don’t those blue and white stripes just totally make them Ralph?

    I am in love with them. Really, I’m in love with every project I’ve done for the Summer Soiree Style Series. I have truly surprised myself.

    Here’s what they looked like before:

    Ralph Lauren Inspired Barstools {rainonatinroof.com} #ralphlauren #barstool #makeoverJust your basic industrial vibe barstools. I didn’t dislike them, but I knew they could be better.

    After making my Kate Spade lamp, I knew I wanted more kelly green in my living room, and these barstools were the perfect pieces for it. I wanted the seat to be contrasting, but work well with the green, so I went for the classic Ralph Lauren navy blue stripes.

    This post contains affiliate links for your shopping convenience. Click here to read my full disclosure policy.

    First, I took the back rest apart from the seat, cleaned them up well, and set them up in my super hi-tech spray painting station.

    Ralph Lauren Inspired Barstools {rainonatinroof.com} #ralphlauren #barstool #makeover

    Ralph Lauren Inspired Barstools {rainonatinroof.com} #ralphlauren #barstool #makeoverThey got 2 coats of Rust-Oleum spray paint in Forest Green and a clear gloss topcoat, also Rust-Oleum. My go-to spray paint is always Rust-Oleum. Never once have I been unsatisfied with its results.

    While the stools were drying, I went to upholstering the seats with white fabric. I had to put a small nut and bolt through the seat to be able to tighten it down once I got it back on the stool. Originally , the seats had just been tacked down.

    Ralph Lauren Inspired Barstools {rainonatinroof.com} #ralphlauren #barstool #makeoverOnce the stools were dry, I put the seats back on. And where are those navy stripes, you ask? I didn’t have any navy and white striped material, so I taped off the seats and painted the navy stripes on.

    Ralph Lauren Inspired Barstools {rainonatinroof.com} #ralphlauren #barstool #makeoverIt took about 2 1/2 coats to get the blue evened out. I just used a sample pot of regular latex paint I had.

    Ralph Lauren Inspired Barstools {rainonatinroof.com} #ralphlauren #barstool #makeover

    I put Rub ‘N Buff along the bottom ring to add a pop of gold.

    Ralph Lauren Inspired Barstools {rainonatinroof.com} #ralphlauren #barstool #makeover

    And that’s it! It was simple and cheap and now I have amazeballs Ralph Lauren barstools. And you don’t. haha. I’m kidding. I’m not really that mean.

    Ralph Lauren Inspired Barstools {rainonatinroof.com} #ralphlauren #barstool #makeover

    Ralph Lauren Inspired Barstools {rainonatinroof.com} #ralphlauren #barstool #makeover

    Ralph Lauren Inspired Barstools {rainonatinroof.com} #ralphlauren #barstool #makeover

    Ralph Lauren Inspired Barstools {rainonatinroof.com} #ralphlauren #barstool #makeover

    Ralph Lauren Inspired Barstools {rainonatinroof.com} #ralphlauren #barstool #makeover

    Ralph Lauren Inspired Barstools {rainonatinroof.com} #ralphlauren #barstool #makeoverToo much green? I think not. Hmmmm….maybe I should have called these “Kate meets Ralph Barstools…” Too late now!

    Love designer inspired home projects? 

    Want Lilly Pulitzer Inspired projects – here are 10+ of them! 

    More Ralph Lauren style? See these projects then!

    More of a Jonathan Adler person? Right here are projects inspired by him!

    Kate Spade girl? This way then!

    Follow along so you don’t miss out:

    SaveSave