Category: Cleaning

Cleaning tips and tricks to decrease your cleaning time and make your life easier.

  • Restore Wood Furniture with Just Two Things from Your Kitchen

    Restore Wood Furniture with Just Two Things from Your Kitchen

    If you’ve got old furniture that is looking worn, dull and dated, then give it new life with these simple steps for how to restore wood furniture. You’ll just need a couple of things that I bet you already have on hand – no chemical stripper or sanding required!

    If you’re signed up for my email newsletters, you know I’ve been helping my aunt redo her bedroom. We completely remodeled her and my uncle’s master bathroom last fall. By “we”, I mean that I helped with the design and then handed it over to the contractor. My uncle’s version is probably somewhere along the lines of “Jenna spent all my money.” Either way you look at it, my aunt and uncle got a killer new bathroom that is so much more functional for them. I really need to snap some pics and show you what we did. I digress though.

    The bathroom remodel snowballed into a kitchen remodel for them that should happen within the next month or so – can’t wait to show you that one when it’s done too! Somewhere along the way, my aunt got hit with the decorating bug and much to my uncle’s dismay I’m sure, we are now also redoing their master bedroom, mudroom/garage entry and she’s told me when we’re done with that, we’re moving to the living room. She’s a woman on a mission, folks.

    The furniture they have in their bedroom was actually my grandparent’s bedroom furniture. And since our family’s side is a sentimental bunch, we don’t easily part well with things of that nature. Sorry, Aunt Sherry. So a non-negotiable for my uncle was that the bedroom furniture stay.

    The bedroom furniture though, well it had most definitely seen better days. The finish was worn and dull and the pulls were dirty. Initially my aunt wanted to completely refinish it, but she decided she would try to clean it up first. I gave her my secrets for restoring old furniture (without sanding!) and cleaning up the hardware. She put some elbow grease to it, and boom, that 50+ year old bedroom furniture was born again.

    How to Restore Wood Furniture - before and after

    Can y’all even believe that?! And no, she didn’t paint the hardware or use a single chemical / topcoat / whatever on the wood! She took the ‘before’ photo and I took the ‘after.’ Don’t worry, I’m going to have a talk with her about photo angles. 😜

    I’ve used this furniture refinishing trick a few times now and I’ve had the same results – it’s really like magic.

    This post contains affiliate links for your shopping convenience. Click here to read my full disclosure policy.

    How to Restore Furniture

    Restoring Old Furniture - stained antique dresser before.

    Supplies Needed:

    Step 1

    Remove all items from the piece of furniture including the hardware. Wipe the piece clean with a damp cloth or a tack cloth to remove any dirt or dust. If you use a damp cloth, let the furniture dry completely before proceeding.

    Step 2

    Mix 1 part white vinegar with 1 part vegetable oil. I generally do a cup of each.

    Step 3

    Using a clean, soft cloth, rub the mixture onto the wooden furniture.

    To be on the safe side, I suggest testing the solution in an inconspicuous spot on the furniture first, then proceed if all goes well. I’ve never had an issue with this mixture, but if you’ve got a priceless piece of sentimental antique furniture, it’s best to err on the side of caution.

    As you apply the mixture to the furniture, most scratches will disappear and shine will be restored!
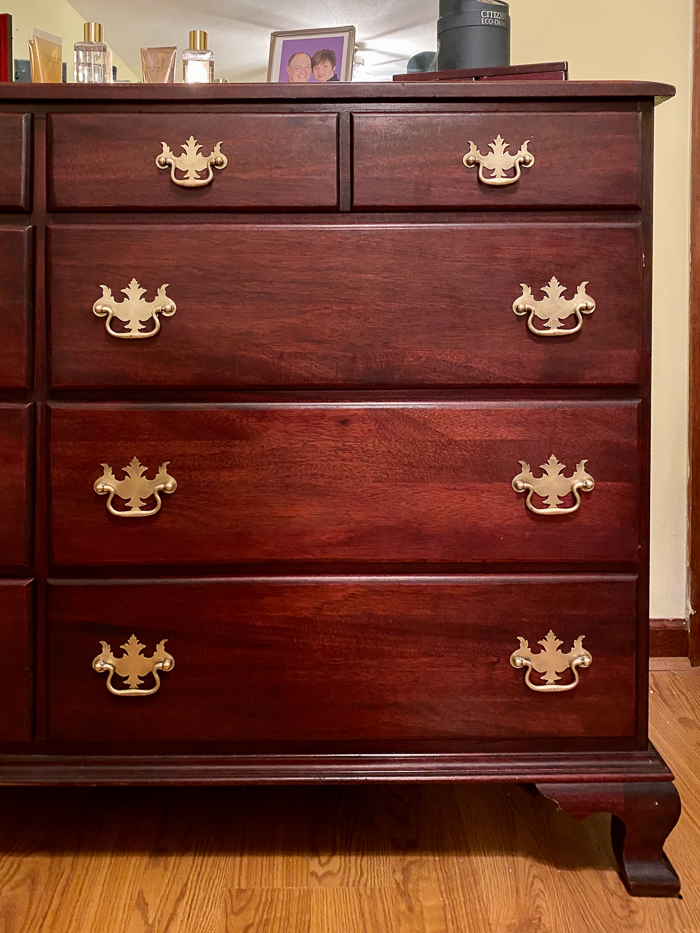
    How to Restore Furniture - restored antique mahogany dresser after.

    As I said before, I’ve used this solution for refinishing wood furniture before and I’ve gotten great results. I’ve done it on both dark wood like this, but also on light wood as well and it worked perfectly on both.

    Related: Need to remove paint from furniture and then restain it? Then read this post on restaining furniture.

    Did you also notice how well her brass pulls cleaned up?

    How to Clean Old Brass Hardware

    Supplies Needed:

    • Brass Polish (Brasso is what I use) and/or Bar Keepers Friend
    • Two Cloths – one for cleaning and one for polishing
    • Gloves

    Step 1

    Depending on how dirty your hardware is, you may be able to get by with brass polish alone. If the hardware is really bad though, using Bar Keepers Friend will often drastically cut down on cleaning time.

    To clean the hardware, simply wipe on the Brasso or create a paste with the Bar Keepers Friend and scrub until the grime is gone. I wrote a whole post solely on how to clean brass hardware using Bar Keepers Friend right here.

    Use gloves because this stuff is rough on your hands!

    Step 2

    Once you’ve removed all the tarnish and grime from the hardware, rinse it well, then polish with a clean soft cloth.

    How to Restore Wood Furniture Without Sanding - restored mahogany dresser and brass pulls.

    I’m so glad she was able to bring this bedroom set back to it’s former glory!

    Can you share any tips on how to restore wood furniture without sanding?

    Looking to save yourself more time on furniture makeovers or cleaning things up? Here’s a few of my tricks…

    Velvet Finishes Paint – the no priming, no topcoat way to paint furniture! And yes, I’m serious.

    Waxing Furniture Tips – the easy way to wax furniture if you prefer to go that route!

    Vinyl Seat Cleaner – the best way I’ve found to clean vinyl upholstery.

    How to Clean Copper – restore copper to its original beauty in a fraction of the time!

    How to Remove Rust from Chrome – yes, you can salvage that chrome furniture! Try this trick before tossing it!

    Want to remember this furniture tip for later? Pin the image below to quickly come back here!

    How to Restore Wood Furniture without Stripping or Sanding

    Get more tips on social media:

    Facebook | Instagram | Pinterest | Twitter

  • Hold Onto Your Britches Season

    Hold Onto Your Britches Season

    This post is in partnership with i​Robot​®. While this was a sponsored opportunity, all content and opinions expressed here are my own.

    I’m not sure where August has gone. One day I’m dropping the kid off for her first day back to school, thinking about all the work I’ve got to get caught up on this month before my crazy season starts and now, we’re just a few days away from September – and guess who isn’t caught up on any of that work.

    With September upon us, we are in full-on Halloween prep mode. The Circus and I are plotting out our Halloween costumes (currently thinking Cruella and dalmation), making new Halloween decorations, putting it all out, and are planning our Halloween party.

    October is of course filled with Halloween festivities and then also two trips for us.

    Then we’ll quickly move into November – hello Thanksgiving, two concerts and another trip.  

    And finally – Christmas is really just around the corner. I don’t need to tell you how insane December can get with all the decorating, gift buying and holiday parties.

    And of course, on top of all that we have the weekly shuttling around to riding lessons, dance lessons, etc. 

    Busy is very often our normal. This time of the year though, it’s elevated to “hold onto your britches boys and girls.” 

    Besides having a husband who is always willing to take anything off my plate he can, I’m also happy to now have an in-house dynamic duo to take care of some of the cleaning and at least make things around the house a little less hectic.

    This pair takes care of both the vacuuming and mopping. 

    I got the iRobot® Roomba® i7+ this summer (we call her Greta) and she was a godsend – you can read about that here. Just when I thought it couldn’t get any better though, Betty went and proved me wrong.

    Betty is my new iRobot® Braava jet® m6 – and after one run, it’s clear she does a better job mopping than I ever have. 

    Crazy, right? What you’re seeing there is one clean unused mopping pad and what one mopping pad looked like after it mopped just three rooms in my house. 

    I hung my head in shame and also jumped for joy at the same time when I saw this.

    The iRobot® Braava jet® m6 is designed to clean all well-sealed floors. Just put on one of the cleaning pads and it does its thing. Betty can do full on Wet Mopping or Dry Sweeping. 

    The Wet Mopping Pads feature wicking fibers help tackle sticky messes and kitchen grease. Dry Sweeping Pads use electrostatic force to capture dirt, dust and pet hair. 

    Betty has a Low Profile Design so that she can easily clean under furniture and other hard-to-reach places. 

    She also mops snugly right up against corners and edges. 

    Just like my iRobot® Roomba i7+, the m6 also uses Imprint™ Smart Mapping. Betty learns my home’s floor plan, remembers the rooms and determines the best way to clean. This also means she can decipher my kitchen from my living room or my office from my bathroom and so on. And that means I can choose which rooms to have her mop. I can also set up a mopping schedule for Betty. It’s all right within the iRobot® Home App.

    The Braava jet® m6 robot mop can dry sweep as well, however I prefer to do all my sweeping and vacuuming with my Roomba® i7+. In fact, these two can actually communicate with each other. 

    The two use Imprint™ Link Technology and with a couple taps on your phone using the iRobot® Home App, when Greta finishes vacuuming, she automatically tells Betty to mop. Boom. How awesome is that? Fully automated floor cleaning. 

    Right now thru September 7th, you can save up to $150 on select iRobot® floor care robots – including the Braava jet® m6 robot mop. This is the perfect time to treat yourself and take a little something off your plate during the upcoming “hold onto your britches” season. 

    Godspeed my friends. May we all come out of this season only marginally crazier than we were before – because really, we all know not to expect much more.

  • A month with Greta.

    A month with Greta.

    Thinking about buying a Roomba i7+ robot vacuum but wondering if it’s really worth all that money? I get it – those things aren’t cheap! Here’s my iRobot Roomba i7+ review. Read this then decide for yourself.

    It’s been a little over a month since we added a new addition to our family. She’s not cute and cuddly, but she is sleek and efficient. 

    She’s Greta.

    iRobot Roomba i7+ Review

    This post is brought to you by i​Robot​. While this was a sponsored opportunity, all content and opinions expressed here are my own.

    Greta is our iRobot® Roomba® i7+ if you missed the first post about her.

    We’ve spent the last month getting to know each other better and figuring out exactly how we can benefit each other.

    Who am I kidding? She benefits zilch from me. I’m 100% the user in this relationship.

    I know a robot vacuum is an investment and a lot of questions arise with spending that much money on a vacuum. I had quite a few questions myself when I got this bad girl. I’m going to answer both questions I had and questions I got from you guys, friends and family. I’ve also included tips for using your Roomba® and overall thoughts as well. 

    iRobot® Roomba® FAQ

    For reference, my Roomba® is the i7+ WiFi connected robot vacuum with automatic dirt disposal. Yes, friends – no emptying the canister. 

    Q: Does the vacuum work on tile? Carpet? Wood floors?

    Yes, yes, and yes. It even leaves carpet lines! 

    iRobot Roomba i7+ Wifi Connected

    I know – I was really surprised the suction was that powerful to leave carpet lines. 

    Tile and wood floors are no problem either. I didn’t know how well it might work on tile since grout lines are often recessed a bit lower than tile. However, I had a powder spill in the bathroom the other day and opted to let Greta clean it up to see how she did. 

    Robot Vacuum Review - going over tile

    She sucked up every bit of the powder and cleaned the rest of the floor as well.

    Q: Will a Roomba® go over rugs? 

    Yes, it easily transitions from my wood floors to rugs and from my carpeted areas to rugs. I do suggest removing scatter rugs, such as bath mats, from the areas you’ll be cleaning though. Since those are so lightweight, the Roomba tends to move those around.

    Q: What about rugs and/or carpets?
    This model does rugs and carpets well too. My daughter has the rug you see below in her room.

    Roomba Vacuum review - going over thick rugs

    It’s a heavy duty rug with lots of varying textures from the pattern on the rug. It gives it a good surface cleaning. Because she is a kid and this rug can hold a lot of dirt, I do still try to give this rug a go over with my old vacuum once a month or so for a deep cleaning. 

    Q: How well does it clean up dog hair? 

    Extremely well. It vacuumed up dog hair I didn’t even know was there. We have a lab and while it spends most of its time outside, she does come in occasionally and sit on her bed downstairs. She’s always downstairs and the Clean Base™ Automatic Dirt Disposal for the robot vacuum is upstairs. Because of this, when Greta is cleaning downstairs and her canister gets full, I often just dump it out myself instead of taking her back upstairs to let her empty herself. When I did this the first time, I was absolutely baffled to see how much dog hair she had picked up. I had no idea there was so much down there.

    Q: What about stairs? How do you keep it from falling off stairs?
    The Roomba® i7+ can actually sense drop offs such as stairs and therefore will avoid them.

    Roomba i7+ - senses stairs and drop-offs

    If you’re still nervous about the Roomba® being so close to stairs, just place the Dual Mode Virtual Wall Barrier (comes with the Roomba) along the stairs and it will create a virtual wall that the Roomba® won’t go near. 

    Q: Is there any place you don’t use it? 

    I don’t let it go in my daughter’s playroom. It’s not a huge space anyway and there’s just a whole lotta stuff in there. You parents know what I’m talking about.

    Using the virtual wall barrier with a Roomba.

    There’s no door to close between her playroom and her bedroom though, so I just place the Virtual Wall Barrier here to create an invisible barrier that Greta won’t go past.

    Keeping a Roomba out of areas with the virtual wall barrier.

    There are two modes for the Virtual Wall Barrier – Virtual Wall and Halo Mode. I use Virtual Wall most often as it creates a straight line that Greta won’t cross. The halo mode creates a circular barrier that’s perfect for pet bowls. 

    Q: Can it go over threshold dividers?

    Yep. We have threshold floor moldings in multiple places in our house and the Roomba® i7+ easily goes right over them.

    iRobot Roomba - going over thresholds

    Q: How does it work with a smartphone?

    When you download the iRobot® app to your phone, you’ll be guided through the process of setting up your iRobot® Roomba® and floor plans. It’s super simple. 

    Using a Roomba with the iRobot app

    Once you get everything set up, you’ll be able to just open the app from anywhere, hit clean and your Roomba® will do their thing! 

    Q: Can you set up multiple levels or floor plans in the app? 

    Yes – it can map and store up to 10 floor plans.

    Setting up smart maps on the iRobot app.

    I have both my upstairs and downstairs mapped in the app. After your floor plan is mapped out, you can choose to clean certain rooms instead of the whole house if you’d like. This is called Imprint™ Smart Mapping. 

    Cleaning certain rooms with the iRobot app.

    Q: Why did you name her Greta?

    The last housekeeper my Pap had was Greta. She came once a week and was a sweet soul. That one day a week she came would be the only day we didn’t eat out for lunch – Greta would cook for us. And if it wasn’t for her, those gallons and gallons of grapes my dad sent over would have went to waste instead of becoming the tasty jelly we made it into with Greta’s guidance. That’s another story though…

    Tips for Using the iRobot® Roomba® i7+

    A few things I’ve learned while setting up and using my iRobot® Roomba® i7+: 

    Do training runs to map out your home faster.

    When you first start creating your maps, use the “training run” feature to map it out faster. The Roomba® won’t clean during the training run, but instead just maps your floor plan.

    Do the first run when you are home. 

    When I did the training run and the first cleaning run, I made sure I was at home. Occasionally, I would peek in on Greta and see how she was doing. This way, I was able to pick up any smalls I missed and just keep an eye on her.

    Once you get your space mapped out and you’re fully comfortable with your iRobot® Roomba®, then you can create a cleaning schedule on the app for her to clean automatically where and when you want her to.

    Remove “smalls” from areas you are cleaning.

    Before sending Greta to do her thing, I go around the house and pick up any clutter that might be on the floors and also any small furniture items like ottomans, small side tables, etc. This just allows her to do a better job cleaning since she won’t have as much to work around. 

    Also, I will often set her up to just clean one room at a time, like the kitchen. Before I send her to clean, I’ll move the kitchen chairs into another room just so she can get a really good cleaning in, rather than having to clean around the chairs. After she’s done in the kitchen, I’ll move her into the dining room and the dining room chairs into the kitchen. She can go under chairs and does go under these if left out, but this just helps to get the whole area more clean.

    She’ll get smarter the more she works. 

    On the first few cleaning runs, you may notice your Roomba® missing some spots. I had this issue and it really bugged me at first. However, after a couple more runs, I noticed that she wasn’t missing those spots she had initially.

    Overall Thoughts

    The Roomba® has made cleaning so much easier for us. As I said when I first got this little gem, I rarely got my floors swept before and when I did have spare time to do it, I really didn’t want to be spending it sweeping. I don’t have to pick anymore because Greta does it for me.

    It is annoying taking her back and forth between the upstairs and downstairs, but it’s still a lot less time spent doing that than actually vacuuming myself. 

    I think one of my favorite aspects of having Greta is that after dinner each night, we just wipe all the counters off, letting any crumbs go into the floor, then I send Greta into vacuum and I go off to cuddle with the Circus – if she’ll let me. I wake up to clean floors the next morning. 

    Also, when I’m doing a whole house deep cleaning, Greta can be vacuuming while I’m scrubbing the bathtub or doing something else. It saves me so much time and energy. By the time, I’m done with the other cleaning tasks, she’s done vacuuming.

    Do you have a Roomba®? What do you love about it?

    Want to reference this post later? Just pin the image below!

    Roomba i7+ Review

    Keep up with me on social media!

    Facebook | Instagram | Pinterest | Twitter

  • Less Stress, More Summer

    Less Stress, More Summer

    This post is brought to you by i​Robot​. While this was a sponsored opportunity, all content and opinions expressed here are my own.

    Friends, I had a meltdown the other day.

    A full-on lock myself in the bathroom, ugly crying, snotty tissues meltdown.

    It had been a day. My stress level was off the charts, thanks to a to-do list that just kept getting longer.

    After the umpteenth thing didn’t go according to plan that day, I lost it.

    Later that day after licking my wounds, Grunt and I pulled out our calendars to plan out the rest of the summer and see about squeezing in one more fun trip with our girl.

    It became quickly apparent that we didn’t have as much free time as we thought we did this summer.

    Add to that, the previously mentioned to-do list and it became abundantly clear to me – time is fleeting and especially the summer.

    It was then I also realized my never-ending to-do list means nothing. There’s not a thing on it that’s really all that important in the grand scheme of things.

    What is important is making sure I spend every possible second I can during these special summer days with my best girl. She’s growing – fast, and I want to be stress-free and present for her, not a slave to my to-do list.

    Cleaning the house is a constant on my to-do list. It’s always a hot mess and I just don’t have that much time to clean it. One thing I’m able to cross off my to-do list now though, without leaving my seat I might add, is vacuuming the floors.

    Roomba i7+

    Meet Greta. She’s an iRobot® Roomba® i7+. And she is a godsend.

    For the first time, in a loooong time, I’m actually ok not putting on my house shoes when I first get up in the morning – because my floors are no longer always covered with dirt, crumbs and other questionable debris.

    iRobot Roomba Vacuum

    Greta vacuums every flooring surface clean: wood, tile, carpet, rugs – everything. The Roomba i7+ has Dual Multi-Surface Rubber Brushes that are flexible so they hug every type of floor surface. They were also made to stand up to hair – it doesn’t get tangled in the Roomba. With a dog and two girls with long hair that both shed like a dog, that’s important stuff, folks.

    When I’m ready for Greta to clean, all I have to do open up the iRobot HOME App on my phone and hit clean.

    iRobot App for Roombas

    The Roomba i7+ has Imprint™ Smart Mapping Technology, so after running a few times, she mapped out my floor plan all on her own. All I had to do was go in and name the rooms. With the floor plan in place, I have the option to choose to have Greta clean certain areas, rather than the whole house. I don’t even have to be home for her to clean, I can open up the app anywhere and put her to work. You can also opt to set up a cleaning schedule to have your Roomba clean on certain days and times.

    iRobot 7+ on Carpet

    Greta also cleans up after herself. She automatically empties her bin into a disposable bag that holds 30 bins of dirt, dust and hair.

    iRobot 7+ Docking Station

    I don’t have to think about vacuuming for weeks at a time. That means more time for my best girl.

    If you need us, we’ll be by the pool this summer soaking in the sunshine and sweetness of being seven – and telling the to-do list exactly where it can go….

    From now until 6/29, you can save $150 off the same Roomba i7+ I have – find it here!

    You can also save on other select floor cleaning robots thru 6/29 as well – that robot mop is going at the top of my wish list!

    I’ll be reporting back in a month or so about how my Roomba is doing – leave any questions you’d like answered in the comments below!

  • Hassle Free Cleaning

    Hassle Free Cleaning

    This post is sponsored by Swiffer. All opinions are 100% mine.

    Every farmhouse should be equipped with a muddy boots and clothes drop zone-washroom.

    By farmhouse, I mean actual houses on farms, not farmhouse style houses in the middle of the city. Y’all know how I feel about that term being used in the design world these days.

    Said drop zone-washroom should be the first room you enter immediately after coming in from the muddy field. If one is muddy, they should not be permitted to pass the washroom until they have stripped off all their muddy boots, clothes, etc. It’s also preferable to have a shower, deep sink, washer and dryer in this space. And for the love of God, no shiplap. 😉

    You see, this is what happens when actual farmhouses don’t have one of these spaces…

    Mud. Everywhere.

    Our farmhouse floors get as dirty in one weekend as the average person’s floors over the course of a month.

    If you’ve ever done farm work, then you also know that there is little downtime. We usually get there on Friday evening, work all day Saturday, often a good bit of Sunday and then it’s time to head back. There’s very little spare time to clean the house.

    Luckily though, my Swiffer® WetJet Wood™ helps out. Cleaning up doesn’t take near as much time since I’m not lugging out a mop bucket, floor cleaner and mop.

    After a quick sweep with my Swiffer ® Sweeper ™, all I have to do is pull out my WetJet Wood™, put on a new microfiber-like pad (super soft so no worries they’ll mess up the flooring!) and in less than 10 minutes, I’m done.

    Swiffer® WetJet Wood™ is safe on finished wood surfaces, has an ultra fine mist spray + LED lights so you can see a little better in dark corners. My favorite aspect of this little baby though is that it has a quickdry solution. By the time, I’m done with all the floors, it’s already dry where I started. We aren’t having to wait forever for the floors to dry or hop and tiptoe over them.

    Ain’t nobody on a farm got spare time to wait for floors to dry. There’s much bigger fish to fry, or should I say cattle to work? 😉

  • One Stop Workshop: DIY Mobile Workbench + Pegboard Organization

    One Stop Workshop: DIY Mobile Workbench + Pegboard Organization

    This is a sponsored conversation written by me on behalf of True Value. The opinions and text are all mine.

    As you know, I’ve been on a purge streak lately. I’ve said good riddance to so much clutter in our house that I’m actually a little embarrassed by just how much we had. Quickly followed by the purging, a huge wave of motivation to get more organized arrived.

    I mean, when you’ve cleaned out so much stuff, you don’t want to end up once more as a finalist for your own television show about your hoarding tendencies, right? So to prevent that and the sheer embarrassment of realizing just how much junk you had, you organize it.

    And just let me tell you, organizing feels so good.

    I just can’t even begin to tell you the amount of satisfaction I have gotten out of seeing a space come to its full organized potential. I don’t care how nerdy it makes me sound. 

    And let me just show you the latest shining example of this organization spree that took place in our garage.

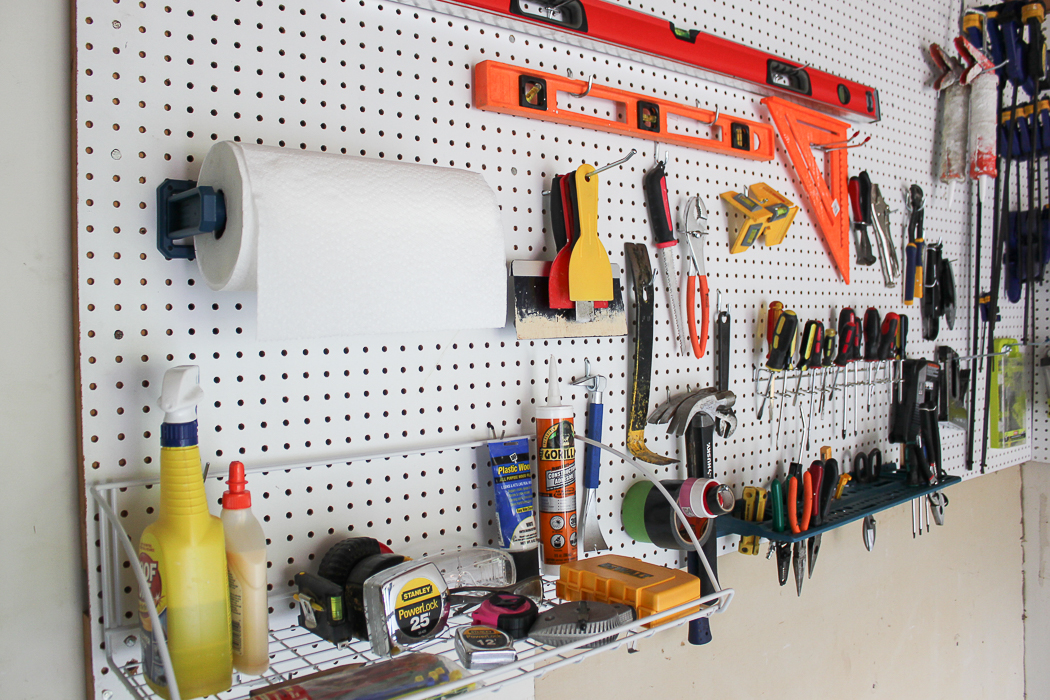
    Create a one-stop workshop in your garage with this DIY Mobile Workbench and Pegboard Organization Ideas.

    Just look at that, y’all! I can actually find the tools I need when I need them. I’m not scrounging around through tool boxes and bags or banging my head on metal shelves in the tiny cramped closet in our garage that once held so many of our tools.

    The sad thing about this whole thing is that we had this pegboard in our garage from the beginning.

    Create a one-stop workshop in your garage with this DIY Mobile Workbench and Pegboard Organization Ideas.

    We just never utilized it to its full potential. I’m equally ashamed and giving myself a swift kick in the rear end about that fact. Now, I can find things. I don’t have multiples of things I don’t need in various locations of the same room. And did you notice my new workbench?

    Create a one-stop workshop in your garage with this DIY Mobile Workbench and Pegboard Organization Ideas.

    I made that.

    Well, I didn’t actually make the metal cabinetry part because I’m not that good, but I made those cabinets into a mobile workbench. That’s right – it can go anywhere and it was so easy to do. I’m not going to lie – after this space was completed, I actually just sat there and stared at it awhile. It makes me so happy, I just want to get out there and jump into a new building project.

    Here’s how we made it all happen with the help of some products from True Value…

    One-Stop Workshop: Pegboard Organization + DIY Mobile Workbench

    Pegboard Organization

    1. Get pegboard on the walls. 

    If you don’t have pegboard in your garage or workspace already, get some up. Like I said, we already had this in our garage when we bought the house, but had never utilized it. Pick up some pegboard panels and 2 x 4s from your local True Value. Determine where you want to hang your pegboard and locate the studs in that wall. Either nail or screw up the 2 x 4s along the studs, then attach the pegboard to the 2 x 4s with nails or screws.

    2. Lay out tools and determine what hooks and accessories you need. 

    Next, I suggest laying out all the tools you want to get up on the pegboards and determine what kind of pegboard hooks and accessories will work best for hanging those items.

    Create a one-stop workshop in your garage with this DIY Mobile Workbench and Pegboard Organization Ideas.

    For our pegboard, I bought the following from True Value:

    3. Get the tools on the pegboard.

    I found that working from the bottom up works best. This is kind of a game where you just have to play around with the location of some of your tools and determine what fits best where.

    Create a one-stop workshop in your garage with this DIY Mobile Workbench and Pegboard Organization Ideas.

    If you go with a paper towel holder, keep it lower for easy access. I suggest doing the same with the utility shelf as well.

    Hanging multiples of the same tool types helps to save on space and utilize those hooks to their maximum potential. I did this with all of our rolls of tape, hammers, scrapers and more.

    Create a one-stop workshop in your garage with this DIY Mobile Workbench and Pegboard Organization Ideas.

    Use two single hooks, one on each side, for longer tools such as levels.

    Organize your screwdrivers by type and put any single random tools that will fit in the 3-in-1 tool holder.

    Create a one-stop workshop in your garage with this DIY Mobile Workbench and Pegboard Organization Ideas.

    I grouped my clamps together by size and hung them up on single heavy-duty 8 and 10 inch hooks.

    Create a one-stop workshop in your garage with this DIY Mobile Workbench and Pegboard Organization Ideas.

    For the power tools, I used either two 6, 8, or 10 inch hooks to hold each power tool up deepening on its size.

    For easy access to small parts such as washers, nuts, bolts, screws, nails, etc., I put the small parts storage cabinet in the lower corner of the pegboard and attached it with screws that went into the 2 x 4s holding the pegboard up. The video below for the DIY mobile workbench also touches on the pegboard organization.

    DIY Mobile Workbench

    Create a one-stop workshop in your garage with this DIY Mobile Workbench and Pegboard Organization Ideas.

    You’ll Need: 

    • Two – Five Drawer Tool Chests on Wheels
    • One sheet of 3/4 inch plywood, cut into the following sizes:
      • Two pieces cut to 26 1/4″ x 17 3/4″
      • One piece cut to 53 1/2″ x 18″
    • Drill
    • 1 1/4″ or 1 1/2″ Screws

    Step 1

    Lay a piece of the plywood cut to 26 1/4″ x 17 3/4″ into the top of each tool chest. Each chest has a rim along the top that will keep the wood from sliding out.

    Step 2

    Lay the long piece of plywood cut to 53 1/2″ x 18″ across both smaller sheets of plywood and the tool chests. Line up everything up nicely.

    Step 3

    Using either 1 1/4″ or 1 1/2″ screws and your drill, connect all three pieces of wood together. Put a screw in each of the four corners of each tool chest.

    That’s it! I told you it was simple!

    Create a one-stop workshop in your garage with this DIY Mobile Workbench and Pegboard Organization Ideas.

    A few tips and ideas for the workbench: 

    • If you want to make the workbench top completely permanent, then before putting the smaller pieces of plywood on the tool chests, apply an adhesive such as Liquid Nails to the top of the chests, then put the plywood on top of that.
    • You can also opt to leave the larger piece of plywood off the top and have two smaller mobile workbenches as well. This was initially our plan, but in the end we wanted to have the option for both a smaller and a larger workbench.
    • If you ever want to remove the workbench top to transport it a farther distance, separate the chests or store it away, you can leave the top together and simply lift it off the tool chests as one piece.

    Alright guys, I’m off to plot out my next project that puts this baby to use!

    Do you have any great garage organization ideas to share? 

    Pin This Post

    Create a one-stop workshop in your garage with this DIY Mobile Workbench and Pegboard Organization Ideas.

    This is a sponsored conversation written by me on behalf of True Value. The opinions and text are all mine.


    SaveSaveSaveSaveSaveSaveSaveSaveSaveSaveSaveSaveSaveSaveSaveSaveSaveSaveSaveSaveSaveSaveSaveSave

  • How I Made $2K+ in Two Months Selling Our Clutter

    How I Made $2K+ in Two Months Selling Our Clutter

    The title of this post speaks for itself.

    We had a ton of stuff piled up in the garage, in the guest bedroom, in our closets – everywhere. Yes, I have slight hoarding tendencies. 

    Most of that stuff, we didn’t need.

    So I finally sifted through all the clutter, went all “You are the weakest link. Goodbye.” on many things and then sold them.

    Given the amount of things I’ve sold in the last couple of months, I’m sure that some of my Facebook friends thought we might have been going through a rough patch financially. There were a few “Is everything ok?” messages I received, but no, we aren’t having to skip meals or anything. That being said, we were working on the farmhouse remodel and there were a lot of unforeseen expenses that came our way such as getting the whole house replumbed, a new garage door, a new water heater and lots of other things that added up pretty quickly. To help pay for all of that, I pulled on my big girl panties, waded through the excess furniture, clothing, home decor items, and random other miscellaneous stuff that had been piling up, and sold whatever we didn’t need or want anymore.

    I didn’t keep track of the exact amount of money I made from selling all the unwanted items, but I know it is somewhere in the neighborhood of $2,000 over about two months because I paid $1500 cash for all the plumbing updates and new garage door at the farmhouse, then had a little over $500 left to spend on other items.

    Here’s how I did it. From beginning to end. The cleaning out to the selling. All of it. 

    Now y’all, keep in mind that you may have more or less things to sell than I did. Your things may  be worth more or less than mine were. Don’t go getting all scrappy with me if you don’t make $2000. This is one of those “results will vary” kind of deals. I feel like a commercial saying that, but there are some people out there who might think I can magically put $2K in their pocket by them reading this post. I’m not a magician, y’all. 

    How I Made $2K+ in Two Months Selling Crap We Didn’t Need

    1. Go Through Your Entire House

    This is, of course, the no-brainer here. You are going to have to go through every room, every closet, every nook and cranny and be ruthless.

    Purge like you’ve never purged before.

    No matter how big or small the item is, if you no longer need it, don’t like it anymore, doesn’t fit anymore, or haven’t used it in a year, let it go.

    I had been holding onto multiple pieces of furniture, some small, some larger, from our previous home as well as some pieces I had picked up at yard sales and thrift stores, because I kept telling myself I might need them here or there or at the farm. I took a long, hard look at each of the pieces and determined that I really didn’t need about 90% of it. The only things I kept were a couple of side tables for when we makeover the guest room and a couple of pieces to makeover and then sell because I knew I would get a substantial amount of more money out of those pieces if I just took a little time to redo them.

    I went through all of our closets and got rid of anything that no longer fit or that we hadn’t worn in a year.

    I went through the closet in my office where I keep little home decor knick-knacks and got rid of any that I hadn’t used in a year.

    Just turn on some good music, grab yourself a beer and get to purging, baby. 

    Gather all the items you are purging in one space. For us, we used our guest bedroom.

    2. Create Two Piles / Categories.

    After you have gathered all the items you no longer want/need in one space, create two piles or categories within the space.

    Category One: Larger items that can be sold locally online such as on Craigslist, Facebook, Close5 app, Letgo app, etc. I only sold items locally. I wasn’t going to deal with the headache of shipping items.

    Now you might be asking yourself, “How do I decide what could be sold online?” Here are the general guidelines I go by when determining what I will sell online locally…

    Try to Sell Items Online First if They Meet the Following Criteria:

    • You think it will sale for $20 or more. (This is a personal preference here, but I’ll only take the time to list something online if it will sell for $20 or more. You might have a higher or lower number.)
    • Furniture – just about any furniture piece, unless it’s badly damaged or banged up, I will list online.
    • Item Lots – I group all my daughter’s outgrown clothes together by size and try to sell in one big lot or in smaller lots to a few different people.

    Category Two: Smaller items that can be sold at the upcoming yard sale you will now be having since you cleaned out so much shit. 😉

    You might have some things you think just need to be tossed in the trash right then and you can totally do that, but y’all, I tend to put those items in my yard sales first. You would be amazed at what some people buy at those. My friend Jason’s mom, sent over old bras with him to sell in one of our yard sales and they went like hotcakes. Hell, Kathryn even sold a bottle of partially used shampoo at one of our sales! I think she was just going to give it away, but someone actually paid money for it!

    3. List the larger and higher-value items for sale via local online marketplaces.

    You’ve got your two piles now – one for the things to try and sell locally online and the other for your yard sale. Let’s get those higher priced items listed for sale now!

    First:

    • Take photos of the items you will be listing for sale online.
      • Take photos in well-lit spaces.
      • Shoot from different angles.
      • Get detailed shots.

    How to Sell Your Used Items via Facebook, Craigslist, Yard Sales and More.

    • Take measurements of each piece.
    • Make note of any imperfections.

    Next –

    List your items for sale on:

    • Your Local Craigslist Page – if you don’t already have an account, you’ll have to create one and then it will walk you through setting up a listing.
    • Facebook Marketplace – type in “Facebook Marketplace” in the Facebook search bar while you are logged in and it will bring up local listings in your area, then click the blue button on the right that says +Sell Something.

    How to Sell Your Used Items via Facebook, Craigslist, Yard Sales and More.

    • Local Facebook Yard Sale Pages – while logged into your Facebook account, do a search there for “InsertYourTownHere Yard Sale.” There are probably lots of local yard sale pages already out there that you can request to join and then list your items for sale. Once in the group, if you scroll down a little on the right, you will see more suggested groups that will most likely also be local yard sale groups you can join and list your items on.
    • Your Own Facebook Profile – If I have items that I think some of my friends might be interested in buying, then I will also list them for sale on my personal Facebook page. I just create a post detailing what I’m selling and then list the items in the comments. I’ve found this very useful for selling lots of kid’s clothing and smaller home decor items.How to Sell Your Used Items via Facebook, Craigslist, Yard Sales and More.
    • Close5 and Letgo Apps – you can download both of these apps for free on your smartphone and list items you wish to sell.

    When Listing Your Items Be Sure to Include:

    • The photos you took of the item.
    • What the item is (yes, there are some people that just can’t tell from photos)
    • Measurements (especially for furniture!)
    • Any imperfections on the item – photos of these imperfections are helpful for buyers as well.
    • The overall condition of the piece (Brand New, Like New, Excellent, Great, Good, etc.)
    • What the item is used for or what it could potentially be used for – for example, a dresser could also be used as a buffet or sideboard in a dining room. I also had a piece once that could double as a storage cabinet or a bar.
    • The item location or where you are willing to meet someone to sell the item.
    • Any other buying criteria you have. In all my listings, I always include the following language:
      Located in ABC City. Pickup only. Cash Only. First Come, First Serve. No holds. Cross-Posted.

    If it’s a smaller item that you are willing to meet someone with, then replace “Pickup only” with “Willing to meet at” and then wherever you want to meet. I don’t hold anything for anyone unless I have cash in hand from them. The “cross-posted” lets people know that the item is posted for sale in multiple places and not just that one. Below is a posting of mine for a table and chairs set that I sold.

    How to Sell Your Used Items via Facebook, Craigslist, Yard Sales and More.

    Any large furniture pieces that I sell are usually pickup only items. I’m fine with putting a small side table, mirror, or something similar in my car and meeting someone with those, but if it’s a bigger piece that requires more than one person to load it, then that person has to pick it up. I don’t care to help them load it when they come, but I won’t deliver or meet with those items. The main reason for this is that I’m not going to haul something across town and then they decide they don’t like it when they see it. That being said, having a stranger come to your house can be a little scary though. Here are my tips on that…

    Things to Keep In Mind for Selling Pickup Only Items When People Come to Your Home: 

    • Try to have the item in a spot at your home that is very easily accessible to where the person would park and also that is very visible to neighbors. For me, I have found that my garage works best for this. As soon as someone sets up a time to come see something, I have Grunt help me pull that piece right smack dab by the garage door and that way I can just open the garage door and show the person the piece right there. If the weather isn’t questionable, I’ll even pull the piece outdoors. What you really don’t want to do is have a person walk all through your house to see something.
    • Try to set up times for people to view items when someone else is also at your house with you.
    • If someone else can’t be there with you when someone comes, then send a text to your significant other or a friend saying, “Hey, just wanted to let you know someone is coming to look at XXX at XXX time.” I do this with Grunt Labor if he isn’t home. If I don’t text or call him after that person is set to arrive, then he calls me to make sure everything is ok.
    • Only let people come over to see items during daylight hours. Yes, I know bad things still happen during the broad daylight, but still, it’s better to have them come during the day rather than at night.
    • Sometimes people will come and look at an item and say they want to buy it, but can’t take it with them that day. If you’re a sweet, kind soul, then you may take their word for it. Because I’m not a sweet, kind soul though, I tell them that they have to leave at least half of the cost of the item as a deposit for me to hold it for them. I also tell them that it must be picked up within a week or I keep that money and also re-list the item to sell.

    Things to Keep In Mind When You Are Meeting People to Sell Items: 

    • Meet only during daylight hours and in populated areas you are familiar with. I tend to lean toward grocery store parking lots, large retail store parking lots, etc.
    • Take someone with you or let your significant other or a friend know what you’re doing, just like I noted above.
    • Be sure to ask them what type of car they will be driving so you can be on the lookout for them.

    Here’s another sale posting where I sold a lot of toddler shoes and was willing to meet the buyer:

    How to Sell Your Used Items via Facebook, Craigslist, Yard Sales and More.

    After Listing Your Items for Sale: 

    • Keep a good eye on your email, Facebook Notifications, Facebook Messenger, phone, etc. for anyone who may be contacting you about purchasing an item.


    • “Renew” Your Items on Craigslist every 48 hours.

    With Craigslist, after you list an item, you can renew it once every 48 hours for the first 30 days that it is listed. This bumps your listing to the top of the sale category you posted it in. To do this, login to your Craigslist account, and you should see a link that says “Renew” beside your listing. Click that.

    • Bump Your Sale Posts in Facebook Yard Sale Groups

    Like renewing your Craigslist sale posts, bumping your sale posts in Facebook yard sale pages will also move them to the top of the discussion. To bump a listing, you simply comment on the sale post by writing “bump.” Most Facebook yard sale groups have rules about how often you can bump posts, so make sure you are following those. Generally, I bump those posts about once a week.

    • As items sell, be sure to delete the listing.

    I try to delete items that sale just as soon as they are sold. That way I don’t get calls about them and people don’t get mad if they see something for sale and then it turns out, it isn’t anymore. Be sure to delete the listing on all the outlets that you listed it on – Craigslist, Facebook, etc.

    • Lower prices if needed.

    If I haven’t had any bites on items that I’ve listed after a couple of weeks, then I will lower the price some.

    4. Have a Yard Sale.

    And now, the final piece of the “get money for the crap you don’t need” puzzle. Have yourself a yard sale. Now is the time to get rid of all of those smaller items you set aside in the yard sale pile earlier. I wrote a post last year detailing all of my tips for the most successful yard sales, which you can read here. All the information you should need for a great yard sale is in that post. One thing I will add though is that if you’re doing a big clean-out where you have lots of larger items that you have listed online for sale, then wait about a month after listing those before having your yard sale. That way, you can add any items that didn’t sale online to your yard sale as well. From my experience, you can usually make a little more money on those larger items by selling them online as I’ve noted above, rather than at a yard sale, thus why I suggest waiting a month.

    I think that just about covers it.

    Here’s to reclaiming some of your square footage and making a buck or two while doing it!

    If you have any selling tips, please do share them in the comments! I’m always up for hearing more ideas! 

    You might also want to read…

    DIY Clothes Rack and Free Printable Size Dividers - great for yard sales or organizing babies closets.

    DIY Clothes Rack and Free Printable Size Dividers for Your Next Yard Sale

    Three Things That Could Cut Your Electric Bill In Half

    Three Things That Could Cut Your Electric Bill In Half

    Five Ways to Decorate Your Entire Home on a Tiny Budget 

    Pin This Post

    How to Sell Your Used Items via Facebook, Craigslist, Yard Sales and More.

    SaveSave

  • The Easiest Way to Clean Really Gross Vinyl Upholstery

    The Easiest Way to Clean Really Gross Vinyl Upholstery

    The Circus and I have trekked through some interesting places in our yard sale and estate sale adventures. There are times I pray she doesn’t blurt out something about how bad it stinks wherever we are or how dirty the place is. Oftentimes, I bathe her in Germ-X when we get back in the car.  Sometimes I pray there isn’t a psychopath waiting for us at the end of a long hallway in a dark basement.

    The latter scenario is how I came to find this little gem.

    Before tossing that grime covered vinyl chair out, try this idea for cleaning vinyl upholstery. You might be surprised at how easy it is to clean vinyl!

    Unfortunately though, this little gem was quite rough to begin with. The whole thing had to get a new paint job and the upholstery….

    Before tossing that grime covered vinyl chair out, try this idea for cleaning vinyl upholstery. You might be surprised at how easy it is to clean vinyl!

    Whoo lawd, the upholstery, it was bad. It was greasy and grimy and after I loaded that thing in my truck, I’m certain I used an entire thing of hand sanitizer on my hands. That being said though, I bought it from a sweet old lady who was moving and honestly, I just don’t think she was able to get up and down those stairs to clean it anymore, bless her heart.

    My first thought was that I would have to replace the upholstery completely, but I really loved that cute yellow piping on the cushions. So, instead I decided to try cleaning it with a cleaner I had used on a Mid-Century Modern sofa and chairs that had been in similar condition when I purchased it. 

    And it worked. 

    Like a charm. 

     How to Clean Vinyl Upholstery

    This post contains affiliate links for your shopping convenience. Click here to read my full disclosure policy.

    Before tossing that grime covered vinyl chair out, try this idea for cleaning vinyl upholstery. You might be surprised at how easy it is to clean vinyl!

    Side note: There might be other cleaners that work, but this was the best one I found after trying a few. This post is NOT sponsored by Zep in any way, I was just amazed at how well their product worked and wanted to share with you.

    Step 1. 

    You want to work in small sections, so first spray a section of part of the piece you are working on. With these cushions, I started with the top, fully cleaned it, then moved to the sides, cleaning each side completely before moving to the next one. 

    Before tossing that grime covered vinyl chair out, try this idea for cleaning vinyl upholstery. You might be surprised at how easy it is to clean vinyl!

    Let the cleaner sit on the upholstery for about 2-3 minutes. 

    Step 2.

    Using your scrub brush, give the vinyl a good scrubbing. You should literally see the dirt, grease and grime start to lift away. 

    Before tossing that grime covered vinyl chair out, try this idea for cleaning vinyl upholstery. You might be surprised at how easy it is to clean vinyl!

    Step 3. 

    After you have scrubbed the section thoroughly, come back with a paper towel and wipe up all that gross junk. 

    Before tossing that grime covered vinyl chair out, try this idea for cleaning vinyl upholstery. You might be surprised at how easy it is to clean vinyl!

    With these cushions, it only took one round of cleaning per section. However, if your piece is really heavy with dirt and grime, it might take a couple of passes with the cleaner. 

    Before tossing that grime covered vinyl chair out, try this idea for cleaning vinyl upholstery. You might be surprised at how easy it is to clean vinyl!

    And because no cleaning post is good without a little side-by-side before and after action:

    Before tossing that grime covered vinyl chair out, try this idea for cleaning vinyl upholstery. You might be surprised at how easy it is to clean vinyl!

    What’s even funnier is that I didn’t realize the vinyl was actually supposed to be white when I bought it, I knew it was dirty, but I just assumed it was more of a beige-y color with all the dirt. 

    Before tossing that grime covered vinyl chair out, try this idea for cleaning vinyl upholstery. You might be surprised at how easy it is to clean vinyl!

    I think the yellow piping is just too cute on these chairs. How could I not try to salvage those cushions?!  

    Before tossing that grime covered vinyl chair out, try this idea for cleaning vinyl upholstery. You might be surprised at how easy it is to clean vinyl!

    Any tricks you have for cleaning upholstery? 

    Want more shortcuts for cleaning? See these then…

    How to Remove Rust and Polish Chrome – do not throw away rusty metal just yet! Try this first!

    How to Clean Brass – who knew it was supposed to look like that?

    Want to come back to this vinyl upholstery cleaning tip later? Just pin the image below!

    Before tossing that grime covered vinyl chair out, try this idea for cleaning vinyl upholstery. You might be surprised at how easy it is to clean vinyl!
  • Cleaning Up Vintage Brass

    Cleaning Up Vintage Brass

    This is a sponsored post written by me on behalf of Scrub Daddy. All opinions are 100% mine.

    I get giddy like a schoolgirl over a good piece of vintage brass. I already have more pieces of it than I can use in my own house, but with starting the pop-up shops, I’ve gained just one more excuse to be on the hunt for it. As if I needed an excuse, anyway. 😉

    Rarely do I ever find a piece of vintage brass that is clean and shiny. Buying those pieces does mean more work for me to clean them up, but it’s really not too bad at all. Even if a piece hasn’t been cleaned up in the past decade and is sporting a few rust spots, I can typically have an average piece of brass cleaned up in 10 minutes or less.

    Cleaning Up Vintage Brass | Learn how to clean brass in under ten minutes to make it look like new again.

    When I clean up brass, I tend to go for a Scrub Mommy, which is part of the Scrub Daddy family – American’s Favorite Sponge. I’m just waiting on them to release brothers and sisters too. 😉

    Cleaning Up Vintage Brass | Learn how to clean brass in under ten minutes to make it look like new again.

    All Scrub Daddy products are scratch free, which is a must for brass, but a Scrub Mommy is different in that it is two-sided. On one side is the traditional unique FlexTexture®, which is firm in cold water and soft in warm water, and on the other side is a soft sponge. I load up the sponge side with brass polish and go about cleaning up the brass. If there are any rust spots on the brass, I flip the Scrub Mommy and use the FlexTexture® side on those spots, which easily powers through them.

    Cleaning Up Vintage Brass | Learn how to clean brass in under ten minutes to make it look like new again.

    The built-in eyes and mouth are good for getting awkward places on the pieces as well.

    Cleaning Up Vintage Brass | Learn how to clean brass in under ten minutes to make it look like new again.

    The gunk, so to speak, and other particles picked up stays in the Scrub Daddy, but will also easily rinse out when you’re ready. And when you rinse it out, the odors go with it too.

    After cleaning the brass, I rinse it off with water and dry it immediately. Don’t let any water sit on it – as that will just leave you with water spots.

    You can find Scrub Mommy at All Major Retailers. Also, be sure to visit the Scrub Daddy Facebook page for more cleaning ideas with Scrub Daddy and special offers!

    Happy vintage brass cleaning! 

  • Keeping the Carpet from Going to the Dogs

    Keeping the Carpet from Going to the Dogs

    This is a sponsored post written by me on behalf of Skout’s Honor. All opinions are 100% mine.

    I am not a dog person. I never have been. It’s like God just forgot to give me that little piece of my heart that thinks dogs are cute and cuddly no matter what they smell like or how much hair they shed. It’s just not in me. 

    However, it is very much in the Circus and Grunt Labor.  Therefore, I am a dog person only when it comes to our dogs.  If your home smells like your pets and you're battling tough pet stains, then try this all natural pet stain and odor remover! When Grunt and I got together he had two dogs, Zie and Zoe. Zie was a Boston Terrier and Zoe, a Boxer. I must have been really infatuated with that man because I actually let Zie sleep in the bed with us. Unfortunately, little Zie died a couple of years ago. I had never cried over a dog before until her. I think that was one of the hardest things our family has ever went through. Zoe is still driving me crazy on occasion, although I find myself petting her much more than I had ever intended to. The Circus loves on her often, occasionally dresses her up in tutus and Zoe, bless her heart, just goes with it. 

    Before this house, Zoe had never slept in our bedroom before and her dog bed had always been on a hard surface like wood floors or tile. Her usual spot in the new place is in our bedroom – which has carpet and is more prone to be taken over with stains and dog smells. A little while after we moved in, I walked through the sitting area in our master bedroom where her bed is and got an overwhelming scent of dog. 

    The smell of dog is not one I have much patience with. 

    I tried spraying some air freshener in the area and we even got her a new bed, but the smell still came back more often than I cared for. 

    After trial and error though, I have finally figured out the winning combination for getting rid of those dog smells and also for removing pet stains. 

    First, you need a good vacuum cleaner.  If your home smells like your pets and you're battling tough pet stains, then try this all natural pet stain and odor remover!

    Our previous vacuum cleaner was, I think close to a decade old, if not already. It used to be great, but was losing its suction and just not pulling up as much stuff as it once had. Around Black Friday, I found a vacuum cleaner with good reviews on sale and treated myself to it. I can’t even begin to tell you the joy I have derived from that vacuum cleaner. I truly had no idea that Zoe shed as much as she did, until I used the new vacuum cleaner around the house and specifically where she hangs out most of the time. Vacuuming her area has made a huge difference in knocking that dog smell out. 

    The second part of the winning combination is an odor eliminator from Skout’s Honor. 

    If your home smells like your pets and you're battling tough pet stains, then try this all natural pet stain and odor remover!

    Skout’s Honor Odor Eliminator is all-natural and knocks those smells right out. You can even use it in other places like stinky kitchen garbage cans. 

    Skout’s Honor also has a Stain and Odor Remover that will pull up any urine stains and get rid of the smell.  If your home smells like your pets and you're battling tough pet stains, then try this all natural pet stain and odor remover!
    ​I used to use my steam cleaner for this and it worked, but it is so much easier to just grab the Skout’s Honor, spray it on the stain, wait five minutes and blot it up instead of dragging out the steam cleaner, filling it with water and using it.  

    Now, I come from a land where old ladies driving Cadillacs load their cars down with ammonia come spring cleaning time. I tend to lean toward powerful cleaners with chemicals, but I will be the first to say that this stain and odor remover, which is all natural is the most powerful stain remover I’ve ever used. This is the before and after of a stain that was in our bedroom:  If your home smells like your pets and you're battling tough pet stains, then try this all natural pet stain and odor remover! All you do is spray it on, you do want to saturate the area though, wait five minutes and blot it up. If the stain is really set in, you might want to scrub it with a cloth a little. I usually run over the spot with a vacuum cleaner as well after using the spray, but that’s not necessary. 

    These stains were on the rug in our jungle room downstairs:  If your home smells like your pets and you're battling tough pet stains, then try this all natural pet stain and odor remover! I have no idea where they came from, they just showed up one day and everyone claimed innocence. I had literally tried everything on them and couldn’t get them to budge. Skout’s Honor can also be used on stains besides pet ones, so I gave it a whirl and am so glad I did. 

    If your home smells like your pets and you're battling tough pet stains, then try this all natural pet stain and odor remover!

    We sprayed them with the Skout’s Honor Stain and Odor Remover, let it sit, scrubbed them with a cloth and they came up. There were some spots that I did have to do twice since they were set in.

    The best thing about this stuff in my opinion is that I can let my kid do it. 😉 

    Seriously, y’all. She wants to help with cleaning all the time, but I’m always scared to let her clean with those harsh chemicals. Since this stuff is all natural though, she can have at it. Also, it’s a roundabout way of me getting out cleaning. There. I said it. This stuff is easy to use, safe to use and super powerful. On top of all that, Skout’s Honor donates a day’s worth of food to a shelter animal with every product sold. That’s pretty cool, even if you aren’t too big of a dog person like me. 

    Find out where to buy Skout’s Honor here. If your home smells like your pets and you're battling tough pet stains, then try this all natural pet stain and odor remover!

  • 5 Simple Storage and Organization Ideas that are Life-Changing

    5 Simple Storage and Organization Ideas that are Life-Changing

    Ok, I feel like the title of this post is slightly dramatic. But. These five simple storage and organization ideas have seriously changed and simplified our home.

    Whenever we moved into the 70’s Landing Pad, something happened to me.

    I got bit by the purge and organize bug. This bug bite though, was a welcome one.

    I got rid of so much stuff, y’all. Enough for two huge yard sales and now even more waiting for another yard sale in our garage. (P.S. My best yard sale tips are here.)

    I went label and bin crazy. Whatever could fit in a bin, went in one and got a label slapped on top of it.

    By no means am I now an organizing pro. Trust me, I still have hot messes in many areas of our house. But after doing these five things, I’m always trying to figure out what else I can better store, organize, purge, etc.

    Here are the best five things I’ve done to organize and create storage in our home since we’ve moved in. All of them are pretty simple and most are very budget-friendly. Cheap and easy, baby. My kinda projects. 😉

    Simple Storage and Organization Ideas

    Affiliate links may be contained in this post.

    1. Cleaning Closet

    Create a cleaning closet - even more great ideas in the post! 5 Simple Storage and Organization Ideas that are Life-Changing

    If you’ve ever looked for cleaning or organization ideas on Pinterest, no doubt you’ve seen this idea from lots of other people. I’m certainly not trying to steal the credit for it and honestly there are so many people who’ve done this, I’m not sure who the “originator” is. I just wanted to show you my version. We had enough room in our master bedroom closet to move all the coats in there and free up this hall closet to make it the “cleaning closet.” It houses all our cleaning supplies in one central location which has been so handy. All the cleaning bottles are held in an over-the-door shoe organizer.

    You’ll have to forgive my poor pictures of this space – it’s in the hallway which isn’t exactly the roomiest place on earth. 

    Create a cleaning closet: 5 Simple Storage and Organization Ideas that are Life-Changing

    I also bought a half-size hanging organizer which holds dust rags, wipes and Swiffer refills. I’ve got more details on how I organized this space (and a great tip for easy bathroom cleaning!) in the video below.

    2. Entertainment Center turned Storage Central

    A.K.A. The Three Boxes of Steel

    5 Simple Storage and Organization Ideas that are Life-Changing: Turn an old entertainment unit into a storage center! More great storage ideas in the post!

    I picked up this old entertainment unit at a local thrift shop for $100. I knew I would need something bigger than anything I had to go against the long wall that connects the living room and dining room. I sent Grunt Labor and Nicky to get it, but didn’t tell them anything about it’s size. They both came back and thanked me kindly for having them pick up three steel boxes. I haven’t been able to send them on any errands since. Lurking behind those doors though isn’t a television….

    5 Simple Storage and Organization Ideas that are Life-Changing: Turn an old entertainment unit into a storage center! More great storage ideas in the post!

    It’s storage central for all our china, wine glasses, entertaining items, serving pieces, etc.

    5 Simple Storage and Organization Ideas that are Life-Changing: Turn an old entertainment unit into a storage center! More great storage ideas in the post!

    I was able to put all the items that had been in two buffets at our old house into this piece with room to spare.

    You can watch the video below for more details on our cleaning closet and entertainment unit turned storage central.
    [adthrive-in-post-video-player video-id=”HFDwE4ai” upload-date=”Tue Aug 30 2016 00:00:00 GMT+0000 (Coordinated Universal Time)” name=”Rain on a Tin Roof – Life Changing Organization Ideas” description=”Use these simple storage and organization ideas to make your home a little less hectic.”]

    3. Vanity Organization

    In the master bathroom at the new house, we ran into a slight organization problem with the vanity, it has no drawers – only two large doors. Now that was the look I wanted and it was far cheaper to buy it than one that had drawers, but just having one big open space wasn’t great for organizing items.

    Bathroom Organization - more great ideas in the post! 5 Simple Storage and Organization Ideas that are Life-Changing

    I fixed that with bins and baskets from the Dollar Tree.

    Use command hooks and Dollar Tree bins for vanity organization. More great ideas in the post! 5 Simple Storage and Organization Ideas that are Life-Changing

    My favorite little trick here was hanging these small baskets with command hooks on the back of the vanity door. The top one has my toothbrush and toothpaste, the middle one has Q-tips and cotton rounds and the bottom one has my hair clips and nail clippers. It is great for keeping all those little items that would normally fall into the deep abyss in one place.

    Bathroom Organization - more great storage ideas in the post! 5 Simple Storage and Organization Ideas that are Life-Changing

    Inside the vanity, I just arranged bins and put items in them accordingly. These actually stack, but I’ve found they are better for us just sitting there.

    4. More Containers and Bins and Easy Labels

    The Dollar Tree container aisle and I have been great friends. Not only did I use them for the bins above, but also for organization in my kitchen drawers.

    Great and really simple storage ideas! Pretty cheap too! 5 Simple Storage and Organization Ideas that are Life-Changing

    The baskets in the kitchen drawers help keep cooking utensils from getting pushed to the back of the drawer where I can’t find them.

    I also used larger bins and the baskets in my craft closet.

    Awesome and really simple ideas! 5 Simple Storage and Organization Ideas that are Life-Changing

    All of this stuff used to just be dumped in drawers at our old house. I organized everything and labeled the bins with FrogTape so that if I ever needed to change out the label, there wouldn’t be any sticky residue left behind. Like I said earlier, I certainly still don’t have it all together. You can see that shelf below is a hot mess – it’s where I keep all the random home accessories that haven’t found a home yet and also a troll that was Grunt Labor’s when he was a kid. I know – weird.

    5. Maximized Under-Bed Storage

    Two of the three beds at the 70’s Landing Pad have SmartBase Foundations.

    5 Simple Storage and Organization Ideas that are Life-Changing - how to maximize under-bed storage! More great ideas in the post!

    The SmartBase Foundations work as the bed rails and box spring for the bed, but increase the storage underneath. So where you see the top of the foundation that the mattress sits on would normally be the top of the box springs, therefore the base creates more storage under the bed because it doesn’t take up as much room as a traditional box spring would. We were going to have to buy bed rails and a box springs for both our bed and the Circus’ bed. Getting the smart bases instead was cheaper and increased our storage, so it was a no-brainer. It’s been especially handy in the Circus’ room.

    Do you have any other simple organizing tips or storage ideas? I am all ears, y’all! Hopefully I was able to help you a little bit and send the organizing bug your way. 😉

    Liked this post? Then you’re probably going to want to see these…

    This is an awesome printable - perfect for decluttering your home! 9 MUST READ Cleaning Tips!

    15 Days to a Clutter-Free Home

    Full of easy to do ideas that are pretty, but also functional. 10+ Kitchen Ideas: Decorating, Organizing, Storage

    10+ Kitchen Ideas for Decorating, Organizing and Storage

    Create a one-stop workshop in your garage with this DIY Mobile Workbench and Pegboard Organization Ideas.

    One Stop Workshop: Ultimate Pegboard Organization + DIY Mobile Workbench

    Had NO CLUE on most of these! Must Read Cleaning Tips

    9+ Must Read Cleaning Tips

    blog-signature-summer-15

    pin-this-post-2

    These budget friendly simple storage and organization ideas will have you wishing you had known about them sooner! They will simplify your home and life!

    SaveSave

    SaveSave

  • The Best Yard Sale Tips So You Can Pawn Your Junk Off On Someone Else

    The Best Yard Sale Tips So You Can Pawn Your Junk Off On Someone Else

    Affiliate links may be contained in this post.

    At some point during my adult lifetime, I feel I’ve become a professional yard saler in both having yard sales and going to them. Of course, I hit up yard sales almost any weekend I can, but I also usually have a yard sale or garage sale at least two times a year if not three. After having so many yard sales for the past ten years or so, I’ve figured out what works best to get rid of as much of your crap as you possibly can.

    My Best Yard Sale Tips

    1. Hold yard sales and/or garage sales in groups.

    Just about anytime I have a yard sale, I do it with two or three of my friends. My house usually gets the most yard sale traffic so we often do it there. Having more people means you can advertise it as a multiple family yard sale and you’ll usually get more customers that way. It’s also helpful to have extra hands when you get really busy or if someone needs a potty break or has to make a beer run. I mean lunch run.

    2. Advertise, advertise, advertise.

    Advertising your garage sale hugely determines it success.

    • Make awesome signs for your yard sale.

    My friend Brittany had the stellar idea to make humorous signs for our previous yard sale.

    The BEST Yard Sale and Garage Sale Tips: Have stellar yard sale signs!

    We had so many people who came and were like, “I wasn’t going to stop, but couldn’t resist those signs!” We even had some that pulled up and said, “I saw those signs and knew you were my soul sisters.” They were a hit and so much fun to make

    • Advertise in your local newspaper.

    Anytime I don’t put an ad in the paper for my yard sales, I don’t make as much money or have as many customers.

    • Advertise on Craigslist.

    Lots of people look on Craigslist for yard sales. They have a category dedicated just for that.

    • Advertise in local Facebook yard sale groups.

    Search Facebook for yard sale groups in your area. (I talked more about Facebook yard sale groups here.) On the day of your yard sale, post pictures of your sale with the address and other information needed.

    • Advertise on your own personal Facebook page.

    Every time we do a yard sale, we each always put a post on our personal Facebook pages so local friends will know about it.

    3. Organize as much of your crap as you can.

    • Don’t leave everything in boxes.

    Put as much of it out on tables grouped together as best you can. Put all your home decor items together, baby items together, tech-y stuff together, etc.

    • Hang up any clothing items you are selling – especially adult clothing.

    With baby and toddler clothing, I typically group them by size in Rubbermaid totes and label accordingly. However, adult clothing sells so much better when you can actually hang it up somewhere. You can use a rolling clothes rack to do this or if you are having your yard sale near a garage, consider hanging a dowel rod temporarily where one of the garage doors is. You could install the closet rod holders on either side of the garage door opening, hang the dowel rod and just remove the dowel rod after the sale. The rod holders could stay there for your next sale and won’t really be noticed.

    4. Price your items.

    I am a person who while attending other people’s yard sales will ask what the price is if it isn’t marked, however I find that some people don’t like to do this and I always end up selling more stuff when I have prices on my items rather than when I don’t. You can use garage sale price stickers that already have prices on them to easily price your items. Here are my best tips for garage sale pricing:

    • Price your items just a tad bit higher than what you would take for them.

    Many people will always try to negotiate your price down a bit, so be prepared for that by pricing it slightly higher and being willing to negotiate.

    • Don’t overprice your items though. 

    Remember that while you may have paid $50 for that shirt, it’s not worth that much or even half of that anymore. If you price your items too high, you won’t sell as much and you’ll be left with a bunch of crap you don’t need. Think of it this way: would you rather sell 100 items for $1 each or 10 items for $10 each? Obviously, you won’t price everything at $1 or $10, but you get the idea.

    • Tell people if they buy more, you’ll cut them a deal. 

    If you see someone eyeing something and they’ve already got a couple things in their hands to buy, tell them you’ll cut them a deal if they buy it all.

    • General Pricing Guidelines

    I am in the south and I think we tend to have lower yard sale prices than many other areas. Here are some general price points for how I price items though:

    Clothing: $1 – $3 per piece depending on brand, condition, etc. Shoes are typically $3 – $5 per pair depending on brand and condition. All my baby and toddler clothes, I mark at $1 per piece.

    Small Home Accessories: $1 – $5 per piece. This would include things like photo frames, wall frames, small knick-knacks, etc.

    Medium – Larger Home Accessories: $5 – $20 per piece. This would include stuff like lamps, large wall clocks, and maybe even vintage items that are popular right now.

    Furniture: Unless I’m selling a piece of furniture that is in really nice condition and paid a whole lot of money for it, I don’t typically price any piece of furniture over $100 at a yard sale. Small side tables, end tables, etc. are usually priced between $10 – $20. Chairs may be around $50. Larger pieces, $100. I typically make more money off of furniture by listing them on Craigslist and Facebook yard sale pages. I always give that a try first before putting it in my yard sale. Once more, there’s more info about selling through those outlets here.

    • Cut prices in half after noon.

    We generally start our yard sales around 8 a.m. Around noon, I will usually cut my prices in half to get rid of anything I still have.

    5. Be nice. Greet your customers.

    Anytime I go to a yard sale, I am usually more apt to buy something I like when the sellers are friendly. We always try to say “Hello” or “Good Morning” as people stop by our sale. Also, this is the perfect time to tell them you’re willing to make a deal and all prices are negotiable.

    6. Have plenty of change.

    You would think that someone going yard saleing would have plenty of ones, rather than a twenty or even fifty dollar bill. However, that’s not always the case. Make sure you have plenty of change as soon as your yard sale starts – lots of ones and quarters are best.

    What are your best yard sale or garage sale tips?


    If you liked this post, you might wanna see these too…

    DIY Clothes Rack and Free Printable Size Dividers - great for yard sales or organizing babies closets.

    DIY Clothes Rack and Free Printable Size Dividers for Your Next Yard Sale

    How to Sell Your Used Items via Facebook, Craigslist, Yard Sales and More.

    How I Made $2K+ in Two Months Selling Our Clutter

    A real life guide to banishing clutter in your house! 15 Days to a Clutter-Free Home and some extra cash...

    15 Days to a Clutter-Free Home and Some Extra Cash

    pin-this-post-2

    The Best Yard Sale Tips | Yard Sale Ideas | Best Yard Sale Signs | Yard Sale Pricing | Garage Sale Tips | Garage Sale Ideas

    blog-signature-summer-15

    SaveSave

  • Pink lemonade spills are my favorite…

    This post is sponsored by Mr. Clean Magic Erasers, however all opinions are 100% my own. Affiliate links may be contained in this post.

    One Sunday a month, we make a pilgrimage to the Costco. It usually ends in me being quite frazzled because there were too many people there, Grunt Labor wanted to buy too much junk and we spent too much money. Don’t get me wrong, I love the Costco, but it can be stressful.

    One Sunday however, as I was picking up our monthly supply of paper towels and toilet paper, I spotted something magical just across the aisle – a jumbo variety pack of Mr. Clean Magic Erasers. And they were on a special. It included three each of the extra power Magic Eraser, the bathroom Magic Eraser and the kitchen Magic Eraser. I felt like busting out in song and dance in the aisle, but managed to refrain.

    This was also one of those moments in my life when I realized there truly was no turning back from this thing called adulthood. Getting excited over cleaning items most definitely crossed the point of no return.

    I grabbed one and went to grab another because I knew how much Mama also revered the power of the Mr. Clean Magic Eraser and knew she would want one. But alas, the limit was one. She came down for a visit a week or so later and saw my variety pack of magic. She was so glad to see them. Apparently, the Sam’s Club also had them on special but the limit was one and so she couldn’t get one for me. Great minds, y’all.

    We all know magic erasers are great for getting scuff marks off the walls and regular everyday countertop cleaning, but I wanted to share a few of the ways I use Mr. Clean Magic Erasers that you might not know about.

    Uses for Mr. Clean Magic Erasers

    Uses for Mr. Clean Magic Erasers | Cleaning Tips

    This post is in partnership with Mr. Clean Magic Eraser. However, all opinions are my own.

    1. Remove paint – dried and undried.

    If I’m painting and get a little splatter on the floor, I often use my magic eraser to wipe it up. However, did you know it can also remove dried paint in some cases? The Circus had this play doll bed that I painted for her and then added her monogram with craft paint on the head of the doll bed as well. Since she’s had it for the past few years, she has played with it approximately 1.5 times. I decided this piece would not make the move to the 70’s Landing Pad, but knew it would be hard to sell with the monogram on it. I didn’t want to repaint the whole thing so I got out my magic eraser and tried to remove the monogram – and it worked.

    2. The Bathtub

    Every time I’ve painted the bathroom, I always stick my step ladder inside the bathtub to paint around the top of it. And every time I do that, I always scuff up the bathtub to kingdom come with the ladder feet. The magic eraser removes the scuffs.

    3. Remove dried glue. 

    We had a few extra bunnies left over from the bunny vases we made a few weeks ago. I let the Circus Mod Podge and glitter them up. By herself. With a not-so-tiny paintbrush. At the dining room table. Needless to say, the dining room table was sporting some dried-on glue complete with pink and blue glitter in a few places. The magic eraser cleaned it up though.

    4. Outdoor Furniture

    We’ve had some nice weather lately, so we’ve been spending more time outside. However, our outdoor furniture wasn’t quite ready for that. It was gross and grimy. I used the magic eraser to give it a quick once-over.

    5. Remove Stains on Leather

    Before you try this one, test it out in an inconspicuous spot. You see, I have a weakness. Ok, I have a few. But one specifically is Kate Spade handbags. I only allow myself one per year – or two if it’s a really good sale. Anywho, I don’t have many and of course with a three year old, they often get questionable stains on them. I’ve used a magic eraser to remove most of the stains.

    But my favorite way to use the Mr. Clean Magic Eraser….

    To clean up pink lemonade spills made by a little Circus who loves to make her some pink lemonade.

    Uses for Mr. Clean Magic Erasers | Cleaning Tips

    As a warning, make sure your own circus doesn’t try to wring the eraser back out into the lemonade pitcher. Let’s just say, we made another round of pink lemonade….

    You can get more Mr. Clean tips from Jillian Harris by watching this video where she shares some of her dirty little secrets.

    5 Ways to Use a Mr. Clean Magic Eraser you didn't know about | Cleaning Tips

    blog-signature-summer-15

    Disclosure: This post was a collaboration with Mr. Clean, however all opinions and love of pink lemonade messes are 100% mine.

    SaveSave

  • How to Clean Copper

    How to Clean Copper

    This post is sponsored by Bar Keepers Friend, however all opinions are 100% mine. Affiliate links may be contained in this post.

    I’m not even gonna lie – I had to google what copper was supposed to look like to make sure I was just cleaning it and not stripping it off this cookie jar.

    That’s how bad it was.

    Or how pathetic I am.

    I picked up this sweet little cookie jar (that has never once housed cookies, only applesauce pouches and fruit snacks) on a Goodwill excursion a few years back. It was actually a half-off Goodwill day and I found it at the end of the day for a whopping $3 so not only was I shocked it was still there, but it was a great deal.

    I had originally thought I might spray paint it in order to cover up all the spots on it. I’m not sure what all the “spots” were as it didn’t look like rust, but I figured it was beyond the point of no return. Not wanting to loose the copper feel though, I left it as is on my counter for the past three years.

    How to Clean Copper and Restore It using water, one product, and a little elbow grease will make your copper look new in no time. A MUST TRY! Great cleaning tip!

    I’m really glad I never went crazy with the spray paint on it. Because it looks like this now…

    How to Clean Copper and Restore It using water, one product, and a little elbow grease will make your copper look new in no time. A MUST TRY! Great cleaning tip!

    I know, right?

    Here’s how I did it…

    How to Clean Copper

    You’ll Need:

    Step 1

    Rub the damp cloth over the copper to make it slightly wet.

    How to Clean Copper and Restore It using water, one product, and a little elbow grease will make your copper look new in no time. A MUST TRY! Great cleaning tip!

    Step 2

    If you haven’t already, put the gloves on. Speaking from personal experience, if you do this without gloves, the cleanser will dry your hands out, so I don’t recommend going without the gloves.

    Sprinkle Bar Keepers Friend Cleanser & Polish onto the copper. If you are working with a medium to larger sized item, work in small sections like I did.

    How to Clean Copper and Restore It using water, one product, and a little elbow grease will make your copper look new in no time. A MUST TRY! Great cleaning tip!

    Using the damp cloth, scrub the cleanser all around on the copper until you see the true shade of the copper appear.

    How to Clean Copper and Restore It using water, one product, and a little elbow grease will make your copper look new in no time. A MUST TRY! Great cleaning tip!

    On those spots I had, I did have to use a little more elbow grease to remove them, but they eventually came off just fine.

    The image below was about halfway through my cleaning.

    How to Clean Copper and Restore It using water, one product, and a little elbow grease will make your copper look new in no time. A MUST TRY! Great cleaning tip!

    You can see the right side has been cleaned and polished with Bar Keepers Friend and the left has not.

    Step 3

    After you have cleaned the entire piece with Bar Keepers Friend, I suggest rinsing, then washing it with a little dishwashing liquid to remove any cleanser residue. Dry it with a towel afterwards to prevent water spots.

    How to Clean Copper | Restore Copper | Clean Copper Pots | Cleaning Tip | Cleaning Hack | Kitchen Cleaning Tip

    Crazy, right?

    How to Clean Copper | Restore Copper | Clean Copper Pots | Cleaning Tip | Cleaning Hack | Kitchen Cleaning Tip

    Grunt Labor saw it afterwards and said he never even knew it was supposed to look like that.

    I didn’t tell him I had to go look up what copper was supposed to look like so I would know. 😉

    Have you used Bar Keepers Friend before?

    You might also wanna see…

    How to remove rust from chrome

    How to Remove Rust from Chrome

    Update Furniture Hardware with Barkeeper's Friend - instead of painting the hardware, this gives it a deep cleaning.

    How to Restore Hardware

    pin-this-post-2

    How to Clean Copper | Restore Copper | Clean Copper Pots | Cleaning Tip | Cleaning Hack | Kitchen Cleaning Tip

    blog-signature-summer-15

    You know you don’t wanna miss any of this crazy.

    Sign up to get my posts delivered to your inbox here.

    Stalk Me Here:

    Bloglovin / Pinterest / Facebook / Twitter / Google+ / Instagram

    Disclosure: This post was a collaboration with Bar Keepers Friend, however all opinions and admittance of not knowing what copper was supposed to look like are 100% mine.


    SaveSave

  • How to Remove Paint Overspray from Floors

    How to Remove Paint Overspray from Floors

    This post is sponsored by HomeRight, however all opinions are 100% mine. Affiliate links may be contained in this post.

    I can’t tell you how many times I’ve sat at the kitchen table or been driving the car having a conversation with one of the part-time children about their day and all of a sudden they say, “So I told him you would do it.”

    Stop.

    Hold the phone.

    Shut the front door.

    You did what? What did you just volunteer me for child?

    To buy ad space on a t-shirt.

    To help sell peaches.

    To makeover the locker room.

    While there are countless more events to note in this department, today I would like to talk about the time I was volunteered to makeover a football locker room.

    What had happened was…

    Bill, the 17 year old, is very interested in what I do for a living – blogging. He has figured out the basics of it and knows that I have pretty decent painting skills.

    He knows enough to be dangerous.

    Not to himself though – to me.

    He loves to try and explain to people what I do.

    And then he loves to volunteer me.

    Now, in all honesty, I really don’t care. I love helping the kid out. This locker room makeover though – I don’t think we’ve ever wanted to rip out each other’s throats more.

    So he finds out his football coach wants to makeover the locker room. Bill promptly tells his coach that I would probably help out. Bill comes home and talks to me and I said sure, it’s a great idea. He even says it can be his senior project. Great. We’ll have this thing knocked out before his senior year.

    That was in the spring.

    Summer rolls around and nothing has been decided on this makeover. Bill and I have a discussion that it would probably be best to wait and do this until after football season so that we get a few uninterrupted weeks of work without players there. Sounds good.

    It’s late June now. I’ve been over at my Dad’s one Saturday. I come home that day and Bill informs me that he just decided to go on and start on the makeover.

    You did what? 

    Keep in mind, this is the child who has spray painted his cleats multiple times now and never puts anything under them, so I have three different shades of cleat outlines on my garage floor.

    I can tell he isn’t telling me everything, but he says he’s going to finish it and take care of it after FCA camp – which he leaves for the next day – he says I shouldn’t worry about it.

    We drop him off at camp for the week.

    Halfway through the week, I’m out in the front yard when his coach stops to talk (he lives in our neighborhood). The first words out of his mouth are, “Have you seen the locker room?”

    At that point, I knew three things.

    1. Obviously, the locker room was in bad shape.

    2. My upcoming weekend was going to be spent in the locker room.

    3. I was going to strangle that child.

    I picked him up from FCA camp Thursday morning, promptly took him to the dentist for his scheduled root canal and then drug his butt to the locker room to work.

    This is what I found, minus the plastic sheeting, I failed to take a picture when I first got there as flames were shooting from my fingertips, ears, eyes, nose, and mouth. Basically I was a human fireball.

    How to Remove Paint Overspray - great tip for vinyl, plastic and rubber flooring!

    With the exception of a few random newspapers scattered here and there, none of the benches or floor had been covered. None of the helmets or pads or lockers themselves had been cleaned out either.

    Overspray from the spray paint coated everything.

    I fed him some pain meds the doctor had given him and told him to get to work. Root canal or not, we had to fix and finish this locker room by Sunday because football started up again on Monday. We worked all Thursday afternoon, all day Friday, and all day Sunday (Saturday just happened to be the 4th of July) to finish the locker room.

    He’s never started another project without me since.

    Overall, the biggest thing I was worried about was the spray paint all over the floor. After we got all the lockers finished on Friday afternoon, I walked in there on Sunday armed with multiple scrub brushes, floor cleaner and my HomeRight Steam Machine.

    How to Remove Paint Overspray - great tip for vinyl, plastic and rubber flooring!

    I told Bill I was not cleaning up the mess he made, I would only supervise, so he’d better find help. Lucky for him, he has good friends, otherwise he’d been scrubbing for a looooong time.

    This flooring was some sort of rubber flooring. We found the best way to remove the overspray was to wet it down with a mix of water and floor cleaner (that’s what’s in the big bucket) and scrub, then follow with bursts of steam and scrubbing from the Steam Machine.

    It totally did the trick. The Steam Machine ate through any of the really tough spots on the flooring. Here’s a good idea of what we were dealing with…

    How to Remove Paint Overspray - great tip for vinyl, plastic and rubber flooring!

    The far left side has been scrubbed. The right side still has the overspray. Those straight lines of the overspray you see is where he had just thrown newspaper down. Randomly.

    #SMH

    After scrubbing with the Steam Machine, we did go back over the whole thing with a mop to pick up the scrubbed up spray paint residue.

    And in the end, we did manage to get a pretty good looking locker room…

    How to Remove Paint Overspray - great tip for vinyl, plastic and rubber flooring!

    He, however, decided to do something else for his senior project.

    #imaginethat

    What awesome uses have you found for a steam machine?

    pin-this-post-2

    How to Remove Paint Overspray | Steam Cleaning | Cleaning Tips | Cleaning Ideas | Paint Removal | Paint Removing Tips

    You might also want to see…

    GROSS, but very interesting! Clean that Disgustingly Gross Shower with One Single Tool via RainonaTinRoof.com

    How to Clean a Disgustingly Gross Shower

    Disclosure: This post was a collaboration with HomeRight. However, all opinions and children who call me their white mama are 100% mine.

    SaveSave

  • How to Remove Rust from Chrome and Other Metals

    How to Remove Rust from Chrome and Other Metals

    Do you have rust creeping up on metal surfaces, a chrome finish item or even metal furniture? Before you toss it or give up, read this method for how to remove rust from chrome and get rust off metal surfaces. It might just be easier than you think!

    About a month back, I dragged the kids out of bed early one Saturday morning to go yard saleing.

    Yes, saleing is a word.

    That’s when I got the paper sorter that became a rainbow.

    Before I found the paper organizer, well before I even got out of the neighborhood, I also found a leopard print rug for $5, a rattan side table for $2, and a mid-century modern chair with chrome plating for $2.

    We had to make a pit stop back home before proceeding with yard saleing.

    The rug was in great shape, I had to fix a leg on the table, but I was worried that the chair might have been a total waste. There were more rust spots covering it than not.

    This post contains affiliate links for your shopping convenience. Click here to read my full disclosure policy.

    How to remove rust from chrome

    Here’s a closer shot…

    How to Get Rust off Metal

    Rusty areas were pretty much all over the entire chair.

    I almost just tossed the chair, but then I remembered how Bar Keeper’s Friend had cleaned up the hardware on the radio turned bar cabinet so nicely. I decided to give it a whirl (and a lot of elbow grease) and ended up with this…

    how to get rust off chrome

    What I got was a sparkling, pretty much rust-free mid-century modern chair.

    Y’all, I was shocked. Grunt Labor saw it and said “It doesn’t even look like the same chair.”

    If he’s impressed, then its a win.

    Want to revive your metal furniture too? Here’s how to remove rust from metal furniture, chrome surfaces and more.

    How to Get Rust off Metal

    Supplies Needed:

    Step 1:

    Dampen your cleaning cloth with water a bit and shake a little Bar Keeper’s Friend onto it.

    how to remove heavy rust from chrome

    Rub the cloth together to create a sort of paste.

    Step 2:

    Using a circular motion, scrub down any metal areas that have rust.

    how to clean rust off chrome

    As you scrub, you will see your rag start to turn brownish-red from the rust that is coming off. Stop every once in a while, rinse the rag out, reload with more Bar Keepers Friend, then repeat the scrubbing process.

    Step 3:

    If you find that some of the rust spots aren’t coming up with just the cloth and Bar Keepers friend alone, use steel wool in combination with the Bar Keepers friend on those tougher areas.

    Step 4: 

    After you have removed all the rust, wipe the areas you cleaned down with a clean, wet cloth, followed by a clean dry cloth to avoid water marks.

    Ready for some side by side before and after action?

    how to remove rust

    I spent about an hour total removing rust from this chair, however I will say it was well worth it.

    how to remove rust from metal furniture

    The rust on the ends of chair back just wouldn’t budge. I think they may have been made of something other than metal.

    how to remove rust from chrome finishes

    There were also some tiny spots in the nook there that wouldn’t come off, but overall Bar Keeper’s Friend proved once more that it is a miracle product. In my opinion, anyway.

    No more worrying about getting rust stains on your clothes when you sit in this chair! It also did a heck of a job polishing up the chrome.

    Do you have any techniques for how to get rust off chrome or other metals?

    P.S. This post is not sponsored by Bar Keeper’s Friend. I just love the heck out of their product. 🙂

    More cleaning tips you’ll find helpful…

    How To Restore Your Hardware– before you toss it or paint, see what’s underneath…

    How to Clean Copper – bring back that gorgeous copper shine in minutes!

    Cleaning Up Vintage Brass – it can be a pain, but that shine is worth it.

    How to Clean a Disgustingly Gross Shower– the before and after is jaw dropping.

    9+ Must Read Cleaning Tips – cleaning tips for interiors and exteriors.

    Want to easily come back to this cleaning tip later? Just pin the image below!

    How to Remove Rust from Chrome and Other Metals

    You know you don’t wanna miss any of this crazy.

    Stalk Me Here:

    Pinterest / Facebook / Twitter / Instagram

    how to get rust off metal surfaces

    SaveSave

  • 9+ Must Read Cleaning Tips

    9+ Must Read Cleaning Tips

    If we’re being honest, and since I’m always honest with you, my house is not clean right now.

    Its not clean at all. 

    May is a whirlwind of events for us and cleaning is not one of those events that tends to take place during the month.

    Until there is a mad dash next Friday to clean right before the kid’s birthday party so that our guests don’t turn and run screaming out the door…

    I can hear the circus talking to her therapist in ten years, “Everyone showed up for my birthday party that year, but then made a beeline for the door when they saw dust an inch thick and dried crusty milk on the floor. They took all their presents with them. I’ve never been the same since.”

     Therapy is going to cost me a fortune. 

    So next week, to hopefully cut down on therapy costs, these are my best cleaning tips that I will actually do…well at least everywhere that guests will be… 😉

    Must Read Cleaning Tips and Cleaning Ideas for the Home | Cleaning Hacks | DIY Cleaning Hacks | Bathroom Cleaning Tips | Cleaning Tricks

    Disclosure: This post was a collaboration with HomeRight. However, all opinions and dirty, dirty houses are 100% mine. This post contains affiliate links for your shopping convenience. Click here to read my full disclosure policy.

    Indoor and Outdoor Cleaning Tips

    First off, let’s de-clutter.

    This is an awesome printable - perfect for decluttering your home! 9 MUST READ Cleaning Tips!

    Shockingly, I did this last night when I found out the in-laws were coming down for the night. Lord knows, I can’t let them sleep on a bed where they may or may not end up being poked by plastic horses and measuring tapes – both of which were all over the guest bed last night. This de-cluttering printable covers every room, closet, nook and cranny.

    I should probably work on the bathrooms next…

    What??? I have to try this method for cleaning my shower! 9 MUST READ Cleaning Tips!

    I finally did take out the overflowing trash can in my bathroom last night. Once more, because my in-laws are coming down. Thanks for helping me get my butt in gear, Mama and Dad. I will be doing some deep cleaning in the showers though with my HomeRight Steam Machine. Honestly, never in a million years did I think I would love something that cleans so much. I guess age does that to you. Or maybe its the fact that it cuts down on so much time that I can have that cheap beer sooner? 😉

    Of course, the kitchen is gross too…and has a variety of craft items all over the counters that are supposed to be making some party decorations for the kid’s party. Still working on that one.

    I HAVE to get one of these - its the easiest way to clean your kitchen by far! 9 MUST READ Cleaning Tips!

    I also use my steam machine to clean my entire kitchen. Yep. The whole room. Counters, backsplash, sink, stove, refrigerator, all the stainless steel. You name it. I clean it with my steamer. See why I like it so much?

    My favorite thing to do, ok wait its not my favorite because it involves dog accidents, but maybe the best thing about my steam machine plus, is that it can easily clean up pet stains and odors.

    Wish I would have known this a long time ago!! How to clean pet stains and get the odor out of your carpet! 9 MUST READ Cleaning Tips!

    I am not a dog person. Go ahead. Throw the tomatoes at me. Sorry, y’all, they just aren’t my cup of tea. The thought of cuddling up with a furry creature is just gross to me. Alas, Grunt Labor and the circus adore the dogs, therefore I tolerate them. Ok, they are just a tad bit cute. Just a tad though. Their accidents are not cute. At all. Here’s how I clean up their stains and odors easily – yep, even on carpets.

    I steam clean just about every floor in my house actually.

    Use a steam mop to clean just about ANYTHING! 9 MUST READ Cleaning Tips!

    And trust me, never in a million years did I think I would be cleaning chemical-free. I grew up in the country where old ladies load their Cadillacs down with ammonia every spring for cleaning. I had fully intended on being one of those old ladies. The Cadillac will definitely happen – the ammonia, not so much.

    That being said, I do still use store-bought cleaners for some things.

    5 Ways to Use a Mr. Clean Magic Eraser you didn't know about | Cleaning Tips

    I am also a fan of using my magic eraser on a lot of things around the house.

    Instead of spray painting your hardware, here's a way to clean it! Isn't that crazy?! 9 MUST READ Cleaning Tips!

    One of those things being to clean my hardware. Its much cheaper than replacing it.

    How to waterproof fabric and protect upholstery against stains! Great to know! 9 MUST READ Cleaning Tips!

    I also use a spray to protect my upholstery from stains and to waterproof it.

    See, I’m not 100% hippie.

    I literally just laughed out loud at the thought of even being considered a hippie. 

    And since the birthday entourage will obviously see the outside of my house, I’d better make that look a little more presentable too..

    Easy way to clean up your concrete landscape blocks. 9 MUST READ Cleaning Tips!

    There will be some cleaning of concrete landscaping blocks.

    And the sidewalk could use a quick little cleaning refresh…

    Isn't that difference crazy?! How to Clean A Sidewalk. 9 MUST READ Cleaning Tips!

    Yea, I just cringed too at that before picture. I still have no idea what was growing on the sidewalk before I cleaned it.

    How to remove rust. You WILL NOT believe this!

    If you’ve got rust on anything, I’ve got a killer way to remove it.

    How to Clean Copper and Restore It using water, one product, and a little elbow grease will make your copper look new in no time. A MUST TRY! Great cleaning tip!

    I thought this little cookie jar was way past it’s prime, until I figured out how to clean copper!

    I love vintage brass, but I despise cleaning it up! Here’s the easiest way I’ve found to clean it.

    What are your best cleaning tips? 

    Do any of you have a magic genie in a bottle that can just do all the cleaning, the party decorations and make all the food for me before next Saturday?

    Anyone? Anyone?

    Looking for more useful cleaning and organization tips?

    Be sure to see these five simple storage and organization ideas that are truly life-changing!

    You know you don’t wanna miss any of this crazy.

    Sign up to get my posts delivered to your inbox here.

    Stalk Me Here:

    Pinterest / Facebook / Twitter / Instagram

    pin-this-post

    Must Read Cleaning Tips and Cleaning Ideas for the Home | Cleaning Hacks | DIY Cleaning Hacks | Bathroom Cleaning Tips | Cleaning Tricks

    SaveSave

  • How to Clean Concrete Blocks

    How to Clean Concrete Blocks

    Typically, I leave the outdoor arena to Grunt Labor.

    He is amazing at growing flowers.

    He loves to keep the grass looking good.

    He puts his heart and soul into our garden.

    He’s currently working on building a new patio.

    However, cleaning outdoors isn’t necessarily his thing. 

    That’s usually left to me – and that’s ok – especially when its as easy as it was to clean these concrete blocks.

    Wow! Gotta check this cleaning method out! How to Clean Concrete Blocks

    Just before you go into our garage, we have a retaining wall full of these concrete blocks..

    Before: How to Clean Concrete Blocks

    And up until just a few days ago, they all looked like that.

    Now they look like this…

    After: How to Clean Concrete Blocks

    This is a sponsored conversation written by me on behalf of Scotts® Outdoor Cleaner plus OxiClean™ via Burst Media. The opinions and text are all mine.

    Yep, that is the same block.

    How to Clean Concrete Blocks

    Supplies & Materials Needed: 

    Step 1: 

    Spray Scotts® Outdoor Cleaner plus OxiClean™ onto the dirty, gross and grimy area.

    How to Clean Concrete Blocks

    The great thing about this cleaner is that its safe to use around grass and plants. I didn’t have to worry about covering up my boxwoods that are just on the other side of the wall. It has a fast-foaming action that starts working as soon as you spray it on the affected area.

    Step 2: 

    Scrub.

    How to clean concrete blocks

    You may be an excellent homeowner that cleans your outdoor areas regularly. If you are, you may not have as bad of stains as we did and not have to scrub. Us, well….ummm….we had never cleaned these before – so its been a while to say the least.

    As you scrub, you can see the dirt and grime coming off. It gets rid of stains from moss, mold, mildew and algae.

    Step 3: 

    Rinse off the blocks and bask in your awesome cleanliness.

    WOW! Have to check this out! How to Clean Concrete Blocks

    Ya’ll, that’s a minimum of five years worth of gunk that came off. Scotts® Outdoor Cleaner plus OxiClean™ can also be used on fabrics, wood, siding, patio furniture and more.

    I used the Scotts® Outdoor Cleaner plus OxiClean™ in the Ready to Use Trigger sprayer, but if you have a bigger area, you can also buy it in concentrate form. You can find it at the Home Depot, Lowe’s, and Walmart.

    Need more easy outdoor cleaning tips? 

    How to Clean Your Sidewalk – you won’t believe how dirty mine was and you won’t believe how clean it came!

    How to Refresh Your Lattice – in under an hour!

    12 Outdoor Furniture Makeovers – before you toss it, think about giving your outdoor furniture one of these makeovers!

    9 Must Read Cleaning Tips – Outside and inside cleaning tricks!

    pin-this-post

    Wow! Gotta check this cleaning method out! How to Clean Concrete Blocks

  • How I Clean My Entire Kitchen With One Single Thing

    How I Clean My Entire Kitchen With One Single Thing

    Let me be the first to say that I am not a great house cleaner.

    If you’ve been around here long enough, I’m sure you could have easily guessed that one.

    Its not that I’m a bad house house cleaner, its just that I don’t do it often enough.

    We don’t have week old food laying out on the kitchen counter or anything, but most days its questionable as to what the sticky substance on the countertop might be.

    I’m just keeping it real, y’all. 

    However, when I do get around to cleaning – like I did yesterday so that I could take photos for an upcoming house tour that didn’t include gross sticky unknown substances – I clean my kitchen with one single thing. I call it my little mouse.

    Fo’ Realz. 

    How to Clean a Kitchen with One Thing | Kitchen Cleaning Hacks | Kitchen Cleaning Tips | Steam Cleaning Tips | Chemical Free Cleaning

    Disclosure: This post was a collaboration with HomeRight. All opinions and comparisons of mice and steam machines are 100% mine. This post contains affiliate links for your shopping convenience. Click here to read my full disclosure policy.

    I realize the irony in me calling my cleaning tool a little mouse.

    But its a good little mouse…

    HomeRight Steam Machine

    Its also known as the HomeRight Steam Machine.

    Doesn’t it slightly resemble a mouse?

    Ok, its just me and my weird imagination. 

    Anyway, I use this bad boy to clean my entire kitchen.

    This time around, I started with some grout cleaning…and removing blue paint apparently…

    Steam Cleaned Grout

    I just attach the nylon brush to the steam gun and fire away while scrubbing.

    I also had some dried white paint lurking on the countertops from a recent kitchen makeover…

    Get dried paint off with a steamer.

    I shot it with the steam and then used a scraper to peel it right off.

    I steam cleaned my sink as well.

    Steam Cleaned Sink

    With the sink, as I steam, I come behind with a sponge, wiping away the dirt and grime.

    It comes off like buttah’.

    I use it on all my appliances…

    Steam your appliances to get a streak free clean.

    Give the appliance a shot of steam, quickly followed by a wipe down with a towel. I do the same thing on my kitchen faucet.

    And shockingly – the steam machine can also tackle my stove…which is a whole other ballgame.

    Steam Clean Your Stove!

    I clean it the same as the stainless steel on the other appliances – steam, wipe, repeat as needed. If needed, I use a scraper to remove stuck on stuff.

    Do you use a steam machine for cleaning?

    Want more cleaning tips?

    How to Steam Clean Your Shower – you won’t believe how dirty this shower was before!

    How to Get Pet Stains and Odors Out Of Your Carpet – easy!

    9+ Must Read Cleaning Tips – super useful tips for all around the house!

    You know you don’t wanna miss any of this crazy.

    Sign up to get my posts delivered to your inbox here.

    Stalk Me Here:

    Pinterest / Facebook / Twitter / Instagram

  • 10+ Kitchen Ideas for Decorating, Organizing, and Storage

    10+ Kitchen Ideas for Decorating, Organizing, and Storage

    I am all about a pretty space.

    I’m also all about a real life space.

    The problem is that pretty + real life don’t always work together.

    And real life tends to trump pretty everyday of the week.

    I always struggle with finding that happy balance between pretty and real life in the kitchen.

    Prime example: the chips will always live on top of the fridge. No, its not pretty, but that’s where we expect them to be, so that’s where they will always be come hell or high water unless we magically get more pantry or cabinet space…which I won’t hold my breath for.

    That being said, these are my best kitchen ideas for merging real life and pretty. 

    Doritos bag on the refrigerator not included. 

    Full of easy to do ideas that are pretty, but also functional. 10+ Kitchen Ideas: Decorating, Organizing, Storage

    10+ Kitchen Ideas: Decorating, Organizing, Storage

    #1. Create a coffee station. 

    Create a coffee station. 10+ Kitchen Ideas: Decorating, Organizing, Storage

    This coffee station has only been around for the last few months and let me tell you it has made my morning coffee ritual so much smoother. You see, I tend to want my morning coffee faster than the Keurig can make it. I know – that’s like the purest definition of impatientness (which probably isn’t even a word) ever. It is what it is. I corralled my K-Cups, sugar, and spoons all on a cheap little IKEA tray to get my coffee in my mug as soon as possible. The only thing that isn’t there is the creamer in the fridge. Obviously, its not realistic to leave the creamer sitting out overnight uncovered, so I used that pitcher for my spoons. The little Cafe du Monde sign is a nice reminder of my favorite city in the world.

    #2. Use a locker basket to hold fruit.

    Use a locker basket to hold fruit. 10+ Kitchen Ideas: Decorating, Organizing, Storage

    I hate those banana hanger/holder things. I have no idea why, but they drive me crazy. Instead, I use a vintage locker basket to hold all our fruit.

    #3. Use a shiny pitcher to hold cooking utensils. 

    Use a silver pitcher to hold cooking utensils. 10+ Kitchen Ideas: Decorating, Organizing, Storage

    When I found that silver pitcher at Goodwill, I nearly peed my pants. It does the job of holding all the ugly cooking utensils, while adding a touch of chic.

    #4. Use a tray to corral salt, pepper, olive oil, etc. 

    Use a tray to corral olive oil, salt, pepper, etc. 10+ Kitchen Ideas: Decorating, Organizing, Storage

    Right beside the silver pitcher is a small rustic-y tray that holds salt, pepper and olive oil. The tray keeps everything corralled in one spot and makes them feel unified.

    #5. Bring in color with barstools. 

    Bring color into a kitchen with barstools. 10+ Kitchen Ideas: Decorating, Organizing, Storage

    Lots of kitchens lack color. In fact, just about everything in my kitchen is black and white except for the barstools and curtains. In terms of furniture, barstools are pretty cheap, which makes them a perfect candidate for color. Buy a cheap pair at Target and spray paint them or scour thrift stores for some to makeover. I gave my barstools a kelly green and navy blue makeover a couple years back and I’ve been in love ever since.

    #6. Switch out your hardware. 

    Switch out old hardware and cover the previous holes. 10+ Kitchen Ideas: Decorating, Organizing, Storage

    Granted, I painted my cabinets and switched out their hardware, but never underestimate the power of just switching out hardware. Grunt and I did this at our little cottage and it totally changed the look of the entire kitchen. We probably spent less than $50 on new hardware and it had a big impact. You can even change the location of your hardware and cover the holes easily.

    #7. Don’t want to trade out your hardware? Try restoring it. 

    Instead of switching out old hardware, restore it. 10+ Kitchen Ideas: Decorating, Organizing, Storage

    If your hardware is pretty old, chances are, it could use a good cleaning. Clean it up and you might realize you have a little gem under all the grime. Here’s how to restore your hardware.

    #8. Build your own island or peninsula. 

    AWESOME IDEAS - dressers turned island, build your own island, and more! 7 Kitchen Island Ideas You Haven't Thought Of... via RainonaTinRoof.com

    Yes you can. I know some of you were just like, “No way can I make my own island.” Y’all, if Grunt and I can, anyone can. Our kitchen island (in the photo with the barstools earlier) was made from porch posts and salvaged barn wood – and it only costs about $100 to make, excluding the counter. And if you don’t want to build one, look at these seven different kitchen island ideas – you can even use a dresser for an island.

    #9. Have fun with sweets. 

    Display treats in a unique way. 10+ Kitchen Ideas: Decorating, Organizing, Storage

    This mohawk lollipop holder is definitely not all that kitchen-y. Its not really even needed. Buts its fun and quirky. And I like that. The kid especially loves getting her lollipops out of the mohawk.

    #10. Use locker baskets for cookbook storage.

    Store your cookbooks in an unconventional way. 10+ Kitchen Ideas: Decorating, Organizing, Storage

    A kitchen ideas post wouldn’t be complete without my vintage locker basket cookbook storage. Almost three years and they haven’t budged.

    #11. Ditch some upper cabinets for open shelving. 

    Instead of having all upper cabinets, opt for some open shelving. 10+ Kitchen Ideas: Decorating, Organizing, Storage

    When Grunt Labor and I started the kitchen reno, I knew I wanted open shelving somewhere. Originally, I wanted it on both sides of the window (and would still like that), but there wasn’t enough space for the shelving we bought from IKEA on the left side of the window. The shelving is pretty and functional. In the photo above, its holding my whiteware, but now it actually holds dishes and glasses. You can see our entire kitchen renovation here.

    What are your best kitchen ideas for decorating, organizing, and storage? 

    Want more real life decorating ideas? 

    14 Real Life Bedroom Ideas Anyone Can Do – totally doable, totally real life.

    20+ Living Room Ideas – for every kind of design style.

    You know you don’t wanna miss any of this crazy.

    Sign up to get my posts delivered to your inbox here.

    Stalk Me Here:

    Pinterest / Facebook / Twitter / Instagram

    pin-this-post

    Full of easy to do ideas that are pretty, but also functional. 10+ Kitchen Ideas: Decorating, Organizing, Storage

  • How To Get Pet Stains and Odors Out of Your Carpet without Chemicals

    How To Get Pet Stains and Odors Out of Your Carpet without Chemicals

    I am not a dog person.

    I’m not really a pet person at all.

    Some of you may have just decided to unsubscribe from my blog. I fully understand that not being very fond of pets, especially dogs, is considered to most very un-American.

    You see, I was always skiddish around them when I was a kid – like even a small kid when you are supposed to love all cute and cuddly things. I’m past the skiddish part, but I cannot stand to be licked by a dog or have it up in my face.

    And they smell. They totally have the smelliest farts in the history of the universe. 

    You know I’m right.

    And then Grunt and I got together.

    And he had two dogs.

    That stayed inside the house most of the time.

    And one that slept with him.

    And I seriously considered whether or not I could marry a man who slept with a dog. 

    But then all those chocolate milks just won me over and I had to learn to deal, ok and love, the dogs.

    I couldn’t deal with the dog sleeping with us though – that had to end. I have my limits.

    And then the circus entered the picture.

    And she was sharing her bottle with the dogs at six months old.

    And crawling on their bed, wallowing around in it.

    And I cringed. 

    And then for a solid year all she wanted to play with was her stuffed dogs and the real dogs.

    My friend Ashley even mocked me for having a child that loved dogs when I detested them so much.

    They aren’t kidding when they say God has a sense of humor. 

    I have come to somewhat love the dogs. Well, I love them because Grunt Labor and the kid love the dogs.

    Super easy way to get rid of that nasty smell! How To Get Pet Stains and Odors Out of Your Carpet without Chemicals

    Yea, Zie is pretty cute.

    So the other night after dinner as I was straightening up the kid’s room and asking myself why a two year old just can’t pick up after herself, I stepped in something. Wet.

    And I said, please sweet Lord Jesus, don’t let this be dog pee.

    I got down on the floor and sniffed.

    Super easy way to get rid of that nasty smell! How To Get Pet Stains and Odors Out of Your Carpet without Chemicals

    Remember how I said God has a sense of humor?

    Seriously?  

    Super easy way to get rid of that nasty smell! How To Get Pet Stains and Odors Out of Your Carpet without Chemicals

    Disclosure: This post was a collaboration with HomeRight. All opinions and non-pet person qualities are 100% mine. This post contains affiliate links for your shopping convenience. Click here to read my full disclosure policy.

    After a string of not-so-nice words, I decided to try something new on the pet accidents.

    How To Get Pet Stains and Odors Out of Your Carpet without Chemicals

    First, I got my HomeRight Steam Machine Plus out of the hall closet, filled it with water, and plugged it in.

    Super easy way to get rid of that nasty smell! How To Get Pet Stains and Odors Out of Your Carpet without Chemicals

    Remember the steamer I used to clean that disgustingly gross shower of Grunt Labor’s? Ok, this is similar to that except its kind of like an all-in-one deal. Its a steam mop, but the mop head portion also comes off to make it handheld. I use that handheld deal to clean grout. Probably my favorite thing about this one is that it heats up in less than two minutes – thus why its great for pet accidents.

    Next, I took some paper towels and sopped up as much of the “accident” as possible with those.

    Super easy way to get rid of that nasty smell! How To Get Pet Stains and Odors Out of Your Carpet without Chemicals

    After that, I put the glider attachment (ok, that probably isn’t the technical word for that attachment, but its what I call it) on the mop head. It makes it super easy to use the steam mop on carpets and rugs – it just glides right over them, thus why I call it the glider attachment.

    Super easy way to get rid of that nasty smell! How To Get Pet Stains and Odors Out of Your Carpet without ChemicalsIt just pops on and off.

    Then I held the steamer over the spot where the accident occurred and steamed the heck out of it for 30 seconds or so.

    Super easy way to get rid of that nasty smell! How To Get Pet Stains and Odors Out of Your Carpet without Chemicals

    Then, I got another wad of paper towels and sopped up the area where I had just steamed to soak up any remaining “accident.”

    Super easy way to get rid of that nasty smell! How To Get Pet Stains and Odors Out of Your Carpet without Chemicals

    I repeated this process two more times.

    A little while later I assessed my work.

    Super easy way to get rid of that nasty smell! How To Get Pet Stains and Odors Out of Your Carpet without Chemicals

    No stain.

    And then I got down on all fours and sniffed.

    No smell.

    Victory is mine. 

    I should probably vacuum though.

    Now, if only I would have known this little trick five years ago, then we wouldn’t have had to throw out over $1000 worth of rugs.

    Nope, not kidding.

    Need more helpful cleaning tips?

    9+ Must Read Cleaning Tips – cleaning tips and tricks for all around the house.

    How to Clean a Disgustingly Gross Shower – you will not believe how gross it was or how clean it came.

    How I Clean My Entire Kitchen with One Single Thing – and it’s chemical free!

    You know you don’t wanna miss any of this crazy.

    Sign up to get my posts delivered to your inbox here.

    Stalk Me Here:

    Pinterest / Facebook / Twitter / Instagram

    pin-this-post

    Super easy way to get rid of that nasty smell! How To Get Pet Stains and Odors Out of Your Carpet without Chemicals

    SaveSave

  • Color Coded Organization

    Color Coded Organization

    Let’s get one thing clear.

    I am not an organization guru.

    Heck, I’m not really a guru of any sorts. I just fly my freak flag and do what works.

    I have my own weird methods for organizing and storing stuff.

    For example, the kid has three different boxes in her room for small toys.

    One holds things that could potentially be living: plastic dinosaurs, My Little Ponies, Smurf figurines, Little People, California Raisin figurines, etc.

    I don’t know where I come up with this stuff either.

    Or why I consider Smurfs and California Raisins to be potentially living things.

    Another box holds non-potential living things: wooden blocks and plastic easter eggs.

    I know, it makes no sense.

    And the last box holds paper items: stickers and things to write on.

    Shocking. One box actually makes sense.

    See what I mean when I say that I do what works for me?

    I knew you would get me – you’re my people.

    This is my latest “what works for me” organizing method:

    Color Coded Organization 

    And shockingly, this may actually make sense to more people than myself.

    This is such an easy organizing idea and it holds family members accountable for their mess! Color Coded Organization

    Disclosure: This post was a collaboration with Velvet Finishes. All opinions and ridiculous organization methods are 100% mine. This post contains affiliate links for your shopping convenience. Click here to read my full disclosure policy.

    Here’s the deal.

    I hate clutter.

    (Thus why I shared the 15 days to a Clutter Free Home Checklist last week.)

    That doesn’t mean clutter never happens around here.

    It happens all the time. 

    And then life happens.

    And I don’t have time to pick up all the clutter everyday because I was chasing the kid trying to make her keep her clothes on while its 30 degrees outside.

    In an effort to combat the clutter and at least corral it, I picked up cheap plastic bins and then assigned a color combination to myself, the kid, and Grunt Labor. The bins stay in the living room and each of our bins contain our own items. At the end of the week, we each go through our bins and put whatever has accumulated there over the week back into its proper place.

    Make sense?

    Good. Here’s how I made them.

    Color Coded Organization Bins

    Materials & Supplies Needed: 

    This is such an easy organizing idea and it holds family members accountable for their mess! Color Coded Organization

    • Plastic Bins (Mine were $3 each at Target in the Dollar Spot.
    • Paint Colors of your choice. (I opted to give these a bit of a cohesive feel by painting everyone’s bottom stripe, Modern by Velvet Finishes, a bold blue. The kid chose Bold, a bright yellow, for her other color, Grunt chose Vivid, which is a fabulous red hue, and I went girly and opted for Glamorous, a pink color.
    • FrogTape 
    • Paint Brush

    Steps

    Step 1: 

    Tape off where you want your stripes to be.

    This is such an easy organizing idea and it holds family members accountable for their mess! Color Coded Organization

    You could actually get much more creative and decorative than I did with this and opt for a different pattern or design. However, I am in a “simple” mode right now (probably also referred to as a lazy mode), so easy stripes were just the ticket.

    Step 2: 

    Paint your color on.

    This paint works on just about any surface! No priming needed on plastic - just brush it on!

    As I said above, I used all Velvet Finishes colors on these bins. To be honest, I wasn’t 100% sure if this paint would work on plastic – but it did. No priming it at all! That’s totally why my heart has been captured by this paint – its the lazy girl’s paint. 

    I did three light coats of each color and was impressed by the fact that I still got super saturated, pretty colors.

    Step 3: 

    As soon as you’ve painted on your final coat, remove the FrogTape. If you let the paint dry before removing the tape, you risk the tape pulling some of the paint off.

    Put the bins where everyone can easily access them and lay down the law.

    If you have crap in this room, it goes in your bin. 

    This is such an easy organizing idea and it holds family members accountable for their mess! Color Coded Organization

    Yea, I’m still working on getting the two year old to understand that.

    This is such an easy organizing idea and it holds family members accountable for their mess! Color Coded Organization

    I have to say, I was a little worried about these sticking out like a sore thumb with the decor, but I am digging their colorfulness.

    Have you done any color coded organization before?

    Or maybe you just have an organizing tip you want to share that doesn’t involve classifying Smurfs as potential living things??

    More Organization and Storage Ideas:

    5 Simple but Life-Changing Storage and Organization Ideas – super affordable too!

    10+ Kitchen Ideas for Decorating, Organizing and Storage – and they’re pretty!

    You know you don’t wanna miss any of this crazy.

    Sign up to get my posts delivered to your inbox here.

    Stalk Me Here:

    Pinterest / Facebook / Twitter / Instagram

    pin-this-post

    This is such an easy organizing idea and it holds family members accountable for their mess! Color Coded Organization

    SaveSave

  • 15 Days to a Clutter-Free Home…And Some Extra Cash

    15 Days to a Clutter-Free Home…And Some Extra Cash

    Every year, usually a day or two after Christmas, something very liberating happens at our house.

    No bra burning.

    No marches on the courthouse lawn.

    We purge.

    I go through every nook and cranny of this house and I get rid of stuff.

    Lots of stuff.

    And it feels so good. 

    And then after I’ve went through every nook and cranny, I start selling all that stuff.

    And I make a little money.

    And that feels damn good. 

    This year, I wanted you to get in on the excitement of purging and finding money, so I whipped up this little printable to share what I do.

    A Clutter Free Home in 15 Days | Clutter Organization | Storage Ideas | Organization Ideas for the Home | Organization Ideas for Clutter

    Yes.

    15 Days to a Clutter-Free Home

    And the extra cash – don’t forget the cash.

    Before you download the printable checklist though, let me be clear about something:

    This checklist will not organize your home. I don’t have the first clue how to teach you how to organize your home, because I don’t even know that I have a system for that – I just do whatever works.

    This checklist will help you de-clutter your home and free up some possibly much needed space.

    This checklist may not be anything new to you. That’s probably because these are real-life common sense things that you’ve probably done before. Sometimes, it just helps to have it in checklist form – I’m not the only one who gets a rush when I check something off, right?

    Alright, I think that’s my whole spill.

    Free Clutter-Free Home Checklist

    And by all means, if you’ve got some de-cluttering tips, please share them in the comments below!

    Looking for more organizing and de-cluttering tips?

    Here are five simple storage and organization ideas that are life-changing and don’t miss these 12+ Ideas for Organizing Your Home.

    If you like money (hehehe), you may also want to read these tips…

    How I “Find” Money – you know, when it doesn’t grow on a tree. 😉

    Three Things that Could Cut Your Electric Bill in Half – don’t miss these!

    You know you don’t wanna miss any of this crazy.

    Sign up to get my posts delivered to your inbox here.

    Stalk Me Here:

    Pinterest / Facebook / Twitter / Instagram

    pin-this-post

    A Clutter Free Home in 15 Days | Clutter Organization | Storage Ideas | Organization Ideas for the Home | Organization Ideas for Clutter

  • How to Restore Hardware in 5 Minutes

    How to Restore Hardware in 5 Minutes

    I am kicking myself, y’all.

    Kicking myself. 

    I’ve spray painted and Rub ‘N Buffed so many pulls and knobs over the years – I had no idea how to clean them.

    Don’t get me wrong – there are sometimes when you want a bold colored knob, but sometimes I just want that hardware restored to its former glory.

    I had no clue how to restore hardware to its former glory though.

    Until a few weeks ago.

    How to Restore Hardware | How to Clean Hardware | Kitchen Cleaning Tips | Kitchen Cleaning Hacks | Easy Cleaning Tips | Cleaning Hacks

    This post contains affiliate links for your shopping convenience. Click here to read my full disclosure policy.

    First off, thank you to Jennifer from Dimples & Tangles for sharing this product when she cleaned up some silver trays. She’s just awesome, y’all.

    How to Restore Hardware

    The hardware in the photo above is what was original to the vintage radio that I just turned into a bar cabinet. I almost spray painted them, but decided first to give Bar Keeper’s Friend a try.

    AMAZING! How to Restore Hardware in 5 Minutes (No painting, no wax!) via RainonaTinRoof.com

    I had only used it to clean real brass before, and I was pretty sure this hardware wasn’t real brass. I wasn’t sure if it would work or not, but it SO did!

    First, I ran some water over the hardware, then sprinkled the Bar Keeper’s Friend on.

    AMAZING! How to Restore Hardware in 5 Minutes (No painting, no wax!) via RainonaTinRoof.com

    Next, I took an old cloth that was a little damp and rubbed it around the hardware. These pieces had some nooks and crannies, so I took an old toothbrush to really get into those. Then, I just rinsed it off and let it dry.

    How to Restore Hardware | How to Clean Hardware | Kitchen Cleaning Tips | Kitchen Cleaning Hacks | Easy Cleaning Tips | Cleaning Hacks

    The top pull is from the same cabinet, just not cleaned yet.

    Is that not crazy?!

    I was totally baffled. And it took less than 5 minutes to clean it up!

    Have you used Bar Keeper’s Friend before to restore hardware or clean anything else? I want to know what else this bad boy will accomplish!!

    You can see this hardware in all its restored glory on the Vintage Radio turned Bar Cabinet.

    Also guys, this IS NOT a sponsored post for Bar Keeper’s Friend – I just wanted you to know how easy it can be to restore your hardware – put that spray paint down!

    Need another cleaning tip?

    Got rust? Here’s how to get rid of that…

    Or need to know how to cover old hardware holes?

    You know you don’t wanna miss any of this crazy.

    Sign up to get my posts delivered to your inbox here.

    Stalk Me Here:

    Pinterest / Facebook / Twitter / Instagram

    pin-this-post
    How to Restore Hardware | How to Clean Hardware | Kitchen Cleaning Tips | Kitchen Cleaning Hacks | Easy Cleaning Tips | Cleaning Hacks

    SaveSave