This is a sponsored conversation written by me on behalf of True Value. The opinions and text are all mine.
As you know, I’ve been on a purge streak lately. I’ve said good riddance to so much clutter in our house that I’m actually a little embarrassed by just how much we had. Quickly followed by the purging, a huge wave of motivation to get more organized arrived.
I mean, when you’ve cleaned out so much stuff, you don’t want to end up once more as a finalist for your own television show about your hoarding tendencies, right? So to prevent that and the sheer embarrassment of realizing just how much junk you had, you organize it.
And just let me tell you, organizing feels so good.
I just can’t even begin to tell you the amount of satisfaction I have gotten out of seeing a space come to its full organized potential. I don’t care how nerdy it makes me sound.
And let me just show you the latest shining example of this organization spree that took place in our garage.

Just look at that, y’all! I can actually find the tools I need when I need them. I’m not scrounging around through tool boxes and bags or banging my head on metal shelves in the tiny cramped closet in our garage that once held so many of our tools.
The sad thing about this whole thing is that we had this pegboard in our garage from the beginning.

We just never utilized it to its full potential. I’m equally ashamed and giving myself a swift kick in the rear end about that fact. Now, I can find things. I don’t have multiples of things I don’t need in various locations of the same room. And did you notice my new workbench?

I made that.
Well, I didn’t actually make the metal cabinetry part because I’m not that good, but I made those cabinets into a mobile workbench. That’s right – it can go anywhere and it was so easy to do. I’m not going to lie – after this space was completed, I actually just sat there and stared at it awhile. It makes me so happy, I just want to get out there and jump into a new building project.
Here’s how we made it all happen with the help of some products from True Value…
One-Stop Workshop: Pegboard Organization + DIY Mobile Workbench
Pegboard Organization
1. Get pegboard on the walls.
If you don’t have pegboard in your garage or workspace already, get some up. Like I said, we already had this in our garage when we bought the house, but had never utilized it. Pick up some pegboard panels and 2 x 4s from your local True Value. Determine where you want to hang your pegboard and locate the studs in that wall. Either nail or screw up the 2 x 4s along the studs, then attach the pegboard to the 2 x 4s with nails or screws.
2. Lay out tools and determine what hooks and accessories you need.
Next, I suggest laying out all the tools you want to get up on the pegboards and determine what kind of pegboard hooks and accessories will work best for hanging those items.

For our pegboard, I bought the following from True Value:
- Small Parts Storage Cabinet – this holds all our spare and random nails, screws, anchors, etc.
- 10 in., 8in., and 6in. Heavy Duty Pegboard Hooks – these are great for holding heavy items like power tools.
- Pegboard Hook Tool Holder – perfect for screwdrivers.
- 3-in-1 Tool Holder – awesome for scissors, random tools like electrical testers, pliers, etc.
- 4 inch Heavy Duty Double Prong Hook – holds two hammers on one hook and various other tools.
- 4 inch Straight Pegboard Hook – good for holding multiples of skinny tools like scrapers or single tools.
- Curved and Straight Single Pegboard Hooks – for holding single tools as needed.
- 16 Pack Peg Hook Kit – I bought two of these kits, which comes with various pegboard hooks.
- Utility Shelf – great for holding wood glue, measuring tapes, and anything else that can’t be hung on pegboard hooks.
- Towel, Tape or Twine Dispenser – will hold either a roll of paper towels, multiple rolls or tape or twine.
3. Get the tools on the pegboard.
I found that working from the bottom up works best. This is kind of a game where you just have to play around with the location of some of your tools and determine what fits best where.
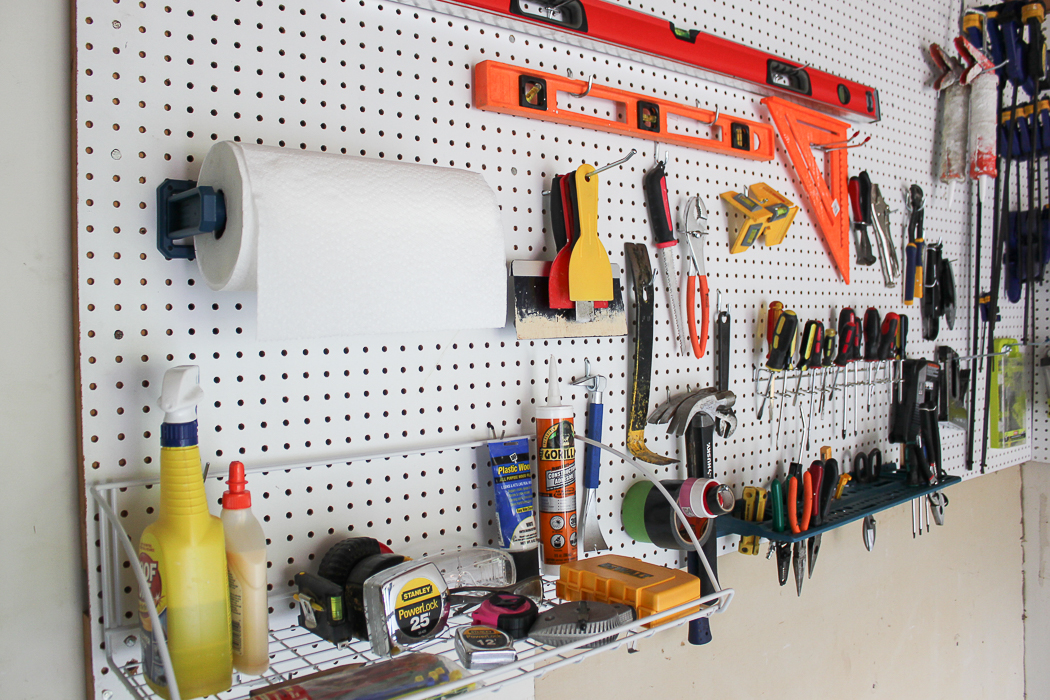
If you go with a paper towel holder, keep it lower for easy access. I suggest doing the same with the utility shelf as well.
Hanging multiples of the same tool types helps to save on space and utilize those hooks to their maximum potential. I did this with all of our rolls of tape, hammers, scrapers and more.

Use two single hooks, one on each side, for longer tools such as levels.
Organize your screwdrivers by type and put any single random tools that will fit in the 3-in-1 tool holder.

I grouped my clamps together by size and hung them up on single heavy-duty 8 and 10 inch hooks.

For the power tools, I used either two 6, 8, or 10 inch hooks to hold each power tool up deepening on its size.
For easy access to small parts such as washers, nuts, bolts, screws, nails, etc., I put the small parts storage cabinet in the lower corner of the pegboard and attached it with screws that went into the 2 x 4s holding the pegboard up. The video below for the DIY mobile workbench also touches on the pegboard organization.
DIY Mobile Workbench

You’ll Need:
- Two – Five Drawer Tool Chests on Wheels
- One sheet of 3/4 inch plywood, cut into the following sizes:
- Two pieces cut to 26 1/4″ x 17 3/4″
- One piece cut to 53 1/2″ x 18″
- Drill
- 1 1/4″ or 1 1/2″ Screws
Step 1
Lay a piece of the plywood cut to 26 1/4″ x 17 3/4″ into the top of each tool chest. Each chest has a rim along the top that will keep the wood from sliding out.
Step 2
Lay the long piece of plywood cut to 53 1/2″ x 18″ across both smaller sheets of plywood and the tool chests. Line up everything up nicely.
Step 3
Using either 1 1/4″ or 1 1/2″ screws and your drill, connect all three pieces of wood together. Put a screw in each of the four corners of each tool chest.
That’s it! I told you it was simple!
A few tips and ideas for the workbench:
- If you want to make the workbench top completely permanent, then before putting the smaller pieces of plywood on the tool chests, apply an adhesive such as Liquid Nails to the top of the chests, then put the plywood on top of that.
- You can also opt to leave the larger piece of plywood off the top and have two smaller mobile workbenches as well. This was initially our plan, but in the end we wanted to have the option for both a smaller and a larger workbench.
- If you ever want to remove the workbench top to transport it a farther distance, separate the chests or store it away, you can leave the top together and simply lift it off the tool chests as one piece.
Alright guys, I’m off to plot out my next project that puts this baby to use!
Do you have any great garage organization ideas to share?


This is a sponsored conversation written by me on behalf of True Value. The opinions and text are all mine.
Leave a Reply