This post is sponsored by HomeRight, however all opinions are 100% mine.Affiliate links may be contained in this post.
I won’t lie.
The sight of a beautifully bold painted piece of furniture (preferably either kelly green, navy blue or a bold red) makes my heart soar.
Not as much as Grunt Labor makes my heart soar, but pretty close.
However, I have come to really appreciate a good grain…a good wood grain that is, because chocolate isn’t a grain yet, is it? I’m still waiting for chocolate to be classified as “good” for me.
Here are a few of my favorite stained and painted furniture makeovers…
Stacy Risenmay is a lucky girl. Because all I want to do is steal her bedside table. The cobalt blue and stain combo is beautiful.
This is another shade of blue paired with stain that I think is stunning. Gail from My Repurposed Life made a hall tree from a door and sewing table. I’m usually not a big aged paint effect person, but I do love the depth the aging has on this shade of navy. She used her HomeRight Finish Max on this project.
A never fail combo is stain and white – especially on mid-century modern pieces like this one from While They Snooze.
My stripped and re-stained buffet makeover is one of my most favorite makeovers ever. I was actually a little worried about going back to stain after the piece had been a bold red, but it was totally the right decision. I used my HomeRight Heat Gun to strip it easily.
This idea from HomeJelly is nothing short of genius. She took an old dresser and turned it into a home gym. She stained the top and feet, but painted the rest with her Finish Max. Now, as much as I would like to think this piece would actually motivate me to work out, I’m probably wrong. The idea is still genius though. 😉
Are you a fan of stained and painted combination pieces?
Disclosure: This post was a collaboration with HomeRight. However, all opinions and corny post titles are 100% mine.
If the piece you are working on has a glossy or shiny finish, spray it down with Ready, let it sit for a few minutes, then wipe the piece down with paper towels until its no longer shiny.
Whether you used Ready or not, use a tack cloth to clean up any dust or dirt that might be on the piece.
Step 2:
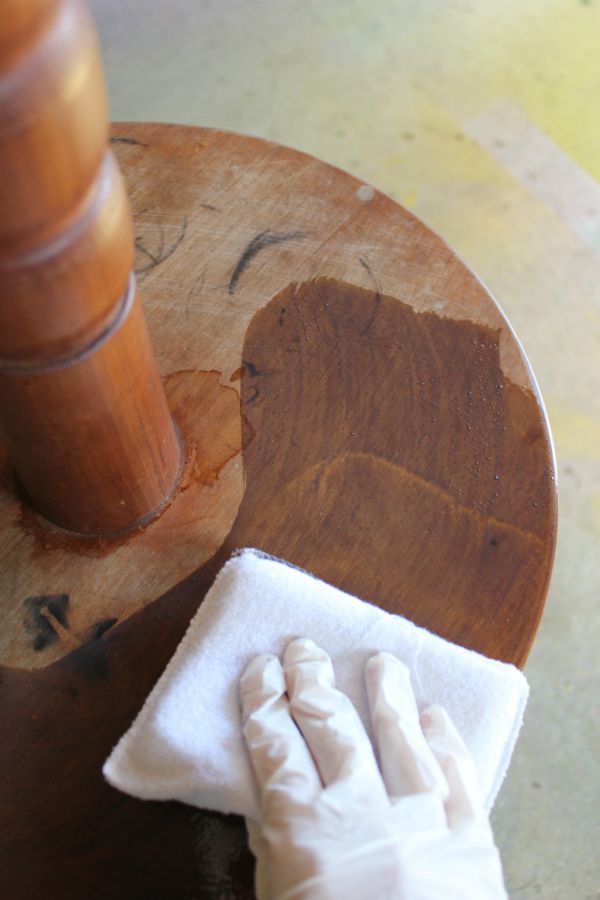
Put on the gloves (this will stain your hands if you don’t!) and pour a little Stain Restore onto a paper plate.
Use the stain pad (it comes with the Stain Restore) and soak up some stain restore.
Spread it onto the surface you are restoring.
You can spread it around however you want to, but make sure your final swipes are in the direction of the wood grain.
Step 3:
Let the Stain Restore dry and repeat as many times as needed or to get the color you want. I did four coats of the Stain Restore to cover my lamp.
You can just barely see the rings that were there in the beginning. I could have done another coat or two and covered them completely, but I didn’t want to go any darker with the lamp.
Stain Restore dries to a shiny, polyurethane type finish. You can add on a topcoat of Protect for more protection.
It may be considered out of style, but this girl is happy to have her Pap’s lamp in her living room.
And she thinks it looks just right.
Do you have any family heirlooms that need to be restored?
You know you don’t wanna miss any of this crazy.
Sign up to get my posts delivered to your inbox here.
Want to kick your wood finishing techniques up a notch? Try making your own bright colored wood stains then! With this tutorial, you’ll learn how to make custom stain colors easily.
After the amazing-out-of-this-world-discovery-that-changes-everything a few weeks ago (when I found out how to make furniture glazes in any color – ok. maybe I’m being a bit dramatic. Just a little bit though.)
I wanted to see if it would work as a wood stain too – on unfinished wood.
It did…
So now you will not only know how to make glazes in any color, but you’ll now know how to make colored stain too.
I KNOW.
AMAZING.
Disclosure: This post is a collaboration with Velvet Finishes. All opinions and color craziness is 100% mine. This post contains affiliate links for your shopping convenience. Click here to read my full disclosure policy.
Unfinished Wood (I picked up that cute tray and box at Hobby Lobby.)
Paint brush
Lint Free Cloth
Paper Cup or Plate
Steps
Step 1:
You mix up the stain the same way you mix up the glaze, because, well its the same stuff. The difference is in how you apply it.
Pour a small amount of clear glaze into your cup or plate. Dip your paintbrush into the paint you want to turn into your stain color. You don’t want much at all – then mix the glaze and paint together.
If you are worried about getting too much paint, then start with just a little bit, then add more if needed. The consistency should be pretty watery – similar to a stain. This is a water based stain.
If the stain seems too thick or too saturated with color, you can add water to it.
Step 2.
Using your paintbrush, brush the stain onto the wood. Unlike with painted wood, the unfinished wood will absorb the stain super quickly, so do light coats so you don’t get more color than you want.
If you want more color, do more coats. Wipe off any excess with a lint free cloth.
Take note: Different types of wood and wood grain will yield different results.
Step 3:
Let it dry. Since there isn’t much paint in the stain, I would suggest a coat of Protect or finishing wax to keep your piece pretty.
I created colored stains using the Clear Glaze and:
When it comes to wood staining, there are a few differences between staining regular wood and staining pressure treated wood. You can typically stain regular wood immediately. With pressure treated lumber, you might be able to stain it immediately or you might have to wait a bit. Read on to see how I was able to stain my new deck without waiting!
I am not a patient person.
I do not like to wait. On anything.
Good things come to those who wait, right? Well, I guess I’m more of a go out there and get it done now kind of girl.
Case in point, our new deck.
Yep, I said new deck. Over the past month, Grunt Labor built a deck. Isn’t he just awesome, y’all?
Of course that deck was built with pressure treated wood. Many people say you should wait at least six months before staining pressure treated wood.
Six months.
Negative.
Ain’t nobody got time for that.
So being a real rebel, I stained that pressure treated wood after only two weeks of the deck being completed.
All that being said, if you do have time to wait, then by all means wait.
Disclosure: This post is sponsored by Thompson’s WaterSeal. However, all opinions and impatient-ness are 100% mine. This post contains affiliate links for your shopping convenience. Click here to read my full disclosure policy.
Can You Stain Pressure Treated Wood?
Yes, you can absolutely stain pressure treated wood. The key is knowing when to stain it. As I said, it’s typically recommended that you wait six months before staining new installed pressure treated wood. But as I said, I did not.
I was able to do mine sooner because of a stain I used that is specifically for new pressure treated lumbers builds that can be used much sooner than the six month wait time. The stain I used was Thompson’s Waterproofing Stain.
To determine if your treated wood is ready for stain, simply flick a little bit of the stain onto the wood in a small spot. If the stain bubbles up on the wood, you are not ready to stain. If the stain soaks in, you’re ready to stain. After two weeks, my deck was ready for stain.
Staining Treated Wood
Because we all love a good before and after, here is the deck before staining:
I’m sure you are looking at that photo and saying, “Ummmm…..Jenna, sweetie, you do realize that there are no steps up or down to the deck, right? How are you going to use it?”
I have stellar jumping skills, y’all.Stellar.
Not.
The deck is right beside the screened-in porch and you access the deck through a soon-to-be-door from the screened-in porch. We could have put steps down from the deck, but we didn’t really want the dog running up there anytime she wanted. No steps also help to contain the kid. I can just let her go on the screened in porch and deck without me having to worry she will fall off it.
As you guys know, I am a fan of Thompson’s WaterSeal products. I used their spray stain to give my lattice and mailbox a quick makeover. For the deck stain, I turned to them again.
Tools and Supplies Needed:
Thompson’s WaterSeal Waterproofing Stain – I went with their Acorn Brown Waterproofing Stain in Transparent. You can also get it in semi-transparent. It only takes one coat and dries in two hours – perfect for impatient people like myself.
Stain Stick – makes it super easy to stain the deck floor boards.
Steps
Step 1.
Pour some of the stain into a container and stir the stain well.
Using a brush, apply the stain to the rails and spindles.
Don’t be scared when you see that the stain looks like this. When it first comes out of the can, it is this mauve-y brown color and I totally freaked out. It’s ok, though. It doesn’t dry like that.
This is what it looked like as I was brushing it on.
It does dry pretty quickly, but you need to give it two hours to fully dry or recoat – if you aren’t impatient like me and want a second coat. If you think you want a lighter stained deck, then definitely do multiple coats and have a cloth on hand to wipe up excess stain as you put it on.
Step 2.
You can also brush the stain on the floor, but I went with my HomeRight Stain Stick.
The Stain Stick has an attached stain pad and a padded roller that easily applies the stain into the crevices between each board. The stain is pulled up through the stick and you push it out as needed.
Let the stain fully dry before applying another coat or putting the deck to use.
A couple hours later this is what we had…..
That one single coat will act as a water repellent and protect the deck for three years. Holla.
Here’s a little close-up after the sun had went down a bit:
There were some places where I overlapped the stain a bit on the floor and it made it more dark. Ya know what, though? I like it like that – gives it a bit more depth and character.
Do you have any tips to share for staining treated lumber?
More outdoor projects you might just want to see…
DIY Cedar Planter Box – a beautiful planter box that’s great for also displaying your house numbers!
I told you that I kinda, sorta, maybe, sometimes ignore the outside of my house.
Well, a couple weeks ago it seemed as if spring was finally arriving here (it was a trick though!). It was sunny, it was nearly 70 degrees and the kid was at preschool (thank heaven).
I certainly did not want to coop myself up in front of this computer all day. I thought it was a good time to spruce-up the porch a bit – seeing as how I have not touched it since its makeover nearly three years ago. And when I did do the makeover, I got pregnant half-way through and failed to touch the lattice on account of being tired all the time.
At least that’s the excuse I’m giving.
So, on that beautiful day a couple weeks ago, I figured out how to stain wood the easy way and gave my lattice a much needed refresh.
How to Stain Wood the Easy Way
Disclosure: This post was a collaboration with Thompson’s WaterSeal. However, all opinions and witty remarks are 100% mine. This post contains affiliate links for your shopping convenience. Click here to read my full disclosure policy.
Seriously y’all, excluding drying time, this whole project took less than an hour.
I have no idea when the last time was that this lattice had been touched.
I hadn’t touched it since we bought the foreclosure and the house had sat vacant for a year before we got it. I know that the previous owner did not build the porch onto the front of the house, so I’m not sure if they ever spruced up the lattice or not.
Either way, the lattice definitely needed a facelift.
Ok, so let’s be real for a moment. Who really wants to stain lattice by hand? Do you see all those criss-crosses, nooks, and crannies? It would have taken forever for me to do this by hand. Like two days worth of preschool and ain’t nobody got time for that. The kid only goes to preschool two days a week and I need every second of that time to accomplish multiple projects.
To do the lattice, I didn’t tape anything off. I just took a piece of cardboard and held it up against the top of the lattice to keep the stain from getting on the painted wood. There were some places where the stain got on the painted wood, but it just wipes right off while wet or its an easy touch-up. Please excuse the fact that there is no picture showing me staining the lattice. I was all alone and I figured the roofers next door wouldn’t take time out of their work day to help a sister out.
Here is a during photo though. The lattice on the left had just gotten the first coat and was still wet.
Seriously y’all, I’m a little embarrassed to show you that photo. I don’t think I realized how bad the lattice was until I saw that huge difference.
I did two coats total and it took about three cans for all of the lattice.
Grunt Labor was quite impressed that I took some outdoor initiative when he got home. I didn’t tell him how easy it was. I just said I had worked all day and couldn’t possibly cook supper. hehehehe
There you have it, how to stain wood the easy way.
You can find Thompson’s WaterSeal spray stain at Wal-Mart and on Amazon.
Now, I no longer have an excuse to neglect the outdoors. But please, don’t tell Grunt Labor about my secret weapon!
Before we start this, I just have to say how touched I was by all of your sweet, sweet comments on my whole sappy dreams coming true post yesterday. Y’all seriously floored me and I’m still going through responding to each of you. All I can say is wow. I’m so blessed to have you as not only readers, but friends.
Ok, that’s all the sappiness I can do for one day. Onto the mailbox makeover.
Disclosure: This post is sponsored by Thompson’s, but ya’ll know how I roll, all opinions are 100% mine. This post contains affiliate links for your shopping convenience. Click here to read my full disclosure policy.
Does anyone else tend to sometimes forget about their outdoor decor? (Ooo, she’s rhyming this morning.)
I do. I don’t forget about my porch, but things like my mailbox that aren’t as close to my actual living space, often get overlooked. I tend to focus on decorating inside. Needless to say, my mailbox was looking rough.
Grunt Labor had put some stain on the mailbox post a couple years ago when we first moved in our beloved foreclosure. It hadn’t been touched since.
See what I mean? Now, those mums are the bee’s knees, Grunt Labor is an excellent gardener, but the mailbox needed a facelift.
This was my first rodeo with a spray stain. It worked just like a regular canned stain, except of course its a spray. But, just like with regular stain, you can wipe off any excess stain you don’t want depending on how dark you want the stain. I wanted my post pretty brown, so I didn’t wipe off any stain and I gave it two coats.
Just after the first and second coats, this is what the post looked like:
Don’t worry about that unevenness look, it all soaks in and evens out in the end. If you do have any runs though, you will want to wipe those away.
While the post was drying, I decided to give the numbers a facelift as well with a coat of green spray paint and I cleaned the bird poo off the mailbox itself. I’m sure my postman is grateful.
In under an hour the post was dry and I had the numbers and mailbox reattached.
Sorry, I have no idea how I managed to get that crooked of a picture.I’ve got high hopes that this will hold up its beauty for a while now! Have you used spray stains before?










 See what I mean? Now, those mums are the bee’s knees, Grunt Labor is an excellent gardener, but the mailbox needed a facelift.
 This was my first rodeo with a spray stain. It worked just like a regular canned stain, except of course its a spray. But, just like with regular stain, you can wipe off any excess stain you don’t want depending on how dark you want the stain. I wanted my post pretty brown, so I didn’t wipe off any stain and I gave it two coats.


