Tag: paint sprayer

  • How to Paint Baseboards

    How to Paint Baseboards

    Painting baseboards and all trim in general can be a tedious, time consuming task. After remodeling four homes, I’ve learned a few tips for all that tedious trim painting. Here are my tried and true methods for how to paint baseboards quickly. 

    When you decide to renovate a house, you pretty much know that the renovation will include painting just about every single room.

    But when you see that house the first couple of times, you are too caught up in the potential to realize just how much painting there is to do – and not just painting of walls, but also of ceilings. And baseboards. And basically all trim. And all doors. Oh and then all cabinets.

    And that’s when you want to go in a corner and cry and hide and ask yourself why, why, why did we do this to ourselves??? 

    Oh ok, that’s just me. 

    No it’s not. Admit it. You’ve been there or at least been in a similar situation. 

    Every single room, every single door, cabinet, baseboard and piece of trim have to be painted in the 70’s Landing Pad.

    Now, I wasn’t too concerned about how much time it would take to paint the walls – rolling doesn’t take too long. The same was true of the doors and cabinets – I would be able to spray a good portion of those with my paint sprayer.

    All the trim though – particularly all the miles and miles and miles of baseboards were causing a touch of anxiety.

    But get this – in the end, it took me about 30 minutes (minus drying time) to paint all the baseboards in the living room, dining room, and hallway of the 70’s Landing Pad. Let me give you an idea of how much baseboard that is:

    Living Room

    Painting Baseboards

    Dining Room

    How to Paint Baseboards Fast

    HallwayPainting Baseboards Fast

    That’s a heck of a whole lot of baseboards to paint. What I did in this case may not be ideal for everyone. Don’t worry though – I’m going to give you a few different methods for painting baseboards and you can determine which is best for you and your home.

    How to Paint Baseboards With a Paint Sprayer

    If you only have one small room to paint baseboards in or if you’re painting trim in a room full of carpet and furniture, then a paint brush is going to be your best option. Go on and skip ahead to method #2. If you have a ton of baseboards to paint though and you’re also ripping up carpet, then this might be for you. This method works best when you also have to paint the walls in the room as well.

    Supplies:

    Steps

    Step 1: Prep Work

    For us, we are having to replace all the flooring in the 70’s Landing Pad. When we pulled up the old flooring, we realized that when the house was built, the baseboards had been put right on top of the subfloor, instead of putting them about 1/4″ above the subfloor to allow room to slide new flooring under. Since this was the case, we carefully pulled off all the old baseboards, then put it right back on the wall, but 1/4″ higher. We actually used a scrap piece of our new flooring to place under the baseboard for measurement, then tacked it on to the wall.

    If you are not replacing your flooring, but still have miles and miles and miles of baseboard to paint, then you could take off your baseboards, mark where each one goes on the back and cover that with a piece of painter’s tape. Then, take the baseboards outside and use a paint sprayer to spray them (I’ll get to the specifics of that in a bit.)

    Fill any nail holes with wood putty, let dry and sand smooth (there’s a tutorial here for filling holes). If you have a gap between the top of your baseboard and the wall, fill it with caulk, smooth it and let it dry.

    Take all outlet covers off and tape over the outlets.

    Vacuum up any dust, dirt or debris that is surrounding the baseboards.

    Step 2: Get your paint and paint sprayer ready.

    Painting Baseboards with a Paint Sprayer

    The best paint for baseboards are ones with a semi-gloss or gloss finish. These are the most durable and scrubbable. These areas tend to get beat up quite easily and semi-gloss is easier to clean than flat, satin or eggshell sheens. Get out your paint sprayer and fill up the cup about 1/2 – 3/4 full, then thin your paint down to the correct consistency. There’s a guide here for thinning your paint.

    Adjust the spray pattern to be vertical by turning the air cap on the front of the sprayer as shown below.

    How to Paint Baseboards with a Paint Sprayer

    When the “wings” as I call them are horizontal, the paint will spray in a vertical pattern.

    Step 3: Paint the baseboards.

    Plug in the sprayer. Hold the Finish Max about 10 inches away from the baseboard.

    Tips for Painting Baseboards

    Pull the trigger and start painting. Stay in constant motion, but moving slowly across the baseboard. Don’t stay in one place for too long.

    How to Paint Baseboards Fast with a Paint Sprayer

    You can see how the paint will get on the wall and floor as well. This is why I said if you aren’t replacing the flooring or painting the wall, to pull the baseboards off and spray them outside. When you put them back up, fill the nail holes and touch up those spots with a brush. It will still save you loads of time if you have a lot of baseboard to paint.

    Let the paint fully dry before doing another coat. I did two coats total.

    If you did get some drips from staying in one place too long, then simply run your paintbrush over those before it dries.

    Tips for Painting Baseboards Fast

    I plan on using this method again in the master bedroom before laying the new carpet and in multiple rooms downstairs as well.

    How to Paint Baseboards with a Brush

    If you aren’t in the middle of a big home remodel and painting baseboards with a sprayer isn’t ideal for you, then you can still get a great finish on your baseboards with a good ol’ paintbrush.

    Supplies:

    Steps

    Step 1: Prep Work

    Fill nail holes with wood putty if needed, then let dry and sand smooth.

    If you have a gap or any cracks between the top of your baseboard and the wall, fill it with caulk, smooth it and let it dry. Do the same in corners where the baseboards meet.

    Wipe down all the baseboards with a wet cloth to remove any dust and dirt.

    Tape off the wall just above the baseboard and the carpet below the baseboard. You can also put plastic down on the ground if you’re worried you might get paint on your flooring.

    Step 2: Prepare your paint. 

    Mix the Floetrol with your paint as the instructions say to on the bottle. The Floetrol is excellent for reducing brush strokes in your paint finish after it dries. If this isn’t something you’re worried about, you may skip this step.

    Step 3: Paint the baseboards.

    Dip your paintbrush only about 2/3s of the way up the brush into the paint. Remove excess paint from the brush by gently wiping the brush along the sides of the paint tray or container.

    Brush the paint onto the baseboards in long even strokes. Do not go back and forth. Go in one direction.

    Step 4: Repeat.

    After the first coat is dry, give the baseboards a second coat if needed. After the final coat of paint, immediately remove the tape from the wall and floor to prevent the new paint from peeling off the baseboards.

    Have any tips or tricks you can add for painting baseboards?

    You might also want to see…

    How to Paint Trim and Doors: A step-by-step guide for painting trim and doors including what kind of paint to use, what the best tools are and how to get a professional paint job.

    How to Paint Doors and Trim

    pin-this-post-2

    Painting Baseboards

    blog-signature-summer-15

    You know you don’t wanna miss any of this crazy.

    Sign up to get my posts delivered to your inbox here.

    Stalk Me Here:

    Pinterest / Facebook / Twitter /  Instagram

    Disclosure: This post was a collaboration with HomeRight. However, all opinions and baseboard painting hacks are 100% mine.

  • The Circus’ Yellow Bookshelf Makeover

    The Circus’ Yellow Bookshelf Makeover

    This project was sponsored by HomeRight, however all opinions are 100% mine. 

    About a year ago, a friend and I went out one Saturday morning thrifting. We got to the first stop, but it was wasn’t opened yet. However, outside was a bookshelf. A bookshelf that wasn’t anything to write home about – except for the doors and the hardware.

    She used a paint sprayer to paint this piece of furniture and it looks so simple! Yellow Bookshelf Makeover | Furniture Makeover | Furniture Painting

    The bookshelf had a price tag of $40. I had no need for a bookshelf – but those doors…and that hardware.

    We drove down to another thrift store until the other one opened. Upon returning to the thrift store with the bookshelf, there was a woman eyeing my the bookshelf. The store still hadn’t opened yet. The woman was eyeing the bookshelf quite intensely. As the store doors opened, I decided I couldn’t let this bookshelf go. So I did what anyone else would do in my situation. I did a quick side shuffle or two and ran through the doors as soon as the owner opened them and proclaimed I would be buying the bookshelf – probably a bit louder than necessary.

    And then the bookshelf sat in my garage for the better part of a year and I kind of started to feel a little bad for stealing it away from the other lady when I hadn’t even figured out to do with it.

    I got over that real quick though after I realized it would be perfect in the Circus’ new room.

    She used a paint sprayer to paint this piece of furniture and it looks so simple! Yellow Bookshelf Makeover | Furniture Makeover | Furniture Painting

    This was such a simple makeover, but some serious BAM as well with that bold yellow.

    Simple Bookshelf Makeover

    This post contains affiliate links for your shopping convenience. Click here to read my full disclosure policy.

    Tools & Supplies

    Steps

    Step 1:

    Before painting anything, I cleaned this bad boy up. I sprayed Ready, a liquid spray primer, on the piece to remove dust, dirt and dead bugs that the bookshelf had housed in the garage.

    Step 2:

    This bookshelf had some laminate in some places. To make sure my paint stuck to those spots well, I gave the entire bookshelf a coat of Kilz Primer before painting the piece yellow.

    yellow-bookshelf-makeover-8

    It’s important to strain the paint before putting it in your sprayer.

    She used a paint sprayer to paint this piece of furniture and it looks so simple! Yellow Bookshelf Makeover | Furniture Makeover | Furniture Painting

    Even if it is brand new paint, I suggest straining it. I just picked up a cheap strainer at TJMaxx and use it as my paint strainer. After straining the paint, add water to thin it. The Finish Max comes with an instruction manual that tells you how to thin your paint. It also comes with a handy little tool to use so you know when it’s thinned enough.

    How to thin paint with the HomeRight Finish Max Paint Sprayer

    I’m borrowing this image from a previous post as I neglected to take a picture of me using my handy little tool during this project.

    After adding water to the paint and mixing, simply dip the viscosity cup into the paint and count how many seconds it takes the paint to run out of the cup. For latex paints, properly thinned paints should run out in 25-40 seconds. If you’re in that timeframe, you’re good. If you’re not, add more water.

    After thinning your paint properly, spray the paint onto your piece standing about 5-10 inches away from the piece you are painting. (If you’ve never used a paint sprayer before, there’s a complete how-to here.) Clean out your paint sprayer afterwards.

    Step 3:

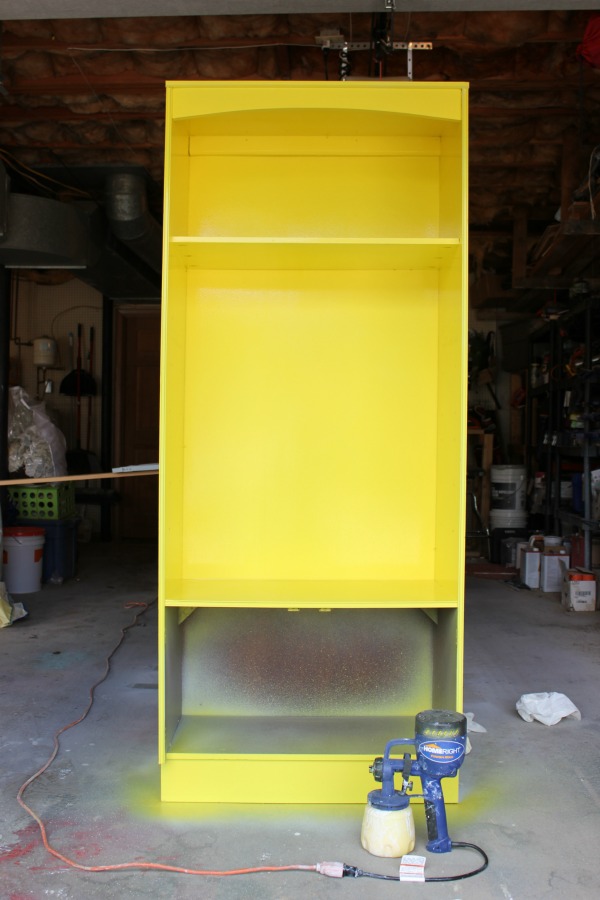
    After letting the primer dry, load your paint sprayer up with your choice of paint color. Once more, remember to strain and thin the paint. Step back and spray the paint onto your furniture.

    She used a paint sprayer to paint this piece of furniture and it looks so simple! Yellow Bookshelf Makeover | Furniture Makeover | Furniture Painting

    I did two coats of yellow.

    She used a paint sprayer to paint this piece of furniture and it looks so simple! Yellow Bookshelf Makeover | Furniture Makeover | Furniture Painting

    I laid out my actual shelves and doors on sawhorses and tables to paint them.

    Step 4:

    After your piece is dry, I suggest following up with a topcoat to help protect the finish. I used a semi-gloss polycrylic, which actually doesn’t have to be thinned, but should be strained before putting it into your paint sprayer. I did one coat of the topcoat.

    She used a paint sprayer to paint this piece of furniture and it looks so simple! Yellow Bookshelf Makeover | Furniture Makeover | Furniture Painting

    Isn’t it adorable? Of course, I haven’t filled it with all her books yet, I just wanted a few on there for now to give you an idea of how it would look.

    She used a paint sprayer to paint this piece of furniture and it looks so simple! Yellow Bookshelf Makeover | Furniture Makeover | Furniture Painting

    I do like the idea of mixing in the stuffed animals with the books – makes it a little more decorative.

    I can’t believe I just referred to stuffed animals as decorative. I guess that’s what happens when your kid owns more of them than an actual zoo has animals.

    She used a paint sprayer to paint this piece of furniture and it looks so simple! Yellow Bookshelf Makeover | Furniture Makeover | Furniture Painting

    I used Bar Keepers Friend to clean up the hardware.

    What do you think of the yellow? Is it too bold for you?

    You might also want to see…

    The Ultimate Guide for How to Use a Paint Sprayer - from set-up to thinning the paint to an easy clean-up, its all here!

    How to Use a Paint Sprayer

    SO adorable! She used a paint sprayer to paint this piece of furniture and it looks so simple! Yellow Bookshelf Makeover | Furniture Makeover | Furniture Painting

    Disclosure: This post was a collaboration with HomeRight, however all opinions and running ahead of people to buy something I want is 100% mine.

    SaveSave

  • Power Tools 101: The Ultimate Guide to Using a Paint Sprayer

    Power Tools 101: The Ultimate Guide to Using a Paint Sprayer

    I had a revelation the other day.

    A hold-the-phone-shut-the-front-door-smack-myself-on-the-head revelation.

    I realized that for two years I’ve been showing you all these awesome (if I do say so myself) furniture makeovers that I’ve completed with my paint sprayer, but never once have I actually told you how to use the paint sprayer from start to finish.

    See why I smacked myself on the head? 

    So here it is. The ultimate guide for how to use a paint sprayer from set-up to cleaning.

    Sorry for the two year delay.

    This post is sponsored by HomeRight, however all opinions are 100% mine. Affiliate links may be contained in this post.

    How to Use a Paint Sprayer | Using a Paint Sprayer on Furniture | Paint Sprayer Tips | Paint Sprayer for Furniture Makeovers

    This post contains affiliate links for your shopping convenience. Click here to read my full disclosure policy.

    How to Use a Paint Sprayer

    First off, let me say that the directions and tips in this post only pertain to the HomeRight Finish Max paint sprayer – the sprayer that I have used for the past two years. While other paint sprayers, may operate similar to this one, I can’t give exact instructions for those as I can this one. And yes, I am a HomeRight Brand Ambassador, but even if I weren’t, I would still use and sing the praises of the Finish Max. You are talking to the girl who tried three paint sprayers prior to finding the Finish Max and every single one of them went back to the store and she swore off paint sprayers forever.

    And then she ate her words. 

    But it was worth it.

    Before you get out your paint, first setup your painting area.

    The Ultimate Guide for How to Use a Paint Sprayer - from set-up to thinning the paint to an easy clean-up, its all here!

    The Spray Shelter is a little big gem. While there isn’t as much overspray as I’ve seen with other sprayers, there is still some with the Finish Max and this baby helps to contain it. Setup is easy and takes less than 10 minutes. The spray shelter doesn’t have a “bottom” so to speak, so if you are concerned about getting paint on your floor, you’ll want to put a tarp down under the shelter. As you can see, I don’t worry with that. A rainbow garage floor never bothered me.

    Also, if the piece I’m painting is smaller, I will set it up on sawhorses so I don’t break my back bending over.

    Now, let’s get down to business.

    Step 1:

    Unscrew the paint container from the sprayer and fill it with paint. If your paint is old (like a month or more), you will want to strain it.

    The Ultimate Guide for How to Use a Paint Sprayer - from set-up to thinning the paint to an easy clean-up, its all here!

    Once paint has been opened, it can sometimes get lumps that dry up in it and if not strained, those lumps will clog your sprayer. To strain my paint, I just use a cheap $3 strainer that I found at Target, I think.

    Fill the container about 1/2 to 3/4 full depending on the size of your project.

    Step 2: 

    Thin the paint.

    To thin the paint, all you need to do is add water. I usually try to have a cup of water nearby. Add a little at a time. Start with about 1/4 of a cup of water for thinner paints and 1/2 cup for thicker paints – you can always add more. Stir as you add water.

    The Ultimate Guide for How to Use a Paint Sprayer - from set-up to thinning the paint to an easy clean-up, its all here!

    The big question is always, “How do I know if I’ve thinned my paint enough?” Ya know what? That used to be my question too! One more reason I love this paint sprayer is because it takes the guesswork out of thinning.

    The Ultimate Guide for How to Use a Paint Sprayer - from set-up to thinning the paint to an easy clean-up, its all here!

    The Finish Max comes with a little tool called a viscosity cup. Once you’ve added water to your paint and mixed, dip the viscosity cup in the paint cup and time how long it takes the paint to run out of the cup. If you’re using a basic enamel paint, the paint is thinned enough if it all runs out of the viscosity cup in 25-40 seconds. If the paint doesn’t run out of the cup within that time frame, add more water, mix and test it again. Repeat until your paint is thinned properly.

    Let me stop here and talk about other materials you can use in the paint sprayer and whether or not you should thin them.

    You can use:

    Oil Based or Latex Based Paint – Needs to be thinned, 25 – 40 seconds run-out time.

    Clear Sealer (Polycrylic) – No thinning required.

    Polyurethane – No thinning required.

    Primer – Needs to be thinned, 30 – 45 seconds run-out time.

    Stain – No thinning required.

    Varnish – Needs to be thinned, 20 – 50 seconds run-out time.

    Its also important to note that many oil based paints recommend thinning with something besides water. Be sure to check the material’s label to see what it says about thinning the paint.

    Step 3: 

    Adjust your spray pattern.

    To adjust the spray pattern, turn the air cap on the front of the sprayer that has the “wings” as I like to call them.

    The Ultimate Guide for How to Use a Paint Sprayer - from set-up to thinning the paint to an easy clean-up, its all here!

    Turning the wings horizontally will give you a vertical spray pattern and turning them vertically will give you a horizontal spray pattern. If I intend on spraying something up and down as I spray, I use a horizontal spray. If I intend on spraying something from side to side, I use a vertical spray.

    You can also turn the wings at a 45 degree angle and spray horizontal or vertically, but honestly, I don’t think I’ve ever used that method.

    Step 4: 

    Plug in the sprayer and paint.

    Another one of my favorite features of the sprayer is that it doesn’t need an air tank – just an extension cord.

    how-to-use-a-paint-sprayer-12

    When you start spraying, hold the sprayer about 5-10 inches away from the piece you are painting. Pull the trigger and start painting. You want to move your entire arm – not just your hand – as you spray, and keep your arm in constant motion. Don’t stay in one place for too long.

    The Ultimate Guide for How to Use a Paint Sprayer - from set-up to thinning the paint to an easy clean-up, its all here!

    The sprayer won’t magically cover the entire piece in one coat. Typically, I have to do 2-3 light coats, but it takes far less time to spray those coats than hand paint them. There will probably be some small spots that don’t have paint on them the first go around – that’s ok  – you’ll get them next time. You can tilt the sprayer to get into hard to reach places, just try not to tip it anymore than 45 degrees. Let the paint dry between each coat. You can protect your paint job with a topcoat (see thinning instructions above), using the sprayer exactly the same way.

    Step 5:

    Clean-Up.

    After you are done painting, first clean out the paint container cup and the paint pick-up tube. If you did any tilting of the sprayer, you’ll also want to clean out the area where the container cup gets screwed on. Set the cup aside, but re-attach the paint pick-up tube. To clean the rest of the sprayer, attach the black faucet attachment end of the Rapid Clean to your water hose and the tube end to the pick-up tube. Clamp both ends.

    The Ultimate Guide for How to Use a Paint Sprayer - from set-up to thinning the paint to an easy clean-up, its all here!

    Turn on the water, pull the trigger and let the water run through the sprayer until it runs clear.

    The Ultimate Guide for How to Use a Paint Sprayer - from set-up to thinning the paint to an easy clean-up, its all here!

    And that’s it – the Rapid Clean makes cleaning the sprayer so easy.

    Have any of you used a Finish Max paint sprayer before? Any tips or tricks you can share with us?

    Want to come back to this paint sprayer guide later? Just pin the image below!

    How to Use a Paint Sprayer | Using a Paint Sprayer on Furniture | Paint Sprayer Tips | Paint Sprayer for Furniture Makeovers