Tag: mid-century

  • Two-Tiered Table Makeover | How to Remove the Top Tier

    Two-Tiered Table Makeover | How to Remove the Top Tier

    This post is sponsored by Velvet Finishes, however all opinions are 100% mine.

    I see these little two-tiered end tables all the time at thrift stores and yard sales. For the most part, I tend to pass them by. Some are pretty nice, but I’ve just never been a big fan of the whole two-tiered aspect of these tables. I know it was hot back in the day, but just not up my alley.

    I don’t know why taking the top tier off though never occurred to me before now.

    I guess I needed to see one of these little guys that had really great lines.

    Two Tiered Table Makeover - How to remove the top tier! Such a great diy furniture makeover idea!

    Like this Mid-Century Modern style one that I happened upon at a local thrift store.

    At first glance, I was like, “Oh man, I wish it wasn’t two-tiered.”

    Then, I thought, “Wait! I bet I can cut that off!”

    So I snatched it up, brought it home and got to work.

    And it was so much easier than I ever thought it would be.

    Two-Tiered Table Makeover | How to Remove the Top Tier

    Tools & Supplies

    Steps

    Step 1

    Flip the table over and look for where the top tier is attached. Using a screwdriver, wrench or your hands, remove the screws or bolts holding the tier on.

    Two Tiered Table Makeover - covering the old holes.

    Mine had four nuts and bolts holding it in place. I was able to just unscrew them with my hands. I also unscrewed the legs of the table just to get those out of the way while I was working on it.

    Step 2

    Find four small pieces of wood that will cover the holes where the screws had been.

    Two Tiered Table Makeover - covering the old holes.

    I had a paint stick on hand so I just cut four small pieces from it.

    Step 3

    Place wood glue around the holes on the underside of the table, then place a small piece of wood over each hole pressing it firmly into place.
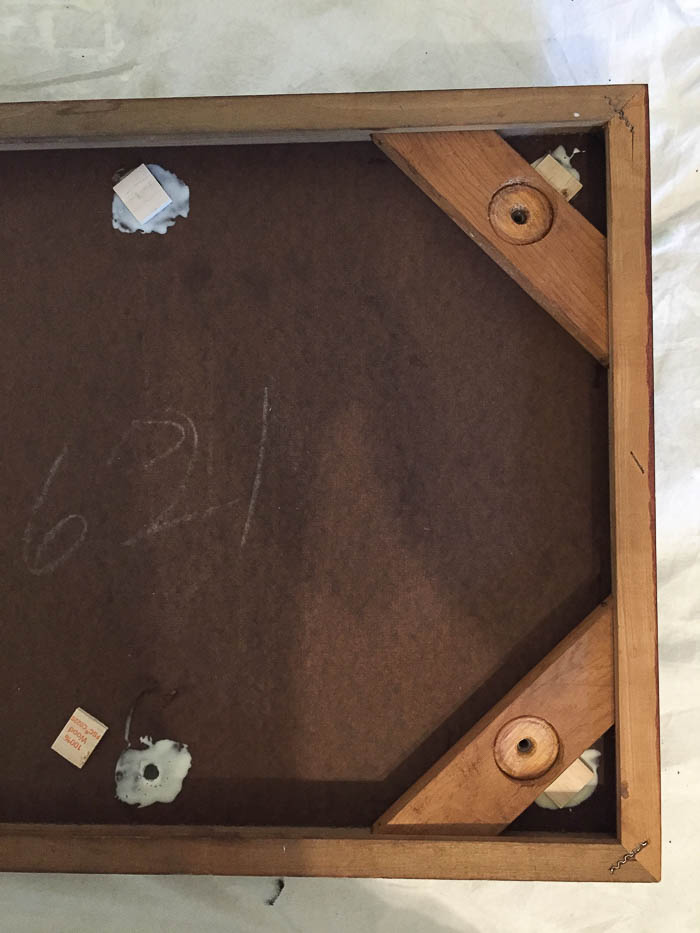
    Two Tiered Table Makeover - covering the old holes.

    Let these sit for at least a few hours.

    Step 4

    Flip the table over and fill the holes on top where the tier had once been with wood filler.

    Two Tiered Table Makeover - covering the old holes.

    Since these holes are pretty deep, you’re probably going to have to fill the holes a few times. I found it best to fill the hole, let dry, sand smooth, repeat. I did this about three times before the holes were even with the table.

    Step 5

    Once the wood filler is dry, smooth and even, you’re ready to start prepping and painting.

    Two Tiered Table Makeover - painting supplies.

    This table had a really shiny finish on it. In order for the paint to get the best adhesion, that finish needed to go before applying the paint. To do that, I used Ready.

    Two Tiered Table Makeover - prep it with Ready to remove old shiny finish.

    Ready is a spray primer / deglosser. You just spray it on, let it sit for a few minutes, then wipe it clean with a towel. Ready also cleans away dust at the same time. For this table, I had to do three rounds of Ready to get the shine gone.

    Step 6

    Let the table fully dry and then you’re ready to paint.

    Two Tiered Table Makeover - paint it

    I opted to go with Luxurious for the table top. It’s black, but not a super deep black. I was leaving the legs as they were so I knew black would go well with those stained legs. I did two coats of Luxurious on the table. This Velvet Finishes paint has great coverage – I know this is a small table, but I bet I didn’t use more than 1/2 –  3/4 of a cup of paint.

    Step 7

    After the Luxurious paint was dry, I gave the table a coat of Protect.

    Two Tiered Table Makeover - topcoat.

    Velvet Finishes paint already has a topcoat built-in, but since this little table might see a lot of action as a coffee table, end table, etc., I wanted to go on and give it some added protection. All you need is one coat of Protect and you just brush it right on.

    After the table was dry, I put the legs back on just as they were. They weren’t in too bad of condition and y’all know I love a good paint and stain combination anyway.

    Two Tiered Table Makeover - How to remove the top tier! Such a great diy furniture makeover idea!

    I think removing that top tier makes the table much more functional. It can be a great coffee table for a smaller room, it could still be an end table / side table, or it could even be a bench!

    Two Tiered Table Makeover - How to remove the top tier! Such a great diy furniture makeover idea!

    Sidenote: That Seventies Glamour book is one of my all-time faves. 😉 It has a totally corny cover, but the photos inside are awesome. 

    Two Tiered Table Makeover - How to remove the top tier! Such a great diy furniture makeover idea!

    Two Tiered Table Makeover - How to remove the top tier! Such a great diy furniture makeover idea!

    I won’t be so quick to pass up those little two-tiered tables anymore! What about you?

    You might also want to see…


    How to Turn a Side Table Into a Bench– one of my all time fave hacks!

    Mid-Century Modern Dressing Table Makeover in a Day – such a beauty that still gives a nod to it’s 60’s roots!


    Pin This Post

    Two Tiered Table Makeover - How to remove the top tier! Such a great diy furniture makeover idea!

    SaveSave

  • Mid-Century Modern Dressing Table Makeover

    Mid-Century Modern Dressing Table Makeover

    This post is sponsored by Velvet Finishes, however all opinions are 100% mine. Affiliate links may be included in this post, which means if you purchase something through one of those links, I may earn a small commission, but you won’t pay a dime more.

    This project is the kind of project that keeps me going sometimes. It’s just another furniture makeover. Nothing groundbreaking. Nothing phenomenal. I won’t be able to fill up my retirement account with it.

    But this little mid-century modern dressing table makeover made me feel a little bit better about the past few weeks I’ve been having.

    Mid-Century Modern Dressing Table Makeover - a painted and stained furniture makeover combination with Velvet Finishes.

    About four out of five projects I’ve had on my to-do list either didn’t happen, didn’t go as planned at all or just flat out went up in smoke.

    And then this little piece came along and renewed my hope in my DIY self.

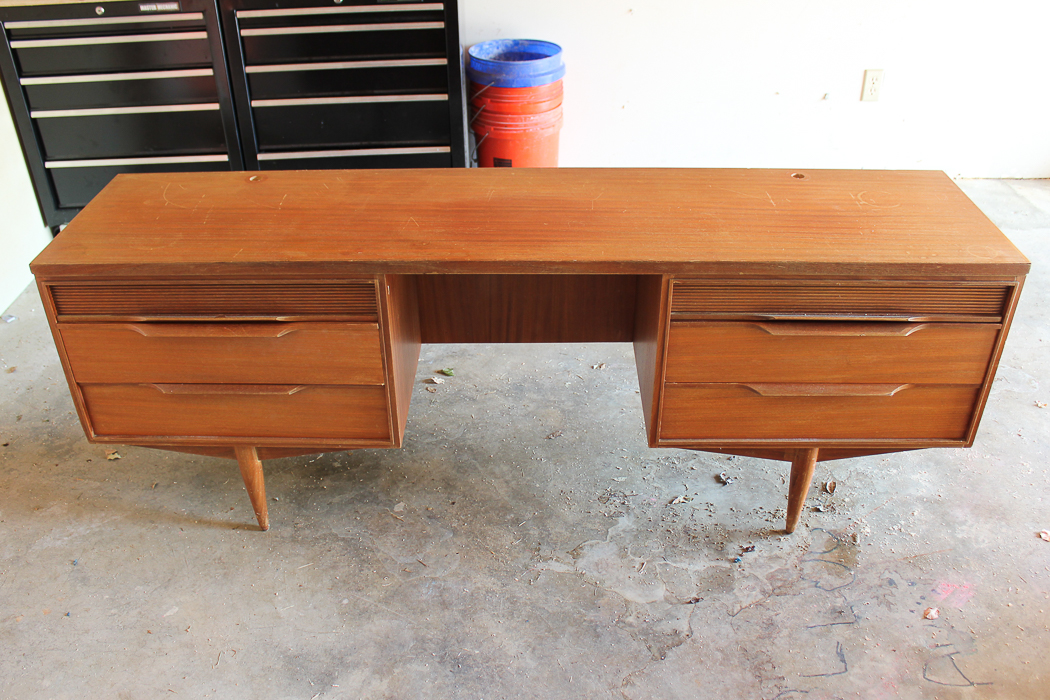
    I started with this…

    Before: Mid-Century Modern Dressing Table Makeover - a painted and stained furniture makeover combination with Velvet Finishes.

    I’ve had this piece for a while and found her at a rummage sale. Judging from the holes on top of her and space in the middle, I think she was once a beautiful mid-century modern dressing table with a mirror across her top.

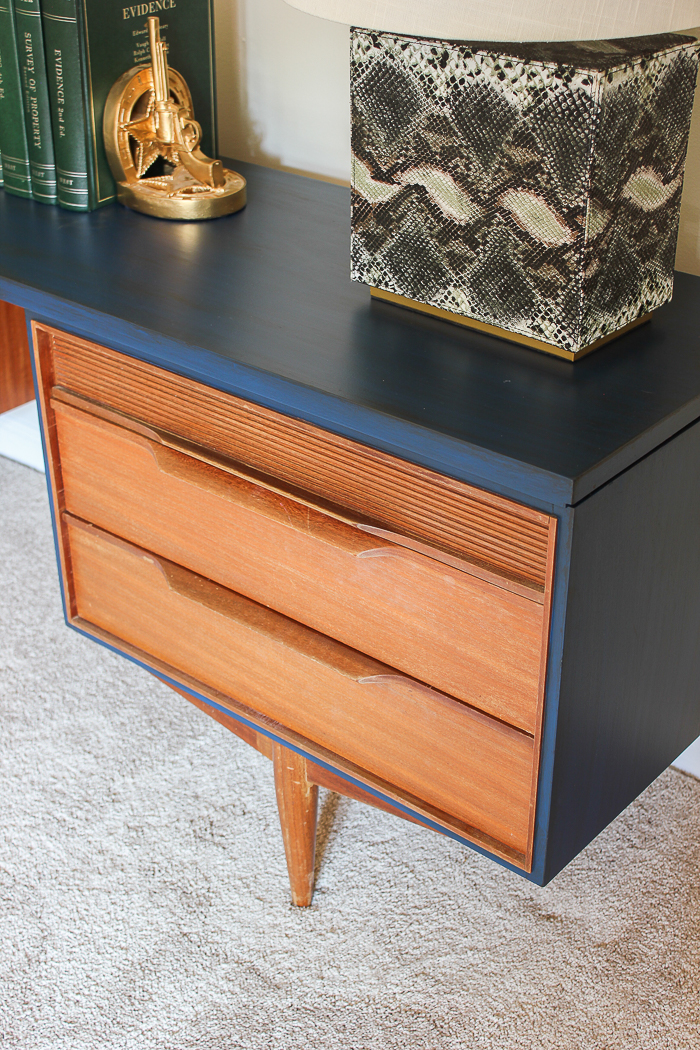
    Now, I’m not usually one to paint wood that’s in good condition. The funny thing about this piece was that her top and sides were in really rough condition, lots of nicks, scratches and of course, those holes on top where a mirror once was, but the drawers were in excellent condition. Oh, the glorious drawers – aren’t the details on them just beautiful!

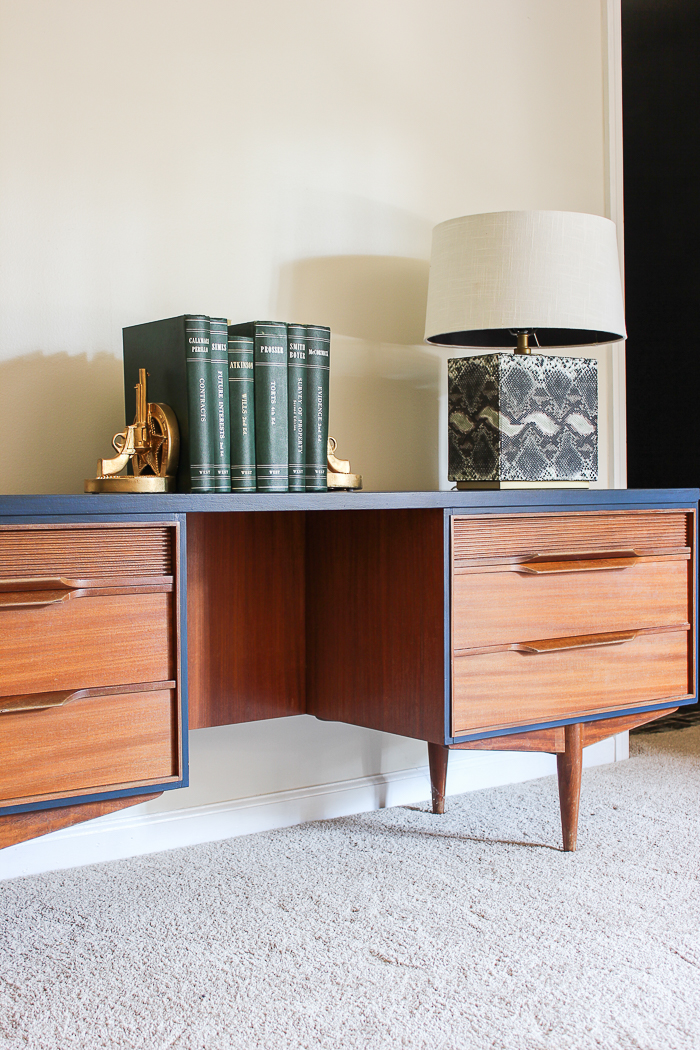
    So I thought about it for a while and knowing that I really didn’t want to cover up those drawers with paint that were in great condition, I instead opted to just paint the top and sides of this piece and leave the drawers untouched.

    And it turned out perfectly – went off without a hitch – in just a day.

    See how my faith was restored now?

    Mid-Century Modern Dressing Table Makeover

    Tools & Supplies

    Mid-Century Modern Dressing Table Makeover - a painted and stained furniture makeover combination with Velvet Finishes.

    I used:

    Steps

    Step 1

    First, I filled those holes on top of the table and fixed any deep scratches, dents and dings that were there as well. I used wood filler and sandpaper to smooth it out. There’s a tutorial here for how to fill holes.

    Step 2

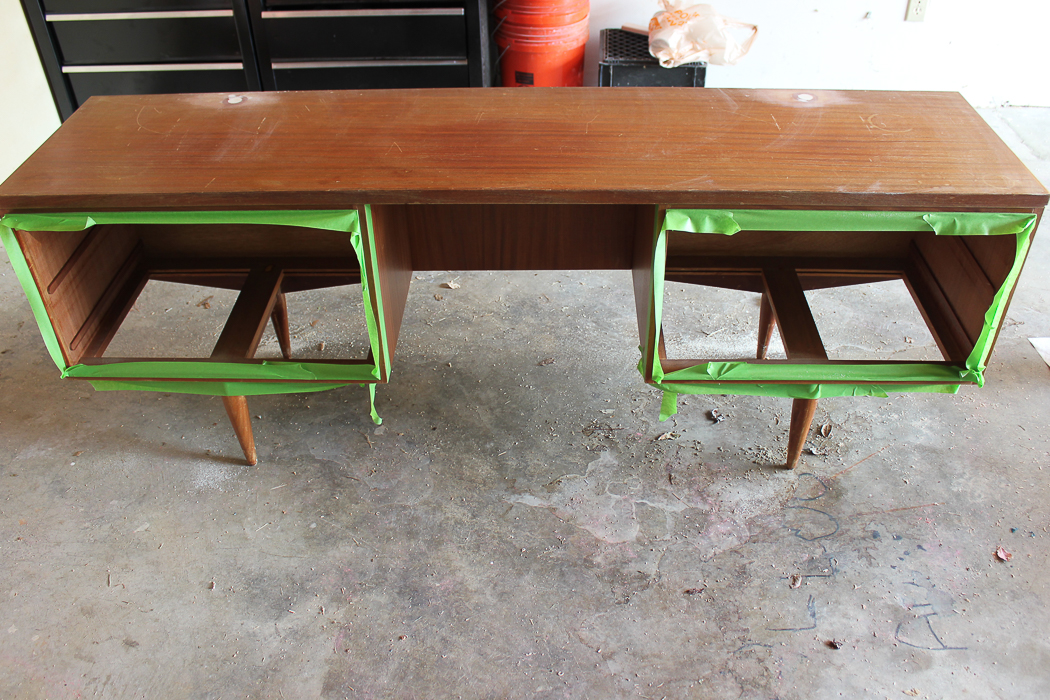
    Next, I removed the drawers and taped off around the edges of the trim that went around those – I wanted to keep that part stained as well.

    Mid-Century Modern Dressing Table Makeover - a painted and stained furniture makeover combination with Velvet Finishes.

    Basically, I just wanted to paint the exterior frame of the table. I also ran FrogTape along the upper part of the legs to make sure I didn’t accidentally get paint on them.

    Step 3

    This piece had a bit of shiny topcoat left on it where I was planning to paint, so I needed to remove that in order to get my paint to adhere well to the surface there. To do this, I used Ready.

    Mid-Century Modern Dressing Table Makeover - a painted and stained furniture makeover combination with Velvet Finishes.

    I just sprayed it on the top and sides of the table, let it sit for a few minutes, then wiped it down with a clean cloth. This removes the shine and cleans at the same time. I was careful not to get the Ready on any part that wasn’t getting painted though.

    Step 4

    After that, I gave the piece two coats of Velvet Finishes Handsome, which is a perfect navy color.

    Mid-Century Modern Dressing Table Makeover - a painted and stained furniture makeover combination with Velvet Finishes.

    I just brushed the color right onto the piece with one of the Reviver series paint brushes. Paint glides on really smoothly with these brushes.

    Step 5

    Since stained wood has so many different variations in its finish, I didn’t want a stark contrast between the navy painted top and sides and the stained drawers on this piece. So to add more dimension to the painted portions, I applied Enhance Dark Glaze to the painted portions after the paint had dried.

    Mid-Century Modern Dressing Table Makeover - a painted and stained furniture makeover combination with Velvet Finishes.

    The glaze is really simple to apply.

    Mid-Century Modern Dressing Table Makeover - a painted and stained furniture makeover combination with Velvet Finishes.

    You just brush it on, let it sit for a minute or two, then gently wipe the excess away.

    Mid-Century Modern Dressing Table Makeover - a painted and stained furniture makeover combination with Velvet Finishes.

    You want to wipe it away very lightly. I ended up doing two rounds of the Enhance glaze to get the look I wanted.

    Mid-Century Modern Dressing Table Makeover - a painted and stained furniture makeover combination with Velvet Finishes.

    Similar Gun Bookends

    Enhance Glaze also works as a topcoat, so even though Velvet Finishes paint already has a topcoat built-in, this piece will have even more added protection. Isn’t the depth the glaze added gorgeous? I love it with the Handsome paint.

    Mid-Century Modern Dressing Table Makeover - a painted and stained furniture makeover combination with Velvet Finishes.

    Similar Snakeskin Lamp

    I think this piece would make a great media console.

    Mid-Century Modern Dressing Table Makeover - a painted and stained furniture makeover combination with Velvet Finishes.

    Similar Snakeskin Lamp / Similar Gun Bookends

    Cheers to a project finally going off without a hitch, friends!

    You might also want to see…

    How to Turn a Side Table into a Bench

    How to Make Furniture Glaze in Any Color

    Pin This Post

    Mid-Century Modern Dressing Table Makeover - a painted and stained furniture makeover combination with Velvet Finishes.

    SaveSaveSaveSaveSaveSave

    SaveSaveSaveSave

    SaveSave

    SaveSaveSaveSave

    SaveSaveSaveSave

  • Mid-Century Modern Lamp Makeover (A.K.A. I Dream of Jeannie Lamp)

    Mid-Century Modern Lamp Makeover (A.K.A. I Dream of Jeannie Lamp)

    I watched reruns of I Dream of Jeannie when I was a kid. It wasn’t one of my favorites, but I thought Barbara Eden was so pretty. And while Larry Hagman will always always always be J.R. Ewing in my mind, he was still pretty great in I Dream of Jeannie.

    Well over a year ago, I found a lamp that screamed “I Dream of Jeannie” at a yard sale.

    It was $2.

    It came home with me.

    And as most things do around here, it sat for a while until I had a great idea for it.

    And finally I did.

    If you follow me on Instagram, you may have seen this image where I asked YOU to tell me what to do with the lamp…

    Mid-Century Modern Lamp Makeover with Velvet Finishes

    Disclosure: This post was a collaboration with Velvet Finishes. However, all opinions and love of bright and cheery color schemes are 100% my own. This post contains affiliate links for your shopping convenience. Click here to read my full disclosure policy.

    You guys were just full of ideas.

    So many ideas that I was even more confused as to what to do to the lamp.

    Some of you even said to leave it as is, but that wasn’t an option – there were lots of chips in the finish and you know me – I needed some color.

    As I was pouring over my paint swatches stressing over what to do, the part-time child, Will, who insists on being called Bill on the blog (I know – I have no idea why either) walked over, played with the paint swatch for a while and said let’s do these colors…

    Velvet Finishes Exotic, Bold, and Minimalistic

    I looked at the colors and wondered how in the hell a 17 year old boy could come up with that great color combination in under five minutes.

    So we started painting. 

    Velvet Finishes Paint Lamp Makeover

    To do this lamp makeover, we used:

    • Paintbrushes of various sizes

    After sitting in my craft room for a year, this lamp was pretty dirty. So, to start with, we cleaned it up really well with Ready, which also primes pieces at the same time.

    Use Ready by Velvet Finishes to clean and prime before painting.

    I just sprayed the Ready onto a paper towel and wiped the lamp down. You can also spray it directly onto a piece, let it sit, then wipe it down.

    I gave the lamp a little while to dry and then started painting.

    Paint Velvet Finishes onto the piece.

    With all the nooks, crannies, and designs going on with this lamp, we used a variety of paint brush sizes. And I won’t lie, since we were using three different colors, it took a while to finish this lamp. I worked on it on and off for 30 minutes or so each day over the course of about five days. First, I painted all spots I wanted Bold, then I went back and painted the spots I wanted Exotic, and finally finished it off by painting some of the small details Minimalistic.

    Wow! That color combination is so pretty! Mid-Century Modern Lamp Makeover with Velvet Finishes Paint

    It wasn’t as hard as it looks to paint all the trim and details. When you use a small paintbrush, its actually pretty easy. I did have baby wipes on hand to quickly wipe up any paint if it got where it wasn’t supposed to be.

    I haven’t decided where I will put it just yet, but I’m thinking its the perfect color scheme for an outdoor living space – maybe the porch?

    Wow! That color combination is so pretty! Mid-Century Modern Lamp Makeover with Velvet Finishes Paint

    It also seems very Lilly Pulitizer-ish to me, which I won’t even get started on that whole Target fiasco.

    What do you think about this bold color scheme? 

    Need more lamp makeover ideas? 

    Don’t miss these 16 lamp ideas and makeovers  – they are so good.

    Find out how to make a lamp out of a bottle here.

    And see how easy it is to make your own gorgeous agate slice lamp finials here.

    You know you don’t wanna miss any of this crazy.

    Sign up to get my posts delivered to your inbox here.

    Stalk Me Here:

    Pinterest / Facebook / Twitter / Instagram

    pin-this-post

    Lamp Makeover Ideas | Painted Lamp Makeover Ideas | DIY Lamp Makeover | How to Paint a Lamp | Lamp Makeover DIY