I may be giving myself too much credit.
My head may be getting a bit too big.
But….
I’m giving succulents a try again.
With the success (meaning I’ve had it for more than a month and haven’t killed it yet) of the fiddle leaf fig and the banana tree, I’m thinking, hoping, praying that I can keep these succulents alive.
In the past year, I’ve successfully killed two succulents.
Yes, I’m well aware I’m the only person on the planet who can’t keep them alive.
I decided that maybe if I gave this new succulent a cozy, happy, pretty home it would want to live longer, so I made it a succulent book planter.
What better place for a succulent to live than in between the pages of a book?
Heck, what better place for anyone to live than in between the pages of a book?

I was selected for this opportunity as a member of Clever Girls Collective and the content and opinions expressed here are all my own.
DIY Succulent Book Planter
Before I tell you how to make this little project, let me answer your question that I know you are asking, “Aren’t the pages going to get moldy and mildewy from the plant’s moisture?”
Why no, they are not. We are going to seal the pages.
Materials Needed:

- Small Potted Succulent
- Plastic tray to go around base of the succulent pot
- Books that you don’t care to cut
- Dremel Micro 8050
- Pencil
- Mod Podge
- Paint Brush
Steps
Step 1
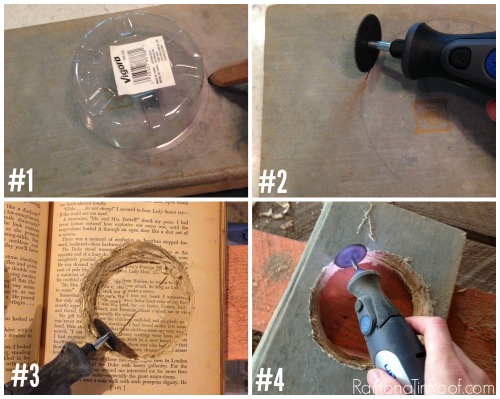
Determine the order you want to stack your books in. Take the book that will be on top and lay the plastic tray in the center of it and trace around it.
Step 2
Put the cutting disc on the Dremel Micro 8050, and begin cutting through the cover of the book. I put the Dremel on the highest speed to do all my cutting. The Micro 8050 is pretty cool because it can cut, carve, engrave, sand, grind, sharpen, clean and polish—helping you bring just about any brilliant project to life. It’s also cordless – which means no worrying about accidentally cutting through cords – not that I’ve ever done that before or anything…
Step 3
Once you get through the front cover of the book, open it up and continue cutting through the pages.
Step 4
Once you get all the way through your book, your circle may be a bit smaller on the back than the front. Flip the book over to the back and cut the circle as needed. You can go up and down with the Dremel to get a good even cut. It is very light and easy to handle in tight spaces, the Dremel® Micro™8050 is packed with features that have crafters, hobbyists and DIYers in mind: soft grip, LED front-end lighting to illuminate projects, a docking station that continually charges, and an 8V Max Lithium-ion battery.
Step 5
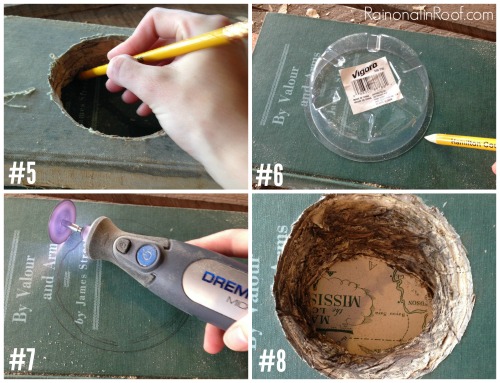
After your top book has its circle cut out, place your succulent pot in the book to make sure it will fit properly. If it doesn’t cut more as needed. If its good to go, move on to cutting the second book. Do this by placing the book you have already cut on top of the book you are about to cut. Use a pencil and trace inside the circle onto the book to be cut.
Step 6
Remove the top book and place the plastic tray around the traced circle. Trace around the plastic tray – it may be slightly bigger and you want that measurement, not the smaller one.
Step 7
Begin cutting out the hole in the second book as you did with the first book.
Step 8
If your pot was the same size as mine, you may not need to go all the way through the back cover on the second book, test the pot in the book as you go to determine how much more you need to cut. If your pot is narrower at the base, as most are, it will be ok if the hole in the second book is a bit angled as you see above. Just test the pot to see if it fits.
Step 9
After all the cutting is done, clean off the books and shake out any pieces of cut paper. To seal the books and keep mildew and mold from forming, you need to apply Mod Podge to the cut edges of the books. I started at the back cover and worked my way through the book. You don’t have to go through every single page, do small sections of pages at a time and you can put it on heavy.
Step 10
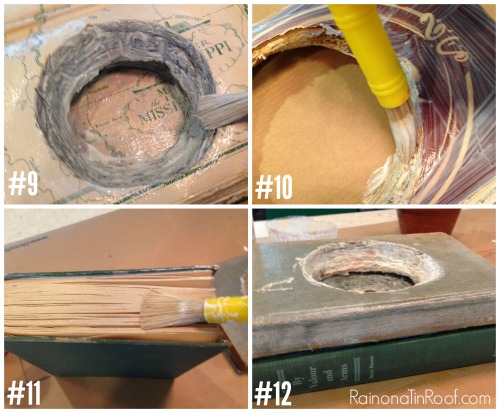
On the inside covers of the books, apply Mod Podge all over the cover and pages to keep the book shut.
Step 11
If you want to, you can seal the outer edges of the book with Mod Podge as well.
Step 12
To hold the books together, apply Mod Podge to the covers of the books and place them in the order you want them stacked. Also, be sure to give the top book cover a really good coat of Mod Podge.
Step 13
After the Mod Podge has dried, place your plastic tray in the books and then your potted succulent plant.

Isn’t this a fun twist on a planter?
The Dremel made the process of cutting out the pages go so fast and even I was able to cut out a decent circle.
I’m even liking it more than I expected.
You can purchase the Dremel Micro 8050 online at Amazon.com and HomeDepot.com.
Want more great planter ideas?
DIY Cedar Planter Box – a great DIY project that will add some curb appeal to your home!
Modern Painted Planter Pots – take basic planters and snaz them up with spray paint!
10+ Creative Flower Pot Ideas – full of so many out-of-the-box ideas!
You know you don’t wanna miss any of this crazy.
Sign up to get my posts delivered to your inbox here.
Stalk Me Here:
Ashley @ 3 Little Greenwoods says
Too cute planter! I have also successfully killed THREE rounds of succulents in my “terrarium”. I’m thinking I didn’t follow directions when I constructed it {as usual}.
~ Ashley
Jenna @ Rain on a Tin Roof says
Thanks, Ashley! I swear I do everything I’m supposed to do with them and they ALWAYS die! It kills me – I love the look of them so much!
Megan says
I killed an aloe-ish looking plant a few months ago. One day it looked sad so I touched it and all the…branches? Arms? Things…just fell off. ALL of them. I have another that is doing well but I’ve kept it outside so maybe I’m not over watering it….
Jenna @ Rain on a Tin Roof says
Oh no, Megan! The same thing happened to me with the last succulent I killed. It wasn’t doing so great, so I though, hmmm… maybe I’ll repot it. Went to go do that and the plant just fell apart in my hands! Seriously?!
Elizabeth @ Real Inspired says
I too am a succulent killer. I’ve killed two aloe plants so far this year. Always after I repot them. Oh well.
I love the book planter! I’ve never seen that before. That plant better appreciate his new home!
Jenna @ Rain on a Tin Roof says
I hope it appreciates it and stays alive, Elizabeth! Yours died after you repotted them too? That’s crazy! I have no idea what we are doing wrong!
Amanda @ Serenity Now says
What a fun and creative idea! I love it. 🙂
Jenna @ Rain on a Tin Roof says
Thanks, Amanda!
kristi@ishouldbemoppingthefloor says
What a fun idea! And I love my Dremmel…not sure I could live without it!
Jenna @ Rain on a Tin Roof says
Thanks, Kristi! Aren’t Dremels just great? I have used it to do so many things!
chris aka monkey says
this is seriously cute and if the plant dies you could put a vase of fresh flowers in it to , i would love to live between the pages of a book but only if it was one of those torrid love novels with a pic of a guy on cover who looks like he can’t believe it’s not butter lmao xx
Jenna @ Rain on a Tin Roof says
Chris, the vase is a great idea! I hadn’t thought of that! That’s just another reason I love you!
Erin @ DIY on the Cheap says
What a fun project! I love the Dremel Micro. I’ve been playing around with mine all week too!
Jenna @ Rain on a Tin Roof says
Thanks, Erin! Aren’t they great?!
Leslie @ House on the Way says
Aren’t you just too clever for words! Love it!
Jenna @ Rain on a Tin Roof says
haha! I wish! Thank you, Leslie!
KC Coake says
What a great idea! I love the look and the Dremel looks like it makes this an easy job.
Jenna @ Rain on a Tin Roof says
Thanks, KC! Yes, the Dremel made it much easier!
Tara says
Love this, Jenna! I am a huge fan of Dremel (just got my hands on the multi-tool during our renovation) and this is SUCH a great idea! I have also had succulents die on me before.
My thumb is decidedly NOT green. Much more of a murky-brown.
Jenna @ Rain on a Tin Roof says
Dremels are so awesome aren’t they, Tara?! Its so handy! I think I have the murky-brown color too…..
April says
I kill succulents too. I got this awesome long boat-shaped planter at Joanns this year for cheap, and I put six succulents in it. Then I found out that my cats loved succulents. So when they were about half dead I put them on the front porch, where they’re still technically alive but not by much! I also had a succulent in a small snail planter, and a purple tree-like succulent. The snail one I completely forgot about so it died from lack of water, and the purple one was attacked by cats as well so it’s on the front porch too. On top of all of this, I think that my house is much too dark for succulents. They need sun and my house just doesn’t get much of it unless it’s our one window facing east that isn’t under the porch roof, and there’s only so much room on that windowsill (assuming the cats leave it alone!).
Sigh. Succulents are so cool. I really wanted to grow some!
Jenna @ Rain on a Tin Roof says
Oh man! I had no idea cats liked succulents so much!! Boo!! But at least you have a good excuse, I don’t have a cat and still can’t keep them alive!
Jamie says
OMG!! I want one! Make me one please! And then make my plant stay alive b/c I kill all plants too LOL
Pinning & sharing on my FB page today. Love it!
J.xo
Jenna @ Rain on a Tin Roof says
Thanks! Girl, I’m praying this one stays alive!
Tania // Run to Radiance says
Such a cute idea!! Love this. So charming!!!
Jenna @ Rain on a Tin Roof says
Thank you, Tania!
Kim@NewlyWoodwards says
This is such an AWESOME idea. Love the books. I’ve been wanting to use a few old books to house our electronic cords on the nightstand. The Dremel will be the perfect tool.
Jenna @ Rain on a Tin Roof says
Kim, that would be an awesome way to hide / store cords!! Love it!
Lolly Jane says
We’ve killed 3 jars worth 🙁 AND a cactus!! We’re only doing fakes now but LOVE this idea! So unique!
xoxox
Jenna @ Rain on a Tin Roof says
Oh no!!!! So far, mine is still looking ok! Hoping it stays that way! You could totally do this with a fake one though!
Amy W says
I love this! Such a clever use with a few vintage books. Please come share at our link party going on now, if you’ve not yet.
Jenna @ Rain on a Tin Roof says
Thanks so much, Amy!
Jessica says
Hey! I am SO IN LOVE with this tutorial! Dremels are the BEST too! I have 2 different kinds and use them both all of the time. I dont know if this helps, but I am pretty good with succulents, I have taken the “leaves” off of them and grew new ones from them and they seem to like me lol. Certain succulents like different things. Always use moisture control soil..and a lot of the indoor ones like gravel too so mix some rocks in with them 🙂 They need about 5 hrs of sun a day, and if they are the Hardy succulents then you will have to make sure they are outside, but not getting soaked with snow during cold winters because they need the cold to “nap”. The majority of them only need water when the soil is dry, so about once every 2-3 weeks and when you water them just water enough that its damp but not soaked. I dont know if any of that helps you but if you have any questions maybe I could answer them lol 🙂 have a great day and thanks for sharing this awesome DIY!
jess
Jenna @ Rain on a Tin Roof says
Jess, Thank you so much!!! I don’t think I realized that succulents need that much sun – that could be my problem!!! You are a lifesaver, well a succulent saver! haha!! Thank you!!!!
Julie says
I love ideas that re-use books but am always a little bit traumatised at the idea of actually cutting up a book! I’ve not actually managed to do one myself yet.
However I can keep succulents alive! That taller one in your pot we always called a money tree (no idea if that’s it’s proper name) It’s very easy to keep alive and when it gets big you can just break of an inch or two, pop it in compost and it will grow a new plant easy peasy. The trick with them all is to not get them too wet I think. The roots and stems will rot if they get over watered.
Jenna @ Rain on a Tin Roof says
Julie, I was the same way about cutting up these books!! I felt like I was committing a horrible sin!! I used to be an English teacher and all I could think was “What the heck am I doing?!” haha!! But these weren’t any books I was attached to and they came from a free pile at a local used bookstore, so no cost invested in them! Oooo, if I can keep this succulent alive long enough I’ll have to try that with the taller one. I’m trying really hard to keep them alive. I think I was overwatering before….and they may not have been getting enough light… Thank you for the tips!
Shelly says
Indeed a very creative and fun planter!! Thanks for sharing!
Jenna @ Rain on a Tin Roof says
Thank you, Shelly!