This post is sponsored by HomeRight, however all opinions are 100% mine. This post contains affiliate links.
Sometimes I lay on the floor.
For no good reason at all.
Sometimes I close my eyes.
And daydream.
Sometimes I stare at the despicable popcorn ceiling and try to find the strength to remove it.
I usually decide I’ll pay someone to do that before I scrape ceilings again.
Sometimes I just ponder life’s mysteries.
Either way, the ceiling is usually ugly.
And most of the time, my wondering leads me down a rabbit hole of painted ceiling designs.

Should I go for a bold, yet classic black?
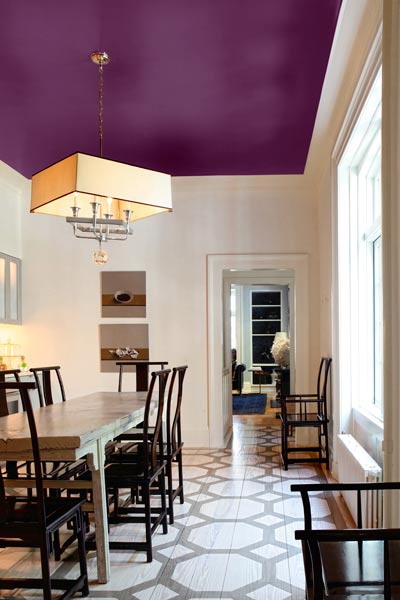
Or an un-expected punch of purple? I am usually never a purple girl, but man this one is reeling me in.

Should I change the color on my pink ceiling?

Perhaps, I should bring the ceiling color a third of the way down the wall too?

Or maybe a cool and calm coral like Shavonda did?

Or I could just pull out all the stops and turn my ceiling into a circus tent.
No.
But I will give them stellar execution on that ceiling. They have far more patience than I do.
All of this ceiling dreaming usually ends in me deciding that I don’t have the strength to strip the popcorn ceilings off another room again.
But one day.
When I have had enough liquid courage to make me crazy enough to want to take off popcorn ceilings again, I’ll have a real pretty view from the floor.
If you are already lucky enough to be free of popcorn ceilings, here are my best tips for painting ceilings A.K.A. what I learned from my pink ceiling adventure…
Ceiling Painting Tips
1. Always use flat paint on ceilings.
Ceilings (especially ones with removed popcorn) tend to have lots of imperfections. Using a satin, semi-gloss or gloss finish will only highlight those imperfections. Flat finish paints tend to hide them better.
2. Clean the Cobwebs.
Just admit it. My ceiling corners are usually littered with cobwebs and yours are too. 😉
3. Tape off.
Tape off any surrounding trim, light fixtures, etc. Yes, there is a difference in using plain old masking tape versus actual painter’s tape. Masking tape will not give you those crisp paint lines. With painter’s tape, you do have to firmly push down along all the edges after you put the tape on the wall to activate the tape against paint bleed. My usual go-to painting tape is FrogTape.
4. Use a Quick Painter.
If you have a hard time cutting in around a room, use the Quick Painter.
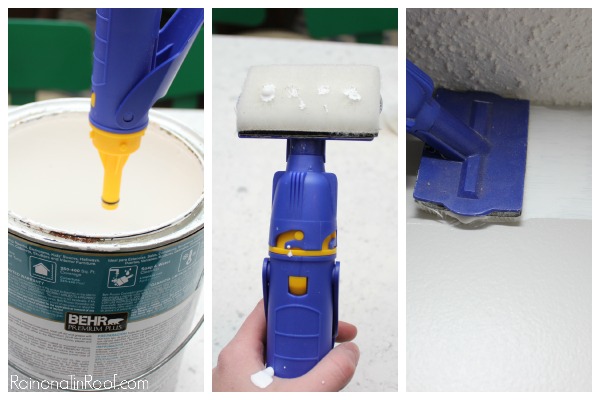
The quick painter is this fabulous little tool that you suck your paint into, click the pad in place and run it right along trim, light fixtures and where the ceiling and wall meet. This little tool can also eliminate the need for taping in some cases.
5. Use a good, easy to use, roller.
When I paint any walls or ceilings, I use a PaintStick EZ-Twist.

The PaintStick EZ-Twist fits onto your paint can. You pull back on the handle to draw paint into the tube. When the tube is full, twist the handle to release paint onto the roller and start painting your ceiling. No paint trays needed, so fewer trips for more paint. The EZ-Twist isn’t too bad to clean up either.
6. Remove any painting tape as soon as you put your final coat on.
A lot of people think they are supposed to wait to take the tape off until the paint is dry – don’t wait! If you wait, you risk the paint drying to the tape and the paint coming off with the tape.
Need Wall Painting Tips? I’ve got you covered…


So who wants to take off my popcorn ceilings so I can have pretty ceilings everywhere and not just in my bathroom?
Yea, I figured there wouldn’t be any takers.
You know you don’t wanna miss any of this crazy.
Sign up to get my posts delivered to your inbox here.
Stalk Me Here:
Bloglovin / Pinterest / Facebook / Twitter / Google+ / Instagram

Disclosure: This post was a collaboration with HomeRight. All opinions and longing for beautiful views from the floor are 100% mine.
Leave a Reply