Tag: coffee table

  • DIY Ottoman Coffee Table

    DIY Ottoman Coffee Table

    This post is sponsored by Velvet Finishes and Boho Luxe Home provided the fabric for this project. All opinions are 100% mine. Affiliate links included in this post. 

    This project isn’t anything groundbreaking. If you’ve ventured on Pinterest anytime since it’s invention, then I’m sure you’ve seen a few versions of how to turn a coffee table into an ottoman – this one is just my take on it.

    I found this little table at a thrift store and in all honesty probably fell in love with the caster wheels more than anything. I had high hopes I could clean them up.

    Take an old coffee table and turn it into an ottoman type coffee table.

    The biggest problem with this piece was the top of it. Most of the top except just around the edges had one of those faux leather inlays and it was in rough condition. Fixing that problem was what led to my idea of putting an upholstered cushion on the top of the table to make it an ottoman coffee table – and it can also serve as extra seating.

    How to Make an Ottoman Out of An Old Coffee Table - easy DIY project for your living room.

    DIY Ottoman Coffee Table

    Supplies & Tools Needed:

    Steps

    Step 1

    If the coffee table you are using is dirty or has shiny finish, you’ll want to clean it up and degloss it first. I also removed those metal accent pieces from the table at this time as well. I just felt those dated it a bit too much and they would have been a huge pain to paint around. To remove those, I just cut them with pliers in a couple of places and then they just pulled right out.

    Take an old coffee table and turn it into an ottoman type coffee table.

    Mine was’t too terribly shiny, but it was very gross. I used Ready to both clean and degloss at the same time.

    Ready: A spray primer that both cleans and deglosses.

    Ready is by far one of my most favorite furniture painting products because it’s such an easy deglosser and cleaner to use. You just spray it on, let it sit a minute or two, then wipe it clean with a paper towel.

    Ready: A spray primer that both cleans and deglosses - just wipe off with a paper towel.

    Gross, right? And that paper towel was just from around the top edges of the coffee table.

    If you don’t have a shiny finish on your piece and you plan on using Velvet Finishes paint for your project, then you can skip the Ready as Velvet Finishes paint already has a primer built-in. You just have to use the Ready when your piece is glossy to begin with or when you want to clean it first.

    Wipe down your table with a tack cloth before moving on to make sure you remove any bits of dirt or dust left on it.

    Step 2

    After you’ve cleaned and deglossed your piece if needed, you can start painting.

    Velvet Finishes Tranquil - a deep teal blue hue.

    I opted to go with Velvet Finishes Tranquil for this piece. The blue hue worked well with all the different colors in the upholstery fabric. Since it’s not too bright of a blue, I think it also helped to anchor the piece with all the pattern that was going on in the material. Tranquil is one of my most favorite Velvet Finishes colors because there isn’t much it doesn’t pair great with.

    I just brushed it right on with a paintbrush and gave the whole piece two coats.

    Sidenote: This is the second project I’ve got out of that one container of Tranquil and there’s still a good bit left. This stuff covers really well.

    Step 3

    I wanted to add a little more dimension to the table base, rather than it just being a flat color. Since the upholstery was going to be busy, I felt that adding a bit something more to the base would also help to even things out.

    I saw this as my chance to try out a new Velvet Finishes product – their metallic gold Enhance glaze.

    Velvet Finishes Enhance Metallic Glaze

    For the most part, this works just like the regular Velvet Finishes dark glaze, it’s just thicker.

    You’ll want to work in small sections, as this does dry fast. I used a small paintbrush to apply the glaze just along the edges and crevices of the table.

    Velvet Finishes Enhance Metallic Glaze - applying.

    After applying a little glaze to a portion of the table, I came back with a t-shirt scrap and wiped off the excess glaze, while at the same time pushing the glaze into that crevice.

    Velvet Finishes Enhance Metallic Glaze - wiping away a part of it.

    This made it to where the gold really helped to accentuate those lines.

    Step 4

    Because this is a coffee table that can also be used to kick your feet up on or sit on, I wanted to add a little more extra protection to it besides the topcoat that already comes in Velvet Finishes paint.

    Velvet Finishes Protect - added protection for your painted pieces of furniture.

    To do that, I gave the whole piece a coat of Protect. One coat is all you need and you can simply brush it on or use a foam brush if you wish.

    Step 5

    Once you’ve cut your plywood piece down to the size you want your upholstery portion to be, cut a piece of upholstery foam to the size of the plywood. Cover that with batting and then with your upholstery material.

    DIY Ottoman Coffee Table - cut a piece of plywood to size, cover it with foam, batting and upholstery material.

    Flip it over, pull everything tight and staple all along the edges. My plywood piece is about two inches smaller all the way around than my table top. I needed to cover up that old vinyl / leather top so I used that as my guide.

    To attach the upholstered top to the coffee table, I used heavy duty velcro, putting a strip on each side of the cushion/table.

    If you’ve got a solid coffee table that doesn’t have the drawer or openings like mine does, then alternatively, you could get under the table, and use a drill to screw from the bottom of the coffee table up into the plywood cushion top.

    DIY Ottoman Coffee Table - How to add a cushion top to an old coffee table.

    I love how beautifully this piece turned out. It has the perfect punch of pattern and color.

    How to Make an Ottoman Out of An Old Coffee Table - easy DIY project for your living room.

    I was able to clean up the drawer knobs and caster feet with Bar Keeper’s Friend.

    DIY Ottoman Coffee Table - can also double as a bench for extra seating in your living room.

    And that upholstery – I think I fell in love with it even more once it was paired with the Tranquil paint! This is just one of the gorgeous colorful prints that Boho Luxe Home offers!

    Add an upholstered top to a coffee table to create an ottoman or extra seating for your living room.

    And the touch of gold detailing I did with the glaze adds the perfect amount of depth, I think.

    What do you think about this piece?

    You might also want to see…

    FAQ: Painting Furniture

    OMG. I'm in love. French Country Chair Modern Makeover

    French Country Chair Modern Makeover

    Oh my goodness! If you love the beachy washed out look in home decor, then you have to see this! It's so easy! How to Create a Beachy Colored Look with Paint | Beach Decorating | Nautical Decor | Ocean Living | Beach Living | Aqua | Furniture Makeover

    How to Create a Beachy Colored Look with Paint

    Pin This Post

    How to Make an Ottoman Out of An Old Coffee Table - easy DIY project for your living room.

    SaveSave

    SaveSaveSaveSaveSaveSave

    SaveSave

  • Industrial DIY Coffee Table from a Yard Sale Cart

    Industrial DIY Coffee Table from a Yard Sale Cart

    Remember how I confessed that my latest chair makeover was a roadside find that sat untouched in my basement for nearly a year?

    Yea, ummm, the same is true of this cart turned industrial DIY coffee table. I picked it up at a yard sale well over a year ago now. From the time I bought it, I had planned on turning it into a coffee table, but one thing led to another and it just now got completed.

    Just like the chair though, I think this one was worth the wait.

    Industrial DIY Coffee Table via RainonaTinRoof.com #diycoffeetable #diy #industrial

    This is a Sponsored post written by me on behalf of Elmer’s ProBond Advanced. All opinions are 100% mine. This post contains affiliate links for your shopping convenience. Click here to read my full disclosure policy.

    Industrial DIY Coffee Table

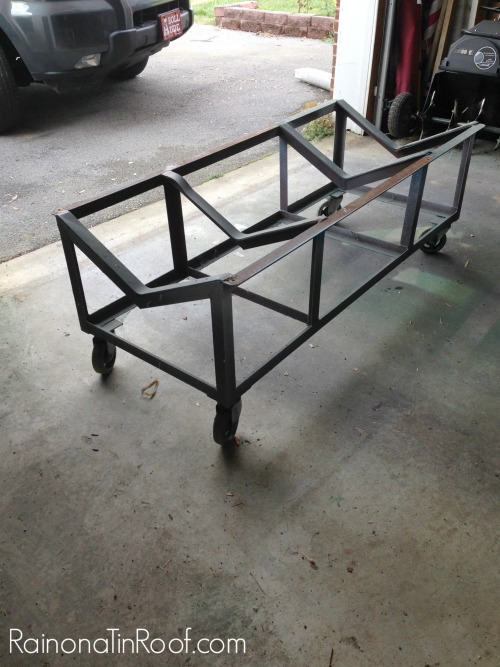
    We started with this:

    Industrial DIY Coffee Table via RainonaTinRoof.com #diycoffeetable #diy #industrial

    I had used it  to do painting on, so there were lots of different colors on it. After taking off the old wood top, I had this:

    Industrial DIY Coffee Table via RainonaTinRoof.com #diycoffeetable #diy #industrial

    I painted the metal frame with copper spray paint to keep that metal look, but add a bit of color. After that, we started the process of cutting wood for the top and bottom.

    Industrial DIY Coffee Table via RainonaTinRoof.com #diycoffeetable #diy #industrial

    We started with 1x6s for the top. We made them overhang slightly on each side, so they were each about 29 inches long. On the bottom, we used 1x4s. The cart was divided into three sections on the bottom by the bars, so each bottom side was 23 7×8 inches long and the middle was slightly smaller at 23 3/4 inches. As we cut the wood, we placed it on the cart to make sure it would fit. After it was all on the cart, we began the process of gluing down the wood.

    Industrial DIY Coffee Table via RainonaTinRoof.com #diycoffeetable #diy #industrial

    We used Elmer’s ProBond Advanced glue to adhere the wood to the metal. This glue is known for bonding Mixed Materials like wood to metal. The great thing about it is there is no foam residue left after it dries. We glued down the wood on the bottom first. All I did was simply run a bead of glue right along the metal rails and then placed the wood on top of the glue. I did the exact same thing on the top of the cart. To really push the wood down onto the glue, we raided our nearby retaining wall for a few concrete blocks to weigh down the wood. I let the table sit like this overnight. The next morning, I removed all the blocks and started staining and painting it.

    Industrial DIY Coffee Table via RainonaTinRoof.com #diycoffeetable #diy #industrial

    First, I sanded it to smooth rough edges and round the corners a bit. Next, I stained all the wood and let it dry overnight. I liked just the wood stain, but ya’ll know me, I wanted it to stand out a bit more, so I added some decorative “arrows” with white paint and FrogTape. I used a piece of tape to space between two pieces of tape, cause I’m lazy (or smart ) like that. Then, as shown in #3, you want to remove the tape where those two x’s are so that you have clean lines on your point. I did this by taking another piece of wood, lining it up on the tape, and running my X-Acto knife over it.  After cleaning up my lines, I painted between the tape, let it dry and finished the whole thing off with a coat of polycrylic.

    Industrial DIY Coffee Table via RainonaTinRoof.com #diycoffeetable #diy #industrial

    The ProBond Advanced glue worked perfectly – not one of the wood pieces will budge at all.

    Industrial DIY Coffee Table via RainonaTinRoof.com #diycoffeetable #diy #industrial

    What do you think? Was it worth the wait?

    Industrial DIY Coffee Table via RainonaTinRoof.com #diycoffeetable #diy #industrial

    Do you have any carts that could become a DIY coffee table?

    If you liked this furniture flip, you should see these too…

    How to Turn a Side Table into a Chic Bench – this can double as a coffee table, bench, end table and ottoman!

    Bookcase turned Kid’s Dress Up Closet – grab an old bookcase and turn it into a magical destination for your kiddos!

    How to Build a Desk Using an Old Kitchen Table – this desk might be slim, but it has loads of storage!

    And you can always see all my furniture makeovers here.

    You know you don’t wanna miss any of this crazy.

    Sign up to get my posts delivered to your inbox here. 

    Stalk Me Here:

    Pinterest / Facebook / Twitter / Instagram

    SaveSave