Tag: nightstand

  • 9 Unique Ways to Makeover a Side Table

    9 Unique Ways to Makeover a Side Table

    Looking for a clever way to update a side table, end table or bedside table in your home? You want something more – something that pops! Here are nine unique DIY side table ideas that are totally doable – even for a beginning DIYer. You’ll be running for your paint by the end of this post!

    It’s been a while since I’ve been able to get my hands dirty with a good ol’ furniture makeover. I’m planning to end that hiatus soon since school has started back and we are finally getting back into a routine around here. There is literally one whole side of our garage that is filled with pieces just calling my name. Y’all know I can’t pass up a piece of thrift store or yard sale furniture with good lines.

    As I was going through the pieces and brainstorming ideas for what to do with each one, I also went through my gallery of past furniture makeovers looking for inspiration – perhaps a good spinoff of another makeover. 🙂 While doing so, I realized a few things:

    1. I like to turn things into bars.
    2. I especially like to give side tables new life or turn them into things they aren’t meant to be.
    3. My photo skills have vastly improved since the creation of this blog.

    I realize that most everyone only needs one bar in their home, but many people do need more than one side table. Or end table. Or bedside table. Or whatever the heck you want to call them. So, I’ve put together some of my favorite DIY end table ideas to get the inspiration flowing the next time you see a side table with fabulous lines, but needing a little love.

    Unique End Table Ideas

    This post contains affiliate links for your shopping convenience. Click here to read my full disclosure policy.

    Idea #1: Cover the Top with Wrapping Paper

    DIY Side Table Ideas

    Wrapping Paper Topped Table

    This little table makeover is definitely a blast from the past! It’s still one of my most favorite colorful pieces I’ve ever done though. I found this little table for a whopping $2 at a yard sale. The top was in really rough condition, but the rest of it was pretty good. I painted most of it a bright coral pink color and then remedied the top by apply wrapping paper. Get all the details on how I did it here. Wrapping paper tip: I find the best patterns and designs on wrapping paper at Home Goods!

    Idea #2: Give it a plaid treatment.

    Unique End Table Ideas

    Plaid Painted Side Table

    It’s been a few years since I did this plaid painted side table, but Grunt Labor will still tell you that he thinks it’s one of the best projects I’ve ever done. The crazy thing about it though is that it doesn’t require a single bit of measuring to get this pattern painted. I used Frogtape to “measure” everything – it was so easy! Tutorial for this guy is here. You can use any colors you want to create the plaid. I’ve always thought this would be really cute in pastel colors – especially for a little girl’s room.

    Idea #3: Get Beachy with It.

    Bedside Table Ideas

    Painted Beachy Colored Side Table

    The paint treatment on this side table is crazy easy to do – seriously, it’s hard to mess it up! I gave this piece a washed-out beachy vibe by painting the whole thing white first, then creating colored furniture glaze with paint and clear glaze from Velvet Finishes. If you get too much color on, then just wipe it off, if you want more, paint more on. Easy peasy. Again, you could do this with any color you wanted to. I think a small side table painted like this would be great in a mostly white bathroom to add a little color. You can read the full tutorial for painting pieces beachy style here.

    Idea #4: Confetti Style

    DIY End Table Ideas

    DIY Confetti Side Table

    This one is another super simple end table idea that just requires paint, tape and very little skill at all. Create “confetti” on the tabletop (or the whole table if you prefer!) by placing random strips of paint over the table before painting it. This creates a fun little table just begging for someone to put a drink, preferably with a little umbrella, on top of it. The full how-to on this one is here.

    Idea #5: Stenciled Top End Table

    Unique End Tables

    Leopard Print End Table

    If you want to add pattern to a tabletop, but don’t want to be confined to using tape to come up with something, then you could look for a stencil to paint onto a side table. I just happened to have this leopard print stencil lying around and went with it for this table that was on the back porch at our old house. The full makeover is here.

    Idea #6: Turn it into a bench.

    Side Table Ideas

    Side Table turned Bench

    And if you ask me what one of my favorite makeovers ever was, I’d say that one of them is definitely this little side table turned bench. I found this table at a thrift store for $7. The sides and legs of this table had perfect lines and there were gorgeous brass details on top of that. The top though had those weird slats and so I decided to cover those by adding a cushion on top. I love this piece because it can serve as a traditional side table or even a tall coffee table by just placing a tray on top of the cushion and putting drinks, remotes, whatever there. But, when you need extra seating or want to throw your feet up, just move the tray! See how I did this makeover here. Also, you can do this with any table that’s open underneath! P.S. If you’re looking for a gorgeous light blue color, that Tranquil that I painted this side table is hands-down one of my most favorite colors ever.

    Idea #7: Ditch the Tier.

    End Table Ideas

    How to Remove the Top Tier of Two-Tiered Tables

    So I found this two-tiered table at a local thrift store and I was immediately drawn to it’s mid-century lines. But then, I was like, “Damn, I hate that it’s tiered.” I’m not a huge fan of two-tiered tables. But then, I was like, “Wait I bet I can get rid of that tier.” And I did. And I have no idea why that had never occurred to me before. When I think about all the two-tiered tables I’ve passed up because of that tier and now knowing how easy it was to remove it, I get so mad at myself! Anywho, you can read about how I gave this table new life here.

    Idea #8: Layer on the Colors.

    Painted Side Table Ideas

    Caribbean Blue Layered Paint Side Table

    I just started experimenting more with layering paint colors earlier this year and this piece was one of the firsts I did. I created this look by using three different paint colors and creating different colored glazes with two of them. It actually isn’t as hard or complicated as it sounds and again, it’s a project that you can’t easily mess up! Find the tutorial here.

    Idea #9: Accentuate details with contrasting colors.

    Painted Bedside Table Ideas

    Gray and White Bedside Table Makeover

    And this one is really taking it back – one of the first furniture makeovers I posted about. See, my photography has definitely  improved. 🙂 Even though the photos here aren’t that great, I still love this simple idea for painting a bedside table that still commands attention. If you ever come across a piece that has good grooves on it, snatch it up. Then, choose two contrasting colors – I tend to go for an actual color and white together – and paint the majority of the piece the color and then pull out all those details with the white paint. The tutorial for how I did this one is here.

    Looking for more painting tips and inspiration?

    What kind of paint do I use on that? – a guide to all different types of paint and what kind to use on what material.

    How to Make Furniture Glaze in Any Color – the possibilities are endless!

    3 Easy Ways to Update Your Furniture Hardware – don’t toss it just yet!

    Want to come back to these side table ideas later? Just pin the image below!
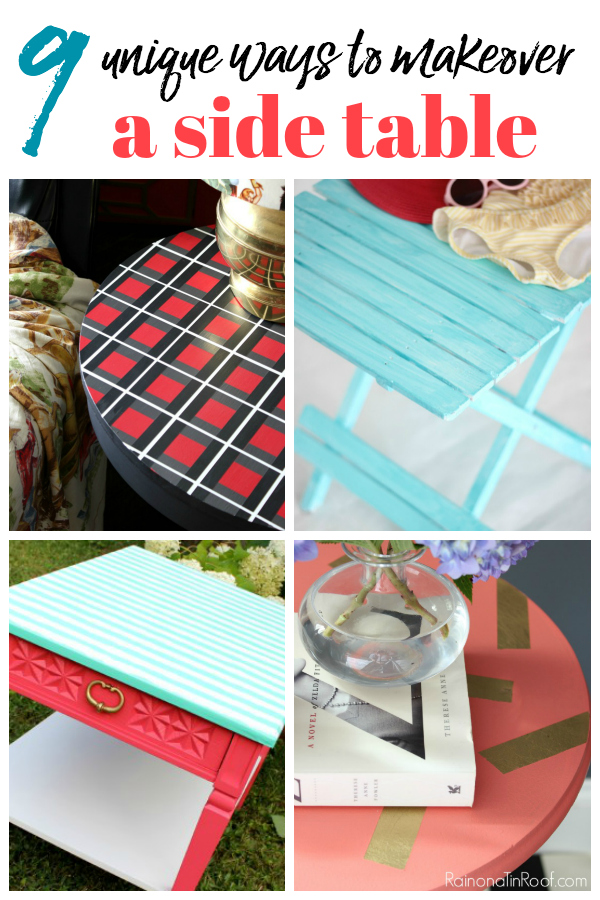
    Unique Side Table Makeover Ideas
    Gift Ideas Signature

  • DIY Leopard Print Table A.K.A. The (Almost) Bee Table

    DIY Leopard Print Table A.K.A. The (Almost) Bee Table

    I’ve had this table in my basement for nearly a year. I loved its shape so much, but just couldn’t decide what to do with it. When I finally did decide what to do with it, it was an utter failure (I’ll get there in a minute). Luckily, it made a spectacular comeback with the help of a little leopard print goodness.

    Leopard Print Table via RainonaTinRoof.com #leopard #stencil #makeover #painting #diy #furnituremakeoverThis post contains affiliate links for your shopping convenience. Click here to read my full disclosure policy.

    This piece is the last one that my sweet neighbor gave me before she moved. Remember how she gave me the navy chests, the chevron tray, the coral and mint nightstand, and so much more? She’s such a sweetie and we miss her dearly. This table sat in my basement for a while because I couldn’t decide what to do with it.

    Leopard Print Table via RainonaTinRoof.com #leopard #stencil #makeover #painting #diy #furnituremakeover

    I was absolutely in love with its retro feel and would have been completely fine keeping it wood toned. But upon close inspection, the finish was peeling – and the top of it wasn’t real wood – it was laminate. No re-staining for this baby.

    And then one day, it hit me. The perfect combination of colors and I already them on hand – black and mustard.

    Bee Table

    Guys.

    Seriously.

    The next time I think that black and mustard (I swear the color was more mustard in the can and was called fresh mustard) work well together please remind me that they work well together on a bumble bee. And a caution sign.

    Not on a table.

    Mkay? Thanks.

    So we went back to square one. I primed the table all over again. It sat around for a while.

    One day I finally said to myself, “Black and Gold. Its never failed you. It looked great on that french desk. Put it on the table.”

    So I painted.

    Leopard Print Table via RainonaTinRoof.com #leopard #stencil #makeover #painting #diy #furnituremakeover

    I painted the whole piece black with my paint sprayer. Next, I topped it off with a gold leopard print using the stencil from the accent wall in my guest bedroom and office.

    Leopard Print Table via RainonaTinRoof.com #leopard #stencil #makeover #painting #diy #furnituremakeover

    I finished it all off with my usual coat of Polycrylic. If you look closely in those pictures, you can see a sneak peek of my porch floor I’m working on – reveal coming next week!

    Leopard Print Table via RainonaTinRoof.com #leopard #stencil #makeover #painting #diy #furnituremakeover

    I was thinking I would put this inside somewhere, but I’m loving the feel of it on the porch.

    Every room needs a little animal print, right?

    Need a little more furniture makeover inspiration? 

    Find out how to make gorgeous colored glazes in any color for furniture flips and colored stains here!

    Get all my tips, tricks and techniques and more for furniture painting here!

    And see my complete gallery of all my furniture makeovers right here.

    You know you don’t wanna miss any of this crazy.

    Sign up to get my posts delivered to your inbox here. 

    Stalk Me Here:

    Pinterest / Facebook / Twitter / Instagram

    SaveSave

  • Coral and Mint Nightstand Makeover

    Coral and Mint Nightstand Makeover

    You guys, spring is finally starting to show up around these parts! I can hardly contain my excitement! I hope its warming up wherever you are as well. I thought I would share this nightstand makeover with you because its cheerful colors just beg spring to come on now!

    Mint and Coral Nightstand Makeover via RainonaTinRoof.com #makeover #nightstand #DIY

    This post contains affiliate links for your shopping convenience. Click here to read my full disclosure policy.

    I actually did this makeover last fall. I just never got around to posting about it. And then when I started to post about it, it was winter, and I thought it would just be a better spring post with its colors.

    This piece was seriously heavy for a nightstand. It was solid wood, but had a laminate-ish top and sides. Strange, but it had potential.

    Mint and Coral Nightstand Makeover via RainonaTinRoof.com #makeover #nightstand #DIYAnytime I makeover a small piece of furniture like this, I try to use paint I already have. I hate going out and buying a can of paint for one small piece. In other words, I’m cheap. Luckily, I had enough of the salmon pink from the kid’s dresser in her nursery, and mint green from another project to do the job.

    Mint and Coral Nightstand Makeover via RainonaTinRoof.com #makeover #nightstand #DIY

    Since there was some laminate, I gave the entire piece a coat of Zinnser primer first, and then the mint. I used my HomeRight FinishMax to paint the entire piece except the drawers.

    Mint and Coral Nightstand Makeover via RainonaTinRoof.com #makeover #nightstand #DIY

    I just brushed the coral paint on them while the mint was drying. I kept the original hardware and updated it with white spray paint.

    And did you notice I distressed this piece?

    And I hardly ever distress any furniture, unless I have to.

    You see, I accidentally bumped into it while the paint was drying and smudged it. So, rather than having to paint it again, I just waited until it was dry, sanded the smudge a bit and then the rest of it. I sprayed the whole thing with a coat of Polycrylic afterwards.

    Lazy, I was. But, I actually love how the distressing turned out on this piece. What do you think?

    Need more furniture painting tips and ideas? You’ll want to see these then…

    How to Make Furniture Glaze in Any Color – the possibilities are endless and this is easy!

    How to Create a Beachy Colored Look on Furniture – this gives furniture a cool washed-out beach look!

    Painting 101 – Everything you could ever want to know about painting furniture – tips, tricks, FAQ, and so much more!

    And you can always see all my furniture makeovers here.

    You know you don’t wanna miss any of this crazy.

    Sign up to get my posts delivered to your inbox here. 

    Stalk Me Here:

    Pinterest / Facebook / Twitter / Instagram

    SaveSave

  • Navy and Gold Chest Makeovers

    Navy and Gold Chest Makeovers

    Have I chatted with you about the guest bedroom before?

    Why am I asking? I know the answer to this. Its no.

    And why have you never heard of this guest bedroom before or seen photos of it?

    Because its ugly.

    Let’s be honest. What room is usually last on the list when it comes to decorating?

    The guest bedroom.

    Those poor guests. A.K.A my amazing in-laws.

    Bless them. They deserve better.

    And they will get it. It’s all starting with these navy and gold chest makeovers.

    Disclosure: This post is sponsored by HomeRight. Y’all know how I roll though, all opinions are 100% mine. This post contains affiliate links for your shopping convenience. Click here to read my full disclosure policy.

    Navy and Gold Chest Makeovers via RainonaTinRoof.com #furnituremakeover #homeright #finishmax

    Sometimes, all you need to make something pop is the simple combination of two colors.

    No frills. No intricate details. Just the simple combination.

    And for me, that simple combination in this case was navy and gold.

    Notice, I said makeovers in the title. Yep, there are two of these. A night stand and a chest of drawers. I think the night stand probably  qualifies as a chest because it certainly doesn’t seem like a “stand.”

    Both of these are pretty solid, but had some issues.

    Navy and Gold Chest Makeovers via RainonaTinRoof.com #furnituremakeover #homeright #finishmaxI think at some point, they may have been in some water. See the bottom of the big chest above?

    And the top needed some love as well.

    Navy and Gold Chest Makeovers via RainonaTinRoof.com #furnituremakeover #homeright #finishmaxSo, before any paint went on these, I sanded them well. And picked up all the sanding dust with a tack cloth.

    And then I pulled out my beloved, my coveted, my just-go-ahead-and-bury-me-with-it, HomeRight Finish Max paint sprayer.

    Navy and Gold Chest Makeovers via RainonaTinRoof.com #furnituremakeover #homeright #finishmax

    Heaven help. Why did I just show you that picture?

    That would be one of those days when the circus went to preschool and I tend to go a little loco.

    You don’t get to judge.

    After a coat of primer, I painted the chests the same navy color I used on the $10 dresser turned buffet.

    Navy and Gold Chest Makeovers via RainonaTinRoof.com #furnituremakeover #homeright #finishmax

    Navy and Gold Chest Makeovers via RainonaTinRoof.com #furnituremakeover #homeright #finishmax

    This is a really deep navy, so it took a few light coats to get the color uniform. The finish was still impeccable.

    Wow, I don’t know that I’ve used that word before on the blog. Yay, Jenna for using big words!

    But, that’s the beauty of the Finish Max, it has a fine finish that looks completely professional.

    Navy and Gold Chest Makeovers via RainonaTinRoof.com #furnituremakeover #homeright #finishmax

    I was not parting with the hardware that these chests came with – I loved their vintage vibe. They got a coat of gold spray paint.

    Navy and Gold Chest Makeovers via RainonaTinRoof.com #furnituremakeover #homeright #finishmax

    Navy and Gold Chest Makeovers via RainonaTinRoof.com #furnituremakeover #homeright #finishmax

    There was this inlay on the top of each chest. To highlight it, I went over it with a gold Sharpie paint pen.

    Navy and Gold Chest Makeovers via RainonaTinRoof.com #furnituremakeover #homeright #finishmax

    Navy and Gold Chest Makeovers via RainonaTinRoof.com #furnituremakeover #homeright #finishmax

    Want to learn more about how to use the Finish Max paint sprayer? See this post then! Oh, you are worried about clean-up of the Finish Max? Don’t be. It takes less than 10 minutes to clean it and in only six steps! Read all about it here!

    So, where is this guest bedroom headed?

    My friends, that is a fabulous question.

    Here’s what I know:

    The Jonathan Adler inspired chair is staying.

    The wall color is going.

    Somewhere in all of it, there needs to be an office space.

    And these chest makeovers were a fabulous start.

    That’s about it.

    Stayed tuned. It should be fun.

    Sign up to get my posts delivered to your inbox here. 

    You know you don’t wanna miss any of this crazy.

    Stalk Me Here:

    Pinterest / Facebook / Twitter / Instagram
