Tag: hardware

  • DIY Faux Crystal Knobs

    DIY Faux Crystal Knobs

    I am a details person. I love little knick-knacks and those small things that make a statement. As a prime example, I have way too many brass lions because I just can’t stand to leave one behind at thrift stores. I think all those little details really help to set a space apart and even give a nod to your personality in a room.

    These DIY faux crystal knobs are one of those small details that give a big impact.

    I made these using the tutorial for the DIY faux crystals I wrote about earlier in the week.

    Give your furniture doors and drawers a touch of affordable glam with these easy to make DIY faux crystal knobs! It will take less than 10 minutes!

    How to Make Faux Crystal Knobs

    This post contains affiliate links for your shopping convenience. Click here to read my full disclosure policy.

    Tools & Supplies

    Give your furniture doors and drawers a touch of affordable glam with these easy to make DIY faux crystal knobs! It will take less than 10 minutes!

    Steps

    Step 1

    After you’ve made your faux crystals, be sure to let them fully dry overnight before making your knobs.

    To make the knobs, all you need to do is apply E6000 glue to the flat knob base, then firmly push the crystal onto the base.

    Give your furniture doors and drawers a touch of affordable glam with these easy to make DIY faux crystal knobs! It will take less than 10 minutes!

    Leave the knobs upright and let them dry overnight. If you’re worried about your knobs knocking over, then nestle them into a bowl of rice. I did this when I made selenite knobs and it worked like a charm.

    The next day you can attach the crystal knobs to your furniture!

    Give your furniture doors and drawers a touch of affordable glam with these easy to make DIY faux crystal knobs! It will take less than 10 minutes!

    That’s all you have to do to make these beauties! Almost too good to be true, right?

    You get bonus points if you attach them to a really colorful piece of furniture that just makes those crystals sing. 😉

    Stay tuned because there are more DIY faux crystal projects coming your way!

    You might also want to see..

    DIY Selenite Knobs - These are GORGEOUS! Plus, they cost LESS than $1 per knob to make! / DIY Hardware / Gem Knobs / Gem Hardware / Stone Knobs / Stone Hardware

    How to Make Selenite Knobs

    DIY Faux Crystal Vase | DIY Vase Ideas | DIY Vase Decor | Vase Decorating Ideas | Faux Crystal DIY | DIY Faux Crystals | How to Make Crystals

    DIY Faux Crystal Vase

    Crystal Finials | DIY Crystal Lamp Finial | How to Make Lamp Finials | How to Make Crystals | DIY Faux Crystals | DIY Lamp Finial

    How to Make a Crystal Lamp Finial

    Give your furniture doors and drawers a touch of affordable glam with these easy to make DIY faux crystal knobs! It will take less than 10 minutes!

  • Door Upgrade in a Day

    Door Upgrade in a Day

    *This post is sponsored by Schlage®, however all opinions and over-thinking of design ideas are 100% mine. 

    I’ve been decorating and DIYing for a little over a decade now and the one thing that still surprises me sometimes is how much impact a simple paint job and a hardware switch can have on a space. Two little things that take up a pretty short amount of time and effort can equal a pretty big wow factor, no?

    Case in point: I had big plans for this pantry door in our kitchen.

    Door Upgrade in a Day: Black Doors, White Trim, and Brass Hardware

    At first, I was going to add molding to it. But then, Grunt Labor and I couldn’t really settle on a design for the molding because the door was so narrow. Plan B: I turned to my old standby of paint and painter’s tape. I was going to paint an elaborately patterned door that would no doubt be a showstopper. The whole thing would be topped off with a pretty new doorknob. 

    I took off the old doorknob and got to work. I painted two coats of black paint on the door and let it dry overnight. 

    The next morning, I sat at the breakfast table and stared at the pantry door.

    It looked pretty darn good just being black with all the white molding around it. I contemplated leaving it black and just switching out the doorknob. But then, the over-achiever in me proclaimed that I had to give the door some more wow factor.

    I mapped out the design. I measured and taped and measured and taped some more. I painted on the contrasting color that would create the pattern. 

    Then I pulled off the tape and hated the way it looked. 

    And that was when I realized that the over-achiever in me had been wrong. Sometimes, all you do really need is a simple coat of paint and a pretty new doorknob.

    Door Upgrade in a Day: Black Doors, White Trim, and Brass Hardware

    The black on the door tied in perfectly with the cabinets and the new Schlage® doorknob was the icing on the cake. Schlage recently launched a campaign, “Open Possibilities,” to bring door hardware to the forefront as an accessory that can complete or enhance the look of any room. 

    Door Upgrade in a Day: Black Doors, White Trim, and Brass Hardware

    Shockingly, sometimes pretty things really do just take a small amount of investment, but give a big return. No elaborate designs needed. 😉 

    The doorknob is a Schlage® Accent Lever with Camelot Trim in Satin Brass. 

    Door Upgrade in a Day: Black Doors, White Trim, and Brass Hardware

    The doorknob has a touch of Hollywood Regency glamour, which goes nicely with the rest of the kitchen and much of the house as well. The knobs pop perfectly against the black and I love the lower sheen the satin brass has. These babies are going to end up on the rest of our doors, to tie more of the whole house together. I’m thinking the hallway doors might get the black paint treatment, too. 

    To get more information on Schlage’s® new line of door knobs and finishes, visit their website here. Schlage products are also available online at Amazon and Build. You can find them at Home Depot and Lowe’s as well. Or you can join the conversation online: Facebook, Instagram, Twitter and Pinterest.

    When’s the last time you upgraded your door knobs? Do you see any satin brass knobs channeling the Hollywood Regency style in your future? 

    Elaborate door designs not necessary. 😉 

    *This post is sponsored by Schlage®, however all opinions and over-thinking design ideas are 100% mine.

  • DIY Selenite Knobs: Super Easy, Super Cheap, Super Pretty

    DIY Selenite Knobs: Super Easy, Super Cheap, Super Pretty

    During our staycation two weeks ago due to the hurricane, we visited the Land of the Gnomes.

    Its not really the land of the gnomes, but that’s what I like to call it. I’ll tell you all about it in another post…

    At every staycation stop, we let the circus get something from the gift shop to attempt and make up for not going to the beach.

    Ok, I wanted something from just about every gift shop too.

    In the Land of the Gnomes gift shop, I found a display of stones and gems.

    They were pretty. And shiny.

    Therefore, I was immediately sucked in.

    Mainly because they were shiny.

    After deliberating 10 minutes about which stones to buy and what I could do with them, I finally settled on a few small bars of selenite.

    And I came home and made the prettiest, and cheapest, hardware knobs you ever did see…

    DIY Selenite Knobs - These are GORGEOUS! Plus, they cost LESS than $1 per knob to make! / DIY Hardware / Gem Knobs / Gem Hardware / Stone Knobs / Stone Hardware

    Of course, their beauty is amped up by like 1000 because they are against my favorite shade of green too.

    You can make these in less than five minutes and for $1 each.

    That’s right, one dollar each.

    DIY Selenite Knobs

    Affiliate links may be contained in this post.

    Materials Needed: 

    DIY Selenite Knobs - These are GORGEOUS! Plus, they cost LESS than $1 per knob to make! / DIY Hardware / Gem Knobs / Gem Hardware / Stone Knobs / Stone Hardware

    • Brass Knob Making Base ($0.59 each)
    • Selenite Sticklets (10 come in a pack for $4 = $0.40 per stick)
    • E6000 Glue (If you don’t have this on hand, it will cost about $7, but trust me, its well worth it and you will get a ton of uses out of it.)
    • Dried Rice or Dried Beans (This will make sense in a minute.)
    • Small Bowl

    (I didn’t include the cost of the glue, rice or bowl in the per knob cost. I’m figuring some of you will already have that on hand.)

    Step 1: 

    Unwrap one of the knob making bases. Apply a small amount of the E6000 glue to the side that has a hole, but does not have threadings for a screw (you’ll easily be able to see what I’m talking about). Then, immediatley place a selenite stick on the glue/knob.

    DIY Selenite Knobs - These are GORGEOUS! Plus, they cost LESS than $1 per knob to make! / DIY Hardware / Gem Knobs / Gem Hardware / Stone Knobs / Stone Hardware

    Let me just say, this was my first time using the E6000 glue and I’m hooked. Quite frankly, it pisses me off that I didn’t discover it sooner. Its clear and significantly less messy than hot glue. It’s also about 100 times stronger than hot glue. I see this glue and I forming a beautiful relationship as we DIY our way into the sunset.

    Step 2: 

    Put a small amount of the dry rice or beans in a bowl and carefully nestle the knobs within the rice/beans. Let them stay here for a minimum of 24 hours to dry. (The glue says it may take up to 72 hours to dry.) If you don’t have a circus running around, there’s a good chance the knobs will be ok just balancing themselves while drying. We weren’t taking chances around here though.

    DIY Selenite Knobs - These are GORGEOUS! Plus, they cost LESS than $1 per knob to make! / DIY Hardware / Gem Knobs / Gem Hardware / Stone Knobs / Stone Hardware

    Step 3:

    After the knobs are dry, screw them onto your furniture.

    DIY Selenite Knobs - These are GORGEOUS! Plus, they cost LESS than $1 per knob to make! / DIY Hardware / Gem Knobs / Gem Hardware / Stone Knobs / Stone Hardware

    I told you they were cheap and easy.

    But most importantly, pretty.

     pin-this-post-2

    DIY Selenite Knobs | How to Make Custom Knobs for Furniture | DIY Stone Knobs | DIY Stone Pulls | How to Make Custom Furniture Pulls

    I may or may not have plans to do this with any other stones and/or gems I can get my hands on…

    What do you think would be a pretty one to try out next? 

    You can read about the beautiful green drink bar here…

    IKEA Tarva Hack: Turn It Into a Drink Bar via RainonaTinRoof.com

    IKEA Tarva Hack: Drink Bar

    And you might also like…

    How to Make Faux Crystal Knobs | Furniture Hardware DIY | Furniture Hardware Ideas | How to Make Crystal Geodes | How to Make Knobs

    How to Make Faux Crystal Knobs

    How to Make Crystals | How to Make Geodes | DIY Faux Crystals | DIY Faux Gemstones | DIY Faux Geode | DIY Faux Gems | DIY Crystals | DIY Geode

    How to Make Faux Crystals

    blog-signature-summer-15

    You know you don’t wanna miss any of this crazy.

    Sign up to get my posts delivered to your inbox here.

    Stalk Me Here:

    Bloglovin / Pinterest / Facebook / Twitter / Google+ / Instagram

    SaveSave

  • How to Cover Old Hardware Holes

    How to Cover Old Hardware Holes

    Want to change the location of hardware in your cabinet doors or on another piece of furniture but don’t know what to do about those old holes? It’s actually an easy fix! Here’s how to fill holes in wood….

    Apparently, its hardware themed week here.

    On Monday, it was how to restore your hardware in five minutes and today its how to cover old hardware holes.

    I didn’t realize that when I was flying by the stick of my broom planned out my posts.

    After my kitchen was featured in Better Homes & Gardens, there were a few new people who came over and asked how I covered the old hardware holes that were in the center of my cabinets.

    I’ve filled holes in furniture so many times now, I often forget I should actually tell you how I do it. I actually figured out how to do this myself in my former life when I was working on the old farmhouse. It was totally by trial and error, y’all.

    You see, I used to think paint would just magically fill holes in trim.

    smacking myself in the face

    After I replaced and painted the trim, I realized, “Oh, that didn’t work.”

    So I found this stuff called wood putty. We’ve been good friends ever since.

    Anyone else find it pathetic that I’m referring to myself and wood putty as good friends?

    How to Cover Old Hardware Holes | How to Cover Holes in Wood | How to Fill Holes in Wood | How to Fill Holes in Cabinets

    If you have seen my kitchen renovation before, you know that we kept our original cabinets and just painted over them. They were in really great condition and I didn’t want to give my first born child as collateral for new cabinets.

    The cabinets use to have centered hardware.

    Banish that old centered hardware! So easy to do! How to Cover Old Hardware Holes via RainonaTinRoof.com

    Now, just so you don’t think I’m pulling a fast one on you, this is not one of the cabinets that is currently in our kitchen. It did used to be in the kitchen, but when we opted to put in open shelving we were left with a couple extra cabinets and so this one is used for storage in the garage. It never got painted, so it was the perfect candidate for this tutorial.

    How to Cover Old Hardware Holes

    This post contains affiliate links for your shopping convenience. Click here to read my full disclosure policy.

    Supplies / Materials Needed: 

    • Wood Putty / Filler (If painting over the wood filler / cabinets, the color of filler doesn’t matter. If you are staining over the filler / cabinets, get a stainable filler.)
    • Fine Grit Sandpaper (I usually use about a 220 grit.)

    Step 1: 

    Remove the old hardware. If your cabinets are older like mine were, there may be a grimy outline of the old hardware left behind. Just sand this lightly until its smooth with the cabinet door.

    Banish that old centered hardware! So easy to do! How to Cover Old Hardware Holes via RainonaTinRoof.com

    Step 2: 

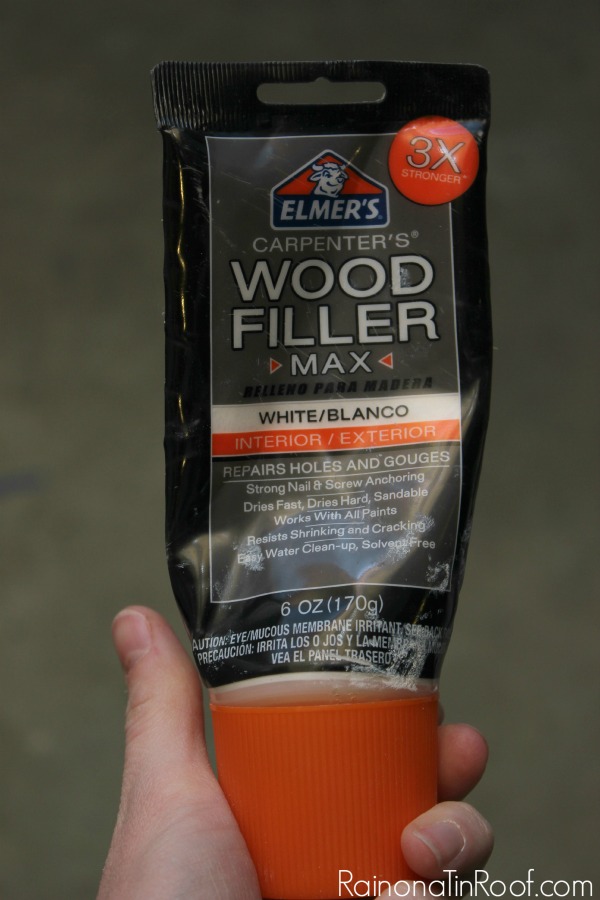
    Grab your wood filler / putty.

    Banish that old centered hardware! So easy to do! How to Cover Old Hardware Holes via RainonaTinRoof.com

    I have used lots of different fillers over the years and this Elmer’s Wood Filler Max is by far my favorite. Its the easiest to work with and the easiest to sand, in my opinion.

    Squeeze a small amount of the filler onto your finger, then rub it right into the hole in a circular motion.

    Banish that old centered hardware! So easy to do! How to Cover Old Hardware Holes via RainonaTinRoof.com

    Some people prefer to do this with a spatula, but honestly, I’ve found that my finger is the best tool.

    After you have covered the hole, let it dry (doesn’t take long at all) and then sand it smooth. After you have sanded it, you may need another coat of the filler. If you do, just repeat as needed. Typically, I find that most holes need 1-2 coats of filler.

    Finally, paint or stain over the filler with paint or stain of your choice.

    Banish that old centered hardware! So easy to do! How to Cover Old Hardware Holes via RainonaTinRoof.com

    As I said in the beginning, if you are staining or want to stain the spot where you filled the hole, be sure to buy one of the wood fillers that is stainable. The stain won’t match up with the rest of the door as well as paint would, but it won’t be too noticeable at all.

    Have you covered up old hardware holes before? Any tips or tricks you can share with us? 

    Looking for more hardware or cabinet tricks? You'll like these then...

    Easy Ways to Update Furniture Hardware - instead of buying new, give these ideas a whirl!

    Best Paint for Painting Kitchen Cabinets - different types of paint you can use for painting cabinets and which does what best.

    Want to remember this wood filler tip for later? Just pin the image below!

    How to Cover Old Hardware Holes | How to Cover Holes in Wood | How to Fill Holes in Wood | How to Fill Holes in Cabinets

    You know you don't wanna miss any of this crazy.

    Stalk Me Here:

    Pinterest / Facebook / Twitter / Google+ / Instagram

    SaveSaveSaveSaveSaveSaveSaveSaveSaveSaveSaveSaveSaveSaveSaveSaveSaveSaveSaveSaveSaveSaveSaveSaveSaveSaveSaveSaveSaveSaveSaveSaveSaveSaveSaveSaveSaveSaveSaveSaveSaveSaveSaveSave

  • How to Restore Hardware in 5 Minutes

    How to Restore Hardware in 5 Minutes

    I am kicking myself, y’all.

    Kicking myself. 

    I’ve spray painted and Rub ‘N Buffed so many pulls and knobs over the years – I had no idea how to clean them.

    Don’t get me wrong – there are sometimes when you want a bold colored knob, but sometimes I just want that hardware restored to its former glory.

    I had no clue how to restore hardware to its former glory though.

    Until a few weeks ago.

    How to Restore Hardware | How to Clean Hardware | Kitchen Cleaning Tips | Kitchen Cleaning Hacks | Easy Cleaning Tips | Cleaning Hacks

    This post contains affiliate links for your shopping convenience. Click here to read my full disclosure policy.

    First off, thank you to Jennifer from Dimples & Tangles for sharing this product when she cleaned up some silver trays. She’s just awesome, y’all.

    How to Restore Hardware

    The hardware in the photo above is what was original to the vintage radio that I just turned into a bar cabinet. I almost spray painted them, but decided first to give Bar Keeper’s Friend a try.

    AMAZING! How to Restore Hardware in 5 Minutes (No painting, no wax!) via RainonaTinRoof.com

    I had only used it to clean real brass before, and I was pretty sure this hardware wasn’t real brass. I wasn’t sure if it would work or not, but it SO did!

    First, I ran some water over the hardware, then sprinkled the Bar Keeper’s Friend on.

    AMAZING! How to Restore Hardware in 5 Minutes (No painting, no wax!) via RainonaTinRoof.com

    Next, I took an old cloth that was a little damp and rubbed it around the hardware. These pieces had some nooks and crannies, so I took an old toothbrush to really get into those. Then, I just rinsed it off and let it dry.

    How to Restore Hardware | How to Clean Hardware | Kitchen Cleaning Tips | Kitchen Cleaning Hacks | Easy Cleaning Tips | Cleaning Hacks

    The top pull is from the same cabinet, just not cleaned yet.

    Is that not crazy?!

    I was totally baffled. And it took less than 5 minutes to clean it up!

    Have you used Bar Keeper’s Friend before to restore hardware or clean anything else? I want to know what else this bad boy will accomplish!!

    You can see this hardware in all its restored glory on the Vintage Radio turned Bar Cabinet.

    Also guys, this IS NOT a sponsored post for Bar Keeper’s Friend – I just wanted you to know how easy it can be to restore your hardware – put that spray paint down!

    Need another cleaning tip?

    Got rust? Here’s how to get rid of that…

    Or need to know how to cover old hardware holes?

    You know you don’t wanna miss any of this crazy.

    Sign up to get my posts delivered to your inbox here.

    Stalk Me Here:

    Pinterest / Facebook / Twitter / Instagram

    pin-this-post
    How to Restore Hardware | How to Clean Hardware | Kitchen Cleaning Tips | Kitchen Cleaning Hacks | Easy Cleaning Tips | Cleaning Hacks

    SaveSave